background image

112 

– FRANÇAIS

FR

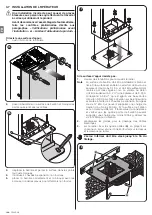
4. 

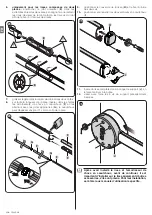
répéter l'opération en plaçant la lisse même à environ 20° 

et à environ 70°. Si la lisse reste à l'arrêt dans sa position, 

cela  signifie  que  son  équilibrage  est  correct ;  un  léger 

déséquilibrage est autorisé, mais la lisse ne doit jamais se 

déplacer lourdement

5. 

embrayer l’opérateur.

3.11  DÉBRAYER ET BLOQUER MANUELLEMENT 

L’OPÉRATEUR

L’opérateur est muni d’un système de déverrouillage mécanique 

qui permet d’ouvrir et de fermer manuellement la lisse.

Ces opérations manuelles doivent être effectuées en cas de 

coupure de courant électrique ou d’anomalies de fonctionnement 

ou dans les phases d’installation.

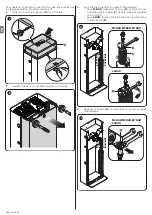
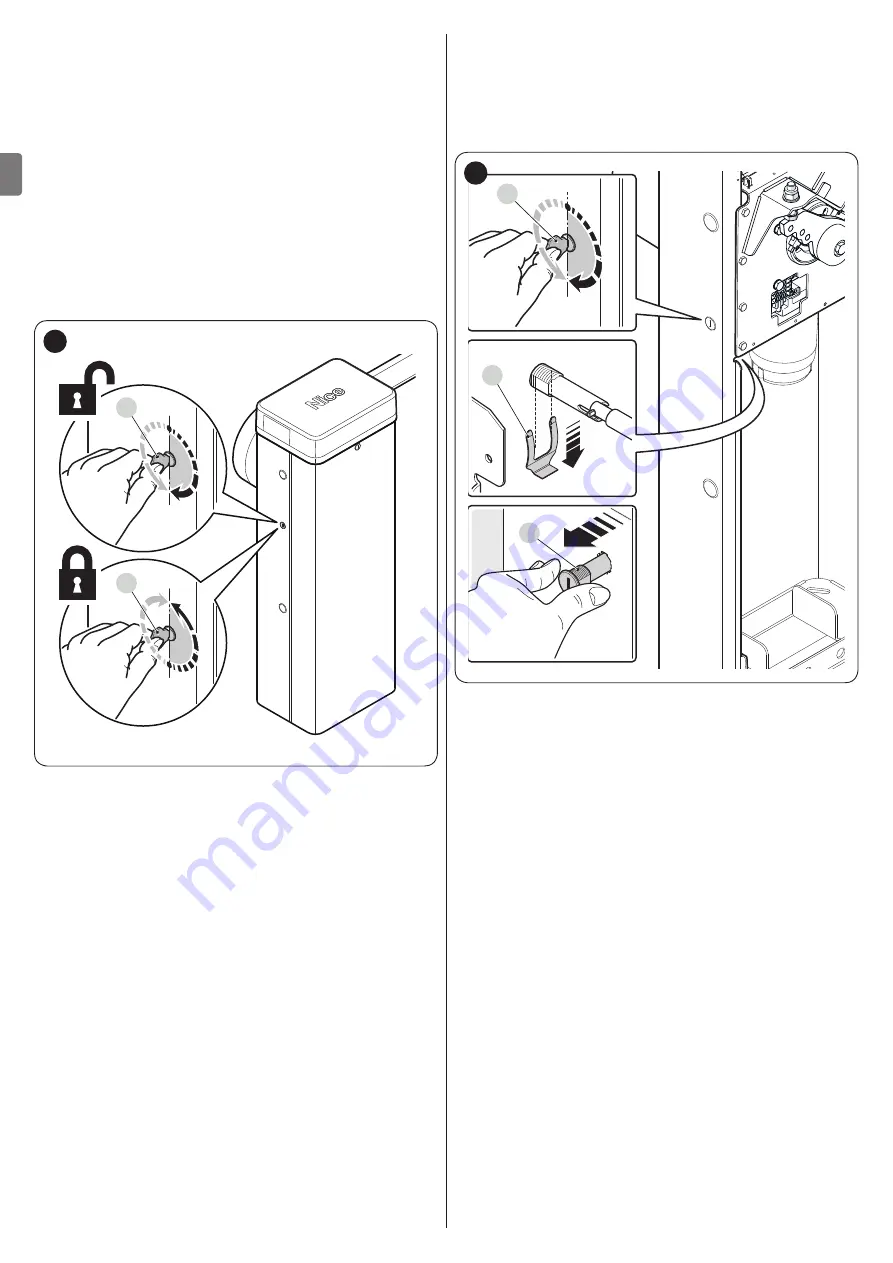
Pour effectuer le déverrouillage :

1. 

insérer et tourner la clé (

A

) de 180° vers la gauche ou la 

droite

A

A

30

2. 

à ce stade, il est possible de déplacer manuellement le 

vantail dans la position souhaitée.

Pour effectuer le blocage :

1. 

tourner la clé (

A

) dans sa position initiale

2. 

retirer la clé.

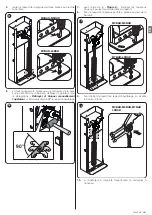
Pour déplacer le barillet de serrure sur le côté opposé de 

l'opérateur :

1. 

introduire et tourner la clé (

A

) de 180° dans le sens des 

aiguilles d’une montre

2. 

de l'intérieur du caisson, tirer vers le bas le ressort en 

« U » (

B

) qui verrouille le barillet de serrure

3. 

enlever le barillet (

C

) vers l'extérieur du caisson

A

B

C

31

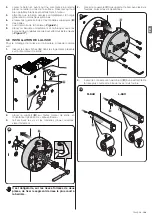
4. 

enlever le capuchon en caoutchouc sur le côté opposé 

du caisson et insérer le barillet de la serrure dans le trou

5. 

de l'intérieur du caisson, insérer le ressort en « U » du bas 

vers le haut pour verrouiller le barillet de serrure

6. 

tourner la clé (

A

) dans sa position initiale

7. 

retirer la clé.

Содержание L9BAR

Страница 1: ...ons and warnings for installation and use FR Instructions et avertissements pour l installation et l utilisation ES Instrucciones y advertencias para la instalaci n y el uso DE Installations und Bedie...

Страница 2: ...oni di pericolo Se questo accade sospendere immediata mente l installazione e rivolgersi al Servizio Assistenza 1 AVVERTENZE E PRECAUZIONI GENERALI PER LA SICUREZZA 2 1 1 Avvertenze generali 2 1 2 Avv...

Страница 3: ...ermanente l etichetta riguar dante la manovra manuale vicino all elemento che con sente la manovra stessa Dopo aver installato il motore di movimentazione assi curarsi che il meccanismo il sistema di...

Страница 4: ...ggiare il prodotto ed essere causa di malfunzionamenti o situazioni di pericolo collegare la centrale ad una linea di alimentazione elettrica dotata di messa a terra di sicurezza 3 2 LIMITI D IMPIEGO...

Страница 5: ...OMBRO Le dimensioni di ingombro e l etichetta A che permette l iden tificazione del prodotto sono riportati in Figura 3 464 5 mm M BAR L BAR 298 5 mm 464 5 mm 298 5 mm 500 mm 1219 5 mm 900 mm 1219 5 m...

Страница 6: ...o di riferimento lo schema di Figura 5 stabilire la posizione approssimativa in cui verr installato ciascun componente previsto nell impianto Nota 1 Se il cavo di alimentazione supera i 30 m di lunghe...

Страница 7: ...iqua dro B la lettera ed il numero relativi ai fori da scegliere per l aggancio della molla se la chiusura dell asta deve avvenire alla destra del mo tore sar necessario spostare l aggancio della moll...

Страница 8: ...riere A 7 2 svitare le due viti che fissano la porta armadio 8 3 per allentare la tensione della molla di bilanciamento per M BAR allentare il dado B e ruotare manualmente la molla C in senso orario p...

Страница 9: ...ccare manualmente il motoriduttore e ruotare di 90 la leva di bilanciamen to 90 12 7 con l aiuto della Figura 6 individuare i nuovi fori in cui agganciare i due capi della molla 8 assicurare la molla...

Страница 10: ...stra di fondazione Nota La superficie di fissaggio deve essere perfettamen te piana e levigata Se la superficie di calcestruzzo quest ultimo deve avere uno spessore di almeno 0 15 m e deve essere adeg...

Страница 11: ...STALLAZIONE DELL ASTA Per il montaggio dell asta all alzabarriera procedere come se gue 1 inserire le due spine A nelle apposite sedi presenti sull albero motore d uscita A 19 2 posizionare il support...

Страница 12: ...ppositi giun ti G la gomma pu sporgere di circa 1 cm dalla fine dell asta F F F G G F F 24 9 posizionare il tappo dell asta H e bloccarlo con le due viti 10 posizionare ed incastrare i due tappi copri...

Страница 13: ...mente in senso antiorario Nota Il valore dello sbilanciamento accettabile quando la forza necessaria per muovere l asta in apertura chiu sura e in tutte le altre posizioni minore oppure uguale a met d...

Страница 14: ...sblocco 1 inserire e ruotare la chiave A di 180 verso sinistra o de stra A A 30 2 a questo punto possibile muovere manualmente l anta nella posizione desiderata Per effettuare il blocco 1 riportare la...

Страница 15: ...cato Per effettuare le connessioni elettriche 1 togliere il coperchio superiore A dell alzabarriere A 32 2 far passare i cavi elettrici all interno dell alzabarriera ver so il lato sinistro partendo d...

Страница 16: ...amite il programmatore oview OGI Uscita Spia Asta Aperta possibile collegare una lampada di segnalazione 24V massimo 10W Pu essere programmata anche per altre funzioni vedere capitolo PROGRAMMAZIONE o...

Страница 17: ...rafo Loop detector MASTER SLAVE Ingresso per il collegamento di due barriere in modalit Master Slave vedere paragrafo Motoriduttore in modalit SLAVE SAFETY Ingresso di tipo Normalmente Chiuso per il c...

Страница 18: ...Dopo l apprendimento dei dispositivi necessario eseguire l apprendimento delle posizioni degli arresti meccanici massi ma apertura e massima chiusura Per fare ci 1 sbloccare il motoriduttore con l ap...

Страница 19: ...a chiave ecc effettuare delle prove di apertura chiusura ed arresto dell asta accer tando che il movimento corrisponda a quanto previsto consigliato eseguire diverse prove al fine di valutare il movim...

Страница 20: ...tura non sia superiore a 200 N circa 20 Kg la forza misurata perpendicolarmente all asta e ad 1 m dall asse di rotazione 11 verifica del sistema di sconnessione dell alimentazio ne agendo sul disposit...

Страница 21: ...dimento posizioni di Apertura e Chiusura viene rilevato il valore della corsa dell asta misurata dal fermo meccanico d arresto di Chiusura a quello d arresto di Apertura Programma P r n 0 0 0 Firmware...

Страница 22: ...trale rileva che l asta viene forzata in apertura la centrale attiva una manovra di chiusura NOTA la manovra di chiusura da antiefrazione deve completarsi in un tempo prestabilito se questo viene supe...

Страница 23: ...po di intervento quando il livello di forza impostato superato espresso in multipli di 30ms e pu essere regolato tra 3 90ms e 32 960ms Aumentando questo valore aumenter il tempo di intervento nella ri...

Страница 24: ...2 5 Passo Passo barriera master 2 6 Apre barriera master e slave 2 7 Chiude barriera master e slave 2 8 Passo Passo barriera slave 2 9 Apre barriera slave 3 0 Chiude barriera slave Ingresso Close I n...

Страница 25: ...dalit funzionamento fotocellule BlueBus e ingressi Foto S E 5 1 Stop e inversione un intervento di una fotocellula durante la manovra di Chiusura ferma la manovra e inverte il moto 4 Stop temporaneo u...

Страница 26: ...ro Verde 1 0 Canale radio n 1 1 1 Canale radio n 2 1 2 Canale radio n 3 1 3 Canale radio n 4 1 4 Ventosa Funzione uscita Flash Consultare Tabella 7 per informazioni sui singoli parametri O U 2 0 Lampe...

Страница 27: ...mpada 0 5 secondi acceso 0 5 secondi spento indica che in corso una manovra Uscita attiva 24 Vcc max 10 W Lampeggiante 12V Il lampeggio della lampada 0 5 secondi acceso 0 5 secondi spento indica che i...

Страница 28: ...e spenta asta in altre posizioni Asta aperta Luce accesa asta aperta Luce spenta asta in altre posizioni Luce di cortesia Luce accesa per la durata della manovra terminata la manovra rimane accesa per...

Страница 29: ...nzione avviene attraver so il lampeggiante Flash oppure dalla Spia di Manutenzione in base al tipo di programmazione impostata l In base al numero di manovre eseguite rispetto al limite programmato il...

Страница 30: ...La manovra non parte da uno dei finecorsa oppure la centrale non riconosce il finecorsa Verificare il collegamento elettrico del finecorsa L alzabarriera Slave non esegue le manovre Verificare che sia...

Страница 31: ...osizione diversa dall apertura Con installazione sinistra SX l asta si trova in una posizione diversa dalla chiusura 8 3 1 Diagnostica display Selezionando con l encoder la modalit diagnostica din e c...

Страница 32: ...della centrale di comando Togliere e ridare alimentazione Se l errore persiste eseguire la Cancellazione totale della memoria come descritto nel paragrafo Cancellazione totale della memoria della cen...

Страница 33: ...entrale di comando Togliere e ridare alimentazione Se l errore persiste eseguire la Cancellazione totale della memoria vedere paragrafo Cancellazione totale della memoria della centrale di comando e r...

Страница 34: ...resistenza costante 8 2 k potrebbero garantire la categoria 3 di sicurezza ai guasti secondo la nor ma EN 13849 1 9 2 3 Fotocellule Per permettere alla centrale di riconoscere i dispositivi collegati...

Страница 35: ...che i coman di Passo Passo Apre e Chiude sullo SLAVE consentono di comandare solo l anta SLAVE Per impostare due motori in modalit MASTER e SLAVE esegui re le seguenti operazioni 1 effettuare l insta...

Страница 36: ...bus EPMB EPLB RX NO NC 8K2 24V 4W OGI FLASH NO NO NO NO NO OGI Bluebus Stop SbS Open Close HPSbS Flash Light Loop1 Master Slave Loop2 LOOP1 LOOP2 NO NC 8K2 24V 4W OGI FLASH NO OGI Bluebus Stop SbS Ope...

Страница 37: ...de 5 Stop Arresta la manovra 6 Passo Passo condominiale Comando in modalit condominiale 7 Passo Passo alta priorit Comanda anche con automazione bloccata o comandi attivi 8 Sblocca e Apre Sblocca l au...

Страница 38: ...una di queste centrali possibile visualizzare sul suo display tutte le centrali collegate in rete massimo 16 centrali L unit Oview pu rimanere collegata alla centrale anche du rante il normale funzion...

Страница 39: ...al metro e non devono essere presenti giunzioni nel caso fosse necessario prolungare il cavo saldare i conduttori e si gillarli con della guaina termo restringente la lunghezza del cavo tristato deve...

Страница 40: ...TEMA AD ENERGIA SOLARE SOLEMYO f Quando l automazione alimentata dal sistema Sole myo NON DEVE ESSERE ALIMENTATA con temporaneamente anche dalla rete elettrica l Per informazioni sul sistema Sole myo...

Страница 41: ...a del cavo luci eseguendo il taglio solo in uno dei punti indicati da un apposito segno Dopo il taglio necessario spostare il tappo presente all estremit tagliata per chiudere la nuo va estremit 7 ins...

Страница 42: ...9 10 COLLEGAMENTO LAMPEGGIANTE OPPURE SEMAFORO Sul coperchio dell alzabarriera pu essere inserito un lampeg giante a led mod XBA7 oppure un semaforo a led rossi e verdi mod XBA8 Le modalit di funziona...

Страница 43: ...ate 5 ricollegare le sorgenti di alimentazione elettrica ed ese guire tutte le prove e le verifiche previste nel paragrafo Collaudo SMALTIMENTO DEL PRODOTTO 11 11 SMALTIMENTO DEL PRODOTTO l Questo pro...

Страница 44: ...Uscita SCA per spia di segnalazione 24V max 10W Uscita per lampeggiante semaforo su coperchio con accessori opzionali lampeggiante a led XBA7 o semaforo a led XBA8 Uscita BLUEBUS Una uscita con caric...

Страница 45: ...1 2017 Spettro radio art 3 2 EN 300 220 2 V3 1 1 2017 Inoltre il prodotto risulta essere conforme alla seguente direttiva secondo i requisiti previsti per le quasi macchine Allegato II parte 1 sezion...

Страница 46: ...46 ITALIANO IT NOTE...

Страница 47: ...non dotato di batterie tampone l automazione pu es sere ugualmente utilizzata eseguendo lo sblocco manuale del motore vedere le istruzioni a fine capitolo e muovendo l asta manualmente Dispositivi di...

Страница 48: ...posizione desiderata Per effettuare il blocco 1 riportare la chiave A alla sua posizione iniziale 2 estrarre la chiave 3 togliere il tappo in gomma al lato opposto del cassone ed inserire il cilindro...

Страница 49: ...che i collegamenti a vite siano stretti adeguata mente specialmente quelli della molla di bilanciamento 4 verificare che non ci sia gioco tra la leva di bilanciamento e l albero d uscita In caso avvi...

Страница 50: ...NTERVENTI Data Descrizione dell intervento effettuato Descrizione delle verifiche regolazioni riparazioni modifiche Firma del Tecnico Firma del Proprietario Sono state eseguite tutte le fasi previste...

Страница 51: ...actions can damage the product and cause it to malfunction or lead to dangerous situations Should this occur immediately suspend the installation process and contact the Technical Assistance Service 1...

Страница 52: ...nual manoeuvre near its actuating element After installing the drive motor make sure that the mechanism protective system and all manual manoeuvres function properly PRODUCT DESCRIPTION AND INTENDED U...

Страница 53: ...damage the product and cause malfunctions or dangerous situations connect the control unit to an electricity supply line equipped with a safety earthing system 3 2 PRODUCT USAGE LIMITS Before proceedi...

Страница 54: ...CATION AND OVERALL DIMENSIONS The overall dimensions and the label A which allows for identifying the product are shown in Figure 3 464 5 mm M BAR L BAR 298 5 mm 464 5 mm 298 5 mm 500 mm 1219 5 mm 900...

Страница 55: ...rding to a typical standard layout Using the layout in Figure 5 as a reference define the approximate position in which each component of the system will be installed Note 1 If the power supply cable...

Страница 56: ...be chosen to attach the spring if the boom must close tot he right of the motor the spring s attachment must be shifted to one of the holes located on the other arm of the balancing lever M3BAR M5BAR...

Страница 57: ...of the boom gate cubicle A 7 2 loosen the two screws fastening the cubicle panel 8 3 to loosen the tension of the balancing spring for M BAR loosen the nut B and manually turn the spring C clockwise...

Страница 58: ...locking the gearmotor paragraph and turn the balancing lever by 90 90 12 7 with the help of Figure 6 identify the new holes to which to attach the two ends of the spring 8 fasten the spring to the dr...

Страница 59: ...ng surface must be completely flat and smooth If the surface is made of concrete the latter must be at least 0 15 m thick and must be suitably reinforced with iron cages The concrete must have a volum...

Страница 60: ...ALLING THE BOOM Proceed as follows to mount the boom of the gate 1 insert the two pins A through the appropriate housings on the exit motor shaft A 19 2 place the support B on the exit motor shaft ori...

Страница 61: ...with the relevant joints G the rubber protector can protrude roughly 1 cm from the end of the boom F F F G G F F 24 9 put on the boom cap H and secure it with the two screws 10 position and fit togeth...

Страница 62: ...The imbalance is acceptable when the force required to move the boom during the opening and closing manoeuvres and in all other positions is less than or equal to half the nominal value The force req...

Страница 63: ...evice 1 insert the key A and turn it by 180 towards the left or right A A 30 2 the gate leaf can now be moved manually to the desired position To lock the device 1 turn the key A back to its initial p...

Страница 64: ...ersonnel To make the electrical connections 1 remove the upper cover A of the boom gate cubicle A 32 2 feed the electrical cables inside the cubicle towards the left starting from the base and moving...

Страница 65: ...hapter or reconfigured through the Oview programmer OGI Open Gate Indicator output it is possible to connect a 24 V maximum 10 W signalling light It can also be programmed for other functions refer to...

Страница 66: ...the control unit programmer refer to the Loop detector paragraph MASTER SLAVE Input for connecting two barriers in Master Slave mode refer to the Gearmotor in SLAVE mode paragraph SAFETY Normally Clos...

Страница 67: ...ected devices have been learned the mechanical stop positions must be learned maximum opening and maximum closing To do this 1 unlock the gearmotor with the relevant key provided refer to the Manually...

Страница 68: ...osing and stopping phases ensuring that the movement matches the specifications Several tests should be conducted to assess the boom s movement and to check for any assembly or adjustment defects or a...

Страница 69: ...e boom during the opening phase does not exceed 200 N roughly 20 kg the force is measured perpendicularly to the boom at 1 m from the rotation axis 11 verification of the power supply disconnection sy...

Страница 70: ...s measured from the closing mechanical stop to the opening mechanical stop Programme P r n 0 0 0 Base default firmware 0 0 1 Firmware 1 Personalisation of the base firmware not used 0 0 2 Firmware 2 P...

Страница 71: ...ed if the control unit detects that the boom is being forced open a closing manoeuvre will be performed NOTE if the closing manoeuvre to protect against forcing times out the control unit cancels the...

Страница 72: ...s exceeded It is expressed in multiples of 30 ms and can be set to between 3 90 ms and 32 960 ms Increasing this value increases the intervention time of the amperometric obstacle detection function t...

Страница 73: ...ter barrier Step by Step 2 6 Master and slave barrier open 2 7 Master and slave barrier close 2 8 Slave barrier Step by Step 2 9 Slave barrier open 3 0 Slave barrier close Close input I n 3 0 No comma...

Страница 74: ...d photo input operating mode S E 5 1 Stop and reversal the intervention of a photocell during the closing manoeuvre stops the manoeuvre and reverses the motion 4 Temporary stop the intervention of a p...

Страница 75: ...Radio channel no 3 1 3 Radio channel no 4 1 4 Suction cup Flash output function Consult Table 7 for information on the single parameters O U 2 0 24 V warning light 1 12 V warning light 2 OGI 3 Boom c...

Страница 76: ...seconds off indicates that a manoeuvre is under way Output active 24 V DC max 10 W 12 V warning light Flashing of the lamp 0 5 seconds on 0 5 seconds off indicates that a manoeuvre is under way Output...

Страница 77: ...ed Light off boom in other positions Boom open Light on boom open Light off boom in other positions Courtesy light Light lit for the entire duration of the manoeuvre after the manoeuvre it remains lit...

Страница 78: ...intenance indicator depending on the type of programming chosen l The Flash warning light and the maintenance indicator give the signals indicated in Table 8 based on the number of manoeuvres complete...

Страница 79: ...e is carried out at slow speed The manoeuvre does not start from one of the limit switches or the control unit does not learn the limit switch Check the electrical connection of the limit switch The S...

Страница 80: ...r that the open position With LH left hand installation the boom is in a position other that the closed position 8 3 1 Display diagnostics Selecting with the encoder the din diagnostics mode and confi...

Страница 81: ...the control unit Disconnect and reconnect the power supply If the error persists delete the memory entirely as described in the Full deletion of the control unit s memory paragraph and redo the instal...

Страница 82: ...econnect the power supply If the error persists delete the entire memory refer to the Full deletion of the control unit s memory paragraph and redo the installation If the condition persists there may...

Страница 83: ...ts in accordance with the EN 13849 1 standard 9 2 3 Photocells To allow the control unit to recognise the devices connected through the BlueBUS system these devices must be addressed This operation ca...

Страница 84: ...f the connections and the fact that the Step by Step Open and Close commands on the SLAVE device allow for commanding the SLAVE barrier only Perform the following operations to install two motors in M...

Страница 85: ...bus EPMB EPLB RX NO NC 8K2 24V 4W OGI FLASH NO NO NO NO NO OGI Bluebus Stop SbS Open Close HPSbS Flash Light Loop1 Master Slave Loop2 LOOP1 LOOP2 NO NC 8K2 24V 4W OGI FLASH NO OGI Bluebus Stop SbS Ope...

Страница 86: ...mmand in condominium mode 7 High priority Step by Step Commands also with the automation locked or the commands enabled 8 Unlock and Open Unlocks the locked automation and carries out an opening manoe...

Страница 87: ...to one of these units it is possible to view on the display all the networked control units up to a maximum 16 units The Oview unit can also be left connected to the control unit during normal operati...

Страница 88: ...and they should not have joints if you need to extend a cable solder the wires and seal them with heat shrink sheathing the twisted cable should be no longer than 20 m 0 35 m SM CR 1 m 53 SM Directio...

Страница 89: ...e 9 8 CONNECTING THE SOLEMYO SOLAR ENERGY SYSTEM f When the automation is powered by the Solemyo system IT MUST NOT BE POWERED by the electricity grid at the same time l For information on the Solemyo...

Страница 90: ...ary shorten the lights cable by cutting it only in one of the points indicated by an appropriate mark After cutting the cable the cap of the cut end must be shifted to close the new end 7 insert the w...

Страница 91: ...cable 63 9 10 CONNECTING THE WARNING LIGHT OR TRAFFIC LIGHT On the boom cover it is possible to insert a LED warning light model XBA7 or a traffic light with red and green LEDs model XBA8 The operati...

Страница 92: ...f components replace any worn parts 5 connect the power supplies again and run all the tests and checks described in the Testing paragraph PRODUCT DISPOSAL 11 11 PRODUCT DISPOSAL l This product is an...

Страница 93: ...l accessory OGI output for 24 V max 10 W indicator light Output for warning light traffic light on cover with XBA7 LED warning light or XBA8 LED traffic light optional accessories BLUEBUS output 1 out...

Страница 94: ...017 Radio spectrum art 3 2 EN 300 220 2 V3 1 1 2017 The product also complies with the following directives according to the requirements envisaged for partly completed machinery Annex II part 1 secti...

Страница 95: ...ENGLISH 95 EN NOTES...

Страница 96: ...he automation can nonetheless be used by manually unlocking the motor consult the instructions at the end of the chapter and moving the boom manually Safety devices out of order the automation can als...

Страница 97: ...ly to the desired position To lock the device 1 turn the key A back to its initial position 2 remove the key 3 remove the rubber cap on the opposite side of the cubicle and insert the lock cylinder th...

Страница 98: ...e that all screwed connections are properly tightened especially those of the balancing spring 4 check that there is no clearance between the balancing lever and the exit shaft If necessary fully tigh...

Страница 99: ...TIONS Date Description of intervention performed Description of checks adjustments repairs modifications etc Signature of Technician Signature of Owner All the phases envisaged in the maintenance sche...

Страница 100: ...t suspendre imm diatement l installation et s adresser au service apr s vente 1 CONSIGNES ET PR CAUTIONS G N RALES DE S CURIT 100 1 1 Recommandations 100 1 2 Recommandations pour l installation 101 2...

Страница 101: ...d finitive l tiquette concernant la man uvre manuelle pr s de l l ment qui la permet Apr s l installation de la motorisation s assurer que le m canisme le syst me de protection et toute man uvre manue...

Страница 102: ...des situations de danger connecter la logique de commande une ligne d alimentation lectrique avec mise la terre 3 2 LIMITES D UTILISATION DU PRODUIT Avant de proc der l installation du produit ll fau...

Страница 103: ...ement et l tiquette A permettant l identification du produit sont repr sent es sur la Figure 3 464 5 mm M BAR L BAR 298 5 mm 464 5 mm 298 5 mm 500 mm 1219 5 mm 900 mm 1219 5 mm 900 mm 400 mm A A 3 3 4...

Страница 104: ...mple de r f rence le sch ma de la Figure 5 tablir la position approximative o sera install chaque composant pr vu dans l installation Note 1 Si le c ble d alimentation fait plus de 30 m de long il fau...

Страница 105: ...spondent aux trous choisir pour fixer le ressort si la fermeture de la lisse doit tre la droite du moteur il faudra d placer la fixation du ressort dans l un des trous pr sents sur l autre bras du lev...

Страница 106: ...qui fixent la porte de l armoire 8 3 pour rel cher la tension du ressort d quilibrage pour M BAR desserrer l crou B et faire tourner manuellement le ressort C dans le sens des aiguilles d une montre p...

Страница 107: ...rayer et bloquer manuellement l op rateur et faire pivoter de 90 le levier d quilibrage 90 12 7 avec l aide de la Figure 6 identifier les nouveaux trous ou fixer les deux extr mit s du ressort 8 fixer...

Страница 108: ...creuser des fondations pour accueillir le radier Note La surface de fixation doit tre parfaitement plane et lisse Si la surface est en b ton ce dernier doit avoir une paisseur d au moins 0 15 m et doi...

Страница 109: ...INSTALLATION DE LA LISSE Pour le montage de la lisse sur la barri re proc der comme suit 1 ins rer les deux fiches A dans les logements pr sents sur l arbre moteur de sortie A 19 2 placer le support...

Страница 110: ...c les joints appropri s G le caoutchouc peut d passer environ d 1 cm de la fin de la lisse F F F G G F F 24 9 positionner le couvercle de la lisse H et le fixer l aide des deux vis 10 positionner et e...

Страница 111: ...Note La valeur du d s quilibrage est acceptable lorsque la force requise pour d placer la lisse en ouverture fermeture et dans toutes les autres positions est inf rieure ou gale la moiti de la valeur...

Страница 112: ...s rer et tourner la cl A de 180 vers la gauche ou la droite A A 30 2 ce stade il est possible de d placer manuellement le vantail dans la position souhait e Pour effectuer le blocage 1 tourner la cl A...

Страница 113: ...personnel qualifi Pour effectuer les raccordements lectriques 1 retirer le couvercle sup rieur A de la barri re A 32 2 acheminer les c bles lectriques l int rieur de la barri re vers la gauche en par...

Страница 114: ...ew OGI Sortie pour clignotant Voyant Lisse Ouverte il est possible de raccorder une ampoule de signalisation 24 V maximum 10W Elle peut galement tre programm e pour d autres fonctions voir le chapitre...

Страница 115: ...e voir le paragraphe Loop detector MASTER SLAVE Entr e pour la connexion de deux barri res en mode Master Slave voir le paragraphe Op rateur en mode SLAVE SAFETY Entr e de type Normalement Ferm e pour...

Страница 116: ...connaissance des dispositifs il est n cessaire de proc der la reconnaissance des positions des but es m caniques ouverture maximale et fermeture maximale Pour ce faire 1 d brayer l op rateur avec la c...

Страница 117: ...des essais d ouverture de fermeture et d arr t de la lisse en veillant ce que le mouvement corresponde bien ce qui est pr vu Il convient d effectuer diff rentes man uvres pour contr ler la fluidit du...

Страница 118: ...erture ne d passe pas 200 N environ 20 Kg la force est mesur e perpendiculairement la lisse et 1 m de l axe de rotation 11 contr le du syst me de mise hors tension intervenir sur le dispositif de mise...

Страница 119: ...ct e mesur e depuis la but e m canique de fermeture jusqu celle d ouverture Programme P r n 0 0 0 Firmware base par d faut 0 0 1 Firmware 1 Personnalisation du Firmware de base non utilis 0 0 2 Firmwa...

Страница 120: ...a lisse est forc e en position d ouverture la centrale active une man uvre de fermeture REMARQUE la man uvre de fermeture anti effraction doit se terminer dans un temps pr d termin s il est d pass la...

Страница 121: ...st d pass e Est exprim en multiples de 30 ms et les valeurs possibles sont comprises entre 3 90 ms et 32 960 ms En augmentant cette valeur le temps d activation augmentera pour la d tection amp rom tr...

Страница 122: ...les Bluebus 2 5 Pas pas Master 2 6 Ouvre barri re master et slave 2 7 Ferme barri re master et slave 2 8 Pas pas barri re slave 2 9 Ouvre barri re slave 3 0 Ferme barri re slave Entr e Close I n 3 0 A...

Страница 123: ...de fonctionnement photocellules BlueBus et entr e PHOTO S E 5 1 Stop et inversion une intervention d une photocellule au cours de la man uvre de fermeture arr te la man uvre et inverse le mouvement 4...

Страница 124: ...Feu rouge 9 Feu vert 1 0 Canal radio n 1 1 1 Canal radio n 2 1 2 Canal radio n 3 1 3 Canal radio n 4 1 4 Ventouse Fonction sortie Flash Consulter Tableau 7 pour plus d informations sur les param tres...

Страница 125: ...s allum e 0 5 seconde teinte indique qu une man uvre est en cours Sortie active 24 Vcc maxi 10 W Feu clignotant 12V Le clignotement de l ampoule 0 5 secondes allum e 0 5 seconde teinte indique qu une...

Страница 126: ...re allum e lisse ouverte Lumi re teinte lisse dans d autres positions clairage automatique Lumi re allum e pendant la dur e de la man uvre la fin de la man uvre elle reste allum e le temps de l claira...

Страница 127: ...oyant de maintenance selon la programmation configur e l Suivant le nombre de man uvres effectu es par rapport la limite programm e le clignotant Flash et le voyant de maintenance donnent les signalis...

Страница 128: ...La man uvre est effectu e basse vitesse La man uvre ne d marre pas de l un des fins de course ou la centrale ne reconna t pas le fin de course Contr ler la connexion lectrique du fin de course La bar...

Страница 129: ...autre qu ouverture Avec une installation gauche GX la lisse est dans une position autre que fermeture 8 3 1 Diagnostic de l cran en s lectionnant l encodeur le mode de diagnostic din et en confirmant...

Страница 130: ...rancher Si l erreur persiste ex cuter l effacement total de la m moire comme d crit dans le paragraphe Effacement complet de la m moire de la centrale de commande et refaire l installation Si cet tat...

Страница 131: ...uer l Effacement total de la m moire voir le paragraphe Effacement complet de la m moire de la centrale de commande et r installer Si rien ne change il pourrait s agir d une panne importante Il faut d...

Страница 132: ...de s curit seuls les dispositifs avec sortie r sistance constante 8 2 k pourraient garantir la cat gorie 3 de s curit aux pannes selon la norme EN 13849 1 9 2 3 Photocellules Pour permettre la central...

Страница 133: ...odit des connexions et du fait que les commandes Pas Pas Ouverture et Fermeture sur le SLAVE permettent de commander uniquement le vantail SLAVE Pour installer deux moteurs en mode MASTER et SLAVE eff...

Страница 134: ...ebus EPMB EPLB RX NO NC 8K2 24V 4W OGI FLASH NO NO NO NO NO OGI Bluebus Stop SbS Open Close HPSbS Flash Light Loop1 Master Slave Loop2 LOOP1 LOOP2 NO NC 8K2 24V 4W OGI FLASH NO OGI Bluebus Stop SbS Op...

Страница 135: ...collectif 7 Pas pas haute priorit Commande aussi avec l automatisme bloqu e ou les commandes actives 8 D verrouille et ouvre D verrouille l automatisme verrouill et effectue une man uvre d Ouverture 9...

Страница 136: ...il suffit de raccorder l une de celles ci au programmateur Oview pour visualiser sur l cran de ce dernier toutes les centrales de commande connect es sur le r seau maximum 16 centrales Le programmateu...

Страница 137: ...il ne doit pas y avoir de jonctions s il est n cessaire de prolonger le c ble souder les conducteurs et les sceller avec une gaine thermo r tr cissante la longueur du c ble torsad doit tre inf rieure...

Страница 138: ...YST ME NERGIE SOLAIRE SOLEMYO f Quand l automatisme est aliment par le syst me Sole myo il NE DOIT PAS tre simultan ment ALIMENT par le r seau lectrique l Pour de plus amples renseignements sur le sys...

Страница 139: ...clairage en effectuant la coupe dans seulement dans l un des points indiqu s par un signe sp cial Apr s la coupe il faut d placer le bouchon pr sent sur l extr mit coup e pour fermer la nouvelle extr...

Страница 140: ...incer le c ble 63 9 10 CONNEXION CLIGNOTANT OU S MAPHORE Le couvercle de la barri re peut contenir un clignotant led mod XBA7 ou un feu led rouge et verte mod XBA8 Les modes de fonctionnement de ces c...

Страница 141: ...lacer les parties us es 5 reconnecter les sources d alimentation lectrique et effectuer tous les essais et les contr les pr vus dans le paragraphe Essai de mise en service MISE AU REBUT DU PRODUIT 11...

Страница 142: ...r voyant 24V maxi 10W Sortie pour clignotant feu sur le couvercle avec accessoires en option clignotant led XBA7 ou feu led XBA8 Sortie BLUEBUS Une sortie avec une charge maximale de 11 unit s BlueBus...

Страница 143: ...A2 2013 Compatibilit lectromagn tique art 3 1 b EN 301 489 1 V2 2 0 2017 EN 301 489 3 V2 1 1 2017 Spectre radio lectrique art 3 2 EN 300 220 2 V3 1 1 2017 Le produit satisfait galement les directives...

Страница 144: ...144 FRAN AIS FR NOTES...

Страница 145: ...lectricit Si le syst me n est pas quip de batteries tampons l automatisme peut tre utilis indiff remment en ex cutant le d verrouillage manuel du moteur voir les instructions en fin de chapitre et en...

Страница 146: ...e vantail dans la position souhait e Pour effectuer le blocage 1 tourner la cl A dans sa position initiale 2 retirer la cl 3 enlever le capuchon en caoutchouc sur le c t oppos du caisson et ins rer le...

Страница 147: ...t ceux du ressort d quilibrage 4 s assurer de l absence de jeu entre le levier d quilibrage et l arbre de sortie Dans le cas contraire serrer fond la vis centrale 5 lubrifier la t te de joint articul...

Страница 148: ...NTIONS Date Description de l intervention effectu e Description des contr les r glages r parations modifications Signature du technicien Signature du propri taire Toutes les phases pr vues par le plan...

Страница 149: ...aso suspender inmediatamente la instalaci n y acudir al Servicio de Asistencia 1 ADVERTENCIAS Y PRECAUCIONES GENERALES DE SEGURIDAD 149 1 1 Advertencias generales 149 1 2 Advertencias para la instalac...

Страница 150: ...o entre las partes en movimiento y las partes fijas durante las maniobras Fijar de manera permanente la etiqueta relativa a la maniobra manual cerca del rgano de maniobra Despu s de instalar el motor...

Страница 151: ...r a arruinarse y tener problemas de funcionamiento o generar situaciones peligrosas Conecte la central a una l nea de alimentaci n el ctrica dotada de puesta a tierra de seguridad 3 2 L MITES DE EMPLE...

Страница 152: ...das m ximas y la etiqueta A que permite la identificaci n del producto se ilustran en la Figura 3 464 5 mm M BAR L BAR 298 5 mm 464 5 mm 298 5 mm 500 mm 1219 5 mm 900 mm 1219 5 mm 900 mm 400 mm A A 3...

Страница 153: ...o y habitual Tomando como referencia el esquema de la Figura 5 establecer la posici n aproximada donde se instalar cada componente previsto en la instalaci n Nota 1 Si el cable de alimentaci n supera...

Страница 154: ...o B la letra y el n mero de los orificios a elegir para el enganche del muelle si el cierre de la barrera debe efectuarse a la derecha del motor ser necesario desplazar el gancho del muelle a uno de l...

Страница 155: ...os dos tornillos que fijan la puerta del armario 8 3 para aflojar la tensi n del muelle de equilibrio para M BAR aflojar la tuerca B y girar manualmente el muelle C en sentido horario para L BAR girar...

Страница 156: ...ear y bloquear manualmente el motorreductor y girar 90 la palanca de equilibrio 90 12 7 con la ayuda de la Figura 6 identificar los nuevos orificios donde enganchar los dos terminales del muelle 8 ase...

Страница 157: ...n para alojar la placa de cimentaci n Nota La superficie de fijaci n debe ser perfectamente llana y lisa Si la superficie es de hormig n ste debe tener un espesor de al menos 0 15 m y debe estar adecu...

Страница 158: ...INSTALACI N DE LA BARRERA Para el montaje de la barrera en el elevador de barrera 1 poner las dos clavijas A en los alojamientos del eje del motor de salida A 19 2 poner el soporte B sobre el eje del...

Страница 159: ...ern ndolas con los ejes G la goma puede sobresalir aproximadamente 1 cm del final de la barrera F F F G G F F 24 9 poner el tap n de la barrera H y bloquearlo con los dos tornillos 10 poner y encastra...

Страница 160: ...l desequilibrio es aceptable cuando la fuerza necesaria para mover la barrera en apertura en cierre y en todas las otras posiciones resulta menor o igual a la mitad del valor de la nominal La fuerza n...

Страница 161: ...el desbloqueo 1 colocar y girar la llave A 180 hacia la izquierda o la derecha A A 30 2 Ahora es posible llevar la hoja manualmente a la posici n deseada Para efectuar el bloqueo 1 llevar la llave A...

Страница 162: ...el ctricas 1 quitar la tapa superior A del elevador de barrera A 32 2 hacer pasar los cables el ctricos por el interior del elevador de barrera hacia el lado izquierdo partiendo desde la base hacia la...

Страница 163: ...urar mediante el programador Oview OGI Salida Testigo Barrera Abierta es posible conectar una l mpara de se alizaci n de 24V m ximo 10W Tambi n se puede programar para otras funciones ver el cap tulo...

Страница 164: ...rtado Loop detector MASTER SLAVE Entrada para la conexi n de dos barreras en modo Master Slave ver el apartado Motorreductor en modo SLAVE SAFETY Entrada de tipo Normalmente Cerrado para la conexi n d...

Страница 165: ...la adquisici n de los dispositivos es necesario efectuar la adquisici n de las posiciones de los topes mec nicos m xima apertura y m ximo cierre Para ello 1 Desbloquee el motorreductor con la llave c...

Страница 166: ...movimiento responda a lo previsto Conviene hacer varias pruebas para controlar el movimiento de la barrera y comprobar los posibles defectos de montaje o de regulaci n as como la presencia de puntos...

Страница 167: ...200 N aprox 20 kg la fuerza se mide perpendicularmente a la barrera y a 1 m del eje de rotaci n 11 verificaci n del sistema de desconexi n de la alimentaci n accionar el dispositivo de desconexi n de...

Страница 168: ...valor de la carrera de la barrera medida desde el tope mec nico de cierre hasta el de apertura Programa P r n 0 0 0 Firmware base de default 0 0 1 Firmware 1 Personalizaci n del Firmware base no util...

Страница 169: ...etecta que se fuerza la apertura activa una maniobra de cierre NOTA la maniobra de cierre antivandalismo debe cumplirse en un tiempo preestablecido superado este tiempo la central anula la funci n has...

Страница 170: ...ula el tiempo de intervenci n al superarse el nivel de fuerza programado Se expresa en m ltiplos de 30ms y se puede regular entre 3 90ms y 32 960ms Al aumentar este valor aumenta el tiempo de interven...

Страница 171: ...as Bluebus 2 5 Paso a Paso barrera master 2 6 Abre barrera master y slave 2 7 Cierra barrera master y slave 2 8 Paso a Paso barrera slave 2 9 Abre barrera slave 3 0 Cierra barrera slave Entrada Close...

Страница 172: ...de las fotoc lulas BlueBus y entradas Foto S E 5 1 Stop e inversi n la intervenci n de una fotoc lula durante la maniobra de cierre detiene la maniobra e invierte el movimiento 4 Stop moment neo la in...

Страница 173: ...foro verde 1 0 Canal radio n 1 1 1 Canal radio n 2 1 2 Canal radio n 3 1 3 Canal radio n 4 1 4 Ventosa Funci n salida Flash Consultar Tabla 7 para informaci n de par metros individuales O U 2 0 Interm...

Страница 174: ...e hay una maniobra en curso Salida activa 24 Vcc m x 10 W Intermitente 12V El parpadeo de la l mpara 0 5 segundos encendida 0 5 segundos apagada indica que hay una maniobra en curso Salida activa 12 V...

Страница 175: ...siciones Barrera abierta Luz encendida barrera abierta Luz apagada barrera en otras posiciones Luz de cortes a Luz encendida durante toda la maniobra terminada la maniobra permanece encendida durante...

Страница 176: ...antenimiento es se alizado por el intermitente Flash o por el testigo de mantenimiento seg n la programaci n elegida l Seg n el n mero de maniobras efectuadas respecto del l mite programado la luz int...

Страница 177: ...a superior La maniobra se ejecuta a velocidad baja La maniobra no se inicia desde un tope o la central no reconoce el tope Verificar la conexi n el ctrica del tope El elevador de barrera Slave no ejec...

Страница 178: ...e la apertura Con instalaci n izquierda SX la barrera est en una posici n diferente del cierre 8 3 1 Diagn stico display Seleccionando con el encoder el modo diagn stico din y confirmando la elecci n...

Страница 179: ...conectar y volver a conectar la alimentaci n Si el error persiste ejecutar el Borrado total de la memoria como se indica en el apartado Borrado total de la memoria de la central de mando y repetir la...

Страница 180: ...onectar la alimentaci n Si el error persiste ejecutar el Borrado total de la memoria ver el apartado Borrado total de la memoria de la central de mando y repetir la instalaci n si el estado persiste p...

Страница 181: ...2 k podr an garantizar la pertenencia a la categor a 3 de seguridad contra las aver as seg n la norma EN 13849 1 9 2 3 Fotoc lulas Para permitir a la central reconocer los dispositivos conectados con...

Страница 182: ...onexiones y el hecho de que los mandos Paso a Paso Abrir y Cerrar en el SLAVE permiten el mando s lo del SLAVE Para configurar dos motores en modo MASTER y SLAVE 1 efectuar la instalaci n de los dos m...

Страница 183: ...bus EPMB EPLB RX NO NC 8K2 24V 4W OGI FLASH NO NO NO NO NO OGI Bluebus Stop SbS Open Close HPSbS Flash Light Loop1 Master Slave Loop2 LOOP1 LOOP2 NO NC 8K2 24V 4W OGI FLASH NO OGI Bluebus Stop SbS Ope...

Страница 184: ...en modo condominio 7 Paso a paso alta prioridad Funciona aun con automatizaci n bloqueada o mandos activos 8 Desbloquear y abrir Desbloquea la automatizaci n bloqueada y ejecuta una maniobra de Apertu...

Страница 185: ...ando Oview a una de estas centrales es posible visualizar en Oview todas las centrales presentes en la red m ximo 16 centrales Oview puede permanecer conectado a la central incluso durante el funciona...

Страница 186: ...l menos 20 veces cada metro y no deben presentar uniones si es necesario prolongar el cable soldar los conductores y sellarlos con una funda termorretr ctil La longitud del cable trenzado no debe ser...

Страница 187: ...DE ENERG A SOLAR SOLEMYO f Cuando la automatizaci n recibe alimentaci n a trav s del sistema Sole myo NO DEBE RECIBIR ALIMENTACI N de la red el ctrica al mismo tiempo l Para obtener informaci n acerca...

Страница 188: ...el cable de las luces realizando el corte s lo en uno de los puntos indicados con una marca espec fica Despu s del corte es necesario sacar el tap n del extremo cortado para cerrar el nuevo extremo 7...

Страница 189: ...car el cable 63 9 10 CONEXI N DEL INTERMITENTE O DEL SEM FORO Sobre la tapa del elevador de barrera se puede instalar un intermitente led mod XBA7 o un sem foro de led rojos y verdes mod XBA8 Los modo...

Страница 190: ...mentaci n el ctrica y ejecutar todos los ensayos y controles previstos en el apartado Prueba ELIMINACI N DEL PRODUCTO 11 11 ELIMINACI N DEL PRODUCTO l Este producto forma parte integrante de la automa...

Страница 191: ...lida para intermitente sem foro en tapa con accesorios opcionales intermitente a led XBA7 o sem foro a led XBA8 Salida BLUEBUS Una salida con carga m xima de 11 unidades BlueBus m ximo 4 pares de foto...

Страница 192: ...tro radioel ctrico art 3 2 EN 300 220 2 V3 1 1 2017 Adem s el producto resulta ser conforme a la siguiente directiva seg n los requisitos previstos para la las cuasi m quinas Anexo II parte 1 secci n...

Страница 193: ...ESPA OL 193 ES NOTAS...

Страница 194: ...tizaci n puede utilizarse igualmente desbloqueando manualmente el motor ver instrucciones al final del cap tulo y moviendo la hoja de la barrera manualmente Dispositivos de seguridad fuera de uso es p...

Страница 195: ...nte a la posici n deseada Para efectuar el bloqueo 1 llevar la llave A a su posici n inicial 2 extraer la llave 3 quitar el tap n de goma del lado opuesto del caj n y poner el cilindro cerradura en el...

Страница 196: ...seguras 3 comprobar que las conexiones roscadas est n bien apretadas especialmente las del muelle de equilibrio 4 comprobar que no haya juego entre la palanca de equilibrio y el eje de salida Si es n...

Страница 197: ...NCIONES Fecha Descripci n del trabajo efectuado Descripci n de los controles regulaciones reparaciones modificaciones etc Firma del T cnico Firma del Due o Se han cumplido todas las fases previstas en...

Страница 198: ...Installation unverz glich abbrechen und den Kundendienst kontaktieren 1 ALLGEMEINE SICHERHEITSHINWEISE UND VORSICHTSMASSNAHMEN 198 1 1 Allgemeine Hinweise 198 1 2 Hinweise zur Installation 199 2 PRODU...

Страница 199: ...iden Bringen Sie das Etikett f r die Bedienung von Hand dauerhaft in der N he des Elements an das die Bewegung selbst erlaubt Nach dem Einbau des Antriebsmotors sicherstellen dass der gesamte Mechanis...

Страница 200: ...eren Dies kann Sch den und Betriebsst rungen am Produkt sowie Gefahren zur Folge haben die Steuerung an einer elektrischen Versorgungsleitung mit Sicherheitserdung anschlie en 3 2 EINSATZBESCHR NKUNGE...

Страница 201: ...000 2 000 000 2 3 3 IDENTIFIZIERUNG UND GESAMTABMESSUNGEN Die Gesamtabmessungen und das Schild A zur Produktidentifikation sind in Abbildung 3 ersichtlich 464 5 mm M BAR L BAR 298 5 mm 464 5 mm 298 5...

Страница 202: ...nem typischen und gebr uchlichen Schema positioniert Mithilfe des Beispiels von Abbildung 5 die ungef hre Position bestimmen in der die f r die Anlage vorgesehenen Komponenten installiert werden solle...

Страница 203: ...mme im unteren Teil von Feld B den Buchstaben und die Zahl f r die zum Einhaken der Feder zu w hlenden Bohrungen ablesen wenn das Schlie en des Schrankenbaums an der rechten Seite des Motors erfolgen...

Страница 204: ...iden Befestigungsschrauben der Geh uset r herausdrehen 8 3 Um die Spannung der Ausgleichsfeder zu l sen Bei M BAR die Mutter B l sen und die Feder C von Hand im Uhrzeigersinn drehen Bei L BAR die Mutt...

Страница 205: ...s Blockieren und Entriegeln des Antriebs und Ausgleichshebel um 90 drehen 90 12 7 Mithilfe von Abbildung 6 die neuen Bohrungen ermitteln in die die beiden Enden der Feder einzuhaken sind 8 Feder in de...

Страница 206: ...Fl che f r die Montage noch nicht besteht 1 Fundament zur Aufnahme der Fundamentplatte ausheben Hinweis DieMontagefl chemussvollkommenglattundeben sein Wenn die Oberfl che aus Beton ist muss dieser mi...

Страница 207: ...hrankenbaums am Schrankenheber wie folgt vorgehen 1 Die beiden Stifte A in die entsprechenden Bohrungen an der Ausgangsmotorwelle einsetzen A 19 2 Halter B auf die Ausgangsmotorwelle setzen und in Ste...

Страница 208: ...indern G in die Schlitze einf hren das Gummi darf am Ende des Schrankenbaums etwa 1 cm berstehen F F F G G F F 24 9 Schrankenbaum Stopfen H einsetzen und mit den beiden Schrauben befestigen 10 Die zwe...

Страница 209: ...erh hen Hinweis DerWertdesUngleichgewichtsistdannakzeptabel wenn die zum Bewegen des Schrankenbaums beim ffnen Schlie en und in allen anderen Positionen erforderliche Kraft kleiner oder gleich der H...

Страница 210: ...elung 1 Schl ssel A einsetzen und um 180 nach links oder rechts drehen A A 30 2 nun kann der Torfl gel in die gew nschte Position bewegt werden Zum Blockieren 1 Schl ssel A wieder in seine Ausgangsste...

Страница 211: ...erden Zur Ausf hrung der elektrischen Anschl sse 1 Oberen Deckel A des Schrankenhebers abnehmen A 32 2 Elektrokabel ins Innere des Schrankenhebers zur linken Seite f hren von der Basis zur Steuerung 3...

Страница 212: ...itel PROGRAMMIERUNG oder neu konfiguriert werden OGI Ausgang Leuchte Schranke offen angeschlossen werden kann eine 24 V Signalleuchte mit max 10 W Kann mit dem Programmierger t Oview auch f r andere F...

Страница 213: ...Abschnitt Loop detector MASTER SLAVE Eingang zum Anschluss von zwei Schranken im Master Slave Betrieb siehe Abschnitt Antrieb im Modus SLAVE SAFETY Eingang als ffner Kontakt zum Anschlie en des Konta...

Страница 214: ...der Ger te m ssen die Positionen der mechanischen Anschl ge max Offenstellung und max Geschlossenstellung eingelernt werden Hierzu wie folgt vorgehen 1 Den Getriebemotor mit dem entsprechenden Schl ss...

Страница 215: ...schalter etc das Schlie en ffnen und Anhalten des Schrankenbaums testen pr fen ob die Bewegung wie vorgesehen erfolgt Es empfiehlt sich mehrere Tests durchzuf hren um die Bewegung des Schrankenbaums z...

Страница 216: ...enbaums beim ffnen nicht mehr als 200 N etwa 20 kg betr gt Die Kraft wird senkrecht zum Schrankenbaum und 1 m von der Drehachse entfernt gemessen 11 Pr fung des Systems zum Trennen der Stromversorgung...

Страница 217: ...en von ffnungs und Schlie positionen Der Weg des Schrankenbaums gemessen vom mechanischen Schlie anschlag bis zum mechanischen ffnungsanschlag wird erkannt Programm P r n 0 0 0 Standardm ige Basis Fir...

Страница 218: ...nke Einbruchsicherung F 1 0 O F F Deaktiviert O n Wenn bei geschlossener Schranke die Steuerung zum ffnen gezwungen wird l st die Steuerung eine Schlie bewegung aus HINWEIS Die Schlie bewegung zur Ein...

Страница 219: ...lfachen von 30 ms ausgedr ckt und kann zwischen 3 90 ms und 32 960 ms eingestellt werden Durch Erh hen dieses Werts erh ht sich die Ansprechzeit bei der amperometrischen Erfassung von Hindernissen t F...

Страница 220: ...ke 2 6 Master und Slave Schranke ffnen 2 7 Master und Slave Schranke schlie en 2 8 Schrittbetrieb Slave Schranke 2 9 Slave Schranke ffnen 3 0 Slave Schranke schlie en Eingang Close I n 3 0 Kein Befehl...

Страница 221: ...en 2 Schlie en Wohnblockbetrieb 1 3 Schlie en Totmannfunktion Funktionsweise Bluebus Fotozellen und Eing nge Foto S E 5 1 Stop und Umkehrung Durch Ausl sung einer Fotozelle w hrend der Schlie bewegun...

Страница 222: ...nal Nr 2 1 2 Funkkanal Nr 3 1 3 Funkkanal Nr 4 1 4 Saugscheibe Funktion Ausgang Flash Informationen zu den einzelnen Parametern in Tabelle 7 O U 2 0 Blinkleuchte 24 V 1 Blinkleuchte 12 V 2 OGI 3 Schra...

Страница 223: ...aktiviert 24 V DC max 10 W Blinkleuchte 12 V Das Blinken der Leuchte 0 5 Sekunden an 0 5 Sekunden aus zeigt an dass gerade eine Bewegung ausgef hrt wird Ausgang aktiviert 12 V DC max 21 W OGI Kontrol...

Страница 224: ...Schranke in anderen Positionen Schranke offen Licht an Schranke ge ffnet Licht aus Schranke in anderen Positionen Orientierungslicht Licht f r die Dauer der Bewegung eingeschaltet nach Abschluss der B...

Страница 225: ...ch eingestelltem Programmierungstyp mittels Flash Blinkleuchte bzw mittels Kontrollleuchte Wartung l Je nach Anzahl an ausgef hrten Bewegungen im VergleichzumprogrammiertenGrenzwertsendendie Blinkleuc...

Страница 226: ...artet von einem der Endanschl ge nicht oder die Steuerung erkennt den Endschalter nicht Elektrischen Anschluss des Endschalters berpr fen Der Slave Schrankenheber f hrt die Bewegungen nicht aus Pr fen...

Страница 227: ...l st Bei Installation rechts DX der Schrankenbaum befindet sich in einer von der ffnungsposition abweichenden Position Bei Installation links SX der Schrankenbaum befindet sich in einer von der Schlie...

Страница 228: ...teuerungseinheit Stromversorgung unterbrechen und wieder herstellen Wenn der Fehler fortbesteht vollst ndige L schung des Speichers wie in Abschnitt Vollst ndige L schung des Speichers der Steuerungse...

Страница 229: ...schnitt Vollst ndige L schung des Speichers der Steuerungseinheit und die Installation erneut durchf hren wenn sich der Zustand nicht ndert liegt m glicherweise eine schwere St rung vor und es ist erf...

Страница 230: ...k Widerstand die Sicherheitsklasse III gegen Defekte gem Norm EN 13849 1 garantieren 9 2 3 Fotozellen Damit die Steuerung die mit BlueBus angeschlossenen Vorrichtungen erkennen kann m ssen diese adres...

Страница 231: ...Schrittbetrieb ffnen und Schlie en am SLAVE nur die Bedienung des SLAVE bewirken F r die Installation von 2 Motoren als MASTER und SLAVE ist wie folgt vorzugehen 1 die beiden Motoren installieren 2 be...

Страница 232: ...bus EPMB EPLB RX NO NC 8K2 24V 4W OGI FLASH NO NO NO NO NO OGI Bluebus Stop SbS Open Close HPSbS Flash Light Loop1 Master Slave Loop2 LOOP1 LOOP2 NO NC 8K2 24V 4W OGI FLASH NO OGI Bluebus Stop SbS Ope...

Страница 233: ...trieb 7 Schrittbetrieb hohe Priorit t Befehl auch bei blockierter Automation oder aktiven Steuerbefehlen 8 Entsperren und ffnen Entriegelt den gesperrten Antrieb und f hrt eine ffnungsbewegung aus 9 E...

Страница 234: ...uerungen anschlie en und am Oview Display alle im Netzwerk vorhandenen Steuerungen anzeigen maximal 16 Steuerungen Das Oview Ger t kann auch w hrend des normalen Betriebs des Antriebs an die Steuerung...

Страница 235: ...estens 20 mal pro Meter gekreuzt werden und es d rfen keine Verbindungen vorhanden sein Wenn es notwendig ist das Kabel zu verl ngern l ten Sie die Leiter und versiegeln Sie sie mit einer thermoschrum...

Страница 236: ...LUSS DES SOLARENERGIE SYSTEMS SOLEMYO f Wenn die Automation durch das System Solemyo gespeist wird darf sie NICHT gleichzeitig auch durch das Stromnetz GESPEIST WERDEN l F r weitere Informationen ber...

Страница 237: ...9 6 Beleuchtungskabel bei Bedarf k rzen jedoch nur an den entsprechend gekennzeichneten Stellen Nach dem Schnitt ist der Stopfen am abgeschnittenen Ende zu versetzen um das neue Ende zu schlie en 7 An...

Страница 238: ...nicht einzuklemmen 63 9 10 ANSCHLUSS VON BLINKLICHT ODER AMPEL In den Deckel des Schrankenhebers kann ein LED Blinklicht Mod XBA7 oder eine Ampel mit roten und gr nden LEDs Mod XBA8 eingebaut werden D...

Страница 239: ...hlie en und alle in Abschnitt Abnahme vorgesehenen Tests und berpr fungen durchf hren ENTSORGUNG DES GER TS 11 11 ENTSORGUNG DES GER TS l Dieses Produkt ist ein fester Bestandteil der Automatisierung...

Страница 240: ...Ausgang f r Blinklicht Ampel auf Deckel mit optionalem Zubeh r LED Blinklicht XBA7 oder LED Ampel XBA8 Ausgang BLUEBUS Ein Ausgang mit einer maximalen Belastung von 11 BlueBus Einheiten maximal 4 Paar...

Страница 241: ...1 2017 Funkfrequenzen art 3 2 EN 300 220 2 V3 1 1 2017 Au erdem entspricht sich das Produkt als Konform zu der folgenden Richtlinie gem den Anforderungen vorgesehenen f r die Unvollst ndige Maschine...

Страница 242: ...242 DEUTSCH DE ANMERKUNGEN...

Страница 243: ...kkehr der Stromversorgung falls die Anlage ber keine Pufferbatterie verf gt kann der Antrieb dennoch benutzt werden indem der Motor von Hand entriegelt siehe Anweisungen am Ende des Kapitels und die S...

Страница 244: ...Zum Blockieren 1 Schl ssel A wieder in seine Ausgangsstellung zur ckbringen 2 Den Schl ssel abziehen 3 Gummistopfen an der gegen berliegenden Seite des Geh uses entfernen und Schlie zylinder in die f...

Страница 245: ...hebel und der Ausgangswelle kein Spiel besteht Gegebenenfalls die mittige Schraube ganz festziehen 5 Gelenkkopf der Ausgleichsfeder und untere Verankerung schmieren 6 Bei den Versionen M7BAR und L9BAR...

Страница 246: ...tum Beschreibung des durchgef hrten Eingriffs Beschreibung der Pr fungen Einstellungen Reparaturen nderungen usw Unterschrift des Technikers Unterschrift des Eigent mers Es wurden alle im Wartungsplan...

Страница 247: ...ringen of gevaarlijke situaties kunnen ontstaan Als dit toch gebeurt stop dan onmiddellijk met de installatie en neem contact op met de klantenservice 1 ALGEMENE AANBEVELINGEN EN VOORZORGSMAATREGELEN...

Страница 248: ...eningselement waarmee de handbediende manoeuvre wordt uitgevoerd Verzeker u er na het installeren van de bewegingsmotor van dat het mechanisme het beveiligingssysteem en alle bewegingen correct functi...

Страница 249: ...n want dan zou het product schade kunnen oplopen of zouden er storingen of gevaarlijke situaties kunnen ontstaan sluit de besturingseenheid aan op een elektrische voedingslijn met veiligheidsaarding 3...

Страница 250: ...A aan de hand waarvan het product kan worden ge dentificeerd zijn aangegeven in Afbeelding 3 464 5 mm M BAR L BAR 298 5 mm 464 5 mm 298 5 mm 500 mm 1219 5 mm 900 mm 1219 5 mm 900 mm 400 mm A A 3 3 4...

Страница 251: ...aan de hand van het referentievoorbeeld van het schema in Afbeelding 5 ongeveer de positie waarop elk onderdeel van de installatie gemonteerd moet worden Opmerking 1 Als de voedingskabel langer is dan...

Страница 252: ...derkant van tabel B de letter en het cijfer af te lezen die overeenkomen met de gaten die u moet kiezen om de veer te bevestigen als de sluiting van de slagboom aan de rechterkant van de motor moet zi...

Страница 253: ...eslagboombarri re A 7 2 draai de twee schroeven die de kastdeur bevestigen los 8 3 om de spanning van de balansveer te verminderen om M BAR de moer los te maken B en de veer handmatig te draaien C met...

Страница 254: ...delen en vergrendelen van de reductiemotor en de balanceerhefboom 90 draaien 90 12 7 m b v de Afbeelding 6 zoekt u de nieuwe gaten waaraan u de twee uiteinden van de veer kunt vasthaken 8 bevestig de...

Страница 255: ...om de funderingsplaat vast te zetten Opmerking Het bevestigingsoppervlak moet volledig horizontaal en glad zijn Als het oppervlak van beton is moet dit een dikte van minstens 0 15 m hebben en moet he...

Страница 256: ...8 INSTALLATIE VAN DE SLAGBOOM Om de slagboom aan de slagboombarri re te bevestigen gaat u als volgt te werk 1 doe de twee staafjes A in de speciale openingen op de uitgangsas A 19 2 plaats de houder...

Страница 257: ...e speciale koppelingen G het rubber mag circa 1 cm uitsteken voorbij het einde van de slagboom F F F G G F F 24 9 plaats de dop van de slagboom H en zet hem vast met de twee schroeven 10 plaats de twe...

Страница 258: ...m met de hand tegen de klok in te draaien Opmerking De waarde van de onbalans is acceptabel als de kracht die nodig is om de slagboom tijdens het openen het sluiten en in alle andere standen te bewege...

Страница 259: ...als volgt 1 doe de sleutel in de opening A en draai hem 180 naar links of rechts A A 30 2 u kunt de vleugel nu handmatig in de gewenste stand plaatsen Om te vergrendelen 1 doe de sleutel A weer in zij...

Страница 260: ...ktrische aansluitingen tot stand te brengen 1 verwijderhetbovenstedeksel A vandeslagboombarri re A 32 2 schuif de elektrische kabels aan de binnenkant van de slagboombarri re naar de linkerkant toe be...

Страница 261: ...v de oview programmeereenheid OGI Uitgang Controlelampje slagboom open het is mogelijk hierop een signaleringslamp van 24 V maximaal 10W aan te sluiten Deze kan ook voor andere functies worden geprog...

Страница 262: ...eereenheid van de centrale zie paragraaf Loop detector MASTER SLAVE Ingang voor de aansluiting van twee barri res in modus Master Slave zie paragraaf Reductiemotor in SLAVE modus SAFETY Ingang van het...

Страница 263: ...leren van de inrichtingen moeten de posities van de mechanische stops maximale opening en maximale sluiting worden aangeleerd Doe het volgende 1 ontgrendel de reductiemotor met de daartoe bestemde sle...

Страница 264: ...en stoppen van de slagboom en te controleren of de beweging ervan overeenkomt met de instelling Geadviseerd wordt om verschillende tests uit te voeren om de beweging van de slagboom te beoordelen en...

Страница 265: ...00 N circa 20 kg de kracht wordt haaks op de slagboom gemeten en op 1 m vanaf de rotatieas 11 controle van het afkoppelingssysteem van de voeding controleer door de afkoppelingsvoorziening van de voed...

Страница 266: ...llatie S e t 1 Aanleren inrichtingen die zijn aangesloten op de klem Bluebus en Alt 2 Aanleren openings en sluitposities de waarde van de loop van de slagboom wordt afgelezen gemeten door de mechanisc...

Страница 267: ...s de stang gesloten is en de besturingseenheid detecteert dat de stang geforceerd wordt geopend dan activeert de besturingseenheid een sluitmanoeuvre OPMERKING de sluitmanoeuvre tegen inbraak moet bin...

Страница 268: ...dt uitgedrukt in veelvouden van 30 ms en kan worden ingesteld tussen 3 90 ms en 32 960 ms Door deze waarde te verhogen zal ook de interventietijd toenemen bij amperometrische detectie van de obstakels...

Страница 269: ...voor stap barri re master 2 6 Opent barri re master en slave 2 7 Sluit barri re master en slave 2 8 Stap voor stap barri re slave 2 9 Opent barri re slave 3 0 Sluit barri re slave Ingang Close I n 3...

Страница 270: ...aanwezig Werkingsmodus fotocellen BlueBus en ingangen Foto S E 5 1 Stop en omkering een ingreep van een fotocel tijdens de sluitmanoeuvre onderbreekt de manoeuvre en keert de beweging om 4 Tijdelijke...

Страница 271: ...groen 1 0 Radiokanaal1 1 1 Radiokanaal2 1 2 Radiokanaal3 1 3 Radiokanaal4 1 4 Zuignap Functie uitgang Flash Raadpleeg Tabel 7 voor informatie betreffende de afzonderlijke parameters O U 2 0 Knipperli...

Страница 272: ...lamp 0 5 seconden aan 0 5 seconden uit geeft aan dat er een manoeuvre aan de gang is Uitgang actief 24 Vcc max 10 W Knipperlicht 12V Het knipperen van de lamp 0 5 seconden aan 0 5 seconden uit geeft...

Страница 273: ...re posities Gebruikerslicht Licht aan voor de gehele duur van de manoeuvre Zodra de manoeuvre be indigd is blijft het gebruikerslicht even aan Parameters uitgangen OU4 met accessoire xba8 Verkeerslich...

Страница 274: ...ordt aangegeven door het knipperlicht Flash of door het Onderhoudslampje afhankelijk van de ingestelde programmering l Op basis van het aantal uitgevoerde manoeuvres ten opzicht van de geprogrammeerde...

Страница 275: ...t De manoeuvre wordt op langzame snelheid uitgevoerd De manoeuvre begint niet vanaf een van de eindaanslagen of de centrale herkent de eindaanslag niet Controleer de elektrische aansluiting van de ein...

Страница 276: ...de slagboom bevindt zich in een andere positie dan de opening Met installatie aan linkerzijde Links de slagboom bevindt zich in een andere positie dan de sluiting 8 3 1 Diagnostiek display Als u met...

Страница 277: ...g uit en weer aan Als de storing voortduurt moet u het geheugen volledig wissen zoals aangegeven in de paragraaf Volledig wissen van het geheugen van de besturingseenheid en de installatie herhalen Al...

Страница 278: ...het geheugen worden uitgevoerd zie paragraaf Volledig wissen van het geheugen van de besturingseenheid en moet u de installatie opnieuw uitvoeren Als de status aanhoudt kan er sprake zijn van een ern...

Страница 279: ...een veiligheidsfunctie aan te sluiten zouden alleen de inrichtingen met een uitgang met constante weerstand van 8 2 k de veiligheidscategorie 3 kunnen garanderen tegen storingen conform de norm EN 13...

Страница 280: ...n met het gemak van de aansluitingen en het feit dat de instructies Stap voor Stap Open en Sluit op de SLAVE alleen de slagboom SLAVE kunnen besturen Voor het installeren van twee motoren in de modus...

Страница 281: ...uebus EPMB EPLB RX NO NC 8K2 24V 4W OGI FLASH NO NO NO NO NO OGI Bluebus Stop SbS Open Close HPSbS Flash Light Loop1 Master Slave Loop2 LOOP1 LOOP2 NO NC 8K2 24V 4W OGI FLASH NO OGI Bluebus Stop SbS O...

Страница 282: ...tap woonblok Instructie in woonblokmodus 7 Stap voor stap hoge prioriteit Geeft de instructie ook als de automatisering geblokkeerd is of de instructies actief zijn 8 Ontgrendelen en openen Ontgrendel...

Страница 283: ...sturingseenheden aan te sluiten op het respectieve display alle in het netwerk aangesloten besturingseenheden maximaal 16 weergeven De Oview eenheid kan ook tijdens de normale werking van de automatis...

Страница 284: ...de aansluitkabels van de spoel minimaal 20 keer per meter worden gekruist en mogen er geen koppelingen in de kabels zijn als de kabel verlengd moet worden soldeer de geleiders dan en dicht ze af met...

Страница 285: ...ONNE ENERGIESYSTEEM SOLEMYO f Wanneer de automatisering wordt gevoed door het Sole myo systeem MAG HET NIET TEGELIJKERTIJD ZIJN AANGESLOTEN op het elektriciteitsnet l Voor informatie over het Sole myo...

Страница 286: ...unt u de lichtkabel afsnijden alleen op een van de twee plekken die door het speciale teken zijn aangegeven Na het snijden moet u de dop van het afgesneden uiteinde verplaatsen om het nieuwe uiteinde...

Страница 287: ...anraakt 63 9 10 AANSLUITEN KNIPPERLICHT OF VERKEERSLICHT Op het deksel van de slagboombarri re kan een led knipperlicht worden aangesloten mod XBA7 of een verkeerslicht met rode en groene leds mod XBA...

Страница 288: ...ugel vervang versleten onderdelen 5 sluit de voedingsbronnen weer aan en voer alle tests en controles uit die worden beschreven in paragraaf Test AFDANKING VAN HET PRODUCT 11 11 AFDANKING VAN HET PROD...

Страница 289: ...leringslampje 24V max 10W Uitgang voor knipperlicht verkeerslicht op deksel met optionele accessoires ledknipperlicht XBA7 of verkeerslicht met leds XBA8 Uitgang BLUEBUS Een uitgang met een maximale b...

Страница 290: ...nde vereisten Bijlage II deel 1 rubriek B Richtlijn 2006 42 EG VAN HET EUROPEES PARLEMENT EN DE RAAD van 17 mei 2006 betreffende machines en tot wijziging van Richtlijn 95 16 EG herschikking Hierbij w...

Страница 291: ...NEDERLANDS 291 NL OPMERKINGEN...

Страница 292: ...tterijen heeft toch worden gebruikt dit doet u door de motor met de hand te ontgrendelen zie de aanwijzingen aan het einde van het hoofdstuk en de slagboom met de hand te bewegen Veiligheidsinrichting...

Страница 293: ...e gewenste stand plaatsen Om te vergrendelen 1 doe de sleutel A weer in zijn beginstand 2 Trek de sleutel eruit 3 verwijder de rubberen dop aan de tegenovergestelde zijde van de kast en doe de slotcil...

Страница 294: ...ehaald vooral die van de balansveer 4 controleer of er geen speling is tussen de balanceerhefboom en de uitgangsas Draai indien nodig de centrale schroef helemaal vast 5 smeer de scharnierkop van de b...

Страница 295: ...ABEL Datum Beschrijving van het uitgevoerde onderhoud Beschrijving van de controles regeling reparaties wijzigingen Handtekening van de monteur Handtekening van de eigenaar Alle fasen van het onderhou...

Страница 296: ...mog doprowadzi do uszkodzenia urz dzenia by przyczyn nieprawid owego dzia ania lub zagro e Je eli dosz oby do kt rej z opisanych sytuacji nale y natychmiast przerwa monta i zwr ci si o pomoc do Serwi...

Страница 297: ...a temat r cznego manewru w pobli u elementu umo liwiaj cego wykonanie manewru Po zamontowaniu silnika nale y si upewni e mechanizm system ochrony i ka dy manewr r czny funkcjonuj prawid owo OPIS PRODU...

Страница 298: ...b r de ciep a w rodowisku potencjalnie wybuchowym szczeg lnie kwa nym lub s onym poniewa mo e to uszkodzi produkt i sta si powodem nieprawid owego dzia ania albo spowodowa zagro enia pod czy central d...

Страница 299: ...OWE Wymiary gabarytowe i etykieta A umo liwiaj ca identyfikacj produktu zosta y przedstawione na Rysunku 3 464 5 mm M BAR L BAR 298 5 mm 464 5 mm 298 5 mm 500 mm 1219 5 mm 900 mm 1219 5 mm 900 mm 400...

Страница 300: ...rozmieszczone wed ug typowego i zwyczajowego schematu Korzystaj c ze schematu na Rysunku 5 ustali przybli on pozycj w kt rej zostanie zainstalowany ka dy przewidziany element sk adowy instalacji Uwag...

Страница 301: ...y B liter i cyfr odpowiadaj ce otworom w kt rych nale y zaczepi spr yn je eli rami ma si zamyka po prawej stronie silnika konieczne b dzie przesuni cie zaczepu spr yny do jednego z otwor w na drugim r...

Страница 302: ...odkr ci dwie ruby mocuj ce drzwi szafy 8 3 aby zmniejszy napr enie spr yny kompensacyjnej w M BAR poluzowa nakr tk B i r cznie obr ci spr yn C w kierunku zgodnym z ruchem wskaz wek zegara w L BAR obr...

Страница 303: ...odblokowywanie motoreduktora i obr ci o 90 d wigni kompensacyjn 90 12 7 korzystaj c z Rysunku 6 zlokalizowa nowe otwory w kt rych nale y zaczepi oba ko ce spr yny 8 zamocowa spr yn do p yty z otworami...

Страница 304: ...fundamentowa Uwaga Powierzchnia mocowania musi by idealnie r wna i g adka Je eli powierzchnia jest wykonana z betonu musi on mie grubo co najmniej 0 15 m i musi by odpowiednio wzmocniony poprzez zast...

Страница 305: ...ramienia szlabanu nale y wykona nast puj ce czynno ci 1 w o y dwa ko ki A w odpowiednie gniazda znajduj ce si na wale wyj ciowym silnika A 19 2 umie ci wspornik B na wale wyj ciowym silnika ustawiaj c...

Страница 306: ...mi z czkami G guma mo e wystawa na odleg o oko o 1 cm od kra ca ramienia F F F G G F F 24 9 w o y za lepk ramienia H i zablokowa j za pomoc dw ch rub 10 w o y i zamocowa dwie za lepki listwy zabezpiec...

Страница 307: ...rotnym do ruchu wskaz wek zegara Uwaga Warto niewywa enia jest akceptowalna kiedy si a niezb dna do przemieszczenia ramienia podczas otwierania zamykaniaorazwewszystkichinnychpozycjach jest mniejsza l...

Страница 308: ...zas czynno ci instalacyjnych W celu odblokowania 1 w o y i obr ci klucz A o 180 w lewo lub prawo A A 30 2 teraz mo na przesun r cznie skrzyd o do danej pozycji W celu zablokowania 1 ponownie umie ci k...

Страница 309: ...ykonania po cze elektrycznych 1 zdj g rn pokryw A szlabanu A 32 2 przeprowadzi kable elektryczne wewn trz szlabanu w lew stron rozpoczynaj c od podstawy w kierunku centrali steruj cej 3 przeprowadzi k...

Страница 310: ...b ponownie skonfigurowa za pomoc programatora Oview OGI Wyj cie Kontrolki otwartego ramienia mo na pod czy lamp sygnalizacyjn 24V o mocy maks 10W Wyj cie mo na zaprogramowa r wnie dla innych funkcji z...

Страница 311: ...do pod czenia dw ch barier w trybie Master Slave zob punkt Motoreduktor w trybie SLAVE SAFETY Wej cie typu Normalnie Zamkni te do pod czenia styku Rami obrotowe opcjonalne wyposa enie dodatkowe a W pr...

Страница 312: ...MECHANICZNYCH Po wczytaniu urz dze nale y wczyta pozycje ogranicznik w mechanicznych maksymalne otwarcie i maksymalne zamkni cie W tym celu 1 odblokowa motoreduktor za pomoc specjalnego klucza patrz p...

Страница 313: ...c si e ruch jest zgodny z przewidzianym Zaleca si przeprowadzenie kilku pr b w celu oceny ruchu wykonywanego przez rami i wykrycia ewentualnych wad monta u regulacji oraz miejsc szczeg lnie nara onych...

Страница 314: ...ksza od 200 N oko o 20 kg si a ta jest mierzona prostopadle do ramienia w odleg o ci 1 m od osi obrotu 11 kontrola systemu od czania zasilania korzystaj c z urz dzenia od czaj cego zasilanie i od cza...

Страница 315: ...nicznego Zamykania do ogranicznika Otwierania Program P r n 0 0 0 Podstawowy domy lny firmware 0 0 1 Firmware 1 personalizacja podstawowego firmware u nie jest wykorzystywana 0 0 2 Firmware 2 personal...

Страница 316: ...ramieniem je li centrala odczytuje e praca ramienia jest wymuszana podczas otwierania centrala uruchamia manewr zamykania UWAGA manewr zamykania w celu ochrony przeciww amaniowej musi si zako czy w u...

Страница 317: ...na jako wielokrotno 30 ms i mo e by regulowana w zakresie od 3 90 ms do 32 960 ms Zwi kszenie tej warto ci powoduje zwi kszenie czasu zadzia ania podczas amperometrycznego wykrywania przeszk d t F 3 3...

Страница 318: ...u bariera master 2 6 Otwiera bariery master i slave 2 7 Zamyka bariery master i slave 2 8 Krok po kroku bariera slave 2 9 Otwiera barier slave 3 0 Zamyka barier slave Wej cie Close I n 3 0 Brak polece...

Страница 319: ...BlueBus i wej Foto S E 5 1 Stop i zmiana kierunku ruchu zadzia anie fotokom rki podczas manewru Zamykania powoduje zatrzymanie manewru i zmian kierunku ruchu 4 Stop tymczasowy zadzia anie fotokom rki...

Страница 320: ...3 1 3 Kana radiowy nr4 1 4 Blokada elektromagnetyczna Funkcja wyj cie Flash Zob Tabela 7 w celu uzyskania informacji dotycz cych poszczeg lnych parametr w O U 2 0 Lampa ostrzegawcza 24V 1 Lampa ostrze...

Страница 321: ...anie manewru Wyj cie aktywne 24 Vcc maks 10 W Lampa ostrzegawcza 12V Miganie lampy 0 5 s w czona 0 5 s wy czona sygnalizuje e trwa wykonywanie manewru Wyj cie aktywne 12 Vcc maks 21 W Ogi Kontrolka wy...

Страница 322: ...o wy czone rami w innych pozycjach wiat o pomocnicze wiat o w czone przez ca y czas wykonywania manewru po zako czeniu manewru pozostaje w czone przez czas wiat a pomocniczego Parametry wyj OU4 z wypo...

Страница 323: ...rowadzenia konserwacji jest sygnalizowana przez lamp ostrzegawcz Flash lub przez kontrolk konserwacji w zale no ci od zaprogramowanego ustawienia l Na podstawie liczby wykonanych manewr w w stosunku d...

Страница 324: ...h lub centrala nie rozpoznaje wy cznika kra cowego Sprawdzi po czenie elektryczne wy cznika kra cowego Szlaban Slave nie wykonuje manewr w Sprawdzi czy zosta a wykonana faza wczytywania Master Slave n...

Страница 325: ...onnej PR rami znajduje si w pozycji innej ni pozycja otwarcia W przypadku instalacji lewostronnej LW rami znajduje si w pozycji innej ni pozycja zamkni cia 8 3 1 Diagnostyka wy wietlacza Po wybraniu z...

Страница 326: ...e Je li sygnalizacja b du nie znika nale y przeprowadzi Ca kowite kasowanie pami ci w spos b opisany w punkcie Ca kowite wykasowanie pami ci centrali steruj cej i ponownie wykona instalacj Je eli prob...

Страница 327: ...li sygnalizacja b du nie znika nale y przeprowadzi Ca kowite kasowanie pami ci zob punkt Ca kowite wykasowanie pami ci centrali steruj cej i ponownie wykona instalacj je eli problem nie zostanie rozw...

Страница 328: ...cjami bezpiecze stwa jedynie urz dzenia ze sta ym oporem 8 2k zapewniaj III kategori odporno ci na usterki wed ug normy EN 13849 1 9 2 3 Fotokom rki W celu umo liwienia centrali rozpoznania urz dze po...

Страница 329: ...lnik w b dzie dzia a jako MASTER a kt ry jako SLAVE podczas wyboru nale y uwzgl dni wygod po cze oraz fakt e polecenia Krok po Kroku Otwiera i Zamyka w SLAVE umo liwiaj sterowanie wy cznie skrzyd em S...

Страница 330: ...bus EPMB EPLB RX NO NC 8K2 24V 4W OGI FLASH NO NO NO NO NO OGI Bluebus Stop SbS Open Close HPSbS Flash Light Loop1 Master Slave Loop2 LOOP1 LOOP2 NO NC 8K2 24V 4W OGI FLASH NO OGI Bluebus Stop SbS Ope...

Страница 331: ...je manewr 6 Krok Po Kroku Zesp mieszkalny Polecenie w trybie zespo u mieszkalnego 7 Krok po Kroku wysoki priorytet Wydaje polecenie r wnie z zablokowan automatyk lub aktywnymi poleceniami 8 Odblokowuj...

Страница 332: ...tych centrali mo liwe jest wy wietlenie na wy wietlaczu wszystkich centrali obecnych w sieci maksymalnie 16 centrali Jednostka Oview mo e pozosta pod czona do centrali r wnie podczas normalnego dzia...

Страница 333: ...wane przynajmniej 20 razy na metr i nie mog by obecne po czenia w razie konieczno ci przed u enia kabla nale y przylutowa przewody i umie ci je w os onie termokurczliwej d ugo skr tki nie mo e przekra...

Страница 334: ...KORZYSTUJ CEGO ENERGI S ONECZN SOLEMYO f Gdy automatyka jest zasilana przez system Solemyo NIE WOLNO JEJ POD CZA r wnocze nie do sieci elektrycznej l W celu uzyskania dodatkowych informacji na temat s...

Страница 335: ...ci skr ci przew d wiate ucinaj c go wy cznie w jednym z zaznaczonych punkt w Po skr ceniu przewodu nale y przesun za lepk z uci tej ko c wki na now 7 poprowadzi przew d okablowania najpierw przez otw...

Страница 336: ...PY OSTRZEGAWCZEJ LUB WIAT A RUCHU Na pokrywie szlabanu mo e by zainstalowana diodowa lampa ostrzegawcza mod XBA7 lub wiat o ruchu z czerwonymi i zielonymi diodami mod XBA8 Tryby dzia ania tych lamp sy...

Страница 337: ...pod czy r d a zasilania elektrycznego i wykona pr by i kontrole przewidziane w punkcie Pr ba odbiorcza UTYLIZACJA PRODUKTU 11 11 UTYLIZACJA PRODUKTU l Opisywane w tej instrukcji urz dzenie jest integr...

Страница 338: ...dla lampy ostrzegawczej wiate ruchu na pokrywie z opcjonalnymi urz dzeniami dodatkowymi diodow lamp ostrzegawcz XBA7 lub diodowymi wiat ami ruchu XBA8 Wyj cie BLUEBUS Jedno wyj cie z obci eniem maksy...

Страница 339: ...netyczna art 3 1 b EN 301 489 1 V2 2 0 2017 EN 301 489 3 V2 1 1 2017 Widmo radiowe art 3 2 EN 300 220 2 V3 1 1 2017 Ponadto produkt jest zgodny z nast puj c dyrektyw w zakresie wymaga dotycz cych masz...

Страница 340: ...340 POLSKI PL UWAGI...

Страница 341: ...dzenie mo e by u ywane nawet je li nie jest wyposa one w akumulatory awaryjne w takiej sytuacji nale y r cznie odblokowa silnik zob instrukcje na ko cu rozdzia u i r cznie przesun rami Niedzia aj ce...

Страница 342: ...yd o do danej pozycji W celu zablokowania 1 ponownie umie ci klucz A w po o eniu pocz tkowym 2 wyj klucz 3 z drugiej strony obudowy wyj plastikow za lepk i w o y cylinder zamka do otworu 4 od wewn trz...

Страница 343: ...y kt re nie daj wystarczaj cych gwarancji bezpiecze stwa 3 sprawdzi czy po czenia rubowe s odpowiednio dokr cone zw aszcza po czenia spr yny kompensacyjnej 4 sprawdzi czy nie wyst puje luz mi dzy d wi...

Страница 344: ...OLSKI PL Tabela 22 TABELA PRAC Data Opis wykonanej pracy Opis kontroli regulacji napraw zmian Podpis Technika Podpis W a ciciela Zosta y wykonane wszystkie przewidziane fazy planu konserwacji ___TAK _...

Страница 345: ...2 360 5 3 361 5 4 361 5 5 361 5 6 361 5 7 361 6 362 6 1 362 6 2 363 7 364 7 1 364 7 2 372 7 2 1 372 7 2 2 372 7 2 3 372 7 2 4 372 8 372 8 1 372 8 2 373 8 3 373 8 3 1 374 8 3 2 375 8 4 376 9 376 9 1 3...

Страница 346: ...346 RU A 70 A 1 2 1 5 200 2 2 M BAR L BAR 24 Master Slave 8 SLAVE Nice Solemyo Solemyo PS224 6 1 M3BAR 3 M5BAR 4 1 5 1 M7BAR 5 2 3 3 2 3 4 L9BAR 3 4 3 4 4 3 4 5 M BAR L9BAR a...

Страница 347: ...347 RU 2 1 1 M L BAR C E A B B A F OGI Bluebus Stop SbS Open Close HPSbS Flash Light Loop1 Master Slave Loop2 D 1 A B C D E F 3 3 3 1 a 3 3 2 3 2 1 1 2 2 2 M5BAR 3 2 10 10 3 20 20 550 000...

Страница 348: ...0 10 4 5 5 5 5 5 10 10 10 10 5 5 5 5 5 5 5 40 C 0 C 5 5 5 5 10 0 20 30 40 50 60 70 80 90 100 N 400 000 0 800 000 1 200 000 1 600 000 2 000 000 2 3 3 A 3 464 5 mm M BAR L BAR 298 5 mm 464 5 mm 298 5 mm...

Страница 349: ...3 1 5 2 30 m 1 2 BLUEBUS 1 2 0 5 2 20 m 2 3 2 2 x 0 25 2 3 30 m OPEN 1 2 x 0 25 2 30 m CLOSE 2 x 0 25 2 30 m 4 1 2 0 5 2 30 m 1 RG58 15 m 5 m 4 1 2 0 5 2 30 m 4 MASTER SLAVE 1 3 x 1 2 20 m 5 1 30 3 x...

Страница 350: ...0 1 1 3 0 1 1 3 0 1 2 3 0 1 3 0 1 2 3 0 1 A 1 A 3 C 2 B 2 A 1 A 3 B 2 B 2 B 3 B 3 C 2 B 2 B 3 B 3 C 1 C 3 B 1 B 1 XBA13 XBA13 XBA4 XBA6 XBA18 XBA13 M5BAR L9BAR M7BAR M5BAR 3 50m 4 15m 5 15m 5 15m 5 0...

Страница 351: ...351 RU 1 A A 7 2 2 8 3 M BAR B C L BAR B M3BAR M5BAR M7BAR L9BAR B B C 9 4 D M3BAR M5BAR M7BAR L9BAR D 10...

Страница 352: ...352 RU 5 M3BAR M5BAR M7BAR L9BAR 11 6 90 90 12 7 6 8 M3BAR M5BAR M7BAR L9BAR 13 9 M3BAR M5BAR M7BAR L9BAR 14 10...

Страница 353: ...353 RU 3 7 a 1 15 2 16 3 4 4 5 17 1 0 15 0 2 3 0 25 0 8 2 0 9 4 12 400 1000 12 2 3 A m A B 18...

Страница 354: ...354 RU 4 5 2 6 B 7 8 8 17 3 8 1 A A 19 2 B 3 B 20 m 4 C 6 C 21 5 D M BAR L BAR D D 22...

Страница 355: ...355 RU 6 E E E 23 7 8 F G 1 F F F G G F F 24 9 H 10 I H I 25 11 J 12 6 J 26 l...

Страница 356: ...356 RU 3 9 1 2 3 A B A B 27 4 3 10 M BAR 28 1 2 45 3 A 1 5 M3 3 5 M5 4 5 M7 1 45 45 A B 28 4 20 70 5 B 6 L BAR 29 1 2 45 3 C C 45 45 C 29 6 5 1...

Страница 357: ...357 RU 4 20 70 5 3 11 1 A 180 A A 30 2 1 A 2 1 A 180 2 U B 3 C A B C 31 4 5 U 6 A 7...

Страница 358: ...358 RU 4 4 4 1 f a 1 A A 32 2 3 3 4 L N 33 5 34...

Страница 359: ...luebus Bluebus EPMB EPLB RX NO NC 8K2 24V 4W OGI FLASH NO NO NO NO OGI Bluebus Stop SbS Open Close HPSbS Flash Light Loop1 Master Slave Loop2 D2 34 4 2 2 4 LIGHT 24 10 oview FLASH 12 21 Nice LUCY B ML...

Страница 360: ...HP Sbs ANTENNA Nice LUCY B MLB MLBT INTERNAL LIGHT XBA7 XBA8 LOOP1 D1 LOOP2 D2 MASTER SLAVE Master Slave SLAVE SAFETY a 5 5 5 1 OXI dip A dip A 35 5 Dip 1 Dip 2 Dip 3 Dip 4 Dip 5 M3BAR M5BAR M7BAR L9...

Страница 361: ...361 RU 5 3 a III 1 2 TX RX 3 FLASH XBA7 5 4 BlueBUS STOP m Set 1 5 5 1 2 45 3 4 Set 2 5 A a 5 6 37 1 f 2 h 3 0 5 0 5 4 5 7 24Vc 30 10 500mA 38...

Страница 362: ...362 RU 6 6 m EN 12445 6 1 1 2 3 4 5 6 70 x 30 x 20 50 1 50 20 300 200 700 500 39 15 300 200 700 300 200 700 500 150 150 40...

Страница 363: ...363 RU 7 5 30 TX RX 41 8 20 50 9 EN 12445 10 200 20 1 11 6 2 a a a 1 2 42 42 3 4 5 6 l Nice...

Страница 364: ...364 RU 7 7 A B l 6 B A 43 7 1 A B 6 A A A ESC ESC A Oview 6 I II A 8 8 8 BlueBus Alt S e t 1 Bluebus Alt 2 P r n 0 0 0 0 0 1 1 0 0 2 2 0 0 3 3 F 0 1 O F F O n F 0 2 O F F 1 2 3 2 F 0 3 1 2 3...

Страница 365: ...bus 4 F 0 6 O F F O n F 0 7 O F F O n Slave F 0 9 O F F Master O n Slave F 1 0 O F F O n t 0 1 0 2 5 0 20 t 0 2 0 5 0 open 0 t 0 3 0 5 0 close 0 t 0 4 0 6 0 60 t 0 6 0 3 0 0 2 t 0 7 0 2 5 0 60 t 0 9 0...

Страница 366: ...3 20 P L C 1 0 2 10 3 20 F r O 1 1 2 2 3 3 4 4 5 5 6 6 F r C 1 1 2 2 3 3 4 4 5 5 6 6 30 3 90 32 960 t F 3 3 2 x 30 3 Sbs I n 1 0 1 3 4 6 7 8 1 1 1 2 1 6 1 9 2 0 2 1 Bluebus 2 2 Bluebus 2 5 Master Slav...

Страница 367: ...2 0 2 1 Bluebus 2 2 Bluebus 2 5 Master 2 6 Master Slave 2 7 Master Slave 2 8 Slave 2 9 Slave 3 0 Slave Close I n 3 0 1 3 4 6 7 8 1 1 1 2 1 6 1 9 2 0 2 1 Bluebus 2 2 Bluebus 2 5 Master Slave 2 6 Maste...

Страница 368: ...Bluebus 2 2 Bluebus 2 5 Master Slave 2 6 Master Slave 2 7 Master Slave 2 8 Slave 2 9 Slave 3 0 Slave S E 1 1 2 3 5 1 6 S E 3 1 2 1 3 S E 4 1 2 1 3 BlueBus S E 5 1 4 5 2 Stop S E 6 1 Alt 2 Alt Stop S E...

Страница 369: ...L O 2 1 2 4 Light 7 O U 1 0 24 1 Ogi 2 3 4 5 6 8 9 1 0 1 1 1 2 1 2 3 1 3 4 1 4 Flash 7 O U 2 0 24 1 12 2 Ogi 3 4 5 6 7 9 1 0 1 1 1 1 2 2 1 3 3 1 4 4 1 5 Ogi 7 O U 3 0 24 1 Ogi 2 3 4 5 6 8 9 1 0 1 1 1...

Страница 370: ...2 3 4 5 6 7 8 9 M n P abc a b c A M n E tuv t u v A E r S 1 Bluebus 2 3 5 F i r nm n m 3 3 2 A HE0 2b H d r pqr p q r 3 3 3 A 620 Ar 00 d i n 7 OU1 OU2 OU3 24 0 5 0 5 24 10 12 0 5 0 5 12 21 Ogi 24 10...

Страница 371: ...371 RU 1 1 24 10 2 2 24 10 3 3 24 10 4 4 24 10 24 10 OU4 xba7 24 0 5 0 5 Ogi OU4 xba8 2 1 3 2...

Страница 372: ...372 RU 7 2 7 2 1 1 2 2 3 3 2 l 7 2 2 Oview Flash l Flash 8 8 Flash 80 0 5 0 5 2 81 100 2 100 2 7 2 3 6 Oview 7 2 4 Oview 8 8 8 1 F2 F1 44...

Страница 373: ...373 RU 9 F1 F2 SbS Sbs BlueBUS 15 Slave Master Slave 8 2 8 3 B A 45 A FC1 B FC2 10 STOP STOP STOP STOP Sbs Sbs Sbs Sbs OPEN OPEN OPEN OPEN...

Страница 374: ...SX 8 3 1 din 3 11 12 13 A1 F1 E1 B1 C1 dp1 G1 D1 A2 F2 E2 B2 C2 dp2 G2 D2 A3 F3 E3 B3 C3 dp3 G3 D3 46 11 A1 1 B1 Close C1 HP Sbs D1 2 E1 Open F1 Sbs G1 dp1 12 A2 FC1 B2 Close C2 DX D2 E2 SX F2 Open G...

Страница 375: ...14 E01 BlueBus Stop BlueBus Stop E02 E03 E04 E05 Master Slave Master Slave Master Slave Slave Slave SLAVE E06 E07 B E08 DIP DIP DIP E09 HP Sbs E10 Safety Safety Safety E11 BlueBus BlueBus 40 I02 I03...

Страница 376: ...376 RU 8 4 FLASH 1 1 15 FLASH 1 1 1 Bluebus BLUEBUS 2 1 2 3 1 3 4 1 4 STOP STOP 5 1 5 6 1 6 7 1 7 8 1 8 9 1 9 9 9 9 1 ER5 l m 9 2 BlueBUS STOP m...

Страница 377: ...STOP STOP 8 2 2 8 2 2 8 2 3 8 2 a STOP 8 2 3 EN 13849 1 9 2 3 BlueBus l Bluebus FA1 FA2 TX RX FA1 FA1 FA2 FA2 FOTO 1 II FOTO 1 II FOTO 1 FOTO 1 47 16 FOTO h 50 FOTO II h 100 FOTO 1 1 h 50 FOTO 1 II h...

Страница 378: ...1 m 9 3 SLAVE SLAVE MASTER SLAVE MASTER MASTER MASTER SLAVE 1 2 MASTER 1 2 SLAVE l MASTER SLAVE SLAVE SLAVE MASTER SLAVE 1 2 48 3 4 5 6 SLAVE SLAVE E5 Master Slave MASTER SLAVE m SLAVE MASTER SLAVE 7...

Страница 379: ...EPMB EPLB RX NO NC 8K2 24V 4W OGI FLASH NO NO NO NO NO OGI Bluebus Stop SbS Open Close HPSbS Flash Light Loop1 Master Slave Loop2 LOOP1 LOOP2 NO NC 8K2 24V 4W OGI FLASH NO OGI Bluebus Stop SbS Open C...

Страница 380: ...M SMXI OXI f 49 1 A B A B 49 18 18 SMXI SMXIS OXI OXIFM OXIT OXITFM I II 1 2 3 4 OXI 19 19 OXI OXIFM OXIT OXITFM II 1 Sbs 2 3 4 5 Stop 6 7 8 9 10 Oview 11 Oview 12 Oview 13 14 MASTER SbS MASTER 15 SLA...

Страница 381: ...381 RU 9 5 f f 1 2 3 A B 50 9 6 OVIEW Oview Oview 100 BusT4 Oview 16 Oview a IBT4N 1 A A 51 2 B C 3 D E B C D E 52 l 9 7 Lp21 Lp22 9 7 1...

Страница 382: ...382 RU a 1 20 1 53 45 54 45 20 20 0 35 m SM CR 1 m 53 0 8 m SM CR 0 2 m 45 54 1 8 30 50 55 2 3 20 1 5 2 55 4 55 a 5 1 2 20 2 4 6 4 7 5 7 12 4 12 3...

Страница 383: ...383 RU 5 mm 8 mm 30 50 mm A C B D E G F B 55 A B 5 8 C D E F G 9 8 SOLEMYO f Sole myo l Sole myo Sole myo 1 A 2 B A B 56...

Страница 384: ...384 RU 9 9 1 2 6 A A 57 3 4 B B 58 5 C STOP C C 59 6 7 a 60 8 LIGHT m LIGHT LIGHT 61...

Страница 385: ...385 RU 9 62 10 6 63 9 10 XBA7 XBA8 Oview...

Страница 386: ...386 RU 10 10 M L BAR a 1 6 20 000 2 3 4 5 11 11 l a l a...

Страница 387: ...50 60Hz V1 120VC 50 60Hz 150 110 110 160 40 50 40 50 1 PS224 SYKCE FLASH 1 LUCYB MLB O MLBT 12 21 LIGHT XBA4 SCA 24 10 XBA7 XBA8 BlueBUS 11 BlueBus 4 EPMB EPLB 2 4 EDSB ETPB 1 FT210B FTA STOP 8 2 STO...

Страница 388: ...10 3 1 a EN 60950 1 2006 A11 2009 A12 2011 A1 2010 A2 2013 3 1 b EN 301 489 1 V2 2 0 2017 EN 301 489 3 V2 1 1 2017 3 2 EN 300 220 2 V3 1 1 2017 II 1 B 2006 42 EC 17 2006 95 16 EC VII B 2006 42 EC 1 1...

Страница 389: ...389 RU...

Страница 390: ...390 RU a a a l 1 2 3 3 2 m m l 1...

Страница 391: ...391 RU 1 A 180 A A 64 2 1 A 2 3 4 U 5 A 6...

Страница 392: ...392 RU m M BAR L9BAR 1 2 3 4 5 6 6 50 000 m 6 50 000 4 3 4 EN 12604 2000 m 2 1 2 3 4 5 6 M7BAR L9BAR 7 8 9 10 20 50 11 EN 12445 12 200 20 1 13...

Страница 393: ...393 RU 22 ___ ___...

Страница 394: ...394...

Страница 395: ...395...

Страница 396: ...www niceforyou com Nice SpA Via Callalta 1 31046 Oderzo TV Italy info niceforyou com IDV0647A02MM_30 11 2018...

Отзывы: