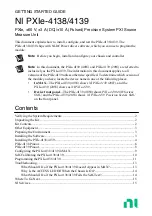
NI PXIe-4138 Скачать руководство пользователя страница 13

Software

Location

Description


NI-DCPower
Instrument Driver

LabVIEW—Available on the LabVIEW
Functions palette at 

Measurement I/O

 »

NI-DCPower

 . Examples are available from

the 

Start

 menu in the 

National

Instruments

 folder.

The NI-DCPower API
configures and operates
the module hardware and
performs basic acquisition
and measurement
functions.

LabVIEW NXG—Available from the
diagram at 

Hardware Interfaces

 »

Electronic Test

 »

NI-DCPower

 . Examples

are available from the 

Learning

 tab in the

Examples

 »

Hardware Input and Output

folder.

LabWindows/CVI—Available at 

Program

Files

 »

IVI Foundation

 »

IVI

 »

Drivers

 »

NI-DCPower

 . LabWindows/CVI examples

are available from the 

Start

 menu in the

National Instruments

 folder.

C/C++—Available at 

Program Files

 »

IVI

Foundation

 »

IVI

 . Refer to the 

Creating an

Application with NI-DCPower in Microsoft
Visual C and C++ 

topic of the 

NI DC

Power Supplies and SMUs Help

 (installed

with the NI-DCPower driver software) to
manually add all required include and
library files to your project. NI-DCPower
does not ship with installed C/C++
examples.

Troubleshooting

If an issue persists after you complete a troubleshooting procedure, contact NI technical
support or visit 

ni.com/support

.

What Should I Do if the PXIe-4138/4139 Doesn't
Appear in MAX?

1.

In the MAX configuration tree, expand 

Devices and Interfaces

.

2.

Expand the 

Chassis

 tree to see the list of installed hardware, and press <F5> to refresh

the list.

3.

If the module is still not listed, power off the system, ensure that all hardware is correctly
installed, and restart the system.

4.

Navigate to the Device Manager.

NI PXIe-4138/4139 Getting Started Guide

  | 

© National Instruments Corporation

  | 

13

Содержание PXIe-4138

Страница 1: ...one of the following places In MAX The PXIe 4139 40W shows NI PXIe 4139 40W and the PXIe 4139 20W shows as NI PXIe 4139 Device front panel The PXIe 4139 40W shows PXIe 4139 40W System SMU and the PXIe...

Страница 2: ...atic package to a metal part of the computer chassis 2 Remove the module from the package and inspect it for loose components or other signs of damage Notice Never touch the exposed pins of connectors...

Страница 3: ...t number 199198 01 NI screwdriver NI part number 781015 01 Visit ni com for more information about these additional items Preparing the Environment Ensure that the environment you are using the PXIe 4...

Страница 4: ...installing the PXIe 4138 4139 The AC power cord grounds the chassis and protects it from electrical damage while you install the PXIe 4138 4139 2 Power off the chassis 3 Inspect the slot pins on the c...

Страница 5: ...Note Tightening the top and bottom mounting screws increases mechanical stability and also electrically connects the front panel to the chassis which can improve the signal quality and electromagnetic...

Страница 6: ...O SENSE LO SENSE HI HI GUARD GUARD ACCESS ACTIVE OUTPUT OUTPUT CAT I C D E F G H I J A B K Table 1 Signal Descriptions Item Description A Access Status LED B Active Status LED C Output LO D Sense LO E...

Страница 7: ...ff Not Powered Green Powered Amber Device is being accessed Table 3 LED Active Status Indicator Status Indicator Output Channel State Off Channel not operating in a programmed state Green Channel oper...

Страница 8: ...CTIVE OUTPUT OUTPUT CAT I C D E F G H I J K A B PXIe 4139 40W System SMU 60 V 3 A 10 A Pulse MAX 150 V MAX to LO SENSE LO SENSE HI HI GUARD GUARD ACCESS ACTIVE OUTPUT OUTPUT CAT I K A B Table 4 Signal...

Страница 9: ...in a programmed state Red Channel disabled because of error such as an overcurrent condition Configuring the PXIe 4138 4139 in MAX Use Measurement Automation Explorer MAX to configure your NI hardwar...

Страница 10: ...he first time you install the PXIe 4138 4139 1 Install the PXIe 4138 4139 and let it warm up for 30 minutes Note Warm up begins when the PXI Express chassis has been powered on and the operating syste...

Страница 11: ...generate signals interactively using InstrumentStudio or you can use the NI DCPower instrument driver to program your device in the supported ADE of your choice NI PXIe 4138 4139 Getting Started Guid...

Страница 12: ...tudio year This launches InstrumentStudio and runs a soft front panel populated with devices detected on your system From Measurement Automation Explorer MAX select a device and then click Test Panels...

Страница 13: ...Files IVI Foundation IVI Refer to the Creating an Application with NI DCPower in Microsoft Visual C and C topic of the NI DC Power Supplies and SMUs Help installed with the NI DCPower driver software...

Страница 14: ...ernal signals only while the PXIe 4138 4139 is powered on Applying external signals while the module is powered off may cause damage 1 Disconnect any signals from the module front panels 2 Power off t...

Страница 15: ...m support Power Supplies Solutions ni com powersupplies Services ni com services NI Community ni com community NI PXIe 4138 Getting Started with LabWindows CVI Getting Started with LabVIEW NI DCPower...

Страница 16: ...and third party legal notices in the readme file for your NI product Refer to the Export Compliance Information at ni com legal export compliance for the NI global trade compliance policy and how to...

Отзывы: