Table 3. Chassis Inhibit Mode: Default (Refer to Inhibit Mode for More
Information) (Continued)
PXIe-1083 Power
Thunderbolt
Connection to Host
Actions Required
To power the PXIe-1083 off Not present
Press the power button
Present
Hot unplug the Thunderbolt cable
Power off the host
Press the power button > 4 s (this
causes a forced shutdown)
Table 4. Chassis Inhibit Mode: Manual (Refer to Inhibit Mode for More Information)
PXIe-1083 Power
Actions Required
To power the PXIe-1083 on
AC on
To power the PXIe-1083 off
AC off
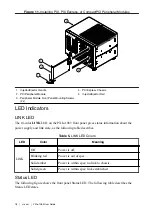
Observe the PXIe-1083 LED status where applicable. A properly connected and powered up
system should report a valid link and power status once the host PC is powered on. Refer to
LED Indicators
for more information.
Installing Peripheral Modules
This section contains general installation instructions for installing a peripheral module in a
PXIe-1083 chassis. Refer to your peripheral module user manual for specific instructions and
warnings. To install a module, complete the following steps:
1.
Connect the AC power source to the PXI Express chassis before installing the module.
The AC power cord grounds the chassis and protects it from electrical damage while you
install the module.
2.
Ensure that the chassis is powered off.
3.
Install a module into a chassis slot by first placing the module card PCB into the front of
the card guides (top and bottom), as shown in the following figure. Slide the module to
the rear of the chassis, making sure that the injector/ejector handle is pushed down, as
shown in the following figure.
4.
When you begin to feel resistance, push up on the injector/ejector handle to fully seat the
module into the chassis frame. Secure the module front panel to the chassis using the
module front-panel mounting screws.
PXIe-1083 User Guide
|
© National Instruments
|
17

