NI AT-FBUS Скачать руководство пользователя страница 9

©

 National Instruments Corporation

9

NI-FBUS Installation Guide for Windows 2000/XP
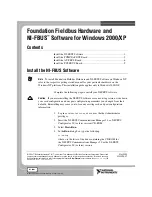
Figure 9.  

Setting Nifb to Automatic 

To view or troubleshoot the hardware resources being used by the 
AT-FBUS boards, select

 Nifb»Properties»Resources

.

Note

You also can start the kernel-mode driver by entering 

net


start


nifb

 at the 

command prompt. This method is especially helpful if you are unable to find 

nifb

 on the 

Show hidden devices

 list. 

If you receive the message 

System error 31 has occurred

, the cause is most likely 

an interrupt or memory address conflict. Set the device to poll mode or change the memory 
address value.

Install the PCI-FBUS Board

Note

Before you install your board, double-check to make sure the settings on your board 

match the resources you have chosen.

1.

Shut down your operating system and power off your computer. Keep 
the computer plugged in so that it remains grounded while you install 
the PCI-FBUS board.

2.

Remove the top cover or access port of the I/O channel.

3.

Remove the expansion slot cover on the back panel of the computer.

4.

As shown in Figure 10, insert the PCI-FBUS board into any unused 
PCI slot with the Fieldbus connector sticking out of the opening on the 
back panel. Make sure all pins are equally far into the connector. 
Although it might be a tight fit, do not force the board into place.

Содержание AT-FBUS

Страница 1: ... FBUS Software on Windows NT refer to the respective getting started manual for your particular hardware on the Windows NT platform This installation guide applies only to Windows 2000 XP Complete the following steps to install your NI FBUS software Caution If you are reinstalling the NI FBUS software over an existing version write down your card configuration and any port configuration parameters...

Страница 2: ...efore you remove the card from the package touch the antistatic plastic package to a metal part of your system chassis to discharge electrostatic energy which can damage several components on your PCMCIA FBUS card Complete the following steps to install the PCMCIA FBUS card 1 Shut down your operating system and power off your system 2 Insert the card into a free PC Card PCMCIA socket The card has ...

Страница 3: ...IA FBUS cable provided Note Although very similar the installation processes for Windows 2000 and Windows XP differ slightly Where those differences occur in the following you see the step for your operating system labeled as either Windows 2000 or Windows XP 4 Power on your computer 5 In Windows 2000 the Found New Hardware wizard appears Click Next to continue In Windows XP a slightly different s...

Страница 4: ...hardware type refer to step 10 Windows XP users see a slightly different screen than what is shown in Figure 2 but make the same selection 8 Choose the appropriate type PCMCIA Fbus is for the one port card and PCMCIA Fbus 2 is for the two port card Click Next 9 To determine if your card is working in the Windows System Tray click the PCMCIA adaptor icon shown inside a box in Figure 3 Figure 3 Syst...

Страница 5: ...igure 4 and click Next Windows XP If you could not find the hardware type National Instruments FieldBus Interfaces in step 7 select Show All Devices in the Hardware Type screen and click Next Figure 4 Finding Other Devices 13 Click Have Disk Click Browse Locate the installation file nifb inf in C WINNT inf as shown in Figure 5 Note Depending upon how you have configured your computer Figure 5 may ...

Страница 6: ...k to Enable 18 Close the Interface Configuration Utility and start the NI FBUS Communications Manager or NI FBUS Configurator Install the AT FBUS Board Note Before you install your board double check to make sure the settings on your board match the resources you have chosen 1 Shut down your operating system and power off your computer Keep the computer plugged in so that it remains grounded while...

Страница 7: ...ard 5 Screw the mounting bracket of the AT FBUS board to the back panel rail of the computer 6 Keep the top cover or access port off until you have verified that your resources are non conflicting This is described in the Set the NI FBUS Software to Use Your NI FBUS Board section of Chapter 2 Installation and Configuration of the Getting Started with Your AT FBUS and the NI FBUS Software manual 7 ...

Страница 8: ...nel mode device driver nifb as shown in Figure 8 Figure 8 Non Plug Play Devices Double click or right click on Nifb and select Properties Select Driver from the properties page Clicking the Start button starts the driver You can now set up the driver to start automatically at system start up by setting the Startup Type to Automatic as shown in Figure 9 ...

Страница 9: ...evice to poll mode or change the memory address value Install the PCI FBUS Board Note Before you install your board double check to make sure the settings on your board match the resources you have chosen 1 Shut down your operating system and power off your computer Keep the computer plugged in so that it remains grounded while you install the PCI FBUS board 2 Remove the top cover or access port o...

Страница 10: ...flicting This is described in the Set the NI FBUS Software to Use Your PCI FBUS Board section of Chapter 2 Installation and Configuration of the Getting Started with Your PCI FBUS and the NI FBUS Software manual 7 Power on your computer 8 Launch the Interface Configuration Utility Find the PCI FBUS board and right click to Enable 9 Close the Interface Configuration Utility and start the NI FBUS Co...

Отзывы: