background image

34

35

IF THE CAR IS FITTED WITH CHILD 
RESTRAINT ANCHORAGE POINT

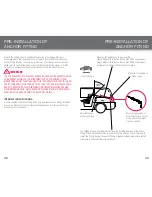
Locate the anchorage point behind the 
rear seating position. (consult the car 
owners handbook for the location of the 
anchorage point). The anchorage point 
should be directly behind and central to 
the restraint. Remove thread plug from 

the parcel shelf/floor/roof, etc. and install 
anchor bolt and fitting as shown in Fig.1.  

CAUTION: DO NOT OVERTIGHTEN ANCHOR 
BOLT. OVERTIGHTENING MAY FRACTURE 
OR BREAK BOLT. MAXIMUM TORQUE IS 20 
N.M.

 (14.75 ft.lb.)

Note: Minimum of five full turns of anchor 

bolt is required before tightening force is 
applied. 

IF THE CAR IS NOT FITTED WITH CHILD 
RESTRAINT ANCHORAGE POINTS
For Sedans only
 - Drill 9mm diameter hole 

in the parcel shelf on the centre line of the 
seating position as shown in Fig.3. Before 
drilling the hole, check the underside for 
accessibility. Install the anchor bolt as shown 
in Fig.2.

For vehicles other than Sedans

 - In 

Australia, consult your nearest child 

restraint  fitting station or traffic authority 
for vehicle inspection to  find the best, 

correct position for the placement of 
the anchorage point, and for the correct 
attachment bolt length and use of spacers. 
In New Zealand, consult the agent for the 
vehicle.

CAR INSTALLATION ACCESSORIES

Available from major child restraint retailers.

EXTRA ANCHOR KITS:

 Available for using the restraint in additional cars.

Safe-n-Sound part no: 0038

EXTENSION STRAPS: May be required for cars without a fixed parcel shelf.
Safe-n-Sound part no: 0035 (length 300mm) or 0036 (length 600mm)

Note to Queensland purchasers: The installation of anchorage points must be 

approved by authorised officers appointed by Queensland Transport. Authorised 
officers can be sourced from all Queensland Transport Customer Service and 

Queensland Ambulance Service Centres.

UPPER ANCHORAGE FITTING

Attachment Bolt
Lock washer

Anchor fitting

Spacer(s) if 
required

Vehicle metal 
structure

Vehicle 
trim

Fig.1.

Attachment Bolt

Anchor fitting

Spacer(s) if 
required

Vehicle metal 
structure

Reinforcing 
washer (cone 
downwards)

Lock washer

Secure nut

UPPER ANCHORAGE 

FITTINGS FOR SEDANS ONLY

Vehicle 
trim

Fig.2.

ONLY USE A 5/16 UNC GRADE 5 BOLT. IF THE 

BOLT IS NOT THE CORRECT LENGTH THE CAR 
MANUFACTURER’S HAND BOOK CAN 
PROVIDE ADVICE ON THE CORRECT LENGTH 
BOLT.

Note: Marking on 

the top of a Grade 5 

Bolt.

Centre line of 
seating position

Fig.3.

Front of Vehicle

Front of Vehicle

CHILD RESTRAINTS MUST NOT BE 
ATTACHED TO UNSOUND METAL OR TO 
WOOD, OR SYNTHETIC STRUCTURES. 
WHEN DRILLING 9 MM HOLE DO NOT 
DRILL THROUGH FUEL LINES, FUEL 
TANKS, ELECTRICAL WIRING, OR RADIO 
SPEAKERS. 
WEBBING STRAPS MUST BE PROTECTED 
FROM SHARP CORNERS AND EDGES. 
THE ANCHOR FITTING MUST BE USED 
ONLY AS DESCRIBED ABOVE. IT MUST 
NOT BE HOOKED ONTO ANY OTHER 
OBJECT. 


200mm 
min

PRE-INSTALLATION OF

ANCHOR FITTING

PRE-INSTALLATION OF 

ANCHOR FITTING 

Содержание 4200/A/2010 Series

Страница 1: ...ers are above the lower shoulder height marker with head restraint in lowest position approximately 4 years of age until child s shoulders reach the upper shoulder height marker with head restraint in...

Страница 2: ...r the child can sit in the car s seat with their lower leg able to hang over the seat cushion This Booster Seat is not designed to be reclined CAREFULLY READ ALL THE INSTRUCTIONS FOR INSTALLATION IN T...

Страница 3: ...NGS AND INSTRUCTIONS Regularly check the restraint components straps and other fitments for correct function cracking condition Seek prompt repair Straps may be damaged by unsecured cargo in a collisi...

Страница 4: ...ger fits move to the next form of child restraint see page 29 When moving from a child restraint with in built harness the child s shoulders will be in line with or above the lowest marker label A wit...

Страница 5: ...ed Cover for Comfort Car Seat Belt Armrest on each side Booster Belt Path Label each side Headrest Adjustment Knob Shoulder Height Markers Shoulder slots for use with Child Harness Seat Belt path labe...

Страница 6: ...lder height marker with the head restraint in the lowest position Just using a seatbelt is not recommended for children that have outgrown this seat Use a larger Booster Seat THIS RESTRAINT MUST BE US...

Страница 7: ...multiple twists from the upper anchorage strap THIS UPPER ANCHORAGE STRAP MUST ALWAYS BE FITTED WHEN THE CHILD RESTRAINT IS USED IN A VEHICLE Pull the Upper Anchorage Adjuster Strap 3 to just remove...

Страница 8: ...s low as possible away from the child Sash Guide USE WITH SEAT BELT 14 15 Sash belt across the chest Ensure lap portion under armrest Red BOOSTER SEATBELT PATH Label Red BOOSTER SEATBELT PATH Label Ad...

Страница 9: ...onto anchor fitting Ensure that none of the straps are twisted and not passing over any sharp edges 1 Attachment Clip from Child Harness 2 VERSATETHER Catch 3 Booster Seat Attachment Clip 4 Anchor Fi...

Страница 10: ...remove slack Attachment Clip attaches to the VERSATETHER Catch 5 6 3 3 7 1 4 7 CHOOSING METHOD OF INSTALLATION The Harness can be installed using either of the following methods Method 1 Using a lap s...

Страница 11: ...nd Attachment Clip through the right hand slot E Then feed the left hand harness strap back through the left hand slot in the Booster Seat cover keeping the attachment clip at the back of the Booster...

Страница 12: ...ound your child If so adjust the gated slide nearer to your child ensure the slide does not touch your child This may provide more belt length to fit your child but if the belt still will not fit try...

Страница 13: ...rap into the Gated Slide followed by the outer strap C Repeat previous step A for the other slot in the Gated Slide B C A D Feed the straps through the Gated Slide to remove any slack Hollow side towa...

Страница 14: ...d Harness Strap 3 Storage strap 4 Cover Pad 5 Right Hand Harness Strap Loop 6 Cross Strap Loop 7 Cross Strap 8 Booster Seat Upper Anchorage Strap 9 Car s Anchor Fitting Pull to remove slack 5 6 3 7 2...

Страница 15: ...nd is a significant safety device for children in a lap only seat belt Refer to the Child Harness instruction book IMPORTANT Use seat belt to hold the child restraint when not in use DO NOT LEAVE CHIL...

Страница 16: ...removable for cleaning Washing and care instructions are on the care label attached to the cover Refer to the following pages for instructions on how to remove and replace the cover Connect the hook...

Страница 17: ...SHELF SINCE THE ANCHOR POINT IS USUALLY NOT VISIBLE IMPORTANT INSTALLATION NOTE In some vehicles the anchor fitting in the rear vertical panel can only be installed in one way Please refer to vehicle...

Страница 18: ...TS Available for using the restraint in additional cars Safe n Sound part no 0038 EXTENSION STRAPS May be required for cars without a fixed parcel shelf Safe n Sound part no 0035 length 300mm or 0036...

Страница 19: ...g the red BOOSTER SEATBELT PATH seat belt path labels 7 Ensure that if you are using a child safety harness that the lap belt is firm on the child s thighs and not on the abdomen Do not tighten the Ch...

Страница 20: ...38 39 NOTES Next Generation Nursery Products Pty Ltd A C N 113 490 949 Australia 6 Thorpe Street Sunshine Victoria 3020 Phone No 1300 363 358 New Zealand Phone No 0508 688 822 CONTACT DETAILS...

Страница 21: ...HER trademarks are the property of Britax Childcare Pty Ltd VERSATETHER Trademark is used by permission of Britax Childcare Pty Ltd This product is covered by Australian and overseas patents and appli...

Отзывы: