Nexsan BEAST Series Скачать руководство пользователя страница 237

Application and Feature Licenses

Clicking

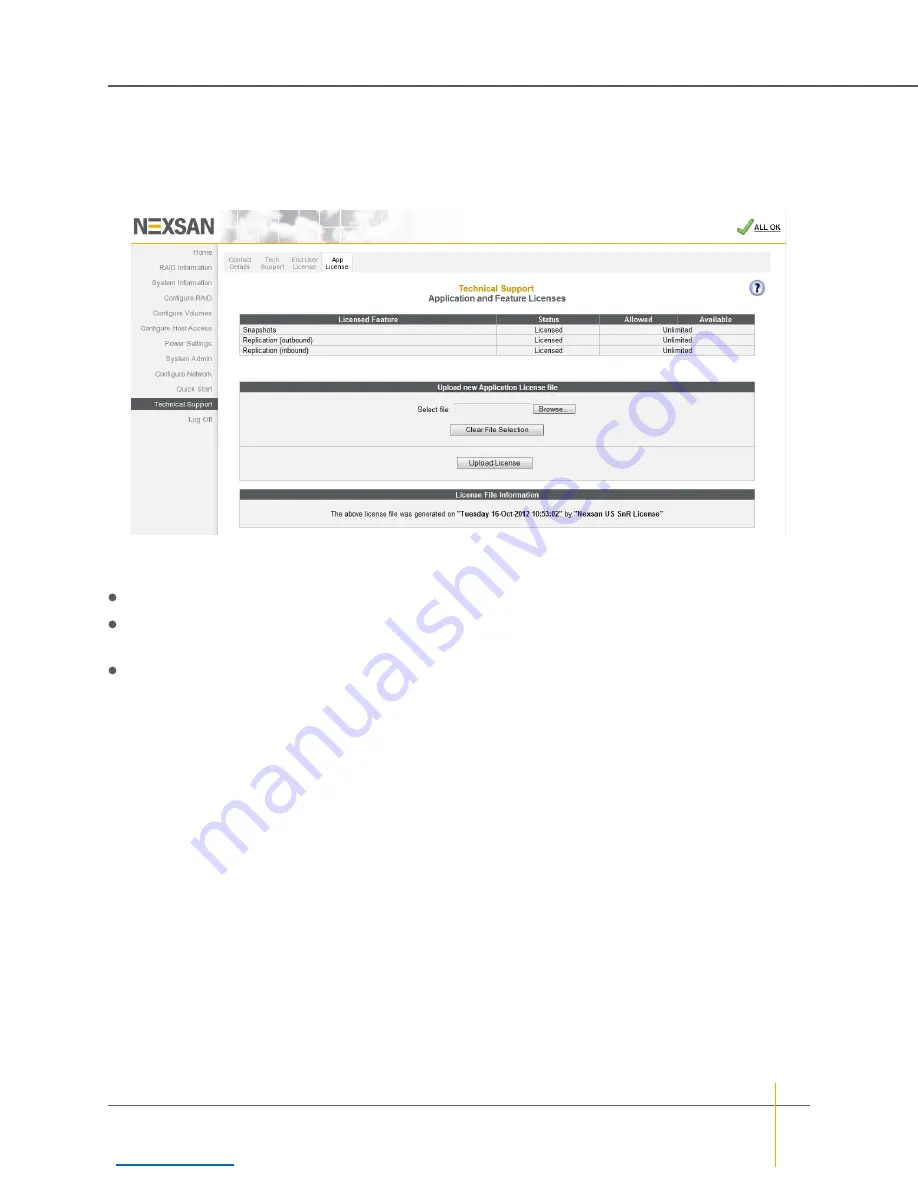
Technical Support > App License

takes you to the

Application and Feature Licenses

page, which

displays licensing details for additional features for Nexsan High-Density Storage units.

Figure 3-173:

Application and Feature Licenses

page

The

Licensed Feature

section displays the license status for

Snapshots

,

Replication (outbound)

, and

Replication (inbound)

.

The

Status

column displays whether this machine is

Licensed

or

Not Licensed

for each feature.

The

Allowed

column displays the number of replications allowed by the license. This can be

None

, a

number, or

Unlimited

.

The

Available

column displays the number of replications still available under the current license. This can

be

None

, a number, or

Unlimited

.

The

Upload new Application License file

section allows you to upload a new license file.

The

License File Information

section displays when and by whom the current license file was generated. This

section is only displayed if a custom license has been installed. Otherwise, it does not appear.

To upload an Application License file:

1. Click the

Browse

button to open the

Choose File to Upload

dialog.

2. Navigate to the location of the new license file, select it, and click

Open

.

Note

If you select the wrong file, you can clear the selection by clicking the

Clear File Selection

button.

Then repeat steps 1 and 2 to select the correct file.

3. Click

Upload License

.

A message appears, indicating that the license file has been uploaded. Click the

Back

button to return to the

Application and Feature License

page.

Note

For detailed information regarding the snapshots and replication features, see the

Nexsan High-Density

Storage Snapshots and Replication User Guide

.

Chapter 3: The Graphical User Interface — Technical Support

Nexsan High-Density Storage
User Guide

www.nexsan.com

237

Содержание BEAST Series

Страница 1: ...NEXSAN HIGH DENSITY STORAGE BEAST and E Series High Density Storage User Guide Part Number P0450147 Rev B NEXSAN 910 E Hamilton Ave Campbell CA 95008 p 1 760 690 1111 www nexsan com...

Страница 2: ...y cause harmful interference to radio communications Operation of this equipment in a residential area is likely to cause harmful interference in which case the user will be required to correct the in...

Страница 3: ...ettings 23 System name 23 Network and E Alert settings 25 Configure Network Settings 25 Configure E Alert Settings 26 Set time and date 28 Set time and date manually 28 Set time and date automatically...

Страница 4: ...atistics 86 Replication Information 87 System Hierarchal View 89 System Information 90 Summary Information 91 Environmental Information 93 Network Information 96 Network Services 98 E Alerts 98 SNMP T...

Страница 5: ...cal Volumes 158 Configure Host Access 162 Configure Fibre 163 Configure SAS 165 Configure 10Ge iSCSI 166 Host authentication 168 Configure 1Ge iSCSI 170 Advanced port settings 173 Host authentication...

Страница 6: ...238 Chapter 4 Troubleshooting 239 Web interface problems 240 Can t connect using my IP address 240 Menus ask for a user name and password 240 Can t access configuration pages even as admin 240 Start u...

Страница 7: ...Storage Provisioning 251 Appendix C RAID levels 252 Appendix D AutoMAID 253 Glossary 254 Nexsan High Density Storage User Guide www nexsan com vii...

Страница 8: ...the command line interface CLI or text that refers to file or directory names is in monospace Text strings that must be entered by the user in the command line interface or in text fields in the grap...

Страница 9: ...ion software support warranty and repair for all Nexsan products A variety of service and support programs are available to provide you with the level of coverage and availability your operation requi...

Страница 10: ...ge Expansion Units FRU Removal and Replacement Guide Nexsan E32 and E18 Form Factor Units Quick Start Guide Nexsan E60 E60V E60VT E60P and Nexsan E48 E48V E48VT E48P RAID Storage Units Installation Gu...

Страница 11: ...e damage to the chassis or to internal components or both Lift the unit ONLY by the bottom edges of the chassis using safe lifting practices Do not install the unit in an enclosed cabinet or other sma...

Страница 12: ...d instructions for creating encrypted arrays on self encrypting disks SEDs to Create a new RAID array on page 41 and Create a New RAID Array on page 115 Updated Array Status Health section of RAID Inf...

Страница 13: ...Updated information about beaconing in Configure Enclosures on page 193 NXS BBES UG Rev 01 April 2014 Changed formatting throughout to reflect Nexsan as an Nexsan brand changed name of document to Ne...

Страница 14: ...page 125 updated enclosure configuration instructions in Configure Enclosures on page 128 updated rebuild priority settings in Configure Rebuild Priority on page 132 updated E Alert settings in E Ale...

Страница 15: ...ide This User Guide covers all of the features that can be accessed through the graphical user interface GUI However because Nexsan High Density Storage systems are shipped preconfigured only the basi...

Страница 16: ...on Linux systems drag the appropriate installer file RPM DEB or tar gz to your hard drive and run it using your application launcher This installation procedure requires that the Nexsan High Density S...

Страница 17: ...n Appendix B Nexsan Storage Tools on page 248 5 Click Next to go to the Ready to Install Nexsan Storage Tools dialog 6 Click Install to begin the installation process This may take a few minutes Once...

Страница 18: ...ccording to the method of your operating system The Nexsan IP Configuration Tool opens If the new Nexsan High Density Storage unit is already attached to the same broadcast network the New RAID system...

Страница 19: ...te In order to use DHCP your network must be configured for DHCP If it is not you MUST use a static IP address 4 Click Apply Changes Note If any items remain orange fill in the necessary information a...

Страница 20: ...address entered c Press Enter or click the browser s Go button The login screen for the unit is displayed Figure 1 6 Nexsan High Density Storage unit login screen Note The login screen varies dependin...

Страница 21: ...indicating that you have agreed to the terms of the EULA Notes In order to access the full functionality of the unit you MUST agree to the terms of the EULA Once you have agreed to the terms of the E...

Страница 22: ...completed or has an unrecommended setting The Quick Start Configuration Checklist is only displayed automatically the first time you log in to a system though it can always be accessed by going to Qu...

Страница 23: ...Series P models running firmware version S011 1300 or later can also use these special characters _ 4 Click Set ADMIN Password A message is displayed informing you that the password has been set 5 Sel...

Страница 24: ...etting you know that the setting has been changed 3 Click the Back button to return to the Quick Start Configuration Checklist Chapter 1 Basic Setup Set up the system Nexsan High Density Storage User...

Страница 25: ...n If the link is up it displays the current link speed and duplex mode setting Make sure that the following settings for the Mgmt port on both controllers are appropriate for your network Port Setting...

Страница 26: ...Click Save Configuration The settings are saved and are applied after the system is restarted see Reboot System on page 194 Click Save and Apply Changes The settings are saved and applied immediately...

Страница 27: ...sh to notify the recipient of by email 10 In the Automatic Status Email options for Recipient N section use the drop down lists to select the Email schedule and Email formatting for automatic status e...

Страница 28: ...mm ss format field Note The time entered in the Current local time in hh mm ss format field will be set when the Save Settings button is clicked Therefore it is suggested that you enter the time round...

Страница 29: ...time server IP address in step 2 and selected Daytime with format in step 3 select the time server time and date format using the drop down list Note If you do not know the format of the time server d...

Страница 30: ...uick Start Note If you have self encrypting disks installed you can enable encryption after array configuration is complete by going to Configure RAID Encrypt Array See Configure Array Encryption on p...

Страница 31: ...nds on the number of disks detected in the unit Number of volumes per array This setting controls whether or not each RAID array will be further divided into two or more smaller volumes The default se...

Страница 32: ...List to return to the Quick Start Configuration Checklist Proceed to Volume Configuration and Access on page 36 Expert Quick Start Note If you have self encrypting disks installed you can enable encry...

Страница 33: ...disks detected in the unit Select RAID level Choose the RAID level that all RAID sets will be configured for You can choose from the following RAID 0 striped RAID 1 1 0 mirrored RAID 4 parity RAID 5...

Страница 34: ...bers LUNs to all available host ports If you wish to change the mapping select one of the following None leave unmapped The LUNs will not be associated with any ports on the unit and will not be avail...

Страница 35: ...r volumes have already been configured on the unit the graphical user interface GUI displays the following warning Figure 1 18 Data erasure warning If you wish to continue click the check box and sele...

Страница 36: ...ap Logical Volumes page Figure 1 19 Map Logical Volumes page Each volume information section lists the volume number current volume name the array the volume belongs to the controller that the array i...

Страница 37: ...It is recommended to leave the Default Access setting as Deny and then grant access to specific hosts as necessary This prevents unconfigured hosts from modifying existing data Select Read to allow r...

Страница 38: ...have finished assigning host access privileges click Apply Changes A message is displayed indicating that the settings have been saved For more information about volumes see Configure Volumes on page...

Страница 39: ...orage system configuration tasks through the graphical user interface GUI This chapter contains the following sections Log in 40 Create a new RAID array 41 Configure volumes on a RAID array 45 Working...

Страница 40: ...lick Here to Login button takes you to the Home page see Home page on page 57 If a USER password has been set up clicking Click Here to Login opens a security dialog similar to the one illustrated bel...

Страница 41: ...ached expansion unit you are first prompted to select which unit the new RAID array will be built on Figure 2 3 Create a New RAID Array enclosure selection page Select the enclosure and click Next to...

Страница 42: ...the box if you want to speed the RAID array creation process This option makes your volumes unavailable until the RAID array creation process is complete 7 The Enable advanced feature support check bo...

Страница 43: ...key once the array has been created 9 Select the check box beneath each available disk that you would like to include in the array You must select a minimum of two disks for RAID 0 or RAID 1 1 0 a mi...

Страница 44: ...cryption button Note If you decide that you do not wish to create an encrypted array click the CANCEL Encryption button 12 You are taken to the Configure Logical Volume page see Configured Logical Vol...

Страница 45: ...ge Figure 2 6 Configure a Logical Volume array selection page 2 Select which RAID array you want to create volumes on by clicking its selection button 3 Click Next to go to the volume creation tool Fi...

Страница 46: ...e snapshots and replication for this volume leave this box checked To disable snapshots for this volume uncheck the box Notes If you disable snapshots for this volume you can enable them later on the...

Страница 47: ...This is the default setting Note It is recommended to leave the Default Access setting as Deny and then grant access to specific hosts as necessary This prevents unconfigured hosts from modifying exis...

Страница 48: ...the Group Default and Default Access settings Select Deny Read or R W to set the access privileges for the specific host Note If at any time you wish to return the Map Logical Volumes page to its init...

Страница 49: ...present Event log entries follow a standard format Figure 2 10 Event log entry format Event number Controller number Event date Event type Port number Event description Table 2 1 Event log entry form...

Страница 50: ...om the last day week or month or show all entries Filter by Importance Show only error events E errors and warnings E W errors warnings and information events E W I or all events E W I S Date Format S...

Страница 51: ...lick System Admin in the left navigation pane then click Update Firmware in the top navigation bar to go to the Update Firmware page Figure 2 11 Update Firmware page 3 Click Browse and navigate to the...

Страница 52: ...as successful a Go to System Information System Info and check that the Firmware revision and Build Loader revision for both controllers are updated b If hosts were shut down or disconnected for the s...

Страница 53: ...The system logs you out and displays the login page again Figure 2 14 Nexsan High Density Storage system login page 2 Close the browser to clear its cache and prevent unauthorized access to the unit...

Страница 54: ...g sections Navigation and status 55 Home page 57 RAID Information 62 System Information 90 Configure RAID 114 Configure Volumes 138 Configure Host Access 162 Power Settings 181 System Administration 1...

Страница 55: ...ity Storage system top navigation bar example These are different for each section of the graphical user interface GUI Status indicator The upper right corner of the GUI displays a unit status indicat...

Страница 56: ...s been lost after the unit has recovered from a failure the indicator displays a red exclamation point next to the ALL OK indicator Click the exclamation point to be taken to the Lost Data Bad Blocks...

Страница 57: ...that the associated component has failed or is indicating a fault Some icons can indicate additional states depending on the component Black text above a Controller icon indicates the controller throu...

Страница 58: ...functioning but is part of a RAID array that is in a critical state see RAID Information on page 62 Disk failed A red icon with a flashing red status bar indicates that the drive has failed Spare adde...

Страница 59: ...ached expansion units the Home page displays a summary diagram of each enclosure with icons for each subsystem If the system has one attached expansion unit the Home page looks like this Figure 3 7 Ne...

Страница 60: ...D arrays are offline or have failed The Management 1Ge iSCSI Host and Exp in or out icons can indicate several states Green indicates that the host port is connected Gray indicates that the host port...

Страница 61: ...te If further problems occur the audible alarm will sound again When an array has been rebuilt following a failure the top of the Home page contains a rebuild statement and the Acknowledge Array Recon...

Страница 62: ...inks to Fibre Channel Information 1Ge Info links to 1Ge iSCSI Information Host Stats links to Host Statistics Volume Replicate links to Replication Information System Nav links to System Hierarchal Vi...

Страница 63: ...name RAID Arrays on page 119 Array number Reference number for the array assigned in order of creation Enclosure Reference number of the unit that houses the disks that make up this array Enclosure 0...

Страница 64: ...ory Indicates whether the cache is enabled its mirroring status its streaming mode and its FUA status Cache size The total size of the cache in megabytes MB Rebuild priority Displays the configured re...

Страница 65: ...being constructed Array critical A status bar alternating amber and red indicates that one or more RAID arrays are in a critical state Array rebuilding A status bar alternating green and amber indicat...

Страница 66: ...ocesses that can be viewed on this page are array construction tuning see Create a New RAID Array on page 115 array reconstruction see Configure Rebuild Options on page 197 disk retirement see Retire...

Страница 67: ...and the total capacity of the volume The volume name can be changed on the Rename Logical Volumes page see Rename Logical Volumes on page 147 If there is room left in the array the total capacity of t...

Страница 68: ...he volume None Read or Read Write Access can be changed on the Host Access page see Configure Host Access on page 162 Volumes are created on the Add Volume page see Create a Logical Volume on page 139...

Страница 69: ...ted to a port with a logical unit number LUN mapping A gray icon on a green background indicates Read Only access but that the host is disconnected or offline Clicking the gray arrow button on the lef...

Страница 70: ...es Used capacity Displays the amount of the total volume capacity that is taken up by data This item is only displayed for arrays that have advanced features enabled see Create a New RAID Array on pag...

Страница 71: ...signated as a spare Array disk functioning normally A green status bar indicates that the drive is functioning and is part of a RAID array see RAID Array Information on page 63 The text below it indic...

Страница 72: ...bar indicates that the drive is locked and cannot be used Locked disks are disks that previously belonged to an encrypted array see Configure Array Encryption on page 120 but that were moved from one...

Страница 73: ...that this can be canceled by either removing the associated disk from the unit or by clicking the Beacon Off button Figure 3 19 Disk Information page with beacon message and Beacon Off button displaye...

Страница 74: ...When you click a disk icon on the Disk Information page or an information icon on the Disk Statistics page see Disk Statistics on page 77 you are taken to the detail page for that particular disk Figu...

Страница 75: ...of array access by attached hosts Write IOs Displays the number of writes executed on the drive because of array access by attached hosts Other IOs Displays the number of disk input output operations...

Страница 76: ...qualified the drive for use in Nexsan High Density Storage systems If the disk is unqualified this row is not displayed Encryption Displays the encryption status of the disk Encrypted Disabled or Not...

Страница 77: ...because of host array access Write indicates the number of times the drive has been written to because of host array access Others indicates the number of times that the drive has been accessed by th...

Страница 78: ...per controller the Fibre Channel Information page looks like this Figure 3 24 Fibre Channel Information page for units with two ports per controller For a system with four Fibre Channel ports per con...

Страница 79: ...Link Speed Shows the current Fibre Channel link speed in gigabits per second Gb s These settings can be configured or changed on the Configure Fibre page see Configure Fibre on page 163 Host connectiv...

Страница 80: ...troller in the system On systems with two SAS ports per controller the SAS Information page looks like this Figure 3 26 SAS Information page for units with two ports per controller On systems with fou...

Страница 81: ...vity is also shown at the bottom of this page The Status column icons can indicate several states Green indicates that the host is connected Gray indicates that the host is not connected or is offline...

Страница 82: ...units with two ports per controller On units with four 10Ge iSCSI ports per controller the 10G iSCSI Information page looks like this Figure 3 29 10Ge iSCSI Information page for units with four ports...

Страница 83: ...icates that the host is on a failed RAID Controller The Host Name column shows the default or user configured name of the host see Manage Hosts on page 177 The Config column shows digest and CHAP auth...

Страница 84: ...nformation page looks like this Figure 3 31 1Ge iSCSI Information page for units with four ports per controller The information is arranged by controller and host port For each the following informati...

Страница 85: ...ost Name column shows the default or user configured name of the host see Manage Hosts on page 177 The Config column shows digest and CHAP authentication settings The Controller columns show which hos...

Страница 86: ...port Write indicates the number of times that a write operation has been performed through the port Others indicates the number of times an RAID Controller initiated I O operation has been performed t...

Страница 87: ...ins the following information The Source Volume Details column displays information for each configured volume on the unit the volume number volume name the Array to which it is assigned the number of...

Страница 88: ...D set is assigned and the total Capacity of the replica The Replication Status section displays the replication Status the Replication partner and the time and date of the Latest recovery point Replic...

Страница 89: ...ys a system information summary see Summary Information on page 91 Array Displays the RAID array information see RAID Array Information on page 63 Progress Displays the progress of any running utiliti...

Страница 90: ...Information Network Services links to Network Services Network Stats links to Network Statistics Problems links to Summary of System Problems Event Log links to Event Log Multi View links to Multiple...

Страница 91: ...n the system Enclosure Type Displays the physical attributes of the system including its U height Host fibre SAS 10Ge iSCSI connection Displays the configuration of the Fibre Channel SAS to Host or 10...

Страница 92: ...mode allows you to upload a main firmware file if the main firmware gets corrupted during upload or if it contains a bug that prevents the normal uploading of new firmware Controller serial number Di...

Страница 93: ...f the screen Click it to be taken to the Environmental Information page for the first expansion unit Figure 3 39 Environmental Information page example For power supply units PSU 0 and PSU 1 the follo...

Страница 94: ...Information Item Contents Temperature The current temperature of the fan tube Power Rails 3V3 12V 12V_1 The voltage of each rail in the fan tube Rear Fan 1 2 The current RPMs of the designated rear t...

Страница 95: ...formation Item Contents Power Module A B The status of power modules A and B in the active drawer Power Pod Internals The status of internal power components in the active drawer Temperatures PCB A B...

Страница 96: ...d by RAID Controller and then by port Figure 3 40 Network Information page with two active 1Ge iSCSI ports Note On some units there are four active 1Ge iSCSI ports On these units the Network Informati...

Страница 97: ...Displays the IP address of the secondary backup DNS server This setting only applies to the management port Mgmt and is not required Hostname Displays the default or user assigned host name of the por...

Страница 98: ...r email address The email address that alerts and statuses are sent from Email Subject format The format for the subject line of sent emails Recipient email address N The email addresses that alerts a...

Страница 99: ...ps The IP address that SNMP traps are sent to One or two IP address can be specified Community string The SNMP password By default this is public Trap version The type of SNMP trap that is sent SNMPv1...

Страница 100: ...for the USER account If a password is required but the default password has not been changed Password is default is displayed GUI mode Indicates the current graphical user interface GUI restrictions...

Страница 101: ...on help Javascript hot tracking Indicates whether JavaScript is being used to highlight lines in tables when the mouse cursor is hovering over them Reduce scrolling by using submenus Indicates whether...

Страница 102: ...page looks like this Figure 3 44 Network Statistics page with four active 1Ge iSCSI ports Regardless of the unit the information provided for each controller and port is as follows Transmitted Packets...

Страница 103: ...oller the 10Ge iSCSI Statistics page looks like this Figure 3 46 10Ge iSCSI Statistics page with four ports Regardless of the unit the information provided for each controller and port is as follows T...

Страница 104: ...cing is listed with a Number indicating its order of occurrence and a Description that gives a summary of the problem and the component that it is related to Clicking the Beacon button causes the LEDs...

Страница 105: ...at Figure 3 50 Event log entry format Event number Controller number Event date Event type Port number Event description Table 3 22 Event log entry format description Item Contents Event number The re...

Страница 106: ...ollers Filter by Date Show events from the last day week or month or show all entries Filter by Importance Show only error events E errors and warnings E W errors warnings and information events E W I...

Страница 107: ...link on the Event Log page displays a text based summary of the current system configuration Figure 3 51 Event Log general configuration page Chapter 3 The Graphical User Interface System Information...

Страница 108: ...t Access link displays a text based volume mapping and host access summary Figure 3 52 Event Log volume and host access summary page Chapter 3 The Graphical User Interface System Information Nexsan Hi...

Страница 109: ...onfiguration link displays a text based summary of disk information Figure 3 53 Event Log disk configuration summary page Chapter 3 The Graphical User Interface System Information Nexsan High Density...

Страница 110: ...lication User Guide Figure 3 54 Event Log replication configuration summary page Download Event Log Files You can download the Event Log General Configuration Volumes Host Access and Disk Information...

Страница 111: ...nter an IP address range in the From IP address and To IP address fields and click the Scan A Range button You can scan the entire subnet for Nexsan High Density Storage units by clicking the Scan The...

Страница 112: ...ge Alternatively you can right click the Click here to display the multiple view page link and select Save Target As or Save Link As to save the HTML summary to your computer The multiple view page sh...

Страница 113: ...which displays a legend of the various icons used throughout the Nexsan High Density Storage system s graphical user interface GUI Figure 3 58 Key page Chapter 3 The Graphical User Interface System In...

Страница 114: ...Arrays Encrypt Array links to Configure Array Encryption Delete Array links to Delete a RAID Array Array Owner links to RAID Array Ownership Add Spare links to Add Hot Spare Delete Spare links to Dele...

Страница 115: ...be taken to the array creation tool Once you have selected the desired enclosure or if your Nexsan storage system is a single unit the array creation tool is displayed Figure 3 61 Create a New RAID Ar...

Страница 116: ...NEVER be able to use advanced features such as snapshots and replication Even if you don t think you want to use these features now if there is any chance that you may want to in the future leave Enab...

Страница 117: ...or RAID 5 or a minimum of four disks for RAID 6 Note There is a section below the Create RAID Set button that allows you to select a section of disks all at once Click the check box next to Disk N th...

Страница 118: ...ption button Note If you decide that you do not wish to create an encrypted array click the CANCEL Encryption button 11 You are taken to the Configure Logical Volume page see Configured Logical Volume...

Страница 119: ...ormation on these items see RAID Array Information on page 63 To rename one or more arrays 1 Enter the new name into the field to the right of the icon for the array Notes If you leave one or more ent...

Страница 120: ...tion key Neither encrypting nor decrypting an array alters the data in the array in any way nor do they require any system down time Figure 3 64 Configure Array Encryption selection page Each array li...

Страница 121: ...t Encryption Key button to save the encryption key to a dat file on your hard drive Note When the encryption key for an encrypted array is changed previous encryption keys cannot be used to restore ac...

Страница 122: ...2 Check the confirmation check box then click Confirm Decryption A message is displayed letting you know that the array has been decrypted Note If you change your mind about decrypting the array click...

Страница 123: ...ion Key button to create a backup The file is saved according to your browser s usual method To change the encryption key encrypted arrays only 1 Click the Change Encryption Key button The confirmatio...

Страница 124: ...unlocks them To delete an array 1 Select the array you wish to delete by clicking the button next to the array icon 2 Click Delete RAID Array A confirmation page is displayed asking you to confirm tha...

Страница 125: ...s see RAID Array Information on page 63 Each section also displays Controller N selection buttons The selected button indicates which controller the array is currently assigned to To assign an array t...

Страница 126: ...t you are first prompted to select which unit the new spare is in Figure 3 71 Add Hot Spare enclosure selection page Select the enclosure and click Next to be taken to the Add Hot Spare tool Once you...

Страница 127: ...s displayed informing you that the new Pool Spares have been added Click the Back button to return to the Add Hot Spare page To designate an unused disk as a Dedicated Spare 1 Next to Add spare disk s...

Страница 128: ...mpted to select which unit the spare is in Figure 3 73 Delete Hot Spare enclosure selection page Select the enclosure and click Next to be taken to the Delete Hot Spares tool Once you have selected th...

Страница 129: ...to return to the unused state Note If at any time you wish to return the Delete Hot Spare page to its initial state click Reset 2 Click Delete Hot Spare A message is displayed informing you that the s...

Страница 130: ...ecrypt the user data on the disk Reading or writing to the disk requires the exported encryption key The Disk retirement setting on the Configure Rebuild Options page see Configure Rebuild Options on...

Страница 131: ...t click the CANCEL Retire button A message is displayed stating that the operation has been canceled Click the Back button to return to the Retire Disk page To retire the disk click the confirmation c...

Страница 132: ...ol spares Inserted disks must be manually configured as hot spares When this setting is active new disk drives are configured as unused disks which are available for use in a RAID array or as either p...

Страница 133: ...d rebuild it using mirrored data for RAID 1 or 10 or parity data for RAID 4 5 or 6 Note If bad data blocks occur on arrays configured as RAID 0 Surface scan will not be able to rebuild the data Parity...

Страница 134: ...informing you that the settings have been updated Click the Back button to return to the Home page When a verification utility is running you can check its progress on the RAID Array Utility Progress...

Страница 135: ...have the unit pause any verification that is in progress during times when the extra I O and CPU load would be undesirable 4 If Disable Verify during critical hours is checked use the Critical hours d...

Страница 136: ...ocks page with no error message When there is a lost data warning the Lost Data Bad Blocks page looks like this Figure 3 82 Lost Data Bad Blocks page with bad data blocks message Click the Acknowledge...

Страница 137: ...ton to return to the Acknowledge Rebuild page Note RAID array reconstruction warnings also appear on the Home page and can be acknowledged from there see Home page on page 57 The Require Rebuild Ackno...

Страница 138: ...inks to Create a Logical Volume Expand Volume links to Expand a Logical Volume Delete Volume links to Delete a Logical Volume Rename Volume links to Rename Logical Volumes Map Volume links to Map Logi...

Страница 139: ...e array selection page Select which RAID array you want to create volumes on by clicking its selection button then click Next to go to the volume creation tool If the selected array has no volumes on...

Страница 140: ...ce The value of this field defaults to all of the remaining space left on the array The units defaults to true gigabytes GB but this can be changed using the unit type selection buttons and Change Uni...

Страница 141: ...exsan High Density Storage Snapshots and Replication User Guide Reserve for snapshots X to one decimal place When Enable snapshots is checked the value of this field defaults to approximately 25 of th...

Страница 142: ...f Use Default is checked this setting is the same as Default Access This is the default setting If Use Default is unchecked this setting overrides the Default Access setting You can select Deny Read o...

Страница 143: ...3 91 Message indicating no free space on array Each volume s information section lists the volume ID array name volume name volume capacity the percentage of the array that the volume uses the number...

Страница 144: ...age is displayed stating that the operation has been canceled Click the Back button to return to the Expand a Logical Volume page To proceed with the volume expansion check the confirmation check box...

Страница 145: ...rmation If there is free space on the array this section displays the total amount of space taken up by existing volumes plus the percentage of the array s total capacity used Each volume s informatio...

Страница 146: ...sage is displayed stating that the operation has been canceled Click the Back button to return to the Delete a Logical Volume page To delete the volume click the confirmation check box and then click...

Страница 147: ...port assignments see Configured Logical Volumes on page 67 To change the name of a volume 1 Enter the new volume name in the New Name field default is the current volume name Note If at any time you...

Страница 148: ...the array is assigned to the enclosure if there is more than one the volume s capacity and the volume s host port assignments see Configure volumes on a RAID array on page 45 To map a volume to a logi...

Страница 149: ...f Use Default is checked this setting is the same as Default Access This is the default setting If Use Default is unchecked this setting overrides the Default Access setting You can select Deny Read o...

Страница 150: ...pshots page See Application and Feature Licenses on page 237 For detailed instructions on how to configure create and manage snapshots see the Nexsan High Density Storage Snapshots and Replication Use...

Страница 151: ...ing snapshots and the amount of space available for additional snapshots Note If a valid snapshot and replication license is not installed on the storage system the message A snapshot license must be...

Страница 152: ...host s internal cache and not written to the RAID array which may cause data to become corrupted For this reason it is strongly recommended that all host I O be halted when taking a volume snapshot th...

Страница 153: ...ication license to use replication features See Application and Feature Licenses on page 237 For detailed instructions on how to configure create and manage replication between Nexsan storage units se...

Страница 154: ...nfigure Replication page for outbound replication The Outbound Replication Details section displays the following information Table 3 23 Outbound Replication Details Item Contents Volume name The user...

Страница 155: ...s replication Pause When a replication is in progress clicking Pause pauses the replication Resume When a replication is paused clicking Resume resumes the replication Abort When a replication is runn...

Страница 156: ...ler which controls that array and the enclosure where the replica resides Capacity Displays the total data storage space of the replica in terabytes TB and binary gigabytes GiB Current status Displays...

Страница 157: ...eplica name Snapshot Reservation and Replication partner For instructions on how to configure replication see the Nexsan High Density Storage Snapshots and Replication User Guide The Manage Replicatio...

Страница 158: ...rray s total capacity used Note If there is no space on the array the array information section looks like this Figure 3 107 Message indicating no free space on array Each volume s information section...

Страница 159: ...e Migrate page 2 In the Select Destination array section click the selection button for the array that you want to send the volume to 3 Click Migrate Volume A confirmation screen is displayed Figure 3...

Страница 160: ...ation check box and click Confirm Migration A message is displayed saying that the volume migration has started 5 If you selected Confirm Migration in the previous step click the Back button to see th...

Страница 161: ...ed stating that the operation has been canceled Click the Back button to return to the Migrate Logical Volume page To abort the volume migration check the confirmation check box and click Confirm Abor...

Страница 162: ...nks to Configure 1Ge iSCSI Groups links to Manage Host Groups Hosts links to Manage Hosts Access links to Host Access On units configured for SAS to Host the Fibre tab is replaced by a SAS tab which l...

Страница 163: ...like this Figure 3 116 Configure Fibre page four ports per controller The information is arranged by Controller and then by host port The Current Status row shows the link status speed and topology To...

Страница 164: ...ng a full fabric topology or if RSCN notification is disabled Select Yes if you are using a full fabric topology with RSCN notification Note If at any time you wish to return the Configure Fibre page...

Страница 165: ...port link speed drop down list select the maximum link speed for the host connection 1 5Gbps 3Gbps 6Gbps 12Gbps or AUTO the default Note The available link speed options may vary by model Notes Select...

Страница 166: ...ost Access takes you to the Configure 10Ge iSCSI page On systems with two 10Ge iSCSI ports per controller the Configure 10Ge iSCSI page looks like this Figure 3 119 Configure 10Ge iSCSI page two ports...

Страница 167: ...For Assign IP address select either Use DHCP Dynamic Host Configuration Protocol the default or Use Static IP If you select Use DHCP then no other configuration is needed Note In order to use DHCP you...

Страница 168: ...check the Allow Access check box to either permit or prevent access to the system from this host This box is checked by default Note If at any time you wish to return the Host Name section to its init...

Страница 169: ...unique secrets enter a Unique target secret and a Unique host secret Each must be 12 32 characters long The same host and target secrets must also be configured on the host interface prior to iSCSI lo...

Страница 170: ...iSCSI The tools on this page differ depending on what kind of unit you are connected to On Nexsan units with two active ports per controller the Configure 1Ge iSCSI page looks like this Figure 3 121...

Страница 171: ...possible selections are Auto Speed Auto Duplex the default Auto Speed Fixed Full Duplex Auto Speed Fixed Half Duplex Fixed to 1Gbit Full Duplex Fixed to 100Mbit Full Duplex Fixed to 100Mbit Half Duple...

Страница 172: ...the network plus an entry for Default host access If a host s name is black the host is online If a host s name is gray the host is offline Only the settings of offline hosts and for Default can be ch...

Страница 173: ...g and adjustment in order to achieve better throughput on higher latency network links Enable TCP Receive Window Enables connections on this port to advertise TCP Transmission Window scaling and adjus...

Страница 174: ...secret mode Use default host secrets or Use host unique secrets If you select Use host unique secrets enter a Unique target secret and a Unique host secret Each must be 12 32 characters long The same...

Страница 175: ...mmon access rights Figure 3 124 Manage Groups page To add a group 1 Click the Add Group button The new group is displayed as a new line in the group list Figure 3 125 Manage Groups group list page 2 U...

Страница 176: ...e check box Note If at any time you wish to return the Manage Groups page to its initial state click Reset 3 Click Apply changes A message is displayed informing you that the host group settings have...

Страница 177: ...dited to give the host a friendly name To change the name of a host 1 Enter the desired name in the Host Name field 2 Click Apply changes The Remove check box can be checked to remove unconnected host...

Страница 178: ...tus whether online or offline and the port ID and the Connection that it is liked to The host s group membership can be changed in the Group Membership secdtion To change a host s group membership 1 S...

Страница 179: ...group and then any hosts that are not in a group Each Access link takes you to the host access configuration page for that host or category If you click the Access link for Default Access or for Group...

Страница 180: ...R W access 2 For each listed Volume check Manage to allow this host to send in band SCSI NMP commands to the target ports that it is mapped to Uncheck it to have the target ports ignore NMP commands s...

Страница 181: ...he navigation bar across the top contains links to this section s subpages Figure 3 132 Power Settings navigation bar AutoMAID Stats links to AutoMAID Statistics AutoMAID Config links to Configure Aut...

Страница 182: ...This list can include names of arrays that no longer exist but did exist at any time during the reporting period Time at MAID Level The percentage of time during the reporting period that the drives i...

Страница 183: ...e percentage of maximum power efficiency that the drives in each array or category have achieved If all drives were Off for the entire reporting period this number is 100 Note An AutoMAID Efficiency p...

Страница 184: ...Settings and AutoMAID 5 Settings Default RAID Array AutoMAID Settings Default RAID Array AutoMAID Settings controls the default AutoMAID settings for all disk drives assigned as array members or dedic...

Страница 185: ...anagement application should be set to a default of between 120 and 150 seconds to avoid the host requests timing out before the disk drives can power on and spin up to full speed 2 Click Save Level 1...

Страница 186: ...e for a specific RAID array Choose the settings in this section exactly as you would in the Default RAID Array AutoMAID Settings section then click Save Current Settings A message is displayed informi...

Страница 187: ...message All levels compatible if all disks in the enclosure are configured to go to AutoMAID level 4 It displays the message Incompatible AutoMAID levels if any disks in the enclosure are not configur...

Страница 188: ...e Cache Alarm links to Audible Alarm Enclosure Config links to Configure Enclosures Reboot links to Reboot System Rebuild Config links to Configure Rebuild Options System Mode not in E60P E48P links t...

Страница 189: ...to take effect Using this check box you can force the cache to become Enabled if it is disabled or Disabled if it is enabled without rebooting the system Desired write cache state By default this is...

Страница 190: ...e settings Random access This setting is best for systems that access a large number of files or many different areas of its volumes such as systems with many individual users or that house frequently...

Страница 191: ...CSI third party copy extensions requires reboot Note If you change this setting you will need to reboot the system after clicking the Save Settings button See Reboot System on page 194 9 Select the Ca...

Страница 192: ...m is present see Summary of System Problems on page 104 Audible alarms can be turned off entirely in the Audible Alarm Settings section This may be useful if for instance the unit is installed in an e...

Страница 193: ...front of the unit and the SAS expansion port LEDs on the back of the unit to flash for one minute This can help in locating a specific unit in a large installation where multiple Nexsan High Density S...

Страница 194: ...Update Firmware on page 205 and the system must be in a mode that supports controller failover Active Active or All Ports All LUNs see System Mode on page 198 If one or more of these conditions is not...

Страница 195: ...return to the Reboot System page Note While a rolling restart or reboot operation is in progress the system status icon may indicate a FAILURE The FAILURE message will clear once the system is fully r...

Страница 196: ...rrays is passed to the other RAID Controller if the unit has two controllers and is in an Active Active or All Ports All LUNs mode see System Mode on page 198 Click the Back button to be returned to t...

Страница 197: ...ituation it may become necessary to increase the rebuild priority so that arrays are rebuilt more quickly The Disk retirement scheme drop down list contains three options Copy disks which copies a ret...

Страница 198: ...n the write cache may be lost if a RAID Controller fails Note If the System Mode is changed volumes may become temporarily inaccessible If this occurs you must remap them see Map Logical Volumes on pa...

Страница 199: ...t sees the storage become active through its second path Notes For failover to occur hosts to be connected to both ports on their owning controller and to the secondary port on the other controller If...

Страница 200: ...System Admin Reboot and perform a System Reboot see Reboot System on page 194 Notes If the System Mode is changed volume mappings may also change Always check the volume mappings see Configured Logic...

Страница 201: ...r settings link 2 Save the file to your computer according to the method of your operating system To upload a new settings dat file to the system CAUTION Because improper or incorrect settings in the...

Страница 202: ...own in red text Figure 3 145 Settings file processing report 4 If there are errors fix them in the settings dat file and repeat steps 1 3 5 Click Upload and Install Settings The settings dat file is a...

Страница 203: ...ile for the array that was exported previously ii Open the encryption key file as a text file iii Verify that the array name and generation date are correct for the array to be restored 2 Verify the e...

Страница 204: ...ed Repeat this procedure for each of the encryption keys 5 Reboot the system see Reboot System on page 194 Chapter 3 The Graphical User Interface System Administration Nexsan High Density Storage User...

Страница 205: ...st be extracted before uploading To upload new firmware to a unit do the following 1 Ensure that both RAID Controllers on the unit are up and running if applicable 2 Click Browse and navigate to the e...

Страница 206: ...ful a Go to System Information System Info and check that the Firmware revision and Build Loader revision for both controllers are updated b If hosts were shut down or disconnected for the system rebo...

Страница 207: ...ect single dual controller mode E60P and E48P only This will cause the device to redetect the number of controllers and set the appropriate system mode Clear expansion chassis identities and settings...

Страница 208: ...ating that the operation has been canceled Click the Back button to return to the Reset to factory defaults page To proceed with the factory reset check the confirmation check box and click Confirm Af...

Страница 209: ...3 152 Configure Network navigation bar Network Settings links to Configure Network Settings E Alert links to E Alert Settings SNMP Syslog links to SNMP SYSLOG Settings Date Time links to Configure ti...

Страница 210: ...re the following settings Port Settings For most networks the default setting of Auto Speed Auto Duplex is recommended However if your LAN switch doesn t support auto negotiation you can force one or...

Страница 211: ...page or use a time server see Configure time and date on page 216 you may also need to fill in values for Gateway Primary DNS and Secondary DNS Note If at any time you wish to return the Configure Ne...

Страница 212: ...riendlyName Model SysID S A Event Populates the subject line with the unit s friendly name the unit model the system ID abbreviated forms of the enclosure and alert type and a short description of the...

Страница 213: ...ion click the Configure link next to a recipient This takes you to the Configure E Alert Recipient page Figure 3 155 Configure E Alert Recipient page 7 Enter a valid email address in the Email address...

Страница 214: ...N field One or two IP address can be specified The default is Not Configured 2 Enter the SNMP Network Management Server password into the Community string field By default this is public 3 For Trap v...

Страница 215: ...end SYSLOG messages for errors only Send SYSLOG messages for warnings and errors Send SYSLOG messages for information warnings and errors and Send SYSLOG messages for all events Note If at any time yo...

Страница 216: ...s format field will be set when the Save Settings button is clicked Therefore it is suggested that you enter the time rounded to the next five minute mark then click Save Settings when the entered tim...

Страница 217: ...er IP address in step 2 and selected Daytime with format in step 3 select the time server time and date format using the drop down list Note If you do not know the format of the time server data click...

Страница 218: ...quired the default to disable password protected login Select Required to enable password protected login Login user name is fixed to Displays the account user name ADMIN or USER Current Password Ente...

Страница 219: ...ires compatible storage management software such as the Nexsan Storage Tools provisioning application see Appendix B Nexsan Storage Tools on page 248 to be installed on the host This section displays...

Страница 220: ...ficate list to avoid certificate errors when connecting via HTTPS SSL mode The type of browser connection allowed by the RAID system There are three options HTTP only the default Disables SSL or HTTPS...

Страница 221: ...iles for the Certificate and Key by clicking Browse and navigating to the files according to the method of your operating system CA certificate and SSL key files must be in PEM or DER format Use uploa...

Страница 222: ...on is enabled by default When enabled this option causes lines in certain tables to be highlighted when the mouse cursor is over them Disable this option to not highlight table lines with the mouse cu...

Страница 223: ...y refreshed with updated information from the unit Disable this option to stop pages from automatically refreshing Change the number in the Auto refresh time field to make automatic page refresh happe...

Страница 224: ...ion bar across the top contains links to this section s subpages Figure 3 161 Quick Start navigation bar Basic links to Basic Quick Start Expert links to Expert Quick Start Check List links to Quick S...

Страница 225: ...rray configuration is complete by going to Configure RAID Encrypt Array See Configure Array Encryption on page 120 Arrays are limited to the disks physically contained in a single Nexsan High Density...

Страница 226: ...the number of disks detected in the unit Number of volumes per array This setting controls whether or not each RAID array will be further divided into two or more smaller volumes The default setting...

Страница 227: ...If you wish to continue click the check box and select Confirm Quickstart Configure If you do not wish to continue click CANCEL Quickstart Note The Quick Start operation may take as much as several h...

Страница 228: ...disks installed you can enable encryption after array configuration is complete by going to Configure RAID Encrypt Array See Configure Array Encryption on page 120 Arrays are limited to the disks phys...

Страница 229: ...detected in the unit Select RAID level Choose the RAID level that all RAID sets will be configured for You can choose from the following RAID 0 striped RAID 1 1 0 mirrored RAID 4 parity RAID 5 rotati...

Страница 230: ...UNs to all available host ports If you wish to change the mapping select one of the following None leave unmapped The LUNs will not be associated with any ports on the unit and will not be available t...

Страница 231: ...check box then click the Quickstart button CAUTION If any arrays or volumes have already been configured on the unit the graphical user interface GUI displays the following warning Figure 3 167 Data e...

Страница 232: ...ure Network Settings on page 210 Time and Date see Configure time and date on page 216 Array Configuration see Array Configuration on page 30 or Configure RAID on page 114 Volume Configuration and Acc...

Страница 233: ...to this section s subpages Figure 3 169 Technical Support navigation bar Contact Details links to Contact Information Tech Support links to Technical Support Email Form End User License links to End...

Страница 234: ...numbers for contacting Nexsan Technical Support If your network settings see Network Information on page 96 and E Alert settings see Network Services on page 98 allow the unit to send email directly...

Страница 235: ...il is sent along with a system diagnostic report to help Nexsan Technical Support understand your issue If you make errors click Clear Form to erase all data in the form You can then re enter it If th...

Страница 236: ...License Agreement page Figure 3 172 End User License Agreement You must accept the EULA the first time you log into the unit see Accept the End User License Agreement EULA on page 19 Chapter 3 The Gra...

Страница 237: ...pload a new license file The License File Information section displays when and by whom the current license file was generated This section is only displayed if a custom license has been installed Oth...

Страница 238: ...age prompting you to close down your browser Do one of the following Log back in to resume your work see Log in on page 40 Close the browser to clear its cache and prevent unauthorized access to the u...

Страница 239: ...nsity Storage system users If you do not find your issue in this chapter refer to Technical Support on page 233 for ways of contacting a service representative for assistance This chapter contains the...

Страница 240: ...ration Tool see Appendix B Nexsan Storage Tools on page 248 Both tools automatically detect all Nexsan High Density Storage units on the same subnet 3 If you are using DHCP make certain that the DHCP...

Страница 241: ...tings on page 212 check the inbox of a recipient s email account If there is a problem an E Alert provides a clear explanation of any problems 2 Log in to the graphical user interface GUI for the unit...

Страница 242: ...DO NOT REMOVE THE FAILED PSU until the new PSU has arrived and is ready to be installed Removing a PSU reduces air flow and cooling and can result in the system overheating 3 Once the new PSU has arr...

Страница 243: ...eys upload the keys using the Upload System Settings function See Download Upload System Settings on page 201 2 If the disks cannot be unlocked Contact Nexsan Technical Support see Contact Information...

Страница 244: ...itional ways to set up the IP address of your Nexsan High Density Storage system This appendix contains the following sections Add a route to access the desired IP address 245 Use the serial port to c...

Страница 245: ...ess route 1 At the command prompt enter the information according to your OS Windows route add 10 11 12 13 mask 255 255 255 255 workstationIPaddress Linux sbin route add 10 11 12 13 32 gw workstationI...

Страница 246: ...e serial cable to the Nexsan Storage Tools unit s serial port 3 Open the terminal emulation program and set up a new connection It should be 115 200 bits per second 8 data bits 1 stop bit no parity bi...

Страница 247: ...e IP address Figure A 3 Network IP address field 8 Press Enter The new IP address is saved 9 Navigate to Apply new settings and press Enter Appendix A Alternate IP configuration Use the serial port to...

Страница 248: ...and Windows Server 2008 2012 2012 R2 all versions Macintosh OSX 10 5 to 10 11 Linux 1 3 5 Note Not all tools are available on all platforms There are six tools in the suite described in the following...

Страница 249: ...area network LAN and displays them in the RAID Systems section along with their status and IP address The left hand pane provides a tree view allowing RAID systems to be organized into folders and Fav...

Страница 250: ...olume on the Properties dialog in Disk Management under Computer Management Storage Computer Management Extension Integrates the High Density Storage Console under Computer Management Storage for conv...

Страница 251: ...vent of problems on the storage area network SAN For details see the Nexsan High Density Storage Multipathing Best Practices Guide Storage Provisioning Nexsan Storage Provisioning allows you to create...

Страница 252: ...n even number of drives minimum of four is selected for a RAID 1 array RAID 4 RAID level 4 provides block level striping similar to RAID level 0 but with a dedicated parity disk If a data disk fails t...

Страница 253: ...avings AutoMAID Level 2 At AutoMAID level 2 the read write heads of the disk drives remain parked and disk rotation slows down If access to the disk is requested when it is at AutoMAID level 2 the dis...

Страница 254: ...ary port on the failed controller allowing host I O to continue see failover the host sees the storage become active through its second path A active drawer A slide out container on the front of Nexsa...

Страница 255: ...ned to the back of one Nexsan main storage unit DAS See direct attached storage DAT The file format of text based event logs downloaded from Nexsan storage units and of snapshot and replication licens...

Страница 256: ...multaneously For example telephones and videoconferencing systems use full duplex communication E E Series The series of Nexsan units that includes the Nexsan E18 E48 and E60 storage units and their V...

Страница 257: ...F failover The capability of a system to switch over automatically to a redundant or standby system upon the failure or abnormal termination of the previously active system In Nexsan storage systems f...

Страница 258: ...nterface frame A data packet on an Ethernet or Fiber Channel link Each frame encapsulates a piece of data with sender and destination information along with a data integrity check routine Normal frame...

Страница 259: ...wap hot swap To replace a failed or faulty component of a computerized system while the system is running See also hot plug hot spare See spare disk HTTP HyperText Transfer Protocol A networking proto...

Страница 260: ...ical network segment MAC addresses are most often assigned by the manufacturer of a network interface device and are stored in its hardware read only memory ROM or some other firmware mechanism MAID M...

Страница 261: ...volume and thus could treat them as different volumes MultiSan IO MSIO One of six Nexsan Storage Tools Allows Nexsan storage systems to load share over multiple host links using a load balance policy...

Страница 262: ...s can be built using any combination of striping mirroring and parity The levels are numbered from 0 through 6 Some RAID levels can also be combined and these configurations are usually referred to wi...

Страница 263: ...ovide information about the Nexsan storage system associated with a particular disk drive Single Controller Mode A system mode for Nexsan storage systems In this mode only one RAID controller is activ...

Страница 264: ...idth The storage capacity of a data stripe see data striping across all disks in an RAID It is calculated by multiplying the stripe size by the number of disks that contain data that is neither mirror...

Страница 265: ...nications endpoint Identified by its number and the IP address with which it is associated V VDS Storage Provisioning One of six Nexsan Storage Tools Allows users to create and manage storage volumes...

Страница 266: ...or more files that are compressed to reduce their size and typically ends in zip Glossary Nexsan High Density Storage User Guide www nexsan com 266...

Страница 267: ...orldwide 1 760 690 1111 Support E mail support nexsan com Sales E mail sales nexsan com Copyright 2010 2016 Nexsan All Rights Reserved Nexsan and the Nexsan logo are trademarks or registered trademark...

Отзывы: