Nexland Pro: Installation
Nexland Pro: Installation
For Dynamic IP DHCP Internet Accounts
(most Cable ISPs, some DSL)
Note:
See PPPoE on the Next Page for that Type of Account
WaveBase & Wireless Enabled Units
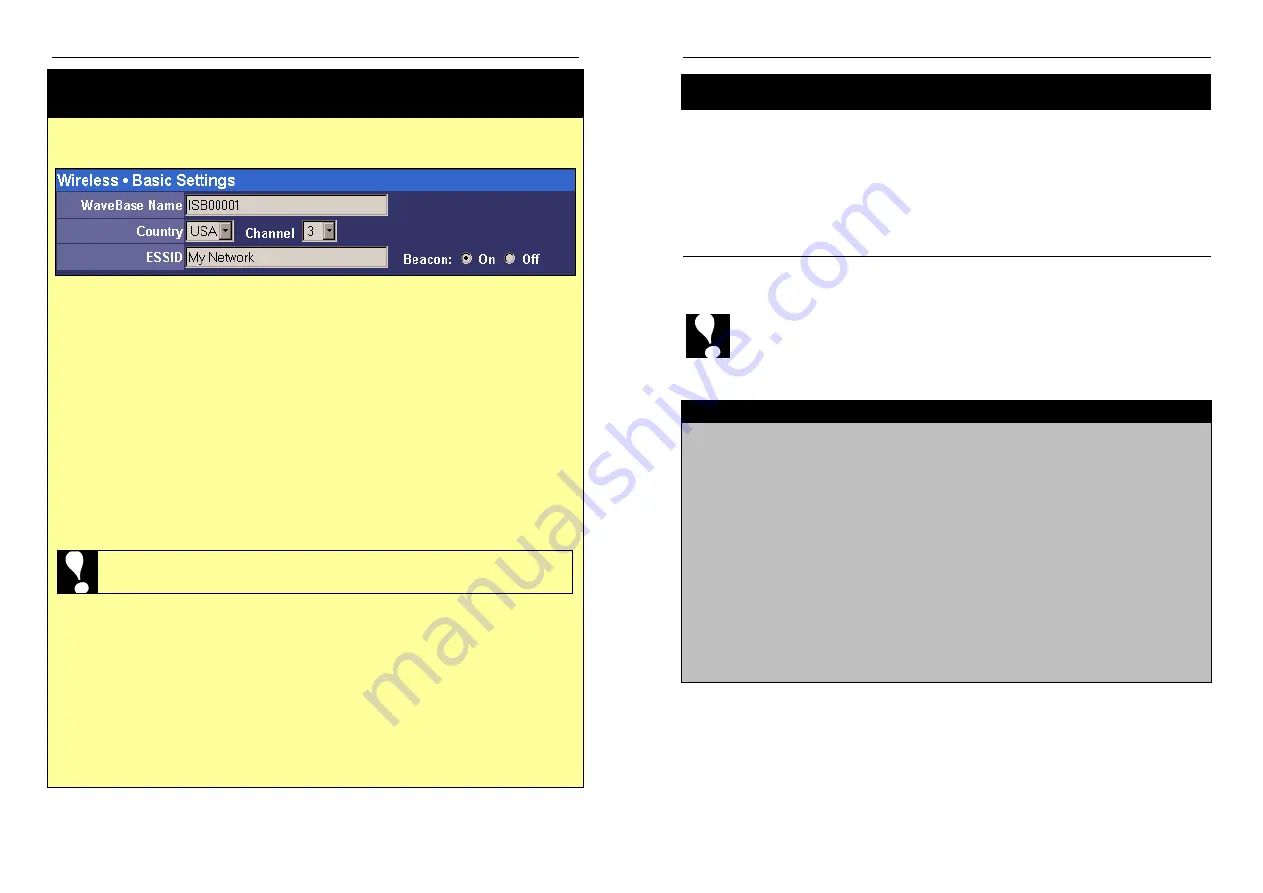
The WaveBase has additional setup fields for Access Point Name, Country, Channel
and ESSID on the Main Setup screen.
WaveBase Name
shows up on Site Scans as an Identifier (usually referred to as “AP
Name”) for this Nexland unit.
The
Country
menu should be used to select your current location now.
The
Channel
menu selects the default channel.
der normal conditions, the
WaveBase will try to communicate on the clearer channel automatically.
u can
change the default if you have problems in your area.
The
ESSID
identifies the wireless Network that the WaveBase is operating on.
should be changed to a custom name now. The ESSID must be no longer than 16
characters and is case sensitive.
mputers connecting via wireless must have a
matching ESSID in their client settings.
Beaconing
can be turned Off (also known as
“Closed Network”) to prevent the WaveBase from broadcasting its ESSID.
te that
the unit will respond with its ESSID if scanned.
Click SAVE after making your settings
Note: When you change the ESSID, you will lose wireless connectivity
until you change the ESSID in the Client settings on your computer.
If you have trouble bringing up the Main Screen:
•
Check that the Wireless Ready LED is illuminated on the front of the WaveBase.
not, the Radio Card might not have been inserted correctly. ower down the unit
and re-insert the card.
e sure you are using the card supplied from Nexland.
•
Check your Wireless Client settings and manager software. It should have a link to
an ESSID of
My Network
and an IP address within 192.168.0.x. If not, you might
be communicating with another Access Point.
•
Check your Wireless Client “Ready” LED if it has one. not illuminated, you may
have installed the Wireless Client driver incorrectly or there is a conflict.
Un
Yo
It
Co
No
If
P
Mak
If
You may already be connected. The
Connection Status
is on the top of the
Main
Setup
page. If it says
Connected
…
Try entering
http://www.nexland.com
in the address bar of the browser. You
should see our home page. Have fun surfing the web! You can now connect
additional computers to the Pro. Remember to follow the steps on page 8 for each.
If you have this type of account and it says Disconnected
…
Then you will have to enter your
Network Adapter
(MAC) or ISP supplied
Host
Name
or
Domain Name
.
Enter the MAC (see below) or Host/Domain Name in the appropriate fields
(host & domain names are case sensitive) then click the
“
Save.”
The Pro
will restart and attempt to connect. Wait a moment then click
Back
to the
Main Setup page and hit
Refresh
on your browser. It should say
Connected
at top. If
it doesn’t, try refreshing again in a moment or consult Troubleshooting.
How To Obtain Your Network Adapter (MAC) Address
Note: The computer
originally
used to connect to the Internet must be used for this procedure.
On Win95/98/ME...
�
Type "winipcfg" at the "Run..." prompt on your Start Menu then hit OK
�
Hit the "More Info" button
�
Select your Ethernet Card from the drop down menu. The adapter address
should appear.
On Win2000/NT…
�
Type "ipconfig /all" at a DOS prompt. our MAC is the “Physical Address.”
On Macintosh (OS9)…
�
In the Apple Menu, click “Apple System Profiler”
�
Under the System Profile Tab, Click the Down Arrow for “Network Overview”
�
Click the Down Arrow for “AppleTalk”
�
The Hardware Address should be listed – This is the MAC address
Y
16
17


