background image


Page | 87 


The ANGLE button thus also lets you revise the angle for a clip you have added to the PLAY LIST. 

8.12


BOOK MARK 

Bookmarks  are  timecode  references  that  are  independent  of marked  In  or  Out 
points you may set for events. This is a very useful feature, enabling you to quickly 
skip through your recorded video to specific points. 

A bookmark is set at the current timecode every time you press the BOOK MARK 
button (as long as recording is underway).   

The maximum number of bookmarks never exceeds ten, so once the limit is reached, pressing BOOK MARK 
again erases the ‘oldest’ bookmark and sets a new one. 

Tip: Bookmarks reference the current (i.e., ‘live’) timecode when they are set.  If recording is not 
underway, pressing the BOOK MARK button has no effect. 

Press  SHIFT  +  BOOK  MARK  to  jump  the  playhead  back  to  the  most  nearest  prior  bookmark.  Doing  so 
enough times will eventually ‘wrap around’ to the most recently set bookmark, and then work backwards 
through them again. 

8.13


UTILITY BUTTONS 

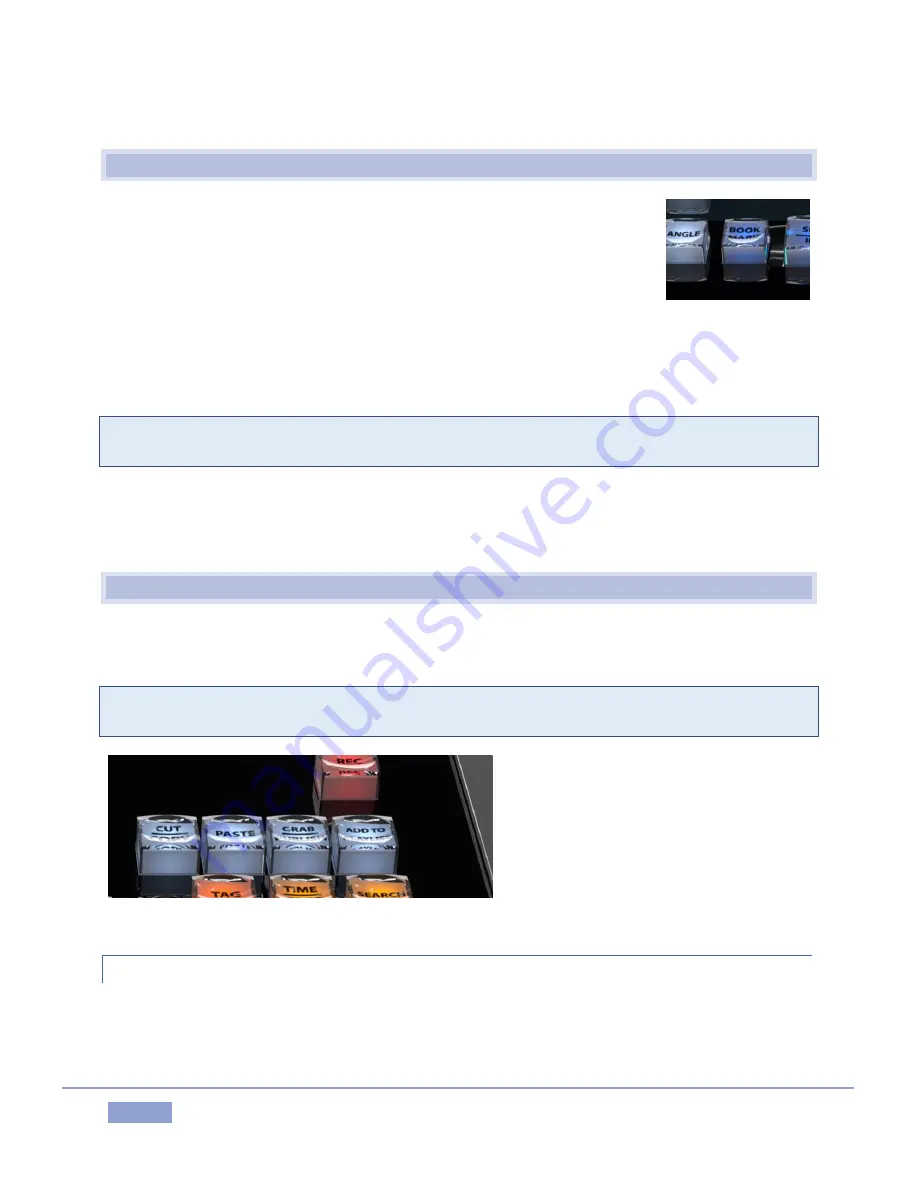
A four-button group located at upper right provides a number of important media management functions, 
as described next. 

Tip: All of these functions operate on the current selection (clip or event) in the delegated list (i.e., the 
Clip or PLAY LIST).  Generally they have no effect in Live or Delayed play modes. 


Figure 93 

8.13.1


CUT/COPY AND PASTE 

These familiar functions can be used to arrange and manage the entries in your CLIP and PLAY LISTs tabs.  
Use SHIFT with the COPY/CUT button to apply the CUT feature.  PASTE insertions generally occur below 
the current selection, and the insertion will receive a new Clip ID

Figure 92


Содержание 3Play 3P1

Страница 1: ......

Страница 2: ...CXD850 TriCaster 450 TriCaster TCXD450 TCXD450 TriCaster 300 TriCaster TCXD300 TCXD300 TriCaster PRO TriCaster STUDIO TriCaster BROADCAST TriCaster DUO MediaDS MDS1 3PLAY 3Play 3Play 3P1 3Play 4800 3PXD4800 3Play 440 3PXD440 3Play Mini 3Play 820 3PXD820 3Play 425 3PXD425 3Play 330 3PXD330 TalkShow TalkShow VS 4000 TalkShow VS100 Network Device Interface NDI NewTek Connect NewTek Connect Spark NewT...

Страница 3: ...3Play ...

Страница 4: ......

Страница 5: ...er Failsafe 10 2 6 3 Input Output Capture 10 2 6 4 Monitoring 11 2 6 5 Video Processing 12 2 6 6 Recording 12 2 6 7 Bookmarks 13 2 6 8 The CLIP LIST 13 2 6 9 The PLAY LIST 14 2 6 10 Program Transitions 14 2 6 11 Text Tags and More 15 2 6 12 Publish 16 2 6 13 Macros 16 3 Setting Up 17 3 1 Command and Control 17 3 2 Registration 18 3 2 1 Online Registration 18 3 2 2 Registering by Telephone 19 3 3 I...

Страница 6: ... Audio 27 3 10 Networking 27 4 Live Production Walkthrough 29 4 1 Creating a Session 29 4 2 The Replay Desktop 31 4 3 Channel and Source Delegates 31 4 4 Record 32 4 5 Marking Events 33 4 5 1 Two Button Marking 33 4 5 2 One Button Marking 33 4 6 LIST Navigation 34 4 7 Memos and Tagging 35 4 7 1 Tagging Clips 37 4 8 SEARCH and GO TO 39 4 9 Trimming Events 40 4 10 Managing Events 41 4 11 Preparing a...

Страница 7: ...nts 58 6 3 Customizing the Replay Desktop 59 6 3 1 Rename 59 6 3 2 Multiple Displays and Monitoring 60 6 4 Dashboard Tools 60 6 4 1 Status Messages 61 6 4 2 Menus File Options Macros and Workspaces 61 6 5 Grab Record 63 7 I O Configuration 65 7 1 Output Configuration 65 7 1 1 Channel A and B 65 7 1 2 Genlock Failsafe 66 7 1 3 Multiview 69 7 2 Input Configuration 69 7 2 1 Input Settings 70 7 2 2 Co...

Страница 8: ...op 82 8 6 3 Play 83 8 6 4 Next 83 8 6 5 FAST JOG 83 8 6 6 Jog Wheel 83 8 7 Play Speed T Bar Section 84 8 7 1 Illumination 84 8 8 List Selection tools 84 8 9 SHIFT 85 8 10 SET IN OUT 85 8 10 1 SET IN 85 8 10 2 SET OUT 86 8 11 ANGLE 86 8 12 BOOK MARK 87 8 13 UTILITY Buttons 87 8 13 1 CUT COPY and PASTE 87 8 13 2 PUBLISH 88 8 13 3 Add to PLAY LIST 88 8 14 TAG GO TO and SEARCH 88 8 15 The Number Pad 8...

Страница 9: ... Event Menu 100 11 1 4 Search Results 100 11 1 5 Add Media 100 11 2 Media Asset Management systems 104 11 3 CLIP LIST Table Features 104 11 3 1 Event ID 105 11 3 2 In Out Points Duration and Trimming 105 11 3 3 Memo Fields 106 11 3 4 Managing Events 106 11 4 Playing Clips 107 11 5 Selection Channels Display 107 11 5 1 Play Indicator 107 11 6 Add to PLAY LIST 108 12 The PLAY LIST 109 12 1 Titlebar ...

Страница 10: ...ing Workflow 117 13 2 The TAGS Button 118 13 3 The TAGS Pane 118 13 3 1 Titlebar Tools 119 13 3 2 A Tagging Example 120 13 3 3 SKIP 122 13 3 4 Input Hinting 122 13 4 SEARCH 123 13 4 1 Dataview Entries 123 13 4 2 Finding Matches 124 13 4 3 GO TO 126 13 4 4 Search Results Tab 126 13 5 Import Tags 127 13 5 1 CSV Example 128 14 Transitions 131 14 1 PLAY LIST Transitions 131 14 2 Program Preview Transi...

Страница 11: ...Overview 149 16 2 The Export Media Panel 149 16 2 1 Social Media Sites 151 16 2 2 Transcode 151 16 2 3 Watermarking 151 17 Macros and Automation 153 17 1 System Macros 153 17 2 Session Macros 154 17 3 Recording Macros 154 17 3 1 Macro Playback Speed 155 17 3 2 Managing Macros 155 17 4 Shortcuts and Triggers 156 17 4 1 Conflicted Shortcuts 157 17 5 MIDI Controllers 158 17 6 NDI Connections 158 17 6...

Страница 12: ...ation for Video Inputs 173 A 2 Sessions 173 A 2 1 What is a session 173 A 2 2 Delete a Session and its Content 173 A 2 3 Rename a Session 173 A 2 4 Manage Selected Content inside a Session 174 A 3 Events and Recording 174 A 3 1 Start recording 174 A 3 2 End recording 174 A 3 3 Mark an Event 174 A 3 4 Play a Clip 175 A 3 5 Prepare a highlight reel 175 A 3 6 Select a different Play List clip for the...

Страница 13: ...ical Support 180 A 6 3 Find Hardware Firmware Revision Numbers 181 A 7 Miscellaneous 181 A 7 1 Set up remote desktop control of 3Play 181 A 7 2 Deal With Clips or images That Seem Blurry 181 A 7 3 Access Windows 181 A 7 4 Return to the Startup Screen from the Windows Desktop 181 A 8 More Questions and Answers 181 A 8 1 Why are my clip duration and Countdown times different 181 Appendix B Keystroke...

Страница 14: ......

Страница 15: ...Page 1 PART I GETTING STARTED Introducing NewTek 3Play 3P1 connections and registration a top level overview of primary features and a hands on tour to get you started ...

Страница 16: ......

Страница 17: ...an be the hero others turn to for expert advice Part I Getting Started introduction to NewTek 3Play 3P1 connecting devices cameras monitors etc and registration ending up with the Live Production Walkthrough a brisk jog through fundamentals about 16 pages if you re a quick study this may provide all you need Part II Reference chapters in this section cover every arcane detail related to using 3Pla...

Страница 18: ......

Страница 19: ...d Channels A and B to external video systems Alternatively the two primary outputs support a video switcher style program preview workflow complete with transitions and even overlays Too 3Play supports selectively publishing data to internal and external file storage ftp and social media platforms on the fly Realtime A V output at a given moment may consist of any combination of the following I Li...

Страница 20: ...ed by setting In and Out points as a live production progresses Newly marked events are successively added to the CLIP LIST for convenient recall The In and Out timecode values for an event are digital pointers identifying the first and last frames of a specific portion of the recorded footage Thus an event is not merely a clip Think of it as a synchronized time slice across all recorded video str...

Страница 21: ...ong with system management tools Figure 2 The Home page of the Startup Screen Figure 2 allows you to define and open sessions essentially custom presets for individual productions or other purposes If you re open a session on some later occasion all of its assets and settings are remembered After creating a session or opening an existing one you are taken to the Sessions page Here you can launch t...

Страница 22: ...nformation and provides quick access to key features including Record Grab and various menus Just below the titlebar are desktop monitors showing 3Play s video input and output streams This region of the Replay Desktop also provides some very special features just below the primary output monitors as follows Figure 4 o A Channel Info pane immediately beneath each output monitor lists important dat...

Страница 23: ...p etc and Transition controls Figure 6 The spreadsheet like CLIP LIST is centrally located Figure 3 Its multiple tabs including the Search results tab and columns help you identify locate manage and replay the huge amount of audio visual data 3Play captures Just below is the PLAY LIST Figure 3 Here you can create and control more complex sequences such as highlight reels These can include imported...

Страница 24: ...rom if a complete hard drive failure ever occurs 2 6 3 INPUT OUTPUT CAPTURE All audio and video monitoring and network connectors are easily accessible from the rear for convenient installation in industry standard 19 rack mount configurations Note some 3Play Mini connections are front mounted Most audio and video connectors are industry standard XLR or BNC as appropriate ensuring broad compatibil...

Страница 25: ...annel mode Tip The display configuration for 3Play s secondary Multiview output is governed by controls found in the Output Configuration panel CHANNEL INFO AND CONTROLS The region of the Replay Desktop just below the primary output monitors also provides some very special features First data pertinent to the current video source for each output is displayed in a Channel Info area immediately belo...

Страница 26: ...itoring needs External Multiview Workspaces offer many alternatives including numerous multi bridge layouts overlays and Event Clocks The Multiview layout output is configured using the Workspaces menu in the Dashboard at the top of the Desktop see Section 6 4 2 for a more thorough discussion 2 6 5 VIDEO PROCESSING Input Proc Amps allow you to adjust the video signal to harmonize color balance for...

Страница 27: ...6 8 THE CLIP LIST Figure 11 Synchronized segments of the recorded data from all cameras are identified as individual events by setting in and out points Each marked event occupies one row in the spreadsheet like CLIP LIST Events can be rearranged and re trimmed in the CLIP LIST The different sources or angles available for each event see Section 2 2 1 are presented as labeled columns Figure 12 Fig...

Страница 28: ...us purposes the PLAY LIST also supports imported files 2 6 9 THE PLAY LIST Figure 14 Individual clips from events appearing in the CLIP LIST can be added to the PLAY LIST pane below as can other items imported using the Add Media button The PLAY LIST plays all entries in sequence from top to bottom with optional transitions between clips Like the CLIP LIST the PLAY LIST pane offers multiple tabbed...

Страница 29: ...ayback something often only possible when system architecture includes a downstream switcher 2 6 11 TEXT TAGS AND MORE Figure 17 A Tags bar is situated at the bottom of the Replay Desktop Figure 17 Dragging this divider bar upward reveals tabbed panes containing rows of numbered cells Text tags e g player names notable play types adjectives etc entered into these cells can be quickly inserted into...

Страница 30: ...pture continues uninterrupted 2 6 13 MACROS Record simple or complex combinations of operations as macros then assign these to internal and external trigger events to be executed at will 3Play s Macro Configuration panel provides numerous management features such as folders rename clone and hotkey and control panel assignment as well as Import and Export share macros with other 3Play users Macros ...

Страница 31: ... C power cable s and 6 USB cable NewTek mouse and keyboard Registration reminder card BNC removal tool 3 1 COMMAND AND CONTROL 1 Connect an external computer monitor to one of the monitor connection ports HDMI Display or DVI on 3Play s backplate use an adapter if necessary Note The user interface requires a minimum screen resolution of 1600 x 1050 2 Connect the mouse and keyboard to USB ports on 3...

Страница 32: ...show a watermark until the system is registered and unlocked using the registration code Tip Serial number stickers are affixed inside the system s hinged front panel If you cannot locate the serial number call NewTek s Customer Support Desk open seven days a week You can register and obtain your registration code either by telephone or online directly from 3Play or from another system connected t...

Страница 33: ... convenient access to the Internet 3 2 2 REGISTERING BY TELEPHONE NewTek s Customer Support desk can also handle registration requests by telephone if that is more convenient when opportunity permits you should still visit the website as discussed above in order to gain access to software updates Please have your Product ID from the Registration dialog mentioned earlier handy when you call The pho...

Страница 34: ... as sources for it see your camera manual for details To do so supply the reference signal from the house sync generator to 3Play s Genlock input connector 3 3 3 TIMECODE CONNECTION 3Play supports external linear timecode LTC Connect the cable from your timecode generator to analog Audio In 3 or one of the motherboard audio input connectors External timecode is enabled and configured in the Replay...

Страница 35: ... connectors in the VIDEO OUT section 2 Connect 3Play s audio outputs a Analog audio Connect external audio devices to the connectors in the AUDIO OUT section b Digital audio A separate digital audio connection is not necessary for SDI output with embedded audio Digital audio is also carried over the network output along with NDI video outputs 3 5 STARTING A SESSION If 3Play is not already running ...

Страница 36: ...t date RECORD MODE 4RU 3PLAY Figure 22 For the 4RU 3Play 3P1 model only continue with session creation by selecting a Record Mode see Section 5 2 1 for an explanation of these options Then assign drives to pairs of cameras you intend to recording controls in the Storage Volumes control group below STORAGE VOLUMES AND SESSION VOLUME Qualified 3Play storage volumes or volumes connected to 3Play are ...

Страница 37: ...nal session configurations for live production You can choose between several HD High Definition and SD Standard Definition formats SD options include 4 3 and 16 9 widescreen image aspect formats Multi standard models permit you to select between video standards for your locale NSTC or PAL Also please note that certain output selections 1080 25p 1080 29 97p and 1080 23 98p are actually transmitted...

Страница 38: ...ay provides complete video input monitoring right on the Replay Desktop This allows you to operate without even connecting downstream video monitors or devices if you wish Often however you will likely connect external devices to the VIDEO OUT connectors on 3Play s backplate see Section 3 4 Connect to SDI connections as appropriate or you might connect across your network to downstream NDI enabled...

Страница 39: ...or best results configure the Multiview Output to the native resolution of the external display s connected to it See Section 6 4 2 for details of the Workspaces menu 3 7 CONFIGURE GENLOCK FAILSAFE 1 Click the Genlock Failsafe tab in the Output Configuration panel 2 The default Reference Type in the Genlock settings group is SD Bi level as this is currently the most common reference signal type Ho...

Страница 40: ...oll your mouse into the footer below any input monitor 2 Notice that a Configure button gear icon appears at right below the input monitor as you do so Figure 28 3 Click the Configuration button gear for Camera 1 to open a settings panel Figure 28 4 Click the Input Settings tab 5 Click the Connection Type menu to reveal a listing of various options 6 The Format menu will usually auto detect the co...

Страница 41: ...djust the slider to achieve an appropriate signal level use the VU meters in the titlebar above the monitor as an aid Tip Most numeric controls in on the Replay Desktop can be reset to their defaults using Shift double click on the control knob 3 10 NETWORKING Here is the basic procedure involved in connecting to a network 1 Connect a suitable cable from one of the ETHERNET port on 3Play s backpla...

Страница 42: ...rator 9 Close the OK button 10 Close the System control panel 11 At this point the network connection should be functional If further help connecting is required please consult your system administrator The next section Chapter 4 Live Production Walkthrough will guide you through your first experience using 3Play ...

Страница 43: ...some important fundamentals Session configuration and launch Monitoring and related features Recording and marking events Playing clips Working with metadata Creating a highlight reel 4 1 CREATING A SESSION We ran through the basics of starting new sessions and configuring devices back in sections 3 5 through 3 7 If you need to review this information go ahead and do so now We ll look at these ite...

Страница 44: ...ign different camera pairs to individual drives under Storage Volumes 3 The Startup Session page will appear when you click the Create Session link at right Figure 32 Glance around this screen which provides some useful session asset management tools but we re going to press on to other features right now 4 To move on click Start Session Figure 32 to launch the Replay Desktop ...

Страница 45: ...udio Review these points if necessary and set up your connections we re assuming at least 3 cameras are connected as we continue 4 3 CHANNEL AND SOURCE DELEGATES 7 Press A on the Control Surface to set the current Channel Delegate Note See Section 8 1 Dual Channel Replay for details of 3Play s A and B channels 8 Press LIVE to set the Source Delegate see Section 8 3 9 Hold down the ANGLE button pus...

Страница 46: ...annel B is still set to around 5o Channel A is still be at the default speed 100 15 Press the red REC Record button on the Control Surface to enable capture Notice that the Record button on the Replay Desktop lights up and a nearby time counter starts keeping track of the total video recorded in the current session Also a new single frame duration event row was added to the CLIP LIST with memo ent...

Страница 47: ...int updates when you do this 21 Complete the current event in the CLIP LIST by pressing the OUT button on the Control Surface Note that the event now has both an In Point and an Out Point and the calculated Duration for the event is also now shown 22 Roll the mouse pointer over the Dashboard and click the Options menu that appears Select the menu item labeled One Button Marking This lets you chang...

Страница 48: ...hat the CLIP LIST is delegated to Channel B press the Previous button again You ll see that the view on the current output updates to show the prior event the row above in the CLIP LIST and the blue highlight in the CLIP LIST moves to the Memo column of a clip in that event row 29 Press Next to return to the original event 30 Let s try something slightly different Find or create using IN OUT a cli...

Страница 49: ... to the CLIP LIST selection when you use the arrow keys providing another way to quickly return to the most recent clip Notice that the blue selection highlight moves from cell to cell as it did before but the red play indicator remains on the currently row in the Event ID column at left The clip shown on output does not update as a result of selection operations during playback This is a delibera...

Страница 50: ... event row The SHIFT plus ENTER combination supports one other very useful outcome too 42 Hold down SHIFT and use the Arrow keys to multi select several Memo cells whether in the same event rows or not 43 Type foul into the dataview then hold SHIFT down and punch ENTER Note that all selected cells are updated Let s try one more trick while we re at it you ll discover many more as you come to fully...

Страница 51: ...clip management purposes 4 7 1 TAGGING CLIPS Let s see how 3PLAY s TAGS module makes Memo cell entries even faster Figure 37 Tags are predefined text entries prepared in tabs of the TAGS module located across the bottom of Replay Desktop 47 If it s not already displayed hold down SHIFT while pushing TAGS on the Control Surface Tip SHIFT TAGS toggles the minimize restore control of the TAGS pane Se...

Страница 52: ...on USING TAGS Having prepared some tags let s try this feature out 57 Use SHIFT TAB as required to select the first TAGS pane tab TEAM 58 Make sure the Auto Advance button at right in the TAGS pane titlebar is turned on 59 Enable the TAGS button on the Control Surface delegating the number pad to tag mode 60 Activate recording 61 Push OUT on the Control Surface to add a new event to the CLIP LIST ...

Страница 53: ...g but tags 4 8 SEARCH AND GO TO Let s experiment briefly with SEARCH and GO TO 66 Tag or otherwise add comments to the Memo cells for a few different clips in different events Use different entries for some clips but matching entries for others In one or two cases add 67 Navigate to a Memo field its current value is snapped into the dataview 68 Push SEARCH The current dataview value serves as crit...

Страница 54: ...r other management operations 73 Navigate to the event row you re after in Search Results then punch GO TO That one event is immediately highlighted in its original CLIP LIST tab ready for further manipulation Tip GO TO normally takes CLIP ID numbers as input Alternatively with a timecode entry in the dataview push SHIFT GO TO This engages Delayed playback mode and jumps the playhead immediately t...

Страница 55: ...ID cell for an event instead of a Memo and press ADD TO PLAY LIST Clips from all camera angles for the event are added to the PLAY LIST 81 Hold down SHIFT and use the arrow keys to multi select several clips by highlighting their Memo fields Press ADD TO PLAY LIST All selected are added to the PLAY LIST 82 Using the mouse drag the Event ID field for an event row onto the PLAY LIST pane Clips from ...

Страница 56: ...LAY LIST clip in its Speed column combine to produce the actual playback rate For example if the clip s Speed in the PLAY LIST table is 50 and the T Bar is also at 50 the actual playback rate will be 25 Note that the Channel info display only reflects the current T Bar position Tip Note that although the maximum Speed you can set using presets or the T Bar is 200 but the PLAY LIST control let you ...

Страница 57: ... PART II REFERENCE A thorough examination of the various aspects of your NewTek 3Play 3P1 every button menu item feature and control is considered in this section so you can take full advantage of your system ...

Страница 58: ......

Страница 59: ...sions by making selections from the icon ring Figure 38 Your intention may be to participate in a live production or perform asset management functions within an existing session In either case let s consider a fundamental concept the session What is a session and why are sessions both important and valuable to you 5 1 INTRODUCTION TO SESSIONS Whenever you work with your 3Play system you provide c...

Страница 60: ...in a specific production goes on but the main point to grasp here is that the session entails of all of the above collectively Assuming you do not deliberately delete the session all of your media and all of your settings are ready for immediate recall When you re open an existing session it s just as if you were continuing an earlier event Thus if you return to the same venue another day under ba...

Страница 61: ... As just mentioned clicking New populates the pane at right with related options Principally for each session you must designate by selecting switches your local video standard select NTSC or PAL and session format e g 1080 60p or perhaps 1080 60i etc SESSION NAME You will see a name entry field above the session options in the pane at right Click in this name field to provide a suitable name usin...

Страница 62: ...uplicate copies provide redundant data security and also permit you to offload a complete record of the production for archival or post production purposes while still having a working session on 3Play the Session Volume must be mounted in this case STANDARD 8 CHANNEL Standard mode stores just a single copy of your recorded data freeing up storage volumes to be assigned to more cameras STORAGE VOL...

Страница 63: ...nother qualified drive must be detected before you can configure the second camera pair 3 4 and so on even though you don t plan to use the extra drive s Use the drop down menus under Inputs to assign drives for recording camera pairs listed in the same row SESSION VOLUME Figure 45 You could think of the Session Volume as storing all of the non a v data required by a session including input settin...

Страница 64: ...ou would normally click the Create Session button at lower right then Create Session to launch the Replay Desktop but first let s explore the features of the Home page a bit more 5 2 2 OPEN SESSION If there are existing sessions on any currently mounted drive s the Home Page menu will default to the Open link Figure 47 Figure 47 When Open is selected the Sessions List appears at right This pane sh...

Страница 65: ...ges to your PLAY LIST directly from a USB thumb drive doing so without actually importing the files into the session Those external files will not be deleted OPENING A SESSION Simply click the desired session name with the mouse to open it immediately Selecting a session takes you away from the Home page to the Session page Let s look at the other Home page features briefly before we go on to open...

Страница 66: ...wnloaded files to 3Play using a network connection or perhaps a USB thumb drive DEFRAGMENT ALL DRIVES Over the course of time storage volumes devoted to audio and video storage can become fragmented Eventually this can degrade playback performance Defragmenting corrects this condition You could think of your hard drive as being like a shelf in your library As time goes along the shelf fills with b...

Страница 67: ...nforeseen problem This does not merely restore the operating system or other data files Rather it restores the system to an as shipped software state Please refer to Section A 5 6 in Appendix A for full details and usage notes 5 2 5 HELP Click the 3Play User Guide link to open the manual Click the License Agreement link to review the 3Play end user license Click About 3Play to list version informa...

Страница 68: ... folders simultaneously and navigate these file windows to other locations as well For example you might copy files from one session into a folder for another Several other important features are found here including Import Media as discussed next IMPORT MEDIA Clicking the Import Media link opens a custom import panel offering batch import of files for use in 3Play s CLIP LIST and PLAY LIST It eve...

Страница 69: ...s up or down with the mouse or removed from the list by highlighting them and clicking Remove Once the batch import list is prepared click Import to complete the operation Files are processed quickly and are automatically added to Import folders properly located according to type for easy access in different modules as required during live production Note Sections 11 1 5 A 4 2 and A 4 3 discuss ot...

Страница 70: ......

Страница 71: ...ters The Replay Desktop is launched by creating or opening a session in the Startup Screen then clicking the large Start Session button 6 1 OVERVIEW The Replay Desktop requires a minimum screen resolution of 1600 x 1050 1 Dashboard 2 Monitoring 3 Toolbar 3 CLIP LIST 4 PLAY LIST 5 TAGS Figure 56 The Replay Desktop provides visual feedback for operations including monitoring features clip marking an...

Страница 72: ...onitors large full time monitors for Output A and B with Channel Info displays Configurable Multiview display on secondary monitor 2 Monitoring FastClip toolbar displays clip event data and text input includes Search tools Transitions Overlays and Transport playback program preview transitions and DSKs 3 Toolbar Speadsheet style event management lists marked events as rows with In Point Out Point ...

Страница 73: ... Configuration panels Click the field to activate it and then type Text field list CLIP LIST Memo Select field and type and then press Enter Esc to cancel changes Tip To make very fine adjustments to slider values hold down the Ctrl key on your keyboard while dragging with the mouse this increases accuracy by a factor of 10 6 3 CUSTOMIZING THE REPLAY DESKTOP The Replay Desktop offers several conve...

Страница 74: ...For example if you position the mouse pointer over the horizontal CLIP LIST drag bar the mouse pointer becomes a double headed arrow Click and hold the mouse button and drag the bar all the way to the top of the screen This provides a useful full screen CLIP LIST and PLAY LIST view while still being able to monitor input and output on another Multiview display Likewise you can drag the horizontal ...

Страница 75: ...6 4 2 MENUS FILE OPTIONS MACROS AND WORKSPACES Figure 61 The Replay Desktop DASHBOARD has important menu options at left discussed individually next FILE Share Publish Queue Open the Publish Queue panel to manage content you wish to upload share or copy to other locations see Chapter 15 for full details on 3Play s Publish features Set Publish Destinations Pre configure targets for media assets add...

Страница 76: ...bled A V Passthrough see Section 7 1 2 you can use this menu item to access setup controls for video Input 8 when the session is in Redundant 4 Channel Mode Tally from TriCaster When a downstream TriCaster is receiving 3Play s network output via one of its own Network Inputs enable this option to shown red and green on air tally borders around 3Play viewports requires TriCaster Advanced Edition Si...

Страница 77: ...one for each detected display The Monitor Resolution menu lets you configure the external display device Select the native resolution of the device for best results The tabs provide Proc Amp controls for the connected display devices These controls directly control graphics the characteristics of output to each display and provide a great deal of convenience especially for remote displays that wou...

Страница 78: ......

Страница 79: ...many outputs independently Source configuration options ensure that you can match camera inputs to each other that their signals fall within legal ranges and mix and match different types of camera And display Proc Amp settings allow you to make adjustments as appropriate to your specific needs Let s begin with a consideration of Output Configuration tools 7 1 OUTPUT CONFIGURATION To open the Outp...

Страница 80: ... each output The name you supply will appear in the Channel Info pane Section 2 5 in the Desktop monitoring section and Multiview display AUDIO VOLUME The Audio Volume slider in the Output Configuration panel lets you independently modulate the raw source sound level before passing it to the corresponding audio output Note You ll recall that the audio and video connectors for Channel A are labeled...

Страница 81: ...locked The 3Play system accepts input from multiple video sources Miniscule local timing differences between these may result in tiny delays during downstream switching operations Serving the same reference signal to i the system s Genlock input and ii other video devices in the chain is the best approach and ensures a match between 3Play system output and any downstream video devices required to ...

Страница 82: ... match between devices Typically these settings are fine tuned with the aid of downstream vectorscope and waveform monitors A discussion of these adjustments goes beyond the scope of this manual but a quick online search for the keywords genlock and adjust turns up a number of excellent references REFERENCE TYPE The bi level reference signal long used for standard definition television is often us...

Страница 83: ... when necessary By default A V Passthrough is off Tip Only use fail safe when a stable video source is connected to the highest number SDI video connector on 3Play s backplane 7 1 3 MULTIVIEW Multiview options layouts and Display Settings are available from the Workspaces menu located in the Dashboard For best results configure the Multiview output to the native resolution of the external display ...

Страница 84: ...ed below the Source selector include auto detection options suitable for most sources and manual options that vary with the session video standard PAL or NTSC Hint Changing from one video standard to another requires opening a new session All connected cameras must conform to the video standard of the current session The Format options provided in an NTSC session are as follows 1080 59 94p 1080 59...

Страница 85: ... basic level established by the Input Type selection permitting you to benchmark individual sources The Mute switch when enabled prevents this particular audio source from being heard at all in captured files or on output VU METERS The audio VU meters VU stands for Volume Unit beside each video input monitor serve several purposes At the simplest level as you record audio with your video or pass i...

Страница 86: ...panel provides Auto Color a unique feature capable of dynamically adapting the color characteristics of your video sources as lighting conditions vary For many productions simply enabling the Auto Color switch is all it takes to produce a show that looks amazingly consistent MULTICAM By default each camera with Auto Color enabled is processed uniquely without reference to other sources Often thoug...

Страница 87: ...P Proc Amp adjustments can be toggled on and off using the Proc Amp switch at upper left or reset by clicking the Restore Defaults button Figure 75 Each Proc Amp has numeric slider controls for Brightness Adjustment range from 50 to 50 IRE the default being 0 As reference the full luminance range of a video signal can be thought of as 100 IRE units named for the Institute of Radio Engineers ignori...

Страница 88: ...e physical placement of a device can make access inconvenient WHITE BALANCE To automatically white balance a source click and hold the mouse button over the Color eyedropper button and then slide the pointer on the monitor for the corresponding source Release the mouse button over a part of the image that should be white ADVANCED COLOR GROUP Figure 76 Expand the Advanced control group to access mo...

Страница 89: ...set the time to 3 30 PM type 1530 and press Enter 7 3 2 TIME The Timecode control group menu allows you to select between timecode sources as follows Tip If the LTC source fails the system automatically reverts to Internal System Clock after a moment or two an error flash message is displayed in the Status Bar see Section 6 4 1 Another switch in the Time group allows you to optionally Subtract 12 ...

Страница 90: ......

Страница 91: ...complexity Its apparent simplicity is no accident and makes using your NewTek 3Play straight forward powerful and trouble free In the sections that follow we ll review the controls in each group on the Control Surface First we should familiarize ourselves with an important concept related to 3Play s primary output channels designated A and B Hint NewTek s optional LivePanel system includes a virtu...

Страница 92: ...hannel A Likewise pushing B assigns control operations to Channel B Only one Channel Delegate can be selected at a time and all operations and input are directed to that channel and its source certain controls can affect both channels when LINK mode is on see Section 8 4 1 Figure 81 Tip You can also choose the currently delegated channel by clicking the mouse in The Channel Info area beneath the o...

Страница 93: ...ons work just like their familiar namesakes on a typical video switcher permitting a direct to display program preview workflow in which Channel B supplies program output with Channel A serving as the preview bus Let s consider 3Play s Source Delegates next 8 3 SOURCE DELEGATES We ve seen how the active Channel Delegate determines which output channel is controlled but we ve yet to choose a specif...

Страница 94: ...tion and the item currently selected in the CLIP LIST is automatically displayed on the delegated output A or B 8 3 2 PLAY LIST While the PLAY LIST delegate button is active Control Surface along with corresponding keyboard and Desktop transport control operations are directed to the PLAY LIST A blue border around the PLAY LIST module signifies its delegated status and again the current selection ...

Страница 95: ...NK Enabling LINK does not alter the current Channel Delegate Rather the LINK button toggles a special lock step mode In broad terms Link mode causes transport control operations Play Stop etc to occur in tandem Other operations such as changing clip selections are not linked For example when A is lit along with LINK on the Control Surface or Replay Desktop The Replay Desktop displays Channel A s o...

Страница 96: ...group momentarily in favor of more fundamental playback controls The familiar VCR style controls in the Transport group provide easy to use transport through your media 8 6 1 PREVIOUS Whenever the playhead is more than three seconds into a clip pressing the first button in this row takes you to the In point Otherwise it selects the previous CLIP LIST or PLAY LIST clip if playback is underway play ...

Страница 97: ...NEXT The Next button makes its appearance at the opposite end of the same row in the Transport Control group Pressing Next takes you to the next clip in the CLIP LIST or PLAY LIST If playback is underway it will continue from this point Hint When play is stopped press SHIFT with NEXT to jump to the last frame of a clip 8 6 5 FAST JOG The FAST JOG button is a toggle Press it to turn the feature on ...

Страница 98: ... mode to extend the T Bar s range In this mode the top and bottom of the lever stroke represent 200 and 200 respectively with 0 playback stopped in the middle 8 7 1 ILLUMINATION The T Bar lighting serves two purposes The light color denotes the delegated source it is controlling at any moment green for LIVE blue for the CLIP LIST and gold for the PLAY LIST Normally the light is brightest at the to...

Страница 99: ...pecial function when used with the ANGLE button see Section 8 11 8 10 SET IN OUT Marking events is of course the core business of NewTek 3Play These two simple buttons will see a lot of use Their roles are not complicated but it would be good to review them anyway Note Of course marking events would be pointless without recording so pressing either IN or OUT automatically enables Record when neces...

Страница 100: ...ly create a series of events just by pressing the OUT button only when you observe noteworthy occurrences Tip The default duration for these events can be set to a custom value using One Button Marking menu options found in the Options menu see Section 6 4 2 SHIFT OUT Again just as for the IN button press SHIFT in conjunction with OUT to update the Out Point for the current CLIP LIST event or PLAY...

Страница 101: ...way pressing the BOOK MARK button has no effect Press SHIFT BOOK MARK to jump the playhead back to the most nearest prior bookmark Doing so enough times will eventually wrap around to the most recently set bookmark and then work backwards through them again 8 13 UTILITY BUTTONS A four button group located at upper right provides a number of important media management functions as described next Ti...

Страница 102: ... PLAY LIST Push Add to PLAYLIST to insert the currently selected clips from the CLIP LIST to the current PLAY LIST page The operation only proceeds if the Source Delegate is set to Clips when the button is pressed 8 14 TAG GO TO AND SEARCH Figure 94 The 3Play functions provided by all three buttons in this group are detailed more completely in Chapter 13 TAGS SEARCH More Just as a brief introducti...

Страница 103: ...pulating Memo fields for your marked events using tags or locating clips using tags ID or timecode values the number pad will almost certainly become your preferred input mechanism detailed discussion of all aspects of this matter can be found in in Chapter 13 TAGS SEARCH More Also handy to know in a Program Preview workflow Section 14 2 you can select a specific transition from among the nine cur...

Страница 104: ......

Страница 105: ...n for convenience Among others these include the Source Connection Type Proc Amp Genlock and Audio controls To give these features their due they were treated individually in Chapter 7 which is entitled I O Configuration Likewise transitions text tags and search tools are dealt with elsewhere in this guide 9 1 OVERLAY OPTIONS Not to be confused with DSKs which allow you to overlay imagery system p...

Страница 106: ... with each Input Monitor When you move your mouse pointer over an Input Monitor the Configure button gear appears at right in the label beneath Click this icon to open the Input Configuration panel for that source see Section 7 2 Among other things you can supply a new name for the input in this panel and it also holds Proc Amp and Audio settings Tip Drag the horizontal divider between the monitor...

Страница 107: ...rea below Clicking this button opens a tabbed panel titled Output Configuration providing controls and options for Outputs A and B Aux Auxiliary output 3Play 4800 only and Genlock Failsafe see Chapter 7 for details on all of these options Tip Double clicking a monitor will also open its configuration panel When the A or B delegate button is lit on the Control Surface your actions determine which s...

Страница 108: ... delegated channel Tip The specific background color indicates the source supplying the delegated channel blue for the CLIP LIST gold for PLAY LIST and green for LIVE or Delayed sources See Section 8 3 for more on Source Delegates CLIP LIST or PLAY LIST details CLIP mode Clip ID and Memo Time display a LIVE or DELAYED play Timecode at the current frame Behind Live time Delayed mode only b CLIPS mo...

Страница 109: ...inputs will be stored Figure 102 4RU options shown These important decisions are made in the Startup Screen at the time of first creating a new session We detailed all of the important aspects of session configuration back in Section 5 2 1 Note The Record Configuration options you choose are retained with the session and cannot be altered after launching it To work with a different Record Configur...

Страница 110: ...all for it to be captured The Input Monitors tabs on the Replay Desktop and Multiview show connected sources whether they are configured for capture or not This may raise a question in your mind though If your setup includes some sources that are not recorded how can you distinguish between these ones and sources that are captured One way to tell which inputs are configured for recording is to obs...

Страница 111: ...ording for example pressing the mark IN or OUT buttons enables Record when necessary see Section 8 10 Reminder Previously recorded data can be sent to 3Play outputs even with Record off For live sources of course operations such as STOP or speed changes can only be applied when recording is active this permits the system to automatically switch to Delayed playback mode RECORD EVENTS Each time Reco...

Страница 112: ...of the current CLIP LIST tab ready for immediate playback during the live production Close the Grab Still Configuration panel by clicking Close or clicking anywhere outside the panel Then click the Grab button to capture images to your hard drive Image files are stored in a folder named for the session inside the main Still folder a sub folder is created for the supplementary files captured from e...

Страница 113: ... 107 The CLIP LIST is the receptacle for timed events that you mark during the course of your production It presents the different recorded camera angles for each event marked by an In Point and an Out Point on one row of a spreadsheet style table 11 1 TITLEBAR TOOLS The CLIP LIST titlebar contains several important tools and features discussed next see also Clip Angle Preview monitors under Optio...

Страница 114: ... In addition you can Undo and Redo also available using standard keyboard shortcuts set the Audio Level for all angles of selected events or add selected angles to the Publish Queue 11 1 4 SEARCH RESULTS Figure 110 This special tab situated at right in the CLIP LIST displays all events that match the criteria you have supplied when performing Search operations The results displayed in the tab are ...

Страница 115: ...he Media Browser to add them as described above Media added in this manner can be played directly from the CLIP LIST or be used in a PLAY LIST 2 Add Media supports compatible third party asset management systems Hold the keyboard Ctrl key down when clicking the sign to access these tools The keyboard shortcut to open the Media Browser is F5 MEDIA BROWSER Figure 112 The left and right panes of the ...

Страница 116: ...on for listings under My Media Locations is limited to one folder level below the folder sub heading selected in the Location List Note Adding a custom Location or adding a clip or image to the CLIP LIST does not import content copy it into a session folder Rather external files are added as linked media Be aware that large linked files highly compressed video clips or media storage devices with s...

Страница 117: ...ly relevant content For example the Media Browser is also used in the PLAY LIST discussed later to let you choose a music file In this case only audio files are shown An additional user configured filter appears above the File Pane This is a smart filter which quickly locates files matching criteria you enter doing so even as you type If you enter goal into the filter field the File Pane displays ...

Страница 118: ...atible custom asset management interface rather than the native Media Browser Hint Alternatively you can open a standard system file explorer by holding down the Shift key rather than Ctrl when adding files 11 3 CLIP LIST TABLE FEATURES Figure 116 By way of reminder as discussed in depth back in Section 2 2 1 an event is not merely a clip It can be likened to a time window on the complete recordin...

Страница 119: ...mported graphics clips to the 900 s Multi select several EVENT ID fields and change the leading tab number voila the selected events appear in the new tab If there are existing event rows in the target tab with the same numbers as the new arrivals these are pushed down and renumbered to make room for the new insertions Note that individual clips camera angles each have their own unique numbers too...

Страница 120: ...can be trimmed independently without altering the timing of the original event in the CLIP LIST or other PLAY LIST clips originally added from the same event 11 3 3 MEMO FIELDS Memo fields allow you to insert text notes or tags to accompany any clip for an event for more information about tagging please see Chapter 13 These can identify a player and team the type of action marked or any other sort...

Страница 121: ...res in this section though note that playback can also be initiated by double clicking the Memo field for a clip or by clicking the onscreen Play button in the transport control group beneath the output monitor for Channel B hosts 11 5 SELECTION CHANNELS DISPLAY Generally the highlighted clip in the active event row is shown on the current output A or B In the case of multi event or multi clip sel...

Страница 122: ...if you pressed PLAY always has a red background 11 6 ADD TO PLAY LIST Selected clips can be added to the current PLAY LIST pane in several ways Press the ADD TO PLAYLIST button on the Control Surface Drag a clip selection onto the PLAY LIST pane with the mouse Tip You can also add all clips from one or more events to a PLAY LIST in their natural order in one easy operation Simply select the Event ...

Страница 123: ...out The PLAY LIST has a gold border when it is the active Source Delegate see Section 8 3 Tip Drag the upper border of the PLAY LIST up or down to show more or less rows Double click this drag bar to reset it to its default position 12 1 TITLEBAR TOOLS The PLAY LIST titlebar contains several important tools and features discussed next 12 1 1 TABS Figure 119 By default the PLAY LIST comprises ten t...

Страница 124: ...LAY LIST titlebar you will see controls that allow the addition of a background music track for highlight reels Figure 121 The common WAVE and MP3 audio file formats are supported Figure 121 Enable the Music Track switch and select Browse from the nearby drop down menu to open the custom Media Browser After use the menu lists your most recent selections for convenience The Media Browser was discus...

Страница 125: ...nitiated This can be useful when for example an imported bumper clip with its own audio precedes the clips in your highlights reel Click in the number field to manually edit it using the keyboard or simply drag the mouse pointer left or right above it The Volume control allows you to adjust the output level of the selected music file 12 2 THE PLAY LIST TABLE Unlike CLIP LIST rows each PLAY LIST ro...

Страница 126: ...de when the clip will end Speed a numeric slider allowing you to preset the speed at which the clip will play back Transition select a transition to introduce the next clip in the playlist Transition rate numeric input field allowing you to specify the time for the transition Ends At the total time for the playlist until the end of play for the clip in the current row 12 3 PLAY LIST PREPARATION Cl...

Страница 127: ...tton on the Control Surface and use the and buttons to change cameras alternatively access a specific angle directly by selecting a number pad button on the Control Surface with Angle held down Tip Copy and paste a clip then edit the copy in this fashion to inset a clip from the same time segment into the Play List without removing the original 12 3 3 MEMO Initially newly added clips show the same...

Страница 128: ...erway if you select this cell you can also use the Control Surface number pad to change the current value pressing ENTER to complete the operation Multiple selections are also supported for direct keyboard adjustments Also when PLAY LIST playback is underway you can use the T bar on the Control Surface to further modify Speed interactively This does not overwrite established clip speed settings in...

Страница 129: ...pecify the time for each transition Use the drop down menu to select a preset time or drag the mouse left right over the current value 12 4 CLIP CONTEXT MENU The PLAY LIST also features a context menu Figure 126 Not unlike its CLIP LIST equivalent the menu provides access to Cut Copy and Paste Delete Undo and Redo features also available using standard keyboard shortcuts It also has two important ...

Страница 130: ...sion 3Play creates an EDL Edit Decision List file for each existing playlist These files can be used to reconstitute a playlist in NLE non linear editing applications with EDL file import support 3Play s EDL files are created on the master Session Drive for the session in a folder located at drivename Media EDL session name ...

Страница 131: ...iptive comments and identifiers for your clips added to Memo fields in plain text or using your personal shorthand In concert with 3Play s powerful and easy to use search features Memo content lets you locate that special clip in moments Of course Memo field content can also be used to help you quickly and easily organize manage or publish your data in powerful workflows Entering metadata could be...

Страница 132: ...ry in the corresponding cell into the dataview You can easily build complete sentences with a few number pad button presses using this method Finish the operation by pressing ENTER to add the final text to a clip Memo or push the SEARCH button to use your entry as criteria to quickly find specific clips you have tagged previously 13 2 THE TAGS BUTTON 3Play s TAGS feature relies on the Control Surf...

Страница 133: ...le click the bar at any time to return it to its default tabs plus one row height on the screen You can also drag the bar to the bottom of the screen to close the pane but you might prefer another approach discussed next Figure 132 The central label area of the drag bar is bounded by small triangles Figure 132 The mouse pointer appears as a pointing hand when it is in this zone Click once here to ...

Страница 134: ...update a tag simply enable EDIT TAGS click in a cell and type Pressing ENTER confirms the edit and moves the cursor to the next tag cell ready to continue When finished turn off EDIT TAGS to resume normal tagging operation Tip The first cell 0 0 in each tab cell is non editable and always shows the word SKIP Figure 133 This fixed cell serves as a null entry that can be especially useful in the Aut...

Страница 135: ...k OUT to add the event to the CLIP LIST To build a complete comment for the Memo field for the new event press the following buttons on the Control Surface 10203 ENTER That s it you re done The current Memo cell now contains the text below Home Squires foul Let s break this example down step by step shall we Figure 136 TEAM tab entries are both on the first row so a single digit completes tag sele...

Страница 136: ... simply punch the 0 zero button once or twice as dictated by the number of active rows in the tab This selects the SKIP cell at upper left in each tabbed pane and with Auto Advance on skips instantly to the next tab without pushing a tag to the dataview 13 3 4 INPUT HINTING Notice that while tagging either the first column or first row of the TAGS pane is displayed with a bright green highlight As...

Страница 137: ... information be it an Event or Clip ID timecode value Memo entry or tag that appears on the Replay Desktop can be easily and quickly directed to the dataview by simply navigating to it using the Control Surface keyboard or mouse click The benefits of this metadata pipeline become abundantly clear in connection with 3Play s Search functions In a nutshell searching works as follows 1 Post suitable s...

Страница 138: ... or GO TO button instead as desired Of course with the TAGS button on the Control Surface off the Control Surface supports direct numeric entry 13 4 2 FINDING MATCHES It s helpful to know that 3Play s search engine performs a logical OR operation using the criteria you supply Thus an exact match of every element of the search criteria is not required Your search criteria can include for example mu...

Страница 139: ...ia i e visitors without quotes was found in any Memo field This cause the inclusion of Events 0 2 and 0 5 in the Search Result Next the second element of the criteria 22 was evaluated This resulted in Event 0 4 being included along with prior matches in the result We can see that 3Play s OR type search processing included matches for any element included in the criteria It s useful to observe too ...

Страница 140: ...layed playback mode Timecode entries are properly formatted as hh mm ss ff hour minute seconds frames but just as hyphens can be omitted for GO TO Event ID operations so punctuation is optional for timecode entries Omit digits thoughtfully for timecode operations however GO TO timecode operations parse the search value right to left The entry 1130 or 11 30 will be assumed to represent the timecode...

Страница 141: ... the event However you can successfully move items as follows Select an Event ID in Search Results to snap it into the dataview Punch GO TO which locates the original clip in its own tab Press CUT and PASTE the item into another location 13 5 IMPORT TAGS Imagine using everyday tools like Microsoft Excel to enter and manage your tags Simply save the correctly formatted spreadsheet in CSV format and...

Страница 142: ...llustrates the correct format for a table with two tabs named Home and Guests Home 0 1 2 3 4 5 6 7 8 9 0 Skip 20 Ginobili 1 11 Ayres 21 Duncan 31 Battier 2 02 Leonard 22 Splitter 3 03 Belinelli 23 Daye 33 Diaw 4 04 Green 5 05 Joseph 15 Bonner 6 16 Baynes 7 07 Hamilton 8 08 Mills 9 09 Parker Guests 0 1 2 3 4 5 6 7 8 9 0 Skip 20 Oden 30 Cole 40 Haslem 06 James 9 Lewis 1 01 Bosh 11 Andersen ...

Страница 143: ...Page 129 2 22 Jones 3 03 Wade 4 5 15 Chalmers 6 7 8 08 Beasley 9 0 Douglas Notes Row and column numbers for each tabbed list must be entered as shown Any entry made in the Skip cells will be ignored ...

Страница 144: ......

Страница 145: ...AY LIST TRANSITIONS Many replay systems provide the ability to play a prepared sequence of clips with transitions between them for use as highlight reels As a rule using transitions in this manner requires you to dedicate not just one but two outputs toward achieving transition effects between clips 3Play s PLAY LIST module however directly supports integrated transition effects eliminating the ne...

Страница 146: ... more powerful Let s consider an example Channel B program is sending a live camera feed to a downstream stadium display With control delegated to Channel A you select a replay clip Press the Auto button on the Control Surface Instantly the currently selected transition introduces the replay clip from Channel A preview Replay playback commences automatically from the clip s In Point If LOOP is ena...

Страница 147: ... obvious Animation Store effects Even compared to the effects provided by typical broadcast video switchers 3Play s Animation Store transitions Figure 146 constitute a powerful effect solution eliminating the need to combine separate animations transition effects and sounds on the fly Figure 146 Animation Store effects can do everything that standard wipes can do but usually also include embedded ...

Страница 148: ...parency When warping is desired you prepare this Wipe Sequence animation using a supplied gradient image to stand in for video imagery This Wipe Sequence animation is then combined with a full color Overlay Animation Figure 146 to produce the final effect which you can then apply on demand simply by pressing the AUTO button 14 3 1 EFFECT SETTINGS The settings for transition effects are very simple...

Страница 149: ...edium or F fast effect speed presets using the menu Note that the default preset times is automatically adjusted for certain effects and will also update depending on which effect type you choose You can also click the value shown to edit it directly with the keyboard or drag the mouse right or left over it to raise or lower the current value ...

Страница 150: ......

Страница 151: ...ant slow motion replay on another and send it to output you can also overlay live video onto another source live or recorded or vice versa Figure 150 DSK allow you for example to continue to display live action while playing highlights show replays or ads in an insert or display two live video angles at once The combinations are almost limitless providing incredible flexibility to design workflow ...

Страница 152: ...from a telestrator overlaid on your video output Or with Reverse Key enabled show markup behind the action over the keyed playing field or court see the heading NDI Telestrator in Section 15 2 4 15 1 3 OFFICIATING AND OVERLAYS Replays are also obviously important for referee and coaching use Instant replay for officiating purposes is increasingly a mandatory requirement of numerous leagues A dedic...

Страница 153: ... commentator overlaid on a clip he is discussing or vice versa 15 2 2 CLIP LIST PREVIEW Clip List Preview selections correspond to the different angles available for the currently select event row in your CLIP LIST This permits you for example to show different angles of an event as a picture in picture composition scaled down in similar fashion Note that this selection actually displays the same ...

Страница 154: ...ng or auto run type The type is determined in the supplied Animation Store Creator utility when the effect is generated Next to the gear you will observe a Remove X gadget Click this to clear the current entry freeing up system graphics memory resources at the same time Still image Buffers have another very valuable ability discussed next WATCH FOLDERS The Frame Buffer folder is actually a watch f...

Страница 155: ...k Device Interface signals into 3Play as DSK sources is the gateway to a truly staggering range of potential opportunities Consider just a few of these Use NewTek s LiveText titling application to supply graphics and titles to 3Play Many third party products too can send and update scoring timing statistics and similar displays to 3Play s network input Insert sponsor messages to add dynamic visual...

Страница 156: ...utput B are available as sources to other NewTek live production systems appearing in the source selector menus for network inputs as 3Play A and 3Play B where 3Play is the network name for the system 3Play 3P1 also supplies clean versions of the A and B outputs over NDI free of overlays This means that a video feed from another 3Play or TriCaster on the network can be utilized in a DSK channel wi...

Страница 157: ...and B buttons in this Telestrator control group allow you to switch from one drawing canvas to the other Click the i button in the Tools panel at the bottom of the Telestrator screen to show Help The next step is to assign Telestrator Pro s output channel s which consist of your drawing only without the background as source for one or both of 3P1 s DSKs assign the Telestrator 1 channel as the sour...

Страница 158: ...ges or the drawing tool button above to reveal freehand and shape drawing tools Figure 162 Figure 160 Figure 162 Note that you can click the Library button 9 small squares to open the Brush Library Figure 161 Click an icon in the Library to update the currently active drawing tool preset To add an item to a slot in the Library click the sign in its upper right corner Supported bitmap file formats ...

Страница 159: ... computer generated imagery 3P1 uses a more advanced version of this technology referred to as Reverse Keying Using a designated background color as the key color 3P1 s Reverse Key allows a DSK source such as a Telestrator output or graphic to be sandwiched behind foreground colored pixels but unlike the weatherman application in front of the original background rather than replacing it completely...

Страница 160: ...further tolerance factor and a very useful one We want our key to blend smoothly into the un keyed area rather than to stand out in hard relief SPILL SUPPRESSION The term Spill refers to key color unintentionally reflected or spilled onto the foreground subject For example a little green spill often appears on the shoulders of someone in a greenscreen shot FIGURE 15 164 The Spill Suppression contr...

Страница 161: ...ing motion as they either qualify or disqualify for inclusion in the resulting matte A little reduction in Tolerance and increase in Smoothness will usually resolve this problem Hint It can be useful to zoom in using Position controls when fine tuning LiveMatte THIRD PARTY APPLICATIONS DEVELOPER NETWORK The NewTek Developer Network comprises a large and ever growing ecosystem of companies and prod...

Страница 162: ...osition on a single axis only Hint You can also constrain mouse actions to one axis by holding down the Ctrl key before dragging Dragging a numeric control with the Ctrl key pressed increases accuracy by 5 times Dragging the cursor on the Scale button magnifying glass affects the size of the overlay Again if you drag just one of the nearby numeric sliders you can adjust just one dimension of the c...

Страница 163: ...online presence may even be the primary broadcast medium for some productions For others distribution of supplemental content on popular Internet channels including Facebook YouTube and Twitter provides opportunity for brand extension and additional monetization The Export feature provided in the live Replay Desktop brings all of the above into easy reach 16 2 THE EXPORT MEDIA PANEL Figure 166 Rol...

Страница 164: ...are relevant for social media uploads The Preset column is home to a menu that lets you selectively checkmark upload targets for the files in the queue To add a new item to the Presets menu use the New Preset item at the bottom of the same menu you used to open the Export Media panel Figure 168 Click the Upload button at the bottom of the panel to initiate processing A progress bar column tracks u...

Страница 165: ... can be invaluable for collaboration whether local or remote Numerous Encoding options ensure you can find a file format suited to your needs The options are similar to those discussed in Section 5 3 1 16 2 3 WATERMARKING To avoid misuse of private or copyrighted media you may want to add a watermark before publishing it to public sites The Watermark feature provided as an option for most export p...

Страница 166: ...nd both outputs with just one click When Add to Export Media is enabled in the Grab Still Configuration panel see Section Grab the grab from the currently delegated channel A or B is added to the export queue each time you grab a still Tip If the Dashboard Export button is lit the transfer to selected presets is initiated immediately ...

Страница 167: ...oke or hardware control surface operation Figure 170 Macros can do almost anything preload frequently used media play clips modify playback speed automate complex operations or perform all of this synchronously The compelling usefulness of macros justifies the prominent Macros menu placement in 3Play s Dashboard Click the Macros button to show a menu Figure 171 containing a list of Favorite macros...

Страница 168: ...st System Macros are specially safeguarded within the system Rename Delete Clone and Paste features are disabled nor can you alter the order of entries in the list Also be aware that un checking the enable switch at left for the entire System Macros folder or individual entries within it will naturally result in the failure of all related keystroke shortcuts This does not affect Control Surface op...

Страница 169: ...end may be simply omitted You will often Snapshot mode very useful for designing macros that configure 3Play to a particular state Hint You can record a macro that includes other macros Depending on your order of operations you may need to re highlight the newly recorded macro in the list to show its Stop control to end macro recording 17 3 2 MANAGING MACROS The Macro Configuration panel has manag...

Страница 170: ...the macro to the Favorites menu shown when you click directly on the Macro control in the Dashboard Figure 175 To set a new shortcut or modify an existing one click one of the Shortcut fields in the footer of the Macro Configuration Editor panel it will display a Listening tag Then press the desired keystroke or control surface Macro button combination Hint For clarity lower case characters are sh...

Страница 171: ...ts group entries at the bottom of the panel Figure 177 Conflicted Listen controls will all show bangs Clicking a bang automatically jumps to the next conflicted entry so you can advance quickly through them resolving conflicts as you go Obviously you can resolve a conflict by assigning a different keystroke to conflicted macros Or you can disable macros if you like using the checkmark switch Hint ...

Страница 172: ... been prepared with the rigorous demands of live production in mind If you install a driver and encounter unintended consequences you can resolve the problem by restoring to factory defaults and if necessary updating to the current software version appropriate for your system 17 6 NDI CONNECTIONS Not surprisingly NewTek products typically have extensive NDI Network Device Interface implementations...

Страница 173: ...n TriCaster s Network Input source selectors as something like 3Play A and 3Play B If you select 3Play A as the active source for TriCaster s Switcher input 1 communication between TriCaster and 3Play can be established Unique Net entries in the macro identify the target system the instructions specified are directed to When examined in TriCaster s Macro Editor a typical macro entry of this type m...

Страница 174: ...urrent clip the one currently visible at on the network input The value ID can be a string ID is global and shared across your system it is not stored per system output if you have multiple For example Delay ms Shortcut Value Key 1 Value 1 time net clip_store index AAA1 The entry above will remember the current clip with the name AAA1 The default for ID is an empty string which is a valid storage ...

Страница 175: ...ic value assigned as the index key selects a specific Play List tab by index assuming Play List mode is active On the other hand in Clip List mode if the value for index was 0 023 the clip referred to would be selected For example Delay ms Shortcut Value Key 1 Value 1 time net clip_select index 4 This would select the fourth Play List tab on the 3Play output A or B connected to the Switcher input ...

Страница 176: ...s Shortcut Value Key 1 Value 1 time net clip_ scrub distance This command will move the playhead backward or forward by a distance of seconds For example Delay ms Shortcut Value Key 1 Value 1 time net clip_scrub distance 5 The entry above would advance the playhead five seconds further into a clip displayed on the source connected to the network input designated NOTES The software associates value...

Страница 177: ...mmands sent to trigger native 3Play shortcut commands of the same sort used by the user interface and Macro system These shortcuts consist of two parts a prefix that identifies the target 3Play output channel A or b and a suffix constituting the command to be executed The AMP instruction may also include values such as unique clip identifiers similar to 3Play s Clip IDs The supported prefixes are ...

Страница 178: ...e should be jlcooper without the quotation marks The value for the name attribute that follows is a custom name of your choosing Hint Normally connected GPI devices are identified by unique names in this file otherwise if GPI devices share a single name GPI commands are issued to them simultaneously The remaining configuration attributes ip port and password are set at the external hardware device...

Страница 179: ...in the following field The entry should be formatted as pin e g pin1 without quotation marks Value 0 n This value controls the contact closure state on or off for the GPI device pin identified by the preceding key The value can be entered variously as 1 or 0 on or off true or false without quotations A typical entry might look like the following Delay ms Shortcut Value Key 1 Value 1 etc 500 gpi jl...

Страница 180: ...rd copy and paste keyboard shortcuts are supported as well When done editing a macro click Apply or Cancel to close the editor without saving your changes Hint Use the Record button in the footer of the Editor to insert newly recorded entries into the current at the selected line 17 10 AUTOMATION AND INTEGRATION More advanced 3Play control methods including TCP IP are discussed in the comprehensiv...

Страница 181: ...Page 167 PART III APPENDICES A time saving question and answer section followed by an extensive listing of Shortcut Keys and keyword index ...

Страница 182: ......

Страница 183: ...her helpful remarks Tip The NewTek website includes a comprehensive FAQ database containing a wealth of useful information on all of its products please see http www newtek com faq How do I Connections 170 Connect cameras 170 Color correct mismatched cameras 171 Connect monitors 171 Improve the quality of Multiview output 172 Connect the Genlock source 172 Connect the 3Play Control surface 172 Sup...

Страница 184: ...ware or codec 178 Restore 3Play software 179 Registration and Tech Support 180 Access Technical Support 180 Find hardware firmware revision numbers 181 Miscellaneous 181 Set up remote desktop control of 3Play 181 Deal With Clips or images That Seem Blurry 181 Access Windows 181 Return to the Startup Screen from the Widows Desktop 181 More Questions and Answers 181 A 1 CONNECTIONS A 1 1 CONNECT CAM...

Страница 185: ...but it s always best to refer to downstream scopes for critical accuracy 1 As required connect external Waveform and Vectorscope monitors to 3Play outputs 2 Your downstream scopes should be configured to conform to the broadcast color specification for your current session 3 Calibrate your sources one by one using the Proc Amp tools for individual inputs see Section 7 2 2 A 1 3 CONNECT MONITORS RE...

Страница 186: ...ol Surface to one of your NewTek 3Play s USB ports Do not extend the supplied cable if possible SUPPLEMENTARY QUESTION Q My system has suddenly stopped responding to the Control Surface What can I do A The foremost reason this might happen is if the cable or extender cable you are using between the Control Surface and 3Play failed to deliver sufficient current consistently In the short term if you...

Страница 187: ...k 3Play provides full time video termination If you need to loop through or t off from upstream video devices such as an external monitor in your video pipeline you should ensure termination is turned OFF for earlier devices A 2 SESSIONS SUPPLEMENTARY QUESTION A 2 1 What is a session A Sessions can be thought of as top level presets They store all of the settings playlists device configurations an...

Страница 188: ...ntent you wish to manage see Section 5 3 1 A 3 EVENTS AND RECORDING A 3 1 START RECORDING 1 Press the REC button on the Control Surface or 2 Press IN or OUT on the Control Surface or 3 Press the Record button in the Dashboard at the top of the Replay Desktop A 3 2 END RECORDING 1 Press SHIFT REC on the Control Surface or 2 Press the Record button in the Dashboard at the top of the Replay Desktop a...

Страница 189: ...A CLIP 1 In the CLIP LIST double click the Memo field for the input clip you want to play or 2 Navigate to a clip using the Control Surface or keyboard and press PLAY 3 Or simply move the T Bar forward from 0 RELATED QUESTIONS Q I pressed PLAY so why is my output frozen A Check to see if the Control Surface T Bar is at the 0 position stopped A 3 5 PREPARE A HIGHLIGHT REEL 1 Select clips for events...

Страница 190: ...2 Click the Import Media button below the Browse Sound and Music link at right 3 Click Add and use the system file explorer that opens to select the file s you wish to import into the current session then click the Open button Selected files are automatically copied to the appropriate folder Clips Stills etc according to their file type see Section 5 2 6 Import Media Tip External files can be used...

Страница 191: ...arger than 4GB As video files will often exceed this size FAT32 is not very suitable for use in that context You should reformat these drives using the NTFS system to eliminate this limitation or you might consider transferring larger files over a network connection A 4 6 AVOID THE ERROR COPY THIS FILE WITHOUT ITS PROPERTIES Windows shows this error message when you export a media file to an exter...

Страница 192: ...plan to connect or import before ever connecting it to 3Play Realistically though in some settings you may feel the need for protection outweighs the risk If you really feel you must install virus protection switch all of its active scanning operations off so that nothing can occur in the background during live production Anything that provides full time protection will dramatically reduce memory ...

Страница 193: ...to try a different approach to restore your system software as follows 1 Select the menu item labeled Restore Factory Defaults from the black boot screen that appears shortly after powering up If this screen does not automatically appear reboot and press F8 a few times in quick succession say once per second immediately after powering up Either method described above will ultimately present you wi...

Страница 194: ...stem drive fails when no User Backup from the same unit has been prepared a User Backup created on a similar model 3Play can be helpful as follows Install the foreign User Backup drive to replace the defunct system drive Power up and at the boot selection screen select Backup and Restore Choose Restore System Partition to Factory Defaults and follow prompts It may be necessary to re activate Windo...

Страница 195: ...THAT SEEM BLURRY When paused or stopped the system performs motion removal to avoid unwanted flicker This can make the image seem slightly blurred when paused but it should look perfect during playback A 7 3 ACCESS WINDOWS 1 If necessary close the Replay Desktop by clicking the x button at the right hand end of the titlebar 2 Click the Shutdown icon on the icon ring in Startup 3 Click the Exit to ...

Страница 196: ......

Страница 197: ...ight arrow One page up Page Up One page down Page Down First cell in row Home Last cell in row End First cell in table Ctrl Home Last cell in table Ctrl End B 2 EDIT LISTS TEXT Cut Ctrl x Copy Ctrl c Paste Ctrl v Remove event item Del Append to current Memo value Enter Confirm edit Enter Copy Memo text to all angles of an event Shift Enter Exit text edit without saving changes Esc Add Media to CLI...

Страница 198: ...Search F3 or Ctrl f Go To Clip Ctrl g Go To timecode Ctrl Shift g B 5 CONTROL Delegate Channel A Control Ctrl Delegate Channel B Control Ctrl Link Channels toggle Ctrl Source Delegate LIVE Ctrl l lower case L Select input or angle Alt Numpad 1 8 Previous input or angle Alt left arrow Next input or angle Alt right arrow Go to first frame of clip Alt Home Go to last frame of clip Alt End ...

Страница 199: ... NewTek 3Play the following standards are applicable Test Parameter Evaluation Standard Temperature Mil Std 810F Part 2 Sections 501 502 Ambient Operating 0 C and 40 C Ambient Non Operating 10 C and 55 C Humidity Mil STD 810 IEC 60068 2 38 Ambient Operating 20 to 90 Ambient Non Operating 20 to 95 Vibration ASTM D3580 95 Mil STD 810 Sinusoidal Exceeds ASTM D3580 95 Paragraph 10 4 3 Hz to 500 Hz Ran...

Страница 200: ......

Страница 201: ...Play indicator 107 Re order 106 Selection 107 Table 104 Titlebar 99 109 Transport 107 Trimming 105 Codecs 178 Connect the Genlock source 172 Connections Cameras 19 69 170 171 Control Surface 172 External Drive 173 Genlock 20 LTC Timecode 20 Output 20 171 Control Surface 6 172 Add to Playlist 88 108 175 Fast Jog 83 IN 85 Jog wheel 83 Navigation 82 One button marking 86 174 OUT 86 Transport 82 Two b...

Страница 202: ... 63 Live playback See Source Delegate Live LiveMatte 146 Spill Suppression 146 LiveText 142 Loop 83 LTC See Connections M Macros 153 Conflicts deliberate 157 Macro Configuration pane 157 Resolving conflicts 157 Sending GPI commands 165 Triggering GPI 164 Marking See Control Surface Memo See CLIP LIST See CLIP LIST Monitors Clip List previews 13 62 Dual Displays 60 Interface 17 171 Replay Desktop 1...

Страница 203: ...9 Software Installing Third Party 178 Source Delegate 31 34 79 80 93 99 109 119 Clip 5 List 5 Live 5 Spill Suppresion See LiveMatte Startup Screen 7 21 45 Home Page 7 21 46 Open Session 50 173 174 Session Page 21 23 53 Shutdown 51 Exit to Windows 51 System Utilities Restore 3Play 179 Utilities Defragment 52 177 Update 3Play 178 Storage external 173 Support 180 T T Bar 84 Technical Support 180 Tele...

Страница 204: ......

Страница 205: ...SE All other software with the 3Play not expressly noted as free is proprietary and subject to NewTek s copyright rights or those of its licensors Trademarks NewTek NewTek VMC1 NewTek VMC1 IN NewTek VMC1 OUT NewTek NC1 NewTek NC1 IN NewTek NC1 I O TriCaster TriCaster TC1 TriCaster Advanced Edition TriCaster XD TriCaster 8000 TriCaster TCXD8000 TCXD8000 TriCaster 860 TriCaster TCXD860 TCXD860 TriCa...

Страница 206: ...Copyright 2018 NewTek Inc All rights reserved ...

Отзывы: