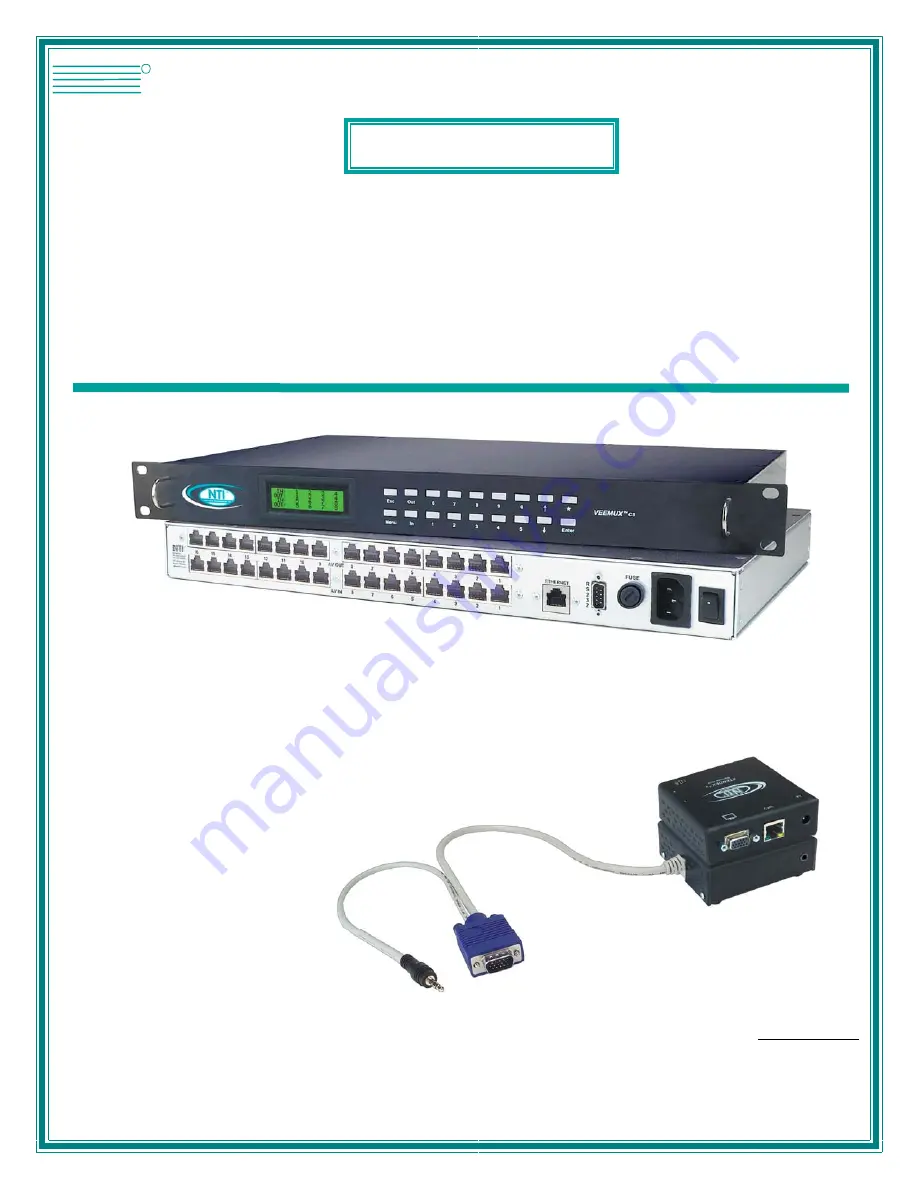
Network Technologies SM-nXm-C5AV-LCD Скачать руководство пользователя страница 1


MAN050  Rev 4/10/06

SM-nXm-C5AV-LCD

Audio/Video Matrix Switch via CAT5

Installation and Operation Manual

Used with NTI ST-C5VA-600 (XTENDEX

TM

) (NOT INCLUDED)

VEEMUX

®

Series

NETWORK
TECHNOLOGIES
INCORPORATED

Tel:330-562-7070
Fax:330-562-1999

1275 Danner Dr
Aurora, OH 44202

  www.networktechinc.com

NTI

R

Содержание SM-nXm-C5AV-LCD

Страница 1: ...Matrix Switch via CAT5 Installation and Operation Manual Used with NTI ST C5VA 600 XTENDEXTM NOT INCLUDED VEEMUX Series NETWORK TECHNOLOGIES INCORPORATED Tel 330 562 7070 Fax 330 562 1999 1275 Danner...

Страница 2: ...lectronic mechanical photocopying recording or otherwise without the prior written consent of Network Technologies Inc 1275 Danner Drive Aurora Ohio 44202 CHANGES The material in this guide is for inf...

Страница 3: ...o Level Digital VU Meter 13 RS232 Interface 14 Matrix Switcher s Control Program For Windows 9X NT 2000 and XP 15 Telnet Interface 16 Web Interface 17 Enter the Password 17 Switch Page 18 Setup Pages...

Страница 4: ...13 Figure 20 Web interface Welcome page 17 Figure 21 Web interface Login Prompt 17 Figure 22 Web interface Switch page 18 Figure 23 Web interface Setup page 20 Figure 24 Web interface Serial Setup pa...

Страница 5: ...displayed by LCD Automatic video quality adjustment with additional manual control assures maximum video quality at lengths of up to 600 feet All connections between local sources and remote displays...

Страница 6: ...d Functions 1 Keypad for manual user control of connections and switch programming 2 LCD for visual indication of connections and audio level indication 3 Power ON OFF switch 4 IEC Power Connector for...

Страница 7: ...for connecting the local user s monitor 5 Audio Jack 3 5mm stereo audio jack for connecting to local speakers 6 Video Connector blue 15HD male for connecting to the video port on the CPU or KVM switch...

Страница 8: ...stereo speakers The Local Unit 1 Plug the cables of the Local Unit into the back of the CPU See Fig 1 a Connect the blue 15HD cable end to the VGA port on the back of the CPU b Connect the black 3 5m...

Страница 9: ...t Local User Components to Local Unit 3 Connect the CAT5 cable to the Cat 5 port on the Local Unit See Fig 2 When properly inserted the cable end should snap into place Note If an RJ45 wall outlet is...

Страница 10: ...ck on the Remote Unit see Fig 3 Figure 3 Connect the Extended Components to the Remote Unit 4 Connect the CAT5 cable to the Cat 5 port on the Remote Unit See Fig 3 When properly inserted the CAT5 cabl...

Страница 11: ...into each port all the way Plug each AC adapter into a power outlet The yellow LED on the RJ45 connector of both the Remote and Local Units should illuminate indicating that a proper power connection...

Страница 12: ...ure 5 Attach ST C5VA 600 Local Unit to VEEMUX 3 Connect a CAT5 cable wired as specified on page 26 between an ST C5VA 600 Remote Unit and VEEMUX connector AV OUT 1 Note Shielded CAT 5 5e or 6 cable mu...

Страница 13: ...Network and the RJ45 connector on the VEEMUX labeled ETHERNET See Fig 8 This cable should be wired straight through between two RJ45 connectors pin 1 to pin 1 etc Figure 8 Connect VEEMUX to LAN 7 For...

Страница 14: ...econds see Fig 11 Figure 11 VEEMUX start up message on LCD During this time the VEEMUX retrieves its switch settings from memory the startup configuration is retrieved from stored configuration 0 Pres...

Страница 15: ...9 ENTER Also used to enter the periods in a IP address or Subnet Mask Configuration Menu By pressing the Menu key the display will show the following configuration menu Figure 13 Configuration menu o...

Страница 16: ...he user to enter a new IP address A new IP address is entered using number keys and the key for periods The user must press Enter to save the new IP address If the new address is invalid the user will...

Страница 17: ...n the LCD display Figure 18 Adjust LCD contrast After adjusting the contrast the user can press Enter to store the new contrast value or press Esc to return the contrast to its original value Video Ad...

Страница 18: ...00 48 00 96 00 Factory default is 9 600 RV SW 00 CR string 0 CR Read NTI Version String RU SW CR IP OP CR Read Unit Size EA SW ip CR Set the IP address ip is in xxx xxx xxx xxx format number of digits...

Страница 19: ...Matrix Switcher s Control Program To install the Matrix Switcher s Control Program after downloading 1 Locate the Setup exe in the directory the program was downloaded to and double click on it 2 Foll...

Страница 20: ...CR Connect All Outputs To Input RO nn CR mm CR Read Connection For Output Returns the number of the input mm connected to output nn CC nn CR nn CR Save Matrix Connections Into Memory Bank nn nn shoul...

Страница 21: ...ess bar of the web browser Address To open a SSL encrypted connection type Address You will be prompted to accept a certificate Accept the NTI certificate A Welcome Page will appear Figure 20 Web inte...

Страница 22: ...ircle to indicate the selection Then press the Submit button The display will be reloaded with the selections changed to orange to indicate they are now active Multiple connections can be changed simu...

Страница 23: ...other user prior to saving the current connection selections the changes made by the other user will be saved as the configuration The webpage configuration that loads after a Save is the configuratio...

Страница 24: ...cified Note Since the webserver will be restarting all active connections will be logged out The Website Timeout option controls how long an inactive web connection will stay logged in Any change to t...

Страница 25: ...nges to input ports without pressing the port s respective Save button will be discarded All input port names must be no more than 12 characters in length and only alphanumeric characters may be used...

Страница 26: ...ge browse to the firmware file 3 Press Update Firmware 4 Wait for the following message to appear may take several minutes Upload Succeeded Flash of new image completed The system will automatically r...

Страница 27: ...e password must be between 5 and 16 characters in length and can be alphabetical or numeric Help Page This page explains the purpose of each of the other pages in the VEEMUX web interface Update Web S...

Страница 28: ...age This page will enable the user to end the session and close the web interface connection Click on the Press Here to Continue Logout button to exit the VEEMUX web interface Note The connection will...

Страница 29: ...display the Device Discovery Tool page Note The Discovery Tool requires the Java Runtime Environment to operate A link to the web page from which it can be downloaded and installed is provided on the...

Страница 30: ...re listed below including equivalent CCITT V 24 identification and signal direction DB 9M pin Common name EIA name CCITT name Function Direction 1 DCD CF 109 Not used 2 RxD BB 104 Receive Data Input 3...

Страница 31: ...seT PROBLEM SOLUTION RS232 control not working Wrong serial address Verify the address of the unit that will not communicate Check all cable connections APPENDIX Appendix A Default Settings SETTING DE...

Страница 32: ...and includes a mounting flange to make attachment easy Install 4 captive nuts to the rack in locations that line up with the holes or slots in the mounting flange on the NTI switch Then secure the NTI...

Страница 33: ...d to be serviced in the field and contain no user serviceable parts In the event repair is needed all servicing must be performed by factory trained and authorized service personnel Only those items s...

Отзывы: