Netti III Comfort HD Скачать руководство пользователя страница 8

Installation instructions Universal Device Rack Netti III Comfort HD / XHD / Mini SW 35 


MD 0167UK  Installation instructions - Universal device rack  

08-2018 

            My.Netti.com       Page 8 of 10 


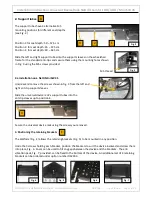
The platform has a circular 115 mm diameter holder that is protected by a 
plate see Fig. 21. 
 
Unscrew the screw in the centre of the plate, you can now remove the it.   
You may need to prise plate out (fig. 22) 
 
Put the oxygen bottle in the holder. Velcro strips are supplied to fasten it to 
the slots in the side panels, figs 23 & 24 


8. Images of a fully assembled universal device rack (Figs 25 & 26) 


An optional set of 4 retaining brackets is available 


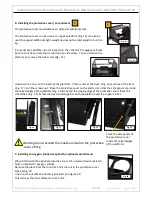
9. Retrofitting a universal device rack to an existing Netti III HD/XHD 


Remove the anti-tips: 
 
Unscrew and remove the screw shown in Fig. 27 on the lower frame. 
This frees the retaining spring inside the tube.  
 
Now pull the entire anti-tip mechanism out of the back of the tube. 
 
Put the screw back and tighten it and continue from section 2 of this 
manual. 


Fig. 25 

Fig. 26 

Fig. 27 

Fig. 21 

Fig. 22 

Fig. 23 

Fig. 24 

Содержание III Comfort HD

Страница 1: ...lepp stasjon post My Netti com Phone 47 51 78 62 20 DEN MARK Alu Rehab ApS Kl fteh j 8 DK 8680 Ry info My Netti com Phone 45 87887300 Installation instruction Universal device rack Version 08 2018 for...

Страница 2: ...iversal device rack where we made some design changes The Universal device rack can now be used also for oxygen containers LOX System like we see here in picture 1 The design change covers also the us...

Страница 3: ...vice rack to an existing Netti III 10 Dimensions and data 11 Basic configuration of the Netti III HD XHD for use with the universal device rack 12 Maximum loads 13 Important notes for user and carers...

Страница 4: ...r the rack has been installed this manual must be given to the wheelchair user The user must be warned of the risks of using this rack if the anti tips are not turned downwards and locked into positio...

Страница 5: ...a Installation on a Netti Mini SW 35 Unscrew and remove the screws shown in fig 3 from the left and right anti tip support sleeves Slide the universal device rack s support tubes into the anti tip sl...

Страница 6: ...ust be replaced by extra long anti tips part 25423 5 Adjusting the anti tips If required the anti tips can be moved forward This is done by changing the position of the anti tip supports To do this un...

Страница 7: ...t the back Fig 16 and one at the front Fig 17 Pull the screws out Place the protective cover on the platform so that the side panels are inside the raised edges of the platform Fig 18 19 and the slopi...

Страница 8: ...e holder Velcro strips are supplied to fasten it to the slots in the side panels figs 23 24 8 Images of a fully assembled universal device rack Figs 25 26 An optional set of 4 retaining brackets is av...

Страница 9: ...ot exceed 160 kg Netti Mini 90 kg 13 Important note A copy of these installation and operating instructions must be given to the user of the wheelchair and their carers Warning make sure that the anti...

Страница 10: ...tive cover are properly secured to prevent them from moving and becoming damaged while the wheelchair is being used 5 Make sure all devices and the connections to them are placed where they cannot col...

Отзывы: