


Installation instructions Universal Device Rack Netti III Comfort HD / XHD / Mini SW 35
MD 0167UK Installation instructions - Universal device rack
08-2018
My.Netti.com Page 6 of 10
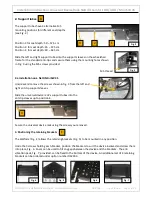
4. Installing the anti-tips
WARNING the anti-tips are mounted at the factory. They should not normally be removed.
If necessary, slide the anti-tips forward, Fig. 8 from the rear of the rack into the anti-tip supports Fig. 9.
Slide the springs provided Fig. 10 over the anti-tips. Compress each spring slightly and secure it by pushing
the pin provided through the hole. The anti-tips are now mounted securely.
WARNING:
If the seat height has been increased, (see diagram), the standard anti-tips must be replaced by extra-long
anti-tips
–
part # 25423
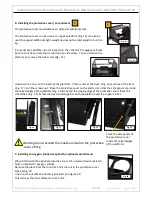
5. Adjusting the anti-tips
If required the anti-tips can be moved forward. This is done by changing the position of the anti-tip
supports. To do this unscrew, the M6 nuts that secure the anti-tip supports and remove the screws, Fig. 11.
Slide the anti-tip supports forward and insert the screws into the 2 empty fixing holes, Fig. 12. Using 2
new self-locking nuts, tighten the screws firmly.
D
C
Fig. 8
Fig. 9
Fig. 10
Fig. 12
Fig. 11
Posi
tions 1, 2, 3 für 12“
-
20“ –
22“
-
24“ –
26“
for standard anti-tips as delivered
12“ H1
Seat height 48,5 cm
20“ H1
Seat height 40,5 cm
22“ H1
Seat height 43,5 cm
24“ H1
Seat height 46,0 cm
26“ H1
Seat height 48,5 cm
Loch 4, 5, 6 12“
-
20“ –
22“
-
24“ –
26“
Extra-long anti-tips part # 25423
12“ H2
Seat height 50,0 cm
20“ H2
Seat height 43,5 cm
22“ H2
Seat height 46,0 cm
24“ H2
Seat height 49,0 cm
26“ H2
Seat height 51,5 cm