background image

41

B

B.   

Compliance Notification

ReadyNAS Ultra, Ultra Plus, Pro

Regulatory Compliance Information

This section includes user requirements for operating this product in accordance with National 
laws for usage of radio spectrum and operation of radio devices. Failure of the end-user to 
comply with the applicable requirements may result in unlawful operation and adverse action 
against the end-user by the applicable National regulatory authority.

This product's firmware limits operation to only the channels allowed in a particular Region or 
Country. Therefore, all options described in this user's guide may not be available in your version 
of the product.

FCC Requirements for Operation in the United States 

FCC Information to User

This product does not contain any user serviceable components and is to be used with 
approved antennas only. Any product changes or modifications will invalidate all applicable 
regulatory certifications and approvals

This device complies with Part 15 of the FCC Rules. Operation is subject to the following two 
conditions: (1) This device may not cause harmful interference, and (2) this device must 
accept any interference received, including interference that may cause undesired operation.

FCC Guidelines for Human Exposure

This equipment complies with FCC radiation exposure limits set forth for an uncontrolled 
environment. This equipment should be installed and operated with minimum distance of 20 
cm between the radiator and your body. 

This transmitter must not be co-located or operating in conjunction with any other antenna or 
transmitter. 

FCC Declaration Of Conformity

We, NETGEAR, Inc., 350 East Plumeria Drive, San Jose, CA 95134, declare under our sole 
responsibility that the NETGEAR ReadyNAS Ultra, Ultra Plus, and Pro comply with Part 15 
of FCC Rules. 

Содержание ReadyNAS Ultra 2

Страница 1: ...st Plumeria Drive San Jose CA 95134 USA April 2011 202 10846 01 ReadyNAS Ultra Ultra Plus and Pro Series Hardware Manual Models Ultra 2 Ultra 4 Ultra 6 Ultra 2 Plus Ultra 4 Plus Ultra 6 Plus Pro 2 Pro 4 Pro 6 ...

Страница 2: ...88 NETGEAR Phone Other Countries See support information card Trademarks NETGEAR the NETGEAR logo and Connect with Innovation are trademarks and or registered trademarks of NETGEAR Inc and or its subsidiaries in the United States and or other countries Information is subject to change without notice 2011 NETGEAR Inc All rights reserved Statement of Conditions To improve internal design operational...

Страница 3: ...ot Menu 12 Chapter 3 ReadyNAS Ultra 4 Ultra 4 Plus Pro 4 Front and Side Panels 15 Drive Bay 16 Rear Panel 17 Status Information 18 System Shutdown 19 Boot Menu 19 Chapter 4 ReadyNAS Ultra 6 Ultra 6 Plus Pro 6 Front and Side Panels 22 Drive Bay 23 Rear Panel 24 Status Information 25 System Shutdown 26 Boot Menu 26 Chapter 5 Disks and Disk Replacements Supported Disks 29 Failed Disk Notification 29 ...

Страница 4: ...s ReadyNAS Ultra 2 Ultra 2 Plus Pro 2 33 ReadyNAS Ultra 4 Ultra 4 Plus Pro 4 35 ReadyNAS Ultra 6 Ultra 6 Plus Pro 6 37 Safety Warnings 39 Electrical Safety Precautions 39 General Safety Precautions 40 Electrostatic Discharge ESD Precautions 40 Appendix B Compliance Notification Index ...

Страница 5: ...about configuring managing and using your ReadyNAS Ultra series or ReadyNAS Ultra Plus series storage system see the ReadyNAS for Home Software Manual For detailed information about configuring managing and using your ReadyNAS Pro series see the ReadyNAS for Business Software Manual Both documents are available at http www readynas com documentation NETGEAR maintains a community website that suppo...

Страница 6: ...the vents in the side of the case is not restricted The air is as free of dust as possible Temperature operating limits are not likely to be exceeded If you are using an uninterruptable power supply UPS for protection the power cable can be securely and safely connected to the UPS System Requirements Your ReadyNAS desktop unit requires the following Ethernet connection Microsoft Windows 7 Vista XP...

Страница 7: ... Pro 2 This chapter provides an overview of the physical features of the ReadyNAS Ultra 2 Ultra 2 Plus and Pro 2 and includes the following sections Front and Side Panels Drive Bay Rear Panel Status Information System Shutdown Boot Menu ...

Страница 8: ...NAS Ultra 2 Ultra 2 Plus and Pro 2 units Your unit s color might vary from the color shown in this manual 1 2 3 6 8 4 5 7 Figure 1 ReadyNAS Ultra 2 Ultra 2 Plus and Pro 2 front and side panels 1 Exhaust vents 2 Power button and LED 3 Disk activity LED 4 Disk 1 and disk 2 LEDs 5 USB 3 0 port 6 Backup button 7 USB and backup status LED 8 Drive bay door ...

Страница 9: ...is section describes the drive bay of ReadyNAS Ultra 2 Ultra 2 Plus and Pro 2 units 3 1 5 3 2 6 4 4 Figure 2 ReadyNAS Ultra 2 Ultra 2 Plus and Pro 2 drive bay 1 Drive bay door 2 Disk bays 3 Recessed disk tray locking mechanism 4 Disk release latch 5 Disk tray latch handle 6 Disk tray ...

Страница 10: ...dyNAS Ultra 2 Ultra 2 Plus and Pro 2 units 1 2 3 4 5 6 7 8 Figure 3 ReadyNAS Ultra 2 Ultra 2 Plus and Pro 2 rear panel 1 Exhaust fan 2 Kensington lock 3 Reset button 4 LAN2 gigabit Ethernet port with LED status indicators 5 USB 2 0 port 6 LAN1 gigabit Ethernet port with LED status indicators 7 USB 2 0 port 8 Power cable socket ...

Страница 11: ...e active Rear panel Ethernet ports Two LED status indicators are built into these ports One LED indicates port activity The other LED indicates connection speed as follows Green The port is operating at 1 000 Mbps Amber The port is operating at 100 Mbps Off The port is operating at 10 Mbps System Shutdown You can shut down your unit in these ways Using the Power button Preferred shutdown Press the...

Страница 12: ...system crashes and corrupts some configuration files OS reinstall boot mode also resets some settings on your unit such as Internet protocol settings and the administrator password to defaults Tech support Boots into a low level diagnostic mode Use the tech support boot mode only when instructed to do so by a NETGEAR Technical Support representative Skip volume check After a system crash the syste...

Страница 13: ... Backup button to scroll through boot mode options The unit shows the boot mode options using the LEDs as described in the following table Boot Mode Status Indicator Normal Power LED is lit Factory default Disk 1 LED is lit OS reinstall Disk 2 LED is lit Tech support USB and backup status LED is lit Skip volume check Power LED and disk 1 LED are lit Memory test Power LED and disk 2 LED are lit Dis...

Страница 14: ...s Pro 4 This chapter provides an overview of the physical features of the ReadyNAS Ultra 4 Ultra 4 Plus and Pro 4 and includes the following sections Front and Side Panels Drive Bay Rear Panel Status Information System Shutdown Boot Menu ...

Страница 15: ...yNAS Ultra 4 Ultra 4 Plus and Pro 4 units Your unit s color might vary from the color shown in this manual 1 2 3 6 7 4 5 8 Figure 4 ReadyNAS Ultra 4 Ultra 4 Plus and Pro 4 front and side panels 1 Exhaust vents 2 USB 2 0 port 3 Backup button and backup LED 4 Disk LEDs 5 Disk activity LED 6 Power button and LED 7 Drive bay door 8 Status display screen ...

Страница 16: ...his section describes the drive bay of ReadyNAS Ultra 4 Ultra 4 Plus and Pro 4 units 3 6 1 4 3 2 5 4 Figure 5 ReadyNAS Ultra 4 Ultra 4 Plus and Pro 4 drive bay 1 Drive bay door 2 Disk bays 3 Recessed disk tray locking mechanism 4 Disk release latch 5 Disk tray latch handle 6 Disk tray ...

Страница 17: ... describes the rear panel of ReadyNAS Ultra 4 Ultra 4 Plus and Pro 4 units 1 2 5 6 4 3 Figure 6 ReadyNAS Ultra 4 Ultra 4 Plus and Pro 4 rear panel 1 Exhaust fan 2 Power cable socket 3 Reset button 4 LAN1 and LAN2 gigabit Ethernet ports with LED status indicators 5 USB 2 0 ports 6 Kensington lock ...

Страница 18: ...ormally Blinking The disk failed or is resynchronizing See the status display screen for details Off The disk bay is empty Disk activity LED The disk activity LED has these states Blinking green A disk is active Off No disks are active Rear panel Ethernet port LEDs Two LED status indicators are built into these ports One LED indicates port activity The other LED indicates connection speed as follo...

Страница 19: ...dyNAS unit Your unit has the following boot modes Normal Initiates a normal boot process just like booting using the Power button Factory default Initiates a short disk test that takes approximately 5 minutes then begins a 10 minute time out period waiting for RAIDar During the 10 minute time out period the system can be powered off safely without causing any data loss After 10 minutes or if you s...

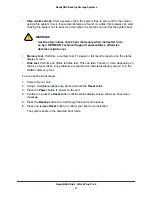
Страница 20: ... memory test The pass or fail result is reported on the status display screen Disk test Performs an offline full disk test This can take 4 hours or more depending on the size of your disks Any problems are reported on the status display screen or in the RAIDar discovery tool To access the boot menu 1 Power off your unit 2 Using a straightened paper clip press and hold the Reset button 3 Press the ...

Страница 21: ...s Pro 6 This chapter provides an overview of the physical features of the ReadyNAS Ultra 6 Ultra 6 Plus and Pro 6 and includes the following sections Front and Side Panels Drive Bay Rear Panel Status Information System Shutdown Boot Menu ...

Страница 22: ...els of ReadyNAS Ultra 6 Ultra 6 Plus and Pro 6 units Your unit s color might vary from the color shown in this manual 7 1 2 3 6 4 5 Figure 7 ReadyNAS Ultra 6 Ultra 6 Plus and Pro 6 front and side panels 1 Exhaust vent 2 Power button and LED 3 USB and backup status LED 4 Backup button 5 USB 2 0 port 6 Drive bay door 7 Status display screen ...

Страница 23: ...his section describes the drive bay of ReadyNAS Ultra 6 Ultra 6 Plus and Pro 6 units 4 1 6 3 2 5 4 3 Figure 8 ReadyNAS Ultra 6 Ultra 6 Plus and Pro 6 drive bay 1 Drive bay door 2 Disk bays 3 Recessed disk tray locking mechanism 4 Disk release latch 5 Disk tray latch handle 6 Disk tray ...

Страница 24: ...r panel of ReadyNAS Ultra 6 Ultra 6 Plus and Pro 6 units 1 2 4 5 8 7 6 3 Figure 9 ReadyNAS Ultra 6 Ultra 6 Plus and Pro 6 rear panel 1 Exhaust fan 2 PSU exhaust fan 3 USB 2 0 ports 4 Reset button 5 LAN1 and LAN2 gigabit Ethernet ports with LED status indicators 6 Kensington lock 7 Power switch 8 Power cable socket ...

Страница 25: ...ed in the bay that corresponds to that icon and it is operating properly X in box The disk in the bay that corresponds to that icon was removed or failed See the status display screen for details Rear panel Ethernet port LEDs Two LED status indicators are built into these ports One LED indicates port activity The other LED indicates connection speed as follows Green The port is operating at 1 000 ...

Страница 26: ...dyNAS unit Your unit has the following boot modes Normal Initiates a normal boot process just like booting using the Power button Factory default Initiates a short disk test that takes approximately 5 minutes then begins a 10 minute time out period waiting for RAIDar During the 10 minute time out period the system can be powered off safely without causing any data loss After 10 minutes or if you s...

Страница 27: ... memory test The pass or fail result is reported on the status display screen Disk test Performs an offline full disk test This can take 4 hours or more depending on the size of your disks Any problems are reported on the status display screen or in the RAIDar discovery tool To access the boot menu 1 Power off your unit 2 Using a straightened paper clip press and hold the Reset button 3 Press the ...

Страница 28: ...28 5 5 Disks and Disk Replacements This chapter includes the following topics Supported Disks Failed Disk Notification Adding a Disk Replacing a Disk ...

Страница 29: ...cat 40 Failed Disk Notification When a disk fails in your ReadyNAS you are notified by email Email alerts must be set up for notifications to be sent In addition FrontView provides information about the failed disk NETGEAR recommends replacing a failed disk with the same disk model Use FrontView to determine the disk vendor and model used in your unit For information about setting up email alerts ...

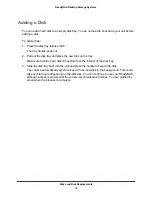
Страница 30: ...y and place the new disk on the tray Make sure that the hard disk connectors face the interior of the disk bay 3 Slide the disk tray back into the unit and press the handle to secure the disk The volume automatically synchronizes with the new disk in the background This could take several hours depending on the disk size You can continue to use your ReadyNAS although access is slower until the vol...

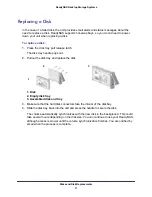
Страница 31: ...andle pops out 2 Pull out the disk tray and replace the disk 1 3 2 1 Disk 2 Empty disk tray 3 Assembled disk and tray 3 Make sure that the hard disk connectors face the interior of the disk bay 4 Slide the disk tray back into the unit and press the handle to secure the disk The volume automatically synchronizes with the new disk in the background This could take several hours depending on the disk...

Страница 32: ... Defaults and Technical Specifications This appendix includes the following sections ReadyNAS Ultra 2 Ultra 2 Plus Pro 2 ReadyNAS Ultra 4 Ultra 4 Plus Pro 4 ReadyNAS Ultra 6 Ultra 6 Plus Pro 6 Safety Warnings ...

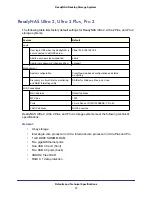
Страница 33: ...iguration FrontView web based configuration and status monitoring Discovery multi unit status monitoring and RAID formatting utility RAIDar for Windows Mac and Linux LAN Connections MAC address Default address MTU size 1500 Ports 2 Auto Sense 10 100 1000BASE T RJ 45 LAN IP address DHCP acquired ReadyNAS Ultra 2 Ultra 2 Plus and Pro 2 storage systems meet the following technical specifications Gene...

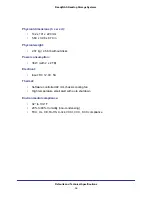
Страница 34: ... 8 70 in Physical weight 2 07 kg 4 56 lb without disks Power consumption 38 W with 2 x 2 TB Electrical Input DC 12 0V 5A Thermal Software controlled 92 mm chassis cooling fan High temperature email alert with auto shutdown Environmental compliance 32 to 104 F 20 to 80 Humidity non condensing FCC UL CE RoHS C tick VCCI CCC KCC compliance ...

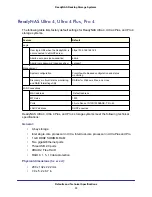
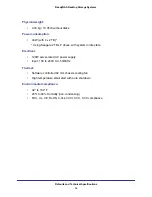
Страница 35: ...based configuration and status monitoring Discovery multi unit status monitoring and RAID formatting utility RAIDar for Windows Mac and Linux LAN Connections MAC address Default address MTU size 1500 Ports 2 Auto Sense 10 100 1000BASE T RJ 45 LAN IP address DHCP acquired ReadyNAS Ultra 4 Ultra 4 Plus and Pro 4 storage systems meet the following technical specifications General 4 bay storage Intel ...

Страница 36: ... 2 TB Using Seagate 2 TB LP drives with system in idle state Electrical 120W server rated AC power supply Input 100 to 240V AC 50 60Hz Thermal Software controlled 92 mm chassis cooling fan High temperature email alert with auto shutdown Environmental compliance 32 to 104 F 20 to 80 Humidity non condensing FCC UL CE RoHS C tick VCCI CCC KCC compliance ...

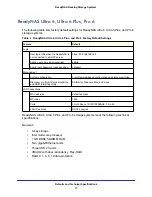
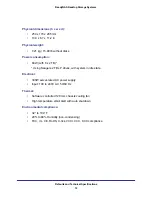
Страница 37: ...in login password case sensitive netgear1 Management System configuration FrontView web based configuration and status monitoring Discovery multi unit status monitoring and RAID formatting utility RAIDar for Windows Mac and Linux LAN Connections MAC address Default address MTU size 1500 Ports 2 Auto Sense 10 100 1000BASE T RJ 45 LAN IP address DHCP acquired ReadyNAS Ultra 6 Ultra 6 Plus and Pro 6 ...

Страница 38: ...sks Power consumption 68W with 6 x 2 TB Using Seagate 2 TB LP drives with system in idle state Electrical 300W server rated AC power supply Input 100 to 240V AC 50 60 Hz Thermal Software controlled 120 mm chassis cooling fan High temperature email alert with auto shutdown Environmental compliance 32 to 104 F 20 to 80 Humidity non condensing FCC UL CE RoHS C tick VCCI CCC KCC compliance ...

Страница 39: ...tlet If an electrical accident occurs you can then quickly remove power from the system Do not work alone when working with high voltage components Always disconnect power from the system when removing or installing main system components such as the main board or memory modules When disconnecting power first power down the system with the operating system and then unplug the power cords of all th...

Страница 40: ...harge ESD is generated by two objects with different electrical charges coming into contact with each other An electrical discharge is created to neutralize this difference which can damage electronic components and printed circuit boards The following measures are generally sufficient to neutralize this difference before contact is made to protect your equipment from ESD Use a grounded wrist stra...

Страница 41: ...ts and is to be used with approved antennas only Any product changes or modifications will invalidate all applicable regulatory certifications and approvals This device complies with Part 15 of the FCC Rules Operation is subject to the following two conditions 1 This device may not cause harmful interference and 2 this device must accept any interference received including interference that may ca...

Страница 42: ...on the user is encouraged to try to correct the interference by one or more of the following methods Reorient or relocate the receiving antenna Increase the separation between the equipment and the receiver Connect the equipment into an electrical outlet on a circuit different from that which the radio receiver is connected Consult the dealer or an experienced radio TV technician for help Modifica...

Страница 43: ...37 failed disk 29 FCC 41 front panel 8 15 22 G general safety 40 H Hardware Compatibility List 6 29 L LEDs 11 18 location unit 6 P Pro 2 7 Pro 4 14 Pro 6 21 R rear panel 10 17 24 restarting 12 19 26 S safety 39 40 safety warning 39 setup location 6 side panel 8 15 22 socket outlet 39 status information 11 18 25 status system 11 18 25 supported disks 29 system requirements 6 system shutdown 11 19 2...

Страница 44: ...44 ReadyNAS Desktop Storage Systems U Ultra 2 7 Ultra 2 Plus 7 Ultra 4 14 Ultra 4 Plus 14 Ultra 6 21 Ultra 6 Plus 21 unit location 6 V volume synchronization 30 ...

Отзывы: