background image

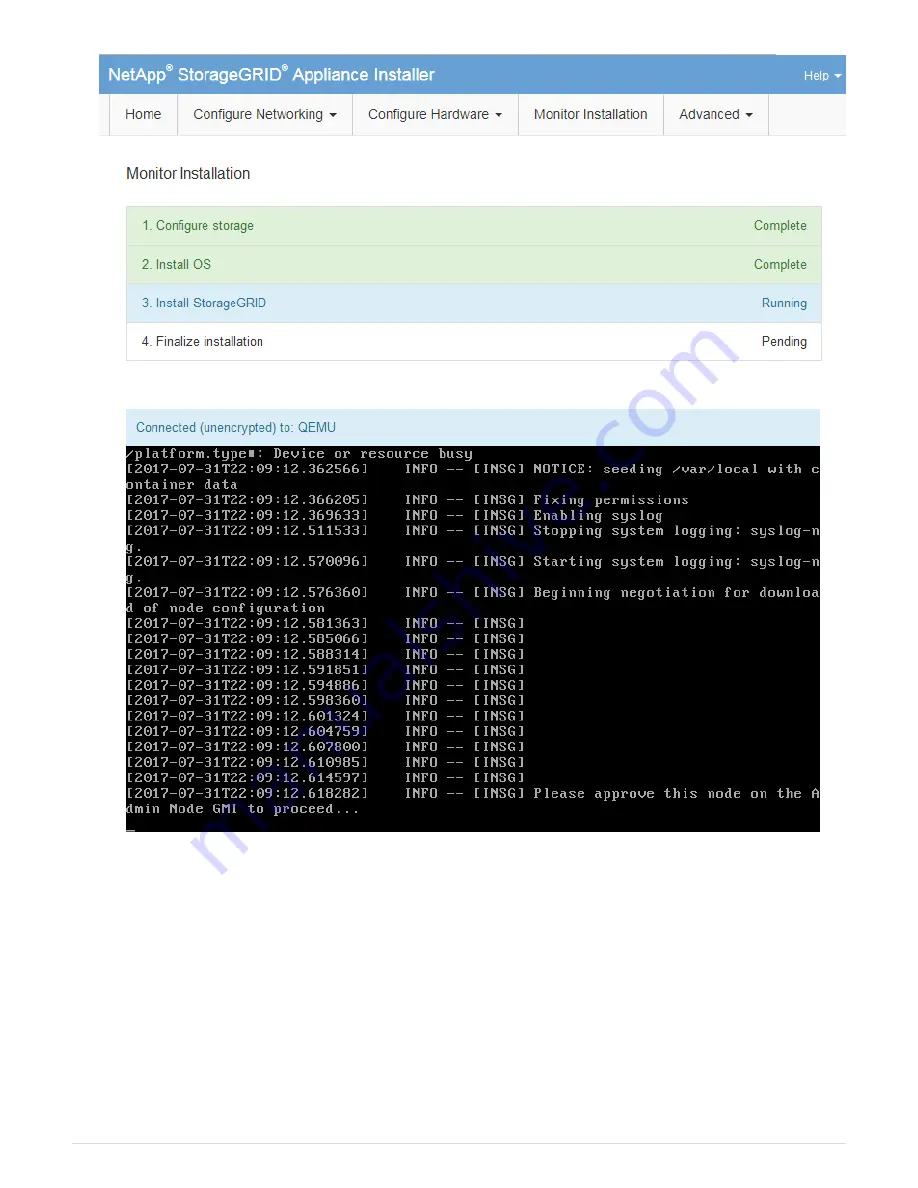
4. Go to the Grid Manager of the Primary Admin node, approve the pending storage node, and complete the

StorageGRID installation process.

When you click 

Install

 from the Grid Manager, Stage 3 completes and stage 4, 

Finalize Installation

,

begins. When stage 4 completes, the controller is rebooted.

Automate appliance installation and configuration (SG6000)

You can automate the installation and configuration of your appliances and configuration
of the whole StorageGRID system.

About this task

89

Содержание StorageGRID Webscale SG6000 Series

Страница 1: ...rage appliances StorageGRID NetApp March 03 2022 This PDF was generated from https docs netapp com us en storagegrid 116 sg6000 sg6060 overview html on March 03 2022 Always check docs netapp com for t...

Страница 2: ...installation SG6000 14 Install hardware SG6000 29 Configure hardware SG6000 45 Deploy appliance Storage Node 84 Monitor storage appliance installation 88 Automate appliance installation and configurat...

Страница 3: ...torage Node deployment and configuration Include SANtricity System Manager for managing and monitoring the storage controllers and drives Include a baseboard management controller BMC for monitoring a...

Страница 4: ...Five drawer drive shelf that holds sixty 3 5 inch drives 2 solid state drives or SSDs and 58 NL SAS drives Redundant power supplies and fans Optional Storage expansion shelves Note Expansion shelves c...

Страница 5: ...bezel optional expansion shelf appears identical 3 SG6000 CN compute controller with front bezel removed 4 E2860 controller shelf with front bezel removed optional expansion shelf appears identical T...

Страница 6: ...E Series E2800 storage controller 1 of 2 and connectors 5 Power supply 1 of 2 for E2860 controller shelf This figure shows the back of the optional expansion shelf for the SG6060 including the input o...

Страница 7: ...f that holds 24 solid state drives SGF6024 components The SGF6024 appliance includes the following components Component Description Compute controller SG6000 CN controller a one rack unit 1U server th...

Страница 8: ...er supplies and fans SGF6024 diagrams This figure shows the front of the SGF6024 which includes a 1U compute controller and a 2U enclosure containing two storage controllers and 24 flash drives Callou...

Страница 9: ...4U enclosure depending on the model Review the diagrams to learn more about each type of controller All appliances SG6000 CN compute controller Provides compute resources for the appliance Includes th...

Страница 10: ...n cable or SFP transceiver type switch speed and configured link speed Connect to the Grid Network and the Client Network for StorageGRID 3 BMC management port 1 GbE RJ 45 Connect to the SG6000 CN bas...

Страница 11: ...060 E2800 storage controllers Two controllers for failover support Manage the storage of data on the drives Function as standard E Series controllers in a duplex configuration Include SANtricity OS So...

Страница 12: ...eave unwired to save a switch port and IP address Access SANtricity System Manager using the Grid Manager or Storage Grid Appliance Installer UIs Note some optional SANtricity functionality such as NT...

Страница 13: ...g alerts the AutoSupport feature and the Drive Security feature Connect to the SG6000 CN controller and provide access to the flash storage This figure shows the connectors on the back of each of the...

Страница 14: ...rollers or additional expansion shelf if any Installation and deployment overview You can install one or more StorageGRID storage appliances when you first deploy StorageGRID or you can add appliance...

Страница 15: ...only maximum of two expansion shelves Cabling the appliance Connecting the power cords and applying power Viewing boot up status codes 3 Configuring the hardware Accessing SANtricity System Manager to...

Страница 16: ...browser requirements Prepare site SG6000 Before installing the appliance you must make sure that the site and the cabinet or rack you plan to use meet the specifications for a StorageGRID appliance S...

Страница 17: ...the bottom to the top of the rack or cabinet to prevent the equipment from tipping over To ensure that the heaviest equipment is at the bottom of the cabinet or rack install the SG6000 CN controller...

Страница 18: ...Two front bezels Two rail kits with instructions 60 drives 2 SSD and 58 NL SAS Four handles Back brackets and cage nuts for square hole rack installation 16...

Страница 19: ...G6060 expansion shelf Expansion shelf with no drives installed Front bezel 60 NL SAS drives One rail kit with instructions Four handles Back brackets and cage nuts for square hole rack installation 17...

Страница 20: ...h 24 solid state flash drives installed Two front bezels Two rail kits with instructions Shelf endcaps Cables and connectors The shipment for the StorageGRID appliance includes the following cables an...

Страница 21: ...s FC Optional Two SAS cables for connecting each SG6060 expansion shelf Obtain additional equipment and tools SG6000 Before installing the StorageGRID appliance confirm you have all of the additional...

Страница 22: ...for the 10 25 GbE ports if you will use optical cables and 10 GbE link speed One to four SFP28 transceivers for the 10 25 GbE ports if you will use optical cables and 25 GbE link speed RJ 45 Cat5 Cat...

Страница 23: ...er shelf This management network can be the same as the Admin Network for StorageGRID or it can be an independent management network If the optional SANtricity System Manager network is not connected...

Страница 24: ...matically provides a failover connection Port 4 provides a backup path for port 2 Grid Network and port 3 provides a backup path for port 1 Client Network In LACP mode each pair of ports forms a logic...

Страница 25: ...ger after StorageGRID is installed indicating that cables are unplugged You can safely acknowledge the alarms to clear them Network bond modes for 1 GbE management ports For the two 1 GbE management p...

Страница 26: ...connect to the appliance These values are required to install and configure the hardware Information needed to connect to SANtricity System Manager on storage controllers You must connect both of the...

Страница 27: ...storage controller router IP address For IPv4 IPv4 address Subnet mask Gateway For IPv6 IPv6 address Routable IP address storage controller router IP address IP address format Choose one IPv4 IPv6 Ch...

Страница 28: ...the label For example if the MAC address on the label ends in 09 the MAC address for the Admin Port would end in 0B If the MAC address on the label ends in y FF the MAC address for the Admin Port woul...

Страница 29: ...rt 3 Client Network for Fixed mode Switch port for port 4 Grid Network for Fixed mode Information needed to connect SG6000 CN controller to Grid Network The Grid Network for StorageGRID is a required...

Страница 30: ...ne No default Yes Network bond mode Choose one Active Backup default LACP 802 3ad VLAN tagging enabled Choose one No default Yes VLAN tag If VLAN tagging is enabled Enter a value between 0 and 4095 DH...

Страница 31: ...ce SG6000 Configure StorageGRID IP addresses Install hardware SG6000 Hardware installation entails installing the SG6000 CN controller and the storage controller shelf into a cabinet or rack connectin...

Страница 32: ...e expansion shelves the same procedure applies What you ll need You have reviewed the Safety Notices document included in the box and understand the precautions for moving and installing hardware You...

Страница 33: ...he four handles to the sides of the chassis Push up on each handle until it clicks into place 4 Place the back of the shelf the end with the connectors on the rails 5 Supporting the shelf from the bot...

Страница 34: ...2860 controller shelf or optional expansion shelves one or two in the cabinet or rack To avoid damaging the hardware never move the shelf if drives are installed You must remove all drives before movi...

Страница 35: ...1 Attach the front bezel to the shelf 12 If you have expansion shelves repeat these steps to install 12 HDD drives into each drawer of each expansion shelf 13 Proceed to the instructions for installin...

Страница 36: ...es all the way onto the rails Do not place additional equipment on the rails after you finish installing the enclosure The rails are not designed to bear additional weight If applicable you might need...

Страница 37: ...d in the box and understand the precautions for moving and installing hardware You have the instructions packaged with the rail kit You have installed the E2860 controller shelf and drives or the EF57...

Страница 38: ...CN controller into the rails 4 Slide the controller into the cabinet or rack When you cannot move the controller any further pull the blue latches on both sides of the chassis to slide the controller...

Страница 39: ...nect the network ports on the SG6000 CN controller to the Grid Network and optional Client Network for StorageGRID What you ll need You have the four optical cables provided with the appliance for con...

Страница 40: ...ser radiation About this task The following figure shows the three controllers in the SG6060 appliance with the SG6000 CN compute controller on the top and the two E2800 storage controllers on the bot...

Страница 41: ...operates only at 1000 baseT full and does not support 10 or 100 megabit speeds Can be bonded with management port 1 if you want a redundant connection to the Admin Network Can be left unwired and ava...

Страница 42: ...valent 4 If you plan to use the Admin Network for StorageGRID connect the Admin Network port on the SG6000 CN controller to the Admin Network using an Ethernet cable 5 If you plan to use the managemen...

Страница 43: ...nect each expansion shelf to the E2860 controller shelf as shown in the diagram This drawing shows two expansion shelves If you have only one connect IOM A to controller A and connect IOM B to control...

Страница 44: ...ches for each of the two storage controllers are off 2 If you have expansion shelves confirm that both of the IOM power switches are off Risk of electrical shock Before connecting the power cords make...

Страница 45: ...the back of each storage controller Refer to the article about viewing boot up status codes for more information Verify that the power button on the front of the SG6000 CN controller is lit 11 If err...

Страница 46: ...o view the boot up and error codes you must access the BMC interface Related information Troubleshoot hardware installation SG6000 Configure BMC interface SG6000 Power on SG6000 CN controller and veri...

Страница 47: ...the software you will use to monitor the storage controllers and other hardware in the controller shelf You must also ensure that you can access the BMC interface for the SG6000 CN controller Configur...

Страница 48: ...r the Admin Network port you must add 2 to the hexadecimal number on the label For example if the MAC address on the label ends in 09 the MAC address for the Admin Port would end in 0B If the MAC addr...

Страница 49: ...can use a link local connection a Connect a service laptop directly to the rightmost RJ 45 port on the SG6000 CN controller using an Ethernet cable b Open a web browser on the service laptop c Enter...

Страница 50: ...orted What you ll need You have accessed the StorageGRID Appliance Installer About this task StorageGRID appliances come from the factory preinstalled with the StorageGRID Appliance Installer If you a...

Страница 51: ...ork and the Admin Network You can set the link speed as well as the port and network bond modes What you ll need If you are cloning an appliance node configure network links for the target appliance f...

Страница 52: ...or configuring the four network ports The default settings are shown in bold You only need to configure the settings on the Link Configuration page if you want to use a non default setting Fixed defau...

Страница 53: ...ingle LACP bond for the Grid Network A single VLAN tag identifies Grid Network packets Ports 1 4 use a single LACP bond for the Grid Network and the Client Network Two VLAN tags allow Grid Network pac...

Страница 54: ...he numbered ports The first time you access this page Link Speed is set to Auto Port bond mode is set to Fixed Network bond mode is set to Active Backup for the Grid Network The Admin Network is enabl...

Страница 55: ...speed drop down list The network switches you are using for the Grid Network and the Client Network must also support and be configured for this speed You must use SFP28 TwinAx cables or optical cabl...

Страница 56: ...k select the Enable network check box for the Client Network The Client Network settings for the network ports are now shown 4 Refer to the table and configure the port bond mode and the network bond...

Страница 57: ...ute re enter the URL for the StorageGRID Appliance Installer using one of the other IP addresses assigned to the appliance https SG6000 CN_Controller_IP 8443 Configure StorageGRID IP addresses You use...

Страница 58: ...ee the instructions for changing the link configuration of the SG6000 CN controller Steps 1 In the StorageGRID Appliance Installer select Configure Networking IP Configuration The IP Configuration pag...

Страница 59: ...onfirm that the list of Grid Network subnets is correct If you have grid subnets the Grid Network gateway is required All grid subnets specified must be reachable through this gateway These Grid Netwo...

Страница 60: ...work must match the value configured on the switch port the node is connected to Otherwise network performance issues or packet loss might occur For the best network performance all nodes should be co...

Страница 61: ...services_appliance 8443 e Confirm that the list of Admin Network subnets is correct You must verify that all subnets can be reached using the gateway you provided The default route cannot be made to u...

Страница 62: ...ure the Client Network you must enable the Client Network on the Link Configuration page 9 If you selected Static follow these steps to configure the Client Network a Enter the static IPv4 address usi...

Страница 63: ...yed The default route uses the Client Network gateway and cannot be moved to another interface while the Client Network is enabled c If you want to use jumbo frames change the MTU field to a value sui...

Страница 64: ...g the gateway on the network or the primary Admin Node 4 Optionally select the Test MTU check box to verify the MTU setting for the entire path through the network to the destination For example you c...

Страница 65: ...fic TCP port or set of ports at the specified IP address or range of addresses About this task Using the list of ports provided in the StorageGRID Appliance Installer you can test the connectivity bet...

Страница 66: ...at should be accessible to your appliance You can test the connectivity between the appliance ports listed in the table and the other nodes in your Grid Network 2 From the Network drop down select the...

Страница 67: ...re trying to connect to is in a pre installed state and the StorageGRID NMS service is not yet running on that node If a port level network connection cannot be made for one or more selected ports the...

Страница 68: ...eries AutoSupport What you ll need You are using a supported web browser To access SANtricity System Manager through Grid Manager you must have installed StorageGRID and you must have the Storage Appl...

Страница 69: ...anagement port This procedure includes steps for your initial access to SANtricity System Manager If you have already set up SANtricity System Manager go to the configure hardware alerts step Using ei...

Страница 70: ...controllers Access SANtricity System Manager by browsing to the storage controller IP 2 Set or enter the administrator password SANtricity System Manager uses a single administrator password that is s...

Страница 71: ...c instructions on configuring a StorageGrid proxy for sending E Series AutoSupport messages without using the management port go to the instructions for configuring storage proxy settings 6 If the Dri...

Страница 72: ...er you must have the SANtricity System Manager administrator username and password You must have SANtricity firmware 8 70 or higher to access SANtricity System Manager using the Grid Manager or the St...

Страница 73: ...components have a status of Optimal a Click the Hardware tab b Click Show back of shelf From the back of the shelf you can view both storage controllers the battery in each storage controller the two...

Страница 74: ...not lose your management connection to the hardware and the controller firmware in the controller shelf What you ll need You are using any management client that can connect to the StorageGRID Admin N...

Страница 75: ...ateway d Click Save It might take a few minutes for your changes to be applied When you connect to SANtricity System Manager you will use the new static IP address as the URL https Storage_Controller_...

Страница 76: ...taller Home page appears 2 Select Configure Hardware BMC Configuration The Baseboard Management Controller Configuration page appears 3 Enter a new password for the root account in the two fields prov...

Страница 77: ...er the URL for the StorageGRID Appliance Installer https SG6000 CN_Controller_IP 8443 For SG6000 CN_Controller_IP use the IP address for the appliance on any StorageGRID network The StorageGRID Applia...

Страница 78: ...ter the IPv4 address using CIDR notation c Enter the default gateway d Click Save It might take a few minutes for your changes to be applied Access BMC interface You can access the BMC interface on th...

Страница 79: ...lt the BMC obtains an IP address using DHCP If DHCP is enabled on the BMC network your network administrator can provide the IP address assigned to the BMC MAC which is printed on the label on the fro...

Страница 80: ...nfiguring SNMP settings for SNMPv1 v2c equipment BMC settings made by this procedure might not be preserved if the SG6000 CN fails and has to be replaced Make sure you have a record of all settings yo...

Страница 81: ...LAN destinations alert policies and event filters BMC settings made by this procedure might not be preserved if the SG6000 CN fails and has to be replaced Make sure you have a record of all settings...

Страница 82: ...erts for different event types to the appropriate users a Select Settings Platform Event Filters Event Filters b For Alert Policy Group Number enter 1 c Create filters for every event you want the Ale...

Страница 83: ...til the key is set to a value provided by the KMS Without the KMS key needed to decrypt the disk data on the appliance cannot be retrieved and is effectively lost This is the case whenever the decrypt...

Страница 84: ...icates in use when the appliance node is in maintenance mode Related information Administer StorageGRID Monitor node encryption in maintenance mode SG6000 Optional Change RAID mode SG6000 only You can...

Страница 85: ...list 4 Click Save Related information NetApp E Series Systems Documentation Site Optional Remap network ports for appliance You might need to remap the internal ports on the appliance Storage Node to...

Страница 86: ...rocess in recovery and maintenance Recover and maintain The appliance has been installed in a rack or cabinet connected to your networks and powered on Network links IP addresses and port remapping if...

Страница 87: ...geGRID installation and deployment processes If you need to deploy multiple appliance nodes at one time you can automate the installation process by using the configure sga py Appliance Installation s...

Страница 88: ...ve previously installed other nodes in this data center the StorageGRID Appliance Installer can discover this IP address automatically assuming the primary Admin Node or at least one other grid node w...

Страница 89: ...t the current state is Ready to start installation of node name into grid with primary Admin Node admin_ip and that the Start Installation button is enabled If the Start Installation button is not ena...

Страница 90: ...all are not re run If you are re running an installation any tasks that do not need to be re run are shown with a green status bar and a status of Skipped 2 Review the progress of the first two instal...

Страница 91: ...click Install from the Grid Manager Stage 3 completes and stage 4 Finalize Installation begins When stage 4 completes the controller is rebooted Automate appliance installation and configuration SG60...

Страница 92: ...using StorageGRID Appliance Installer You can automate the configuration of an appliance by using a JSON file that contains the configuration information You upload the file using the StorageGRID App...

Страница 93: ...sga py script The node names in the JSON file must follow these requirements Must be a valid hostname containing at least 1 and no more than 32 characters Can use letters numbers and hyphens Cannot s...

Страница 94: ...e is shown in red and an error message is displayed in a yellow banner The invalid file is not applied to the appliance You can use ConfigBuilder to ensure you have a valid JSON file 4 Select a node f...

Страница 95: ...nce Installer to automate the configuration Automate appliance configuration using StorageGRID Appliance Installer Steps 1 Log in to the Linux machine you are using to run the Python script 2 For gene...

Страница 96: ...eived 200 2021 02 25 16 25 11 Performing GET on api v2 networks Received 200 2021 02 25 16 25 11 Performing GET on api v2 system config Received 200 StorageGRID Appliance Name LAB SGA 2 30 Node type s...

Страница 97: ...he install sub command 4 If you need to change any of the values in the current configuration use the configure subcommand to update them For example if you want to change the IP address that the appl...

Страница 98: ...mate the configuration configure storagegrid sample json Sample configuration file for use with the script configure storagegrid blank json Blank configuration file for use with the script You have cr...

Страница 99: ...age 994078 rev1 zip Safeguard this file as it will be needed in case of a StorageGRID node recovery Your StorageGRID system is installed and configured when a confirmation message is displayed Storage...

Страница 100: ...reset information upload the Recover Package start the recovery and view the status of the recovery operation recovery package Operations to download the Recovery Package sites Site level configurati...

Страница 101: ...e controller and gather the required equipment Method Required equipment VGA console VGA capable monitor VGA cable KVM RJ 45 cable Serial port DB 9 serial cable Virtual serial terminal SOL Virtual ser...

Страница 102: ...re subsystem firmware update checks have been completed Inter controller communication services are starting HE For an appliance Storage Node only The system is awaiting connectivity with the storage...

Страница 103: ...or codes are shown work with technical support to resolve the issue Code Indicates 0x0E Microcode not found 0x0F Microcode not loaded 0x50 Memory initialization error Invalid memory type or incompatib...

Страница 104: ...ut of resources 0xD5 No space for legacy option ROM 0xD6 No console output devices are found 0xD7 No console input devices are found 0xD8 Invalid password 0xD9 Error loading boot option LoadImage retu...

Страница 105: ...The StorageGRID Appliance Installer might not be available if hardware faults or cabling errors prevent the storage controllers or the SG6000 CN controller from completing their boot up processing Ste...

Страница 106: ..._IP b If you receive no response from the ping confirm you are using the correct IP address Use the IP address for management port 1 on either storage controller c If the IP address is correct check a...

Страница 107: ...nsion shelves are connected to the appliance by viewing the following information in the StorageGRID Appliance Installer The Home page contains a message about expansion shelves The Advanced RAID Mode...

Страница 108: ...ect this option if there are additional maintenance operations you need to perform on the node before rejoining the grid The SG6000 CN controller is rebooted Maintain SG6000 appliance You might need t...

Страница 109: ...nistering StorageGRID About this task In rare instances placing a StorageGRID appliance into maintenance mode might make the appliance unavailable for remote access The admin account password and SSH...

Страница 110: ...ncluding including Request Sent Stopping StorageGRID and Rebooting indicate that the appliance is completing the steps for entering maintenance mode When the appliance is in maintenance mode a confirm...

Страница 111: ...nt port use https 169 254 0 1 8443 to access the StorageGRID Appliance Installer page 7 From the StorageGRID Appliance Installer confirm that the appliance is in maintenance mode 8 Perform any require...

Страница 112: ...node indicating that no alerts are active and the node is connected to the grid Upgrade SANtricity OS on storage controllers To ensure optimal functioning of the storage controller you must upgrade t...

Страница 113: ...Matrix Tool IMT to confirm that the SANtricity OS version you are using for the upgrade is compatible with your appliance You have the Maintenance or Root access permission You are signed in to the G...

Страница 114: ...d the new SANtricity OS Software file from the NetApp support site Be sure to choose the SANtricity OS version for your storage controllers NetApp Downloads SANtricity OS 2 Select MAINTENANCE System S...

Страница 115: ...on Do not change the file name since it is part of the verification process 5 Enter the provisioning passphrase The Start button is enabled 6 Select Start A warning box appears stating that your brows...

Страница 116: ...ce Storage Nodes Software based Storage Nodes are not displayed Select Approve for all nodes that require the upgrade 8 Optionally sort the list of nodes in ascending or descending order by Site Name...

Страница 117: ...e attempted and list the reason the node was not upgraded in the Details column 10 If you need to remove a node or all nodes from the SANtricity OS upgrade queue select Remove or Remove All When the s...

Страница 118: ...city OS upgrade process will not be complete until you approve the SANtricity OS upgrade on all the listed Storage Nodes 13 If you want to end approving nodes and return to the SANtricity OS page to a...

Страница 119: ...e StorageGRID appliance at a time might cause data unavailability depending on your deployment model and ILM policies Steps 1 From a service laptop access SANtricity System Manager and sign in 2 Downl...

Страница 120: ...e has rejoined the grid go back to the Grid Manager The Nodes page should display a normal status no icons to the left of the node name for the appliance node indicating that no alerts are active and...

Страница 121: ...a time Doing so might cause data unavailability depending on your deployment model and ILM policies Steps 1 Access SANtricity System Manager using one of these methods Use the StorageGRID Appliance In...

Страница 122: ...port b On the NetApp Support web site select the Downloads tab and then select E Series Disk Drive Firmware The E Series Disk Firmware page displays c Search for each Drive Identifier installed in you...

Страница 123: ...e other one c Select Next Select Drives lists the drives that you can upgrade with the selected firmware files Only drives that are compatible appear The selected firmware for the drive appears in Pro...

Страница 124: ...each controller Make sure that all cables connected to the controller are not damaged Make sure that all cables are tightly connected Integrated hot spare drives This error condition must be corrected...

Страница 125: ...ue More than 2 Degraded Drive Channel Critical MEL events were reported in the last 7 days Contact technical support to resolve this issue More than 4 critical MEL entries in the last 7 days Contact t...

Страница 126: ...ld display a normal status no icons to the left of the node name for the appliance node indicating that no alerts are active and the node is connected to the grid Related information Upgrade SANtricit...

Страница 127: ...are configured Completing the procedure for one or two expansion shelves should take one hour or less per appliance node To minimize downtime the following steps instruct you to install the new expans...

Страница 128: ...Callout Description 1 SG6000 CN 126...

Страница 129: ...r In approximately five minutes the expansion shelves finish powering up and are detected by the system The Home page shows the number of new expansion shelves detected and the Start Expansion button...

Страница 130: ...Manager to resolve any storage hardware issues 8 Verify that the number of expansion shelves displayed on the Home page matches the number of expansion shelves you are adding If the new expansion shel...

Страница 131: ...appliance Storage Node and the new expansion shelves a In the Grid Manager select NODES and verify that the appliance Storage Node has a green checkmark icon The green checkmark icon means that no ale...

Страница 132: ...can be turned on to help locate the appliance in a data center What you ll need You must have the BMC IP address of the controller you want to identify Steps 1 Access the controller BMC interface 2 Se...

Страница 133: ...ce Locate controller in data center Access BMC interface Locate controller in data center Locate the controller so that you can perform hardware maintenance or upgrades What you ll need You have deter...

Страница 134: ...if it is not functioning optimally or if it has failed What you ll need You have a replacement controller with the same part number as the controller you are replacing You have labels to identify eac...

Страница 135: ...pliance into maintenance mode for this replacement procedure to minimize the potential impact of unforeseen errors or failures If the second controller canister in the shelf does not have Optimal stat...

Страница 136: ...ually you can look on the Base tab for the controller Possible loss of data access If the two part numbers are not the same do not attempt this procedure b Back up the configuration database If a prob...

Страница 137: ...er and install it into the replacement controller a Confirm that the green LED inside the controller between the battery and the DIMMs is off If this green LED is on the controller is still using batt...

Страница 138: ...he controller at a slight downward angle You must insert the metal flange at the front of the battery into the slot on the bottom of the controller and slide the top of the battery beneath the small a...

Страница 139: ...nt controller into the appliance a Turn the controller over so that the removable cover faces down b With the cam handle in the open position slide the controller all the way into the appliance c Move...

Страница 140: ...cement procedure You have physically located the storage appliance where you are replacing storage shelf hardware components in the data center Locate controller in data center About this task To repl...

Страница 141: ...the data center Locate controller in data center About this task To replace an input output module IOM in a 60 drive expansion shelf see the instructions in these instructions for replacing a storage...

Страница 142: ...n the SG6000 CN controller You must perform a controlled shut down of the controller by entering the commands specified below Shutting down the controller using the power switch will result in data lo...

Страница 143: ...e i Access the controller BMC interface Access BMC interface ii Select Power Control iii Verify that the Power Actions indicates that the host is currently off Related information Remove SG6000 CN con...

Страница 144: ...r rack You have physically located the controller in the data center Locate controller in data center Steps 1 Power on the SG6000 CN controller and monitor the controller LEDs and boot up codes using...

Страница 145: ...erational a Log in to the grid node using PuTTY or another ssh client i Enter the following command ssh admin grid_node_IP ii Enter the password listed in the Passwords txt file iii Enter the followin...

Страница 146: ...ation View status indicators and buttons on SG6000 CN controller View boot up status codes for SG6000 storage controllers Replace SG6000 CN controller You might need to replace the SG6000 CN controlle...

Страница 147: ...for the BMC management port To determine the MAC address for the Admin Network port you must add 2 to the hexadecimal number on the label For example if the MAC address on the label ends in 09 the MAC...

Страница 148: ...ontroller has two power supplies for redundancy If one of the power supplies fails you must replace it as soon as possible to ensure that the compute controller has redundant power Both power supplies...

Страница 149: ...eplacing both power supplies at the same time do the following before unplugging the power cords a Place the appliance into maintenance mode b Shut down the appliance 2 Unplug the power cord from each...

Страница 150: ...ontroller and then select Reboot into StorageGRID Remove SG6000 CN controller from cabinet or rack Remove the SG6000 CN controller from a cabinet or rack to access the top cover or to move the control...

Страница 151: ...e cabinet or rack follow the instructions for the rail kit to remove the controller from the rails Related information Remove SG6000 CN controller cover Reinstall SG6000 CN controller into cabinet or...

Страница 152: ...d secure the clip end to a metal ground to prevent static discharge 4 Reconnect the controller data cables and any SFP or SFP28 transceivers To prevent degraded performance do not twist fold pinch or...

Страница 153: ...oller chassis until it stops then carefully lift the cover from the chassis and set it aside Wrap the strap end of an ESD wristband around your wrist and secure the clip end to a metal ground to preve...

Страница 154: ...troller if it is not functioning optimally or if it has failed Verify Fibre Channel HBA to replace If you are unsure which Fibre Channel host bus adapter HBA to replace complete this procedure to iden...

Страница 155: ...r serial number matches you have found the correct appliance If the StorageGRID Appliance section does not display the node selected is not a StorageGRID appliance Select a different node from the tre...

Страница 156: ...he controller cover Remove SG6000 CN controller cover About this task To prevent service interruptions confirm that all other Storage Nodes are connected to the grid before starting the Fibre Channel...

Страница 157: ...the adapters There are two adapters in the riser assembly a Fibre Channel HBA and an Ethernet network adapter The Fibre Channel HBA is indicated in the illustration 5 Open the blue adapter latch circ...

Страница 158: ...d secure the clip end to a metal ground to prevent static discharge 2 Remove the replacement Fibre Channel HBA from its packaging 3 With the blue adapter latch in the open position align the Fibre Cha...

Страница 159: ...cover Change link configuration of SG6000 CN controller You can change the Ethernet link configuration of the SG6000 CN controller You can change the port bond mode the network bond mode and the link...

Страница 160: ...cted by the link configuration changes you made in the link configuration changes step In addition to any other tests you choose to perform confirm that you can ping the Grid Network IP address of the...

Страница 161: ...tatus no icon for the appliance node indicating that no alerts are active and the node is connected to the grid Change MTU setting You can change the MTU setting that you assigned when you configured...

Страница 162: ...ial installation change the MTU setting using maintenance mode Change the MTU setting using the Change IP tool What you ll need You have the Passwords txt file to use the Change IP tool Steps Access t...

Страница 163: ...s and want to start over select Advanced Reboot Controller and then select one of these options Select Reboot into StorageGRID Select Reboot into Maintenance Mode to reboot the controller with the nod...

Страница 164: ...Manager The NODES page should display a normal status no icon for the appliance node indicating that no alerts are active and the node is connected to the grid Related information Administer StorageGR...

Страница 165: ...er for the grid or if you changed the grid wide DNS settings when a node encrypted appliance node was offline the node is unable to connect to the KMS Encrypted data on the appliance cannot be decrypt...

Страница 166: ...is available only when the controller is in maintenance mode Select this option if there are additional maintenance operations you need to perform on the node before rejoining the grid When the node r...

Страница 167: ...de including the node encryption state and key management server KMS details What you ll need Node encryption must have been enabled for the appliance during installation You cannot enable node encryp...

Страница 168: ...uch as renewing expired certificates see the information about KMS in the instructions for administering StorageGRID If there are unexpected problems connecting to KMS hosts verify that the domain nam...

Страница 169: ...n if you are done working in maintenance mode and are ready to return the node to normal operation Select Reboot into Maintenance Mode to reboot the controller with the node remaining in maintenance m...

Страница 170: ...configuration When KMS is cleared data on the appliance will be permanently deleted and no longer accessible This data is not recoverable Decommission the node to move any data it contains to other no...

Страница 171: ...abled Decommission the appliance before clearing KMS to move its data to other nodes in your StorageGRID system Clearing KMS before decommissioning the appliance will result in data loss and might ren...

Страница 172: ...pliance will be permanently deleted This data is not recoverable 3 At the bottom of the window select Clear KMS Key and Delete Data 4 If you are sure that you want to clear the KMS configuration type...

Страница 173: ...Hardware Node Encryption 7 Verify that node encryption is disabled and that the key and certificate information in Key Management Server Details and the Clear KMS Key and Delete Data control are remo...

Страница 174: ...WHETHER IN CONTRACT STRICT LIABILITY OR TORT INCLUDING NEGLIGENCE OR OTHERWISE ARISING IN ANY WAY OUT OF THE USE OF THIS SOFTWARE EVEN IF ADVISED OF THE POSSIBILITY OF SUCH DAMAGE NetApp reserves the...

Отзывы: