


Attention:
Possible equipment damage due to overheating – If the shelf is powered on, do not remove both fans at the
same time. Otherwise, the equipment might overheat.
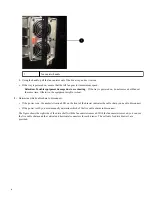
11. Disconnect the left cable chain from its vertical guide rail:
a. Using a flashlight, locate the orange ring on the end of the cable chain attached to the vertical guide rail.
b. To unlatch the cable chain, insert your finger into the orange ring.
c. To unplug the cable chain, pull toward you approximately 1 inch (2.5 cm).
Attention:
Leave the cable chain connector within the vertical guide rail.
Attention:
Possible hardware damage — If the drive tray is powered on, the cable chain is energized until both ends
are unplugged. To avoid shorting out the equipment, do not allow the unplugged cable chain connector to touch the
metal chassis if the other end of the cable chain is still plugged in.
12. Disconnect the left cable chain from the horizontal guide rail, and pull the entire cable chain out of the drive shelf.
If you are performing this procedure with the power on, all LEDs go off when you disconnect the last cable chain connector,
including the amber Attention LED
13. Replace the left fan canister. If the drive shelf is receiving power, confirm that the amber LED on the back of the fan is not
illuminated and that air is coming out the back of the fan.
The LED could remain on for as long as a minute after you reinstall the fan while both fans settle into the correct speed.
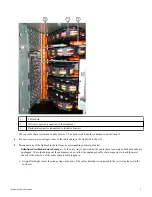
Removing a drive drawer
After removing the right and left cable chains, you can remove the drive drawer from the drive shelf. Removing a drive drawer
entails sliding the drawer part of the way out, recording the locations of the drives, removing the drives, and removing the drive
drawer.
Before you begin
•
You have removed the right and left cable chains for the drive drawer.
•
You have replaced the right and left fan canisters.
•
You have obtained a permanent marker to note the exact location of each drive as you remove the drive from the drawer.
Steps
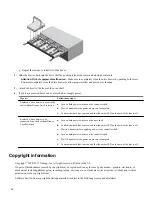
1. Remove the bezel from the front of the drive shelf.
2. Unlatch the drive drawer by pulling out on both levers.
3. Using the extended levers, carefully pull the drive drawer out until it stops. Do not completely remove the drive drawer from
the drive shelf.
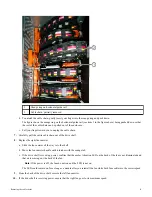
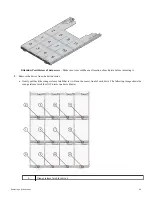
4. If volumes have already been created and assigned, use a permanent marker to note the exact location of each drive. For
example, using the following drawing as a reference, write the appropriate slot number on the top of each drive.
10


