Neopost RENA XPS-ProMail 3.0 Скачать руководство пользователя страница 60

SECTION 5 
TROUBLE SHOOTING 


60  


USER GUIDE 


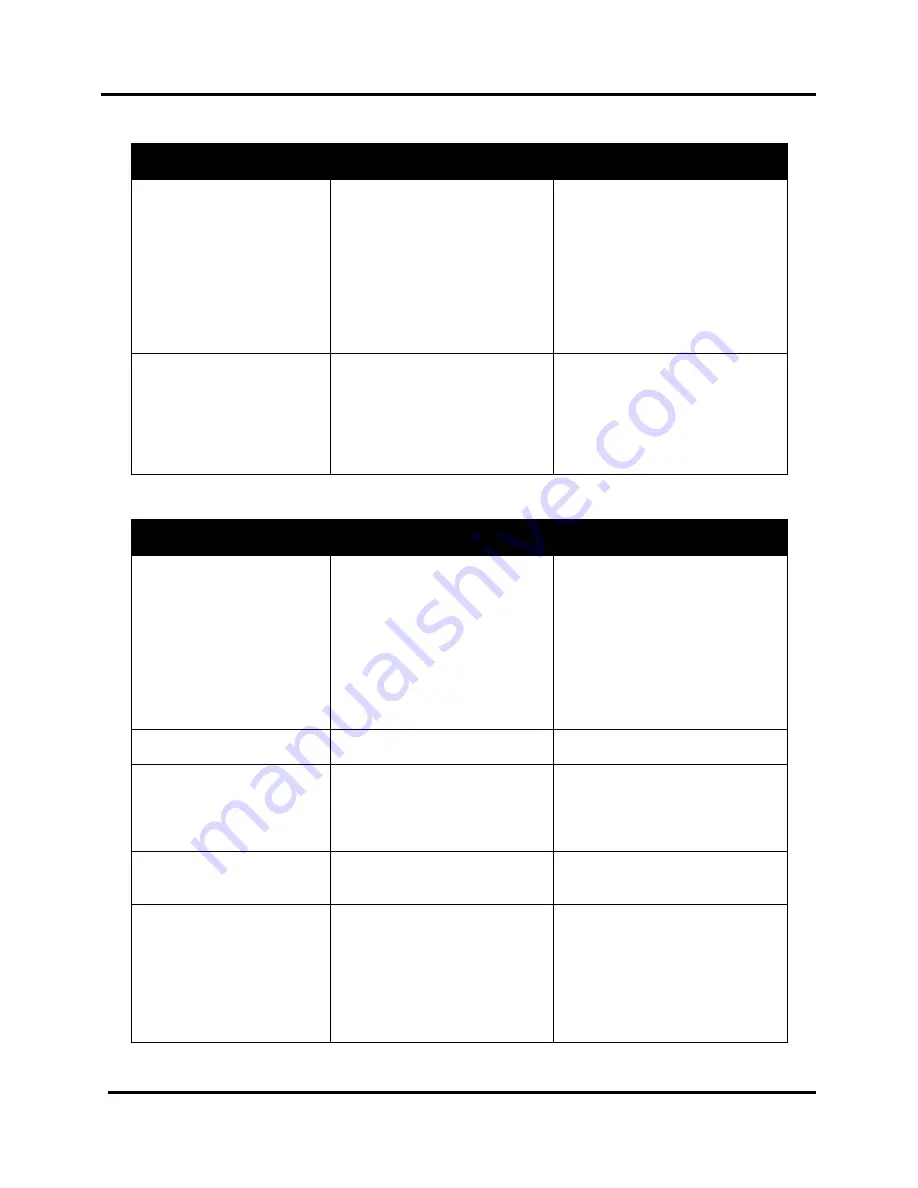
Print Content Incorrect 

CONDITION 

PROBLEM 

SOLUTION 

Information being printed 
is wrong, incomplete, or 
garbage characters are 
being printed. 

Bad communication cable 
connections. 
 
 
Printer was reset or lost power 
in the process of printing job. 
 
Computer or Software issue. 
 
Corrupted database file. 

Check to be sure cable is 
securely fastened at both ends. 
Parallel cable should not exceed 
6’ in length. Replace cable. 
Cancel job. Clear spoolers. 
Reset printer. Restart job. 
 
Test from a known good system 
(computer/software/cable). 
Use another database file 

Not all addresses in 
database print 

 
Only some of the addresses in 
database have been selected 
to print. 
Database problem. 
Computer/software issue. 

 
Start new job and select entire 
database 
 
Check the database program 
Test from known good system 
(computer/software/cable). 

Print Placement Issues 

CONDITION 

PROBLEM 

SOLUTION 

Print is too close to, or 
partially off, 
leading/trailing edge of 
media 

Paper size not set correctly in 
software. 
 
Bad or dirty sensor/reflector 
Address position in software 
not set correctly. 

Set for proper paper size 
(length) in software. 
 
Clean or replace 
sensor/reflector 
Check the location and margins 
in layout software.  Check that 
the piece on the layout screen 
looks exactly the way you want 
the piece to look.   

Print too high or low on 
the media 

Physical location of printheads 
are not set correctly. 

Adjust the printhead positions. 
 

Address prints upside 
down on media 

Wrong printer driver selected. 


Media orientation incorrect. 

Change printer driver selections. 
Select “inverted” driver to print 
“right-side-up” to operator.  
 
Rotate mail piece by 180 deg. 

Address printing partially 
off top or bottom of 
media 

Physical location of printheads 
are not set correctly. 
 

Adjust the printhead positions. 
 

Images printed by 
individual ink cartridges 
are not always aligned 
“stair-stepped”. 

Media is feeding faster than 
printer can receive and 
process data.  
 
 
Media is hesitating under the 
print-heads. 

Reduce feeder speed. Reduce 
amount of data in record. 
Remove graphics. Use program 
that can download graphics into 
printer memory. 
Check carriage height 
adjustment. Turn on vacuum. 


Содержание RENA XPS-ProMail 3.0

Страница 1: ...XPS ProMail 3 0 4 0 USER GUIDE Professional Grade Inkjet Console System Includes Instruction For XPS ProMail Base with XPS ProMail 3 0 4 0 print system XPS ProDry 8 0 TB 659 Conveyor...

Страница 2: ...uilt products Please record the following information for future reference Serial Numbers XPS ProMail 3 0 4 0 Base Printer XPS ProDry 8 0 Base Dryer TB 659 Conveyor Purchase Date Purchased From Dealer...

Страница 3: ...ation Process ____________________________________________________ 20 Side Guide and Belt Positioning _____________________________________________________________ 22 Adjusting the Dryer s Media Hold...

Страница 4: ..._________________________________________________________ 42 Paper Feed Media Transport Test ___________________________________________________ 43 TEST Print _________________________________________...

Страница 5: ..._______________________ 66 Appendix B Supplies Service Support __________________________________ 67 Supplies_________________________________________________________________________ 67 Ink Cartridges...

Страница 6: ...TABLE OF CONTENTS 6 USER GUIDE Notes...

Страница 7: ...re controlled by wall switches or shared with other equipment Make sure there is no strain on the power cord caused by jamming between the equipment walls or furniture DO NOT remove covers Covers encl...

Страница 8: ...ryer rollers belts and other moving parts Avoid touching moving parts or materials while the machine is in use Before clearing a jam press the Emergency Stop button and be sure machine mechanisms come...

Страница 9: ...mputer system are located on or in this unit 4 Monitor Keyboard Stand Supports the computer s monitor keyboard and mouse The computer CPU is normally placed in the Base 3 behind the left front door 5...

Страница 10: ...nit 5 VACUUM This switch controls the vacuum pump in the Transport Base unit 6 SPEED When the Mode switch is set to Auto this dial controls the speed of the transport belts in the Transport Base unit...

Страница 11: ...o the next menu selection 5 ENTER key This key is normally used to start and stop the feeding of media When the printer is placed in the menu mode this key is used to accept or make a selection 6 MENU...

Страница 12: ...above the media 2 TILT LEVER Used to tilt the dryer for cleaning CAUTION Before performing any dryer maintenance let the dryer lamps cool for at least 10 minutes with fan running then unplug the power...

Страница 13: ...gle conveyor use 3 EMERGENCY STOP Press this button to quickly stop shut down the entire system To enable a system restart release the button by turning it clockwise 4 ANGLED BACK STOP Shingled media...

Страница 14: ...SECTION 1 GETTING ACQUAINTED 14 USER GUIDE Notes...

Страница 15: ...normally placed onto the optional XPS ProStand The height of the stand and feeder can be adjusted using the threaded feet located on the bottom of the stand When no tabber is being used with the syst...

Страница 16: ...onditions The feeder control signal will only be activated closed if all of the following are in place Master Power to XPS ProMail Base is ON green button illuminated All the Power Switches Transport...

Страница 17: ...er receptacle power switch and fuse drawer Fuse Rating 1 6A 250V Slow Blow Surge Spike Protection Recommended The printer s power cord is normally connected to the non switchable outlet inside the XPS...

Страница 18: ...from your computer into the printer s Parallel Port and then secure using the two locking clips NOTE The cable used to connect the printer to the computer should not exceed 6 feet long Minimum System...

Страница 19: ...dow opens Click Add a local printer 4 Choose a printer port window opens Select the LPT1 Printer Port Click Next Tip Even if you plan to connect printer via USB please select LPT1 at this time You wil...

Страница 20: ...ter has been connected to this computer in the past you may not see these messages PROCESS TIP If using Windows 10 please access the Devices and Printers folder by typing Control Panel into the Cortan...

Страница 21: ...o Step 3 YES Please proceed to the next step 5 If the printer status changes when you power the printer off on then close the printer driver s properties window by clicking on OK You can also close th...

Страница 22: ...zero positioning on this scale WARNING THE BELTS POSITIONS MUST BE ADJUSTED WITH THE MACHINE RUNNING DO NOT TOUCH ANY MOVING PARTS DURING THIS PROCESS DO NOT USE YOUR FINGERS TO MOVE THE BELT GUIDES...

Страница 23: ...e close to the outer edges of the media as shown Do not position the belts beyond the outer edges of the media 3 STOP the base transport using the Emergency Stop button after making this adjustment 4...

Страница 24: ...y too much pressure this can cause the media to hesitate or skew as it feeds Important Make sure the ends of the hold down strap and side guides do not interfere with the paper sensor or dryer sensor...

Страница 25: ...the cartridge into the pen stall keeping the cartridge as upright as possible Once the cartridge bottoms out push back towards the contacts and down on the cartridge The top end of the cartridge shoul...

Страница 26: ...plays Resetting all Ink Levels in Flash Then release the MENU key All cartridge head positions will be reset to 100 New cartridges can be installed into all positions at this time To Check the Calcula...

Страница 27: ...Media Thickness Knob 10 raise the printhead carriage so that a piece of media can easily be passed under the print units from the exit end of the printer With a piece of media under the printheads slo...

Страница 28: ...in the layout Adjusting the Vertical Print Position The vertical print position is adjusted by moving the print units Loosen the thumb screw that secures the print unit to the shaft Then slide the pri...

Страница 29: ...hown below Note Due to the minimum blank space gap between head clusters you can NOT print a continuous 3 high image with this printer XPS ProMail 4 0 Printer There are four head clusters print units...

Страница 30: ...ncy stop button 5 is located on the operator side of the dryer Pressing this button will cause the entire XPS ProMail system to stop shut down Release this button by turning it clockwise Then restart...

Страница 31: ...dryer lamps may ignite To help avoid a fire if a media jam or hesitation should occur immediately press any of the Emergency STOP buttons to shut down the system In addition the risk of fire can be re...

Страница 32: ...s centering the media on the dryer base may place the edges of the media very close to the side of a belt where the media can easily slide under a belt In this case the media should be repositioned fr...

Страница 33: ...Secure the knob 4 Repeat for other end leg Power The TB 659 s power cord plugs into the outlet labeled conveyor located on the back of the XPS ProMail Base The power to the conveyor is controlled usi...

Страница 34: ...little to the left so less of the media is in contact with the cross stacking guide Depending on the speed of the media exiting the printer or dryer the use of this guide may or may not be necessary I...

Страница 35: ...y distributed under your media Depending on the size of your media you may not be able to use all four belts Clearing Accumulated Media The standard angled back stop can only be used to accumulate a l...

Страница 36: ...SECTION 2 SETTING UP THE SYSTEM 36 USER GUIDE Notes...

Страница 37: ...e for the ink is longer than in lower print qualities In addition when humidity is high drying time is increased The use of a dryer will reduce drying time and help set the ink When using EasyInk Aque...

Страница 38: ...e menu Pressing the ENTER key will test the function To restore the printer to its normal mode turn it OFF then ON MENU key The MENU key is used to access the special features built into the printer T...

Страница 39: ...er It is non resettable BIOS Version Displays the version of the BIOS installed in the printer From time to time it may be necessary for a technician to upgrade the BIOS in the printer When this is do...

Страница 40: ...sport Base Mode switch to MANUAL IMPORTANT Do NOT try to run the system faster than the maximum speed for the selected print resolution or the printed image will be distorted 5 If the XPS ProDry 8 0 i...

Страница 41: ...utomatic Purge For an automatic purge at the start of every print job set the Printer s Menu feature Purge First Piece to ON In addition some software programs have built in features to purge the firs...

Страница 42: ...he ENTER key to register accept the number of pieces to be recovered 5 Press the ENTER key to start the feeder The printer will reprint the number of records you selected and continue printing the res...

Страница 43: ...T key can be used to print a TEST image The TEST image can be used to Check the vertical print position Demonstrate the printer Check the condition or the ink cartridges Check the function of the prin...

Страница 44: ...ile then Print Print window opens Make sure your printer model RENA XPS ProMail 3 0 or RENA XPS ProMail 4 0 is displayed or selected as the Printer Name from the pull down list To use the special feat...

Страница 45: ...d height Type your desired Form name Click on Save Form This new form paper size should now be available in the printer driver s Paper Size pull down list Copy Count Allows you to select the number of...

Страница 46: ...lay between each piece that is printed Can be used to provide additional dry time before the next piece is printed and ejected How to Apply Driver Selections as Default Driver selections made from the...

Страница 47: ...t The Head Alignment Properties Button will appear 6 Click on the Head Alignment Properties Button 7 The Head Alignment window will open Adjust the values as needed to align the images being produced...

Страница 48: ...SECTION 3 OPERATING THE SYSTEM 48 USER GUIDE Notes...

Страница 49: ...Resolution hxv Approximate yield 600 dpi 600 x 600 50 000 addresses 300 dpi 300 x 600 100 000 addresses 200 dpi 200 x 600 150 000 addresses 150 dpi 150 x 600 200 000 addresses NOTE Base on 3 lines of...

Страница 50: ...the cartridge in one direction Either from the front of the head to the back of the head or from back to front It is recommended that you perform a purge just before starting to print again NOTICE NEV...

Страница 51: ...r details Long term Cartridge Storage More than 8 hours 2 hours in very dry environments Clean the cartridge and place the cartridges in a re sealable container i e Tupperware Ziploc etc Place a damp...

Страница 52: ...base with a hinge device This hinge permits the printer to be swung up to remove any jammed media and for cleaning access 1 Shut down stop the system by pressing one of the Emergency STOP buttons 2 To...

Страница 53: ...d by a qualified service technician Please contact your authorized Dealer Accumulated dust should be removed with a vacuum In addition the vacuum pump filters and fans must be checked and cleaned CAUT...

Страница 54: ...it There is an LED located on the top of the sensor which displays the sensor s condition LED ON No Media Present not interrupted LED OFF Media paper Present sensor interrupted Dryer Sensor When the X...

Страница 55: ...plastic harming solvents To clean the dryer housing 1 Press the Emergency Stop button to stop the system and power the lamps off 2 Allow the dryer lamps to cool for at least 10 minutes before you cont...

Страница 56: ...SECTION 4 MAINTENANCE 56 USER GUIDE Notes...

Страница 57: ...puter Printer Offline Data Ready to Print Printer is offline and has received data to print or still has data present from previous job Put printer online then press ENTER to start the feeding and pri...

Страница 58: ...replace cartridge and reset ink level monitor If not empty you may ignore message and or reset the ink level monitor Out of Memory Font No enough memory for downloading a font Reduce the number of di...

Страница 59: ...justment Dial Clean replace cartridge Split line of type Line of type is being positioned across two printheads cartridges Example shows second line of the address being split between two ink cartridg...

Страница 60: ...ize not set correctly in software Bad or dirty sensor reflector Address position in software not set correctly Set for proper paper size length in software Clean or replace sensor reflector Check the...

Страница 61: ...t drive then check connections from printer to base If problem continues call for service Change printer driver to the appropriate driver No base motor drive Master Power button won t illuminate No Po...

Страница 62: ...issue Check connection Replace cable Check driver port selection Cycle printer power and reboot computer Test from known good computer cable software Call for service LCD Display Issues CONDITION PROB...

Страница 63: ...Side guides set too tight against media Dirty worn feed rollers Media stuck together Uneven mail piece Reduce feeder speed Reduce amount of data in record Remove graphics Use program that can download...

Страница 64: ...between pieces Paper Sensor Blocked Dirty Paper Sensor Reflector Bad Paper Sensor Reflector Set software for proper paper size length Readjust feeder reduce feeder speed Make sure guides are not inte...

Страница 65: ...SECTION 5 TROUBLESHOOTING 65 USER GUIDE Notes...

Страница 66: ...5A Style Cartridges PRINT QUALITY Dots Per Inch Dots Per Inch Resolution H x V 600 dpi 600 x 600 dpi 450 dpi 300 x 600 dpi 300 dpi 200 x 600 dpi 150 dpi 150 x 600 dpi IMAGE AREA 3 or 4 x 17 PRINT ORIE...

Страница 67: ...tridge C6173A Red Inkjet Cartridge C6168A Green Inkjet Cartridge C6169A Blue Inkjet Cartridge C6170A Versatile Black C8842A EasyInk C8715A EasyInk Aqueous Plus requires dryer C9050A Obtaining Supplies...

Страница 68: ...ler in your area please use our website XPS ProFeed Shuttle Feeder Professional Grade Vacuum Shuttle Feeder EasyFeed 120 200 Feeder EasyFeed 120 for media up to 12 inches in width EasyFeed 200 for med...

Страница 69: ...is also needed to mount dryer to the conveyor The IR2Ki dryer must be interfaced to the XPS ProMail Base Unless the base was ordered for use with the DRYER IR2Ki the base may need to be modified Imag...

Страница 70: ...kit Part TB DRYER KIT is also needed to mount dryer to the conveyor The standard TB 690 model does not include a dryer or drop tray but these items can be added The TB 690S1 model includes DRYER IR1K...

Страница 71: ...nly one 24V interface on the XPS ProMail Base the XPS ProDry 8 0 can not be used in conjunction with Dryer IR2Ki XPS ProTab 4 0 Professional Grade Tabber Labeler Stamp Affixer Can be used in line with...

Страница 72: ...Appendix 72 USER GUIDE Notes...

Страница 73: ...Jams 52 M Maintenance 49 Media Thickness Adjustment 27 Media Transport Belts 53 MENU key 38 Minus key 39 N Nozzle 50 O ON LINE key 39 Operation Sequence 40 P Paper Feed 38 43 Parallel Port 18 Pen Sta...

Страница 74: ......

Страница 75: ...Neopost Digital Print Group 3100 Horizon Drive Suite 100 King of Prussia PA 19406 2660 Phone 610 650 9170 www neopost com www haslerinc com www renausa com Copyright 2018 Neopost USA...

Страница 76: ...Rev 03 2018...

Отзывы: