background image

Cleaning and servicing

 en

19

13 Cleaning and servi-

cing

To keep your appliance working effi-
ciently for a long time, it is important
to clean and maintain it carefully.
Customer Service must clean inac-
cessible points. Cleaning by cus-
tomer service can give rise to costs.

13.1 Preparing the appliance

for cleaning

1.

Switch off the appliance.
→ 

Page 14

2.

Disconnect the appliance from the
power supply.
Unplug the appliance from the
mains or switch off the circuit
breaker in the fuse box.

3.

Take out all of the food and store it
in a cool place.
Place ice packs (if available) onto
the food.

4.

If there is a layer of hoarfrost, allow
this to defrost.

5.

Remove all fittings and accessor-
ies from the appliance.
→ 

Page 20

13.2 Cleaning the appliance

WARNING

Risk of electric shock!

An ingress of moisture can cause an
electric shock.

Do not use steam- or high-pres-
sure cleaners to clean the appli-
ance.

Liquid in the lighting or in the con-
trols can be dangerous.

The rinsing water must not drip
into the lighting or controls.

ATTENTION!

Unsuitable cleaning products may
damage the surfaces of the appli-
ance.

Do not use hard scouring pads or
cleaning sponges.

Do not use harsh or abrasive de-
tergents.

Do not use cleaning products with
a high alcohol content.

If liquid gets into the drainage hole,
the evaporation pan may overflow.

The rinsing water must not get into
the drainage hole.

If you clean fittings and accessories
in the dishwasher, this may cause
them to become deformed or discol-
our.

Never clean fittings and accessory
in the dishwasher.

1.

Prepare the appliance for cleaning.
→ 

Page 19

2.

Clean the appliance, the fittings,
the accessories and the door seals
with a dish cloth, lukewarm water
and a little pH-neutral washing-up
liquid.

3.

Dry thoroughly with a soft, dry
cloth.

4.

Insert the fittings.

5.

Electrically connect the appliance.
→ 

Page 11

6.

Switch on the appliance.
→ 

Page 14

7.

Putting the food into the appliance.

Содержание KI587 Series

Страница 1: ...Fridge freezer en Information for Use KI586 KI587...

Страница 2: ...Operating tips 14 7 3 Switching off the appliance 14 7 4 Setting the temperature 14 8 Additional functions 15 8 1 Super function 15 9 Alarm 15 9 1 Door alarm 15 10 Refrigerator compartment 15 10 1 Ti...

Страница 3: ...15 Storage and disposal 24 15 1 Taking the appliance out of operation 24 15 2 Disposing of old appliance 24 16 Customer Service 25 16 1 Product number E Nr and production number FD 25 17 Technical dat...

Страница 4: ...m above sea level 1 3 Restriction on user group This appliance may be used by children aged 8 or over and by people who have reduced physical sensory or mental abilities or inadequate experience and o...

Страница 5: ...elec trical installation according to the installation regulations When installing the appliance check that the power cable is not trapped or damaged If the insulation of the power cord is damaged th...

Страница 6: ...g material away from children Do not let children play with packaging material Children may breathe in or swallow small parts causing them to suffocate Keep small parts away from children Do not let c...

Страница 7: ...put frozen food straight from the freezer compartment into your mouth Avoid prolonged contact of the skin with frozen food ice and surfaces in the freezer compartment CAUTION Risk of harm to health To...

Страница 8: ...witch off the fuse in the fuse box Call customer services Page 25 Incorrect repairs are dangerous Repairs to the appliance should only be carried out by trained specialist staff Only use genuine spare...

Страница 9: ...ght Install the appliance as far away as possible from heating elements cookers and other heat sources Maintain a 30 mm clearance to electric or gas cookers Maintain a 300 mm clearance to oil or solid...

Страница 10: ...ss can be found on the rating plate Appliance Fig 1 3 Page 12 Climate class Permitted room tem perature SN 10 C to 32 C N 16 C to 32 C ST 16 C to 38 C T 16 C to 43 C The appliance is fully functional...

Страница 11: ...ing appliance plug of the power cable into the appliance 2 Insert the mains plug of the appli ance s power cable in a socket nearby The connection data of the appli ance can be found on the rating pla...

Страница 12: ...rself with your appliance 5 1 Appliance You can find an overview of the parts of your appliance here 1 2 3 4 5 A B 1 A Refrigerator compartment Page 15 B Freezer compartment Page 16 1 Control panel Pa...

Страница 13: ...2 1 sets the temperature of the refrigerator compartment 2 lights up when the Super function is switched on 3 Displays the set temperature for the refrigerator compart ment in C 6 Features The featur...

Страница 14: ...rtment If the ice cube tray is stuck to the freezer compartment loosen it with a blunt implement only e g spoon handle 2 To loosen the ice cubes twist the ice cube tray slightly or hold it briefly und...

Страница 15: ...ress repeatedly until lights up Note After approx 48 hours the ap pliance switches to normal operation Switching off Super function Press 9 Alarm 9 1 Door alarm If the appliance door is open for a whi...

Страница 16: ...tting the refrigerator compart ment temperature Page 14 Once the appliance is switched on it may take up to 12 hours until the set temperature is reached Correct setting 11 Freezer compartment You can...

Страница 17: ...tter and quark ready meals and leftovers Food that is unsuitable for freezing includes lettuce radishes eggs in shells grapes raw apples and pears yoghurt sour cream cr me fra che and mayonnaise Packi...

Страница 18: ...y A layer of hoar frost in the freezer compartment im pairs refrigeration of the frozen food and increases power consumption Defrosting the freezer compartment Regularly defrost the freezer com partme...

Страница 19: ...sure cleaners to clean the appli ance Liquid in the lighting or in the con trols can be dangerous The rinsing water must not drip into the lighting or controls ATTENTION Unsuitable cleaning products m...

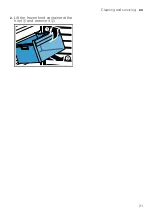
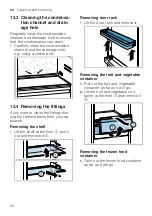
Страница 20: ...the fittings If you want to clean the fittings thor oughly remove these from your ap pliance Removing the shelf Lift the shelf at the front pull it out and remove it Removing door rack Lift the door r...

Страница 21: ...Cleaning and servicing en 21 2 Lift the frozen food container at the front and remove it...

Страница 22: ...eration The LED lighting does not work Different causes are possible Call customer service The customer service number can be found in the enclosed customer service directory The temperature dif fers...

Страница 23: ...hooting en 23 Fault Cause and troubleshooting The appliance makes noises Bottles or containers are touching Move the bottles or containers away from each other Super function is switched on No action...

Страница 24: ...to seven seconds until a second audible signal sounds a The appliance self test starts a While the appliance self test is run ning a long audible signal sounds a If two audible signals sound and flash...

Страница 25: ...mer Service is free of charge The minimum dura tion of the warranty manufacturer s warranty for private consumers in the European Economic Area is 2 years according to the terms of war ranty applicabl...

Страница 26: ...PREL product database Please then follow the instructions on searching for the model The model identifier is made up of the charac ters before the slash in the product number E Nr on the rating plate...

Страница 27: ......
Страница 28: ...Stra e 34 81739 M nchen GERMANY Valid within Great Britain Imported to Great Britain by BSH Home Appliances Ltd Grand Union House Old Wolverton Road Wolverton Milton Keynes MK12 5PT United Kingdom 90...

Отзывы: