Nederman SYSTEM 920 Скачать руководство пользователя страница 1

User Manual

ExhaustRail System 920

ExhaustRail Touchless

Original user manual

EN

USER MANUAL

Translation of original user manual

DE

BEDIENUNGSANLEITUNG

ES

MANUAL DE USUARIO

FR

MANUEL DE L'UTILISATEUR

NL

GEBRUIKERSHANDLEIDING

PL

INSTRUKCJA OBSŁUGI

SV

ANVÄNDARMANUAL

2022-11-15

144231 (04)

EN

DE

ES

FR

NL

PL

SV

Содержание SYSTEM 920

Страница 1: ...ess Original user manual EN USER MANUAL Translation of original user manual DE BEDIENUNGSANLEITUNG ES MANUAL DE USUARIO FR MANUEL DE L UTILISATEUR NL GEBRUIKERSHANDLEIDING PL INSTRUKCJA OBS UGI SV ANV...

Страница 2: ...ExhaustRail Touchless Trace back information Workspace Main version a70 Checked in 2022 11 15 Skribenta version 5 5 022...

Страница 3: ...ExhaustRail Touchless Declaration of Conformity 4 Figures 7 English 10 Deutch 15 Espa ol 20 Fran ais 25 Nederlands 30 Polski 35 Svenska 40 3...

Страница 4: ...y firma que figuran al final de este documento corresponden a la persona responsable tanto de la declaraci n como de la ficha t cni ca FR Fran ais D claration de Conformit Nous AB Ph Nederman Co d cl...

Страница 5: ...st mmelse med alla relevanta best mmelser i f ljande direktiv och standarder Direktiv 2006 42 EC Standarder EN ISO 12100 2010 EN ISO 20607 2019 Namnet och signaturen i slutet av detta dokument r den p...

Страница 6: ...Supply of Machinery Safety Regulations 2008 Standards EN ISO 12100 2010 EN ISO 20607 2019 The name and signature at the end of this document is the person responsible for the declaration of conformity...

Страница 7: ...ExhaustRail Touchless Figures 1400 mm 1030 mm 950 mm 1265 mm 3646 mm 401 mm 5046 mm 1100 mm 800 mm A 1 4100 mm 2 300 mm 4100 mm A 1100 mm B 3 7...

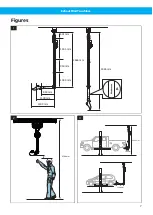
Страница 8: ...ExhaustRail Touchless 4 A B 5 A B Klick 6 2 2 1 7 8...

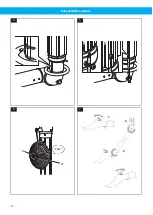
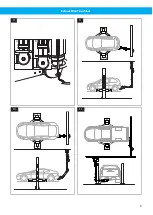
Страница 9: ...ExhaustRail Touchless A B 8 9 10 11 9...

Страница 10: ...data 12 4 Installation 12 4 1 Delivery check 12 4 2 Rail placement 12 4 3 Vertical placement 12 4 4 Horizontal placement 12 4 5 Install rail sections and fan 13 4 6 Telescopic pipe 13 4 7 Installation...

Страница 11: ...s a warning caution or note ac cording to the following examples WARNING Risk of personal injury Warnings indicate a potential hazard to the health and safety of personnel and how that hazard may be a...

Страница 12: ...diately 4 2 Rail placement Before mounting the product determine the height and position of the rail in relation to the car lift It is very important to decide what vehicle lengths are to be used with...

Страница 13: ...ting power Hold the knurled wheel A of the balancer drum in a steady grip and turn the balancer drum B clockwise for increased lifting power 4 8 2 Reducing the lifting power 1 Pull a little cord from...

Страница 14: ...f the rail brackets 7 Spare Parts CAUTION Risk of equipment damage Use only N e d e r m a n original spare parts and ac cessories Contact your nearest authorized distributor or N e d e r m a n for adv...

Страница 15: ...4 Installation 17 4 1 Kontrolle der angelieferten Ware 17 4 2 Anordnung der Schiene 17 4 3 Vertikale Platzierung 17 4 4 Horizontale Platzierung 17 4 5 Installation von Schienensektionen und Gebl se 1...

Страница 16: ...ngen und Hinweisen gegeben wer den WARNUNG Verletzungsgefahr Warnungen weisen auf eine m gliche Gefahr f r die Gesundheit und die Sicherheit der Be nutzer sowie auf die Gefahrenvermeidung hin VORSICHT...

Страница 17: ...Ihre Ne derman Vertretung zu benachrichtigen 4 2 Anordnung der Schiene Bestimmen Sie vor der Montage des Produkts die H he und Position der Schiene in Bezug auf die Fahr zeughebeb hne Es ist sehr wich...

Страница 18: ...Drehrichtung des Ventiltors und die Funktion der Verschlussklappe pr fen Den Schlauch auf L cher untersuchen 3 Teleskopfunktion Ggf die Hubkraft des Balancers anpassen 4 Sicherstellen dass der Absaugw...

Страница 19: ...lls der Teleskoparm herunterf llt muss die Hubkraft erh ht werden Die Teleskopeinheit muss in allen Positionen mit dem Gelenkarm in senkrechter Stellung im Gleichgewicht sein 14 Befestigung der Schien...

Страница 20: ...baci n a la entrega 22 4 2 Colocaci n del ra l 22 4 3 Colocaci n vertical 22 4 4 Colocaci n horizontal 22 4 5 Instalaci n de las secciones del ra l y el aspirador 23 4 6 Tubo telesc pico 23 4 7 Lista...

Страница 21: ...enta como una advertencia precauci n o nota ADVERTENCIA Riesgo de lesi n personal Las advertencias indican un peligro potencial para la salud y la seguridad del personal y la forma en que el peligro p...

Страница 22: ...la direcci n de montaje A en Ilustra ci n 1 4 1 Comprobaci n a la entrega Si al recibir el producto faltara algo o hubiera alguna pieza da ada comun queselo de inmediato al trans portista y al represe...

Страница 23: ...lujo de aire en la abertura del bo querel con un indicador de flujo de aire 2 Antes de conectar la manguera al tubo de escape verifique que la potencia de succi n sea suficien te En caso necesario con...

Страница 24: ...e elevaci n del equilibrador Consulte Sec ci n 4 8 Ajuste de la fuerza de elevaci n del equi librador Comience por probar en la posici n supe rior o cero en primer lugar Si la unidad telesc pica se ca...

Страница 25: ...fication de la livraison 27 4 2 Emplacement du rail 27 4 3 Placement vertical 27 4 4 Placement horizontal 27 4 5 Installation des sections du rail et du ventilateur 28 4 6 Tube t lescopique 28 4 7 Lis...

Страница 26: ...isque de blessures du per sonnel Les avertissements indiquent un danger po tentiel li la sant et la s curit du person nel et expliquent comment ce danger peut tre vit ATTENTION Risque de dommages sur...

Страница 27: ...ivraison En cas de pi ces endommag es ou manquantes la livraison du produit en informer imm diatement le transporteur et le repr sentant Nederman local 4 2 Emplacement du rail Avant de monter le produ...

Страница 28: ...ou le fonctionnement du registre 3 V rifier le fonctionnement du tube t lescopique Le cas ch ant ajuster la puissance de levage de l quilibreur Voir Section 4 8 R glage de la puis sance de levage de...

Страница 29: ...sayer en haut ou la position z ro Si l unit t lescopique tombe la force de levage doit tre aug ment e L unit t lescopique doit tre quilibr e dans toutes les positions avec le bras articul dans une pos...

Страница 30: ...evens 32 4 Installatie 32 4 1 Controle bij levering 32 4 2 Plaatsing rail 32 4 3 Verticale plaatsing 32 4 4 Horizontale plaatsing 32 4 5 Installatie van railsecties en ventilator 33 4 6 Telescoopbuis...

Страница 31: ...ingen aanmaningen om voorzichtig te zijn of opmerkingen WAARSCHUWING Gevaar voor persoonlijk letsel Waarschuwingen wijzen op een mogelijk ge vaar voor de gezondheid en veiligheid van het personeel en...

Страница 32: ...enen het transportbedrijf en uw lokale Nederman vertegenwoordiger hiervan on middellijk op de hoogte te worden gebracht 4 2 Plaatsing rail Voor u het product gaat installeren moet u de hoog te en posi...

Страница 33: ...troleer de slang op gaten 3 Controleer de werking van de telescoop Indien nodig pas de trekkracht aan 4 Controleer of het afzuigwagentje makkelijk in de rails loopt 4 8 Trekkracht van de lifter instel...

Страница 34: ...rhoogd worden De telescoopunit moet in alle standen gebalanceerd zijn met de draaiarm in ver ticale positie 14 Controleer de bevestigingen van de railklemmen 7 Reserveonderdelen VOORZICHTIG Gevaar voo...

Страница 35: ...a 37 4 1 Kontrola dostawy 37 4 2 Usytuowanie szyny 37 4 3 Umieszczenie pionowe 37 4 4 Poziome umieszczenie 37 4 5 Instalacja segment w szyny i wentylatora 38 4 6 Rura teleskopowa 38 4 7 Lista kontroln...

Страница 36: ...fikacja wa nych informacji Niniejszy dokument zawiera wa ne informacje przed stawione w postaci ostrze e przestr g i uwag OSTRZE ENIE Ryzyko obra e cia a Ostrze enia wskazuj na potencjalne zagro enia...

Страница 37: ...stwierdzenia uszkodzenia cz ci lub nie kompletno ci produktu w momencie jego dostawy na le y natychmiast poinformowa o tym przewo nika i lokalnego przedstawiciela firmy Nederman 4 2 Usytuowanie szyny...

Страница 38: ...wd kierunek obrot w wentylatora i lub dzia anie przepustnicy 3 Sprawd dzia anie elementu teleskopowego W ra zie potrzeby wyreguluj si podnosz c balansera 4 Upewnij si e w zek ssawny przesuwa si swo bo...

Страница 39: ...podnosz c Rami teleskopowe musi by zr wnowa one w ka dym po o eniu z ramieniem przegubowym ustawionym w pozycji pionowej 14 Sprawd zamocowanie wspornik w szyn 7 Cz ci zamienne PRZESTROGA Ryzyko uszkod...

Страница 40: ...3 2 Tekniska data 42 4 Installation 42 4 1 Leveranskontroll 42 4 2 Skenplacering 42 4 3 Vertikal placering 42 4 4 Horisontell placering 42 4 5 Montera skensektioner och fl kt 43 4 6 Teleskopr r 43 4...

Страница 41: ...esenteras antingen som en varning ett f rsiktig hetsmeddelande eller en kommentar VARNING Risk f r personskada Varningar anger en m jlig fara f r personalens h lsa och s kerhet samt hur faran kan undv...

Страница 42: ...placering Innan produkten monteras m ste skenans h jd och position m tas i f rh llande till billyften Det r myc ket viktigt att best mma vilka fordonsl ngder som f r anv ndas med enheten Se Figur 3 Fi...

Страница 43: ...Figur 6 4 8 1 ka lyftkraften H ll balanseringstrummans r fflade hjul A i ett stadigt grepp och vrid balanseringstrumman B medurs f r att ka lyftkraften 4 8 2 Minska lyftkraften 1 Dra ut linan litegran...

Страница 44: ...ervdelar VARSAMHET Risk f r skada p utrust ningen Anv nd endast N e d e r m a n originalreservdelar och tillbeh r Kontakta n rmaste auktoriserade terf rs ljare el ler N e d e r m a n f r information o...

Страница 45: ...www nederman com...

Отзывы: