3-6 Disassembly and Reassembly
3.
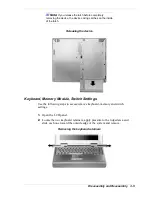
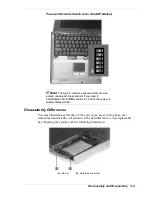
Gently lift up the edge of the keyboard nearest the LCD and slide the
keyboard toward the LCD screen to release the tabs that secure it.
Positioning the keyboard
4.
Carefully turn over the keyboard and place it face down on the VersaGlide.
Be careful not to twist the keyboard cable. Remove the keyboard cable from
the main board by pulling up on the inserts on both sides of the cable
connector.
To remove an installed SO-DIMM, follow these instructions.
Press the locking tabs away from the sides of the SO-DIMM and hold
while gently lifting on the edge of the SO-DIMM.
When the edge of the SO-DIMM pops up and is at approximately a 60
degree angle, pull the SO-DIMM from the socket.
Removing an installed SO-DIMM
Содержание Versa LX
Страница 1: ...NEC Versa LX Notebook Computer VERSA LX S E R V I C E A N D R E F E R E N C E M A N U A L...
Страница 57: ...3 Disassembly and Reassembly Required Tools and Equipment Disassembly Reassembly...
Страница 86: ...4 System Board Layout Audio Board Connector Board LCD Panel Switch Board LED Status Board Main Board...
Страница 91: ...5 2 Illustrated Parts Breakdown Illustrated Parts Breakdown Non AGP Models...
Страница 94: ...Illustrated Parts Breakdown 5 5 Illustrated Parts Breakdown AGP Models...
Страница 102: ...7 Troubleshooting Quick Troubleshooting Helpful Questions...
Страница 112: ...9 Specifications System Components Pin Assignments Connector Locations Memory Map Interrupt Controllers...
Страница 138: ...NEC Computer Systems Division Packard Bell NEC Inc 1 Packard Bell Way Sacramento CA 95828 0903 819 200064 000 3 99...

