Issue 6.0
NEC SL1100
5 - 4
Programming
S
ECTION
4
U
SING
K
EYS
TO
M
OVE
A
ROUND
IN
THE
P
ROGRAMS
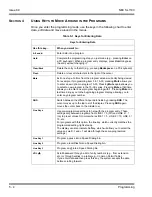
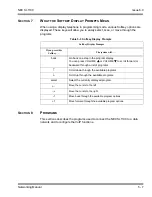
Once you enter the programming mode, use the keys in the following chart to enter
data, edit data and move around in the menus.
Table 5-1 Keys for Entering Data
Keys for Entering Data
Use this key...
When you want to...
0~9 and
Enter data into a program.
Hold
Complete the programming step you just made (e.g., pressing
Enter
on
a PC keyboard). When a program entry displays, press
Hold
to bypass
the entry without changing it.
Clear/Back
Delete the entry to the left (e.g., pressing
Backspace
on a PC keyboard).
Flash
Delete or clear all characters to the right of the cursor.
Mute
Exit one step at a time from the program window currently being viewed.
For example, if programming item 5 in 15-03, pressing
Mute
allows you
to enter a new option in program 15-03. Pressing
Mute
again allows you
to select a new program in the 15-XX series. Pressing
Mute
a third time
allows you to enter a new program beginning with
1
. Pressing
Mute
one
last time brings you to the beginning program display, allowing you to
enter any program number.
DND
Switch between the different input data fields by pressing
DND
. The
cursor moves up to the top row of the display. Pressing
DND
again
moves the cursor back to the middle row.
Line Keys
Use pre-programmed settings to help with the program entry. These
settings vary between programs from LINE 1 = 0 (off) and LINE 2 = 1
(on) to preset values for timers where LINE 1 = 5, LINE 2 = 10, LINE 3 =
15, etc.
For programs with this option, the line key, which currently matches the
programmed setting, lights steady.
The display can also indicate Softkey, which will allow you to select the
values as well (-1 and +1 will step through these pre-programmed
settings.)
Line Key 1
Program a pause into a Speed Dialing bin.
Line Key 2
Program a recall/flash into a Speed Dialing bin.
Line Key 3
Program an @ into a Speed Dialing bin.
VOL
Scroll backward through a list of entry numbers (e.g., from extension
etc.) or through entries in a table (e.g., Common Permit Table).
If you enter data and then press this key, the system accepts the data
before scrolling forward.
Содержание SL1100
Страница 1: ...Networking Manual NDA 31190 Issue 6 0 SL1100...
Страница 2: ......
Страница 4: ......
Страница 22: ...Issue 6 0 NEC SL1100 1 2 Introduction THIS PAGE INTENTIONALLY LEFT BLANK...
Страница 62: ...Issue 6 0 NEC SL1100 5 30 Programming THIS PAGE INTENTIONALLY LEFT BLANK...
Страница 81: ...NEC SL1100 Issue 6 0 Networking Manual 6 19 Ethernet Frame Example Layer 2 QoS Enabled Continued...
Страница 94: ...Issue 6 0 NEC SL1100 6 32 Network Design Considerations THIS PAGE INTENTIONALLY LEFT BLANK...
Страница 134: ...Issue 6 0 NEC SL1100 8 10 DHCP Client THIS PAGE INTENTIONALLY LEFT BLANK...
Страница 159: ...NEC SL1100 Issue 6 0 Networking Manual 9 25 Figure 9 7 Log In to IP Phone...
Страница 181: ...NEC SL1100 Issue 6 0 Networking Manual 9 47 Figure 9 25 IP System Operation Setup...
Страница 206: ...Issue 6 0 NEC SL1100 9 72 IP Multiline Station SIP Figure 9 36 NAPT Configuration Example...
Страница 230: ...Issue 6 0 NEC SL1100 10 18 IP Single Line Telephone THIS PAGE INTENTIONALLY LEFT BLANK...
Страница 232: ...Issue 6 0 NEC SL1100 11 2 NAPT Figure 11 1 NAPT Configuration Example...
Страница 242: ...Issue 6 0 NEC SL1100 12 4 All DSP Busy Indication THIS PAGE INTENTIONALLY LEFT BLANK...
Страница 290: ...Issue 6 0 NEC SL1100 13 48 SL Net THIS PAGE INTENTIONALLY LEFT BLANK...
Страница 291: ......
Страница 292: ...SL1100 Networking Manual NEC Corporation of America Issue 6 0...


