background image

34

2. Projecting an Image (Basic Operation)

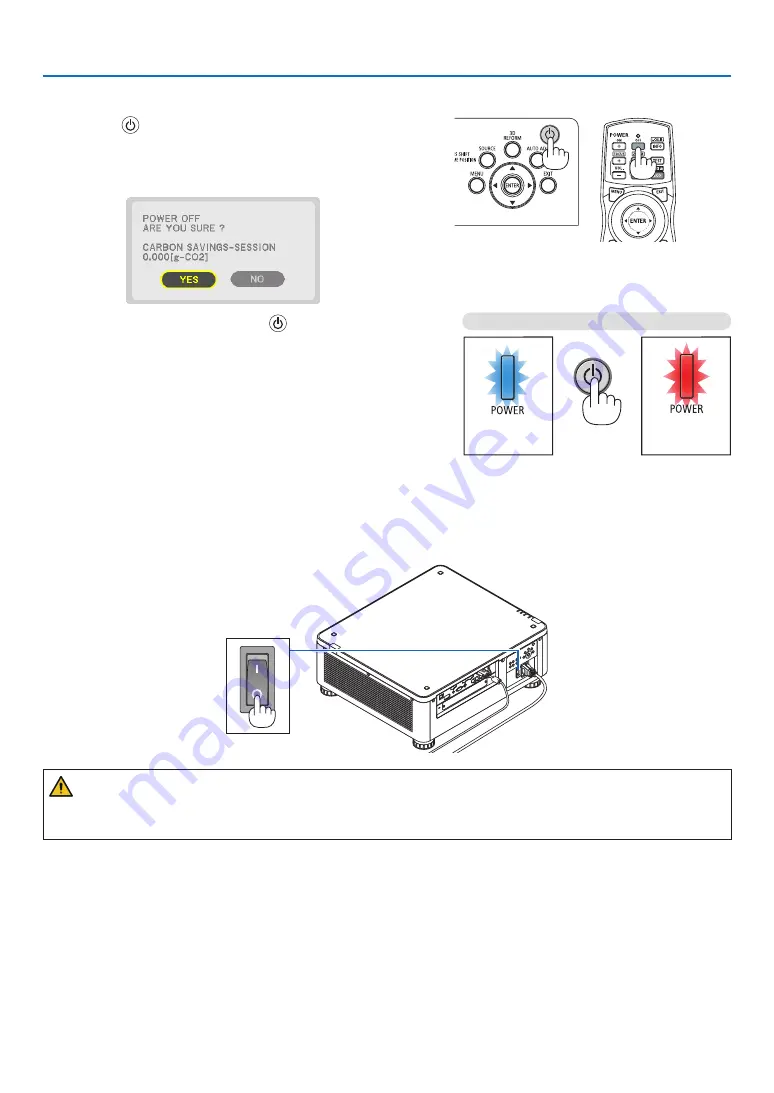
 Turning off the Projector

1.  Press the 

 (POWER) button on the projector cabinet 

or the POWER OFF button on the remote control. 

  The [POWER OFF / ARE YOU SURE ? / CARBON SAV-

INGS- SESSION 0.000[g-CO2]] message will appear.


2.  Press one among the ENTER, the 

 (POWER), and the 

POWER OFF button.

  When the projector is in STANDBY MODE, the POWER 

indicator  lights  up  red.  (When  [STANDBY  MODE]  is  in 
[NORMAL] setting)
•  If you do not want to turn off, select [NO] by 

/

button 

and press ENTER.

3.  Make sure the projector is in STANDBY MODE, then turn 

off the main power switch (

 OFF)

  The POWER indicator will go off and the main power will 

turn off.
•  While  the  POWER  indicator  is  blinking  blue  in  short 

cycles, the power cannot be turned off.

Power On

Steady blue light

Standby

Steady red light

 CAUTION:

Parts of the projector may temporarily overheat if the projector is turned off with the main power switch or the AC 
power supply is disconnected while the projector is in operation or the cooling fan is running. Handle with care.

Содержание PX1004UL-WH

Страница 1: ...Projector PX1004UL WH PX1004UL BK User s Manual...

Страница 2: ...Wi Fi Alliance and Wi Fi Protected Access WPA WPA2 are registered trademarks of the Wi Fi Alliance Blu ray is a trademark of Blu ray Disc Association CRESTRON and ROOMVIEW are registered trademarks of...

Страница 3: ...est sound pressure level is less than 70 dB A in accordance with EN ISO 7779 Disposing of your used product In the European Union EU wide legislation as implemented in each Member State requires that...

Страница 4: ...mps fuse installed for use with this equipment If a power cord is not supplied with this equipment please contact your supplier Important Safeguards These safety instructions are to ensure the long li...

Страница 5: ...ojector is turned off with the POWER button or if the AC power supply is disconnected during normal projector operation Use caution when picking up the projector Prevent foreign objects such as paper...

Страница 6: ...let children to operate the projector by themselves If the projector is operated by children adults need to attend and keep their eyes on children If damage or malfunction of the projector is found i...

Страница 7: ...iple laser diodes is equipped in the product as the light source 2 These laser diodes are sealed in the light module No maintenance or service is required for the performance of the light module 3 End...

Страница 8: ...4 16 1 NP19ZL 7 7 12 7 NP20ZL 5 3 7 9 NP21ZL 3 4 5 4 NP31ZL 27 8 33 6 Vertical angle V Lens Zoom Tele Wide NP16FL 22 0 NP17ZL 9 8 14 0 NP18ZL 7 8 10 2 NP19ZL 4 8 8 0 NP20ZL 3 3 5 0 NP21ZL 2 1 3 4 NP3...

Страница 9: ...tion and the explanatory labels of the LASER PRODUCT in CLASS 3R conforming to IEC60825 1 Second edition and in Class 1 conforming to IEC60825 1 Third edition are stuck on the below indicated position...

Страница 10: ...viii Important Information Manufacturer s ID Label For PX1004UL WH For PX1004UL BK Position of the Manufacturer s ID Label...

Страница 11: ...ntion in a venue such as a coffee shop or hotel and employing compression or expansion of the screen image with the following func tions may raise concern about the infringement of copyrights which ar...

Страница 12: ...wing 3D images if you get sick such as nausea dizziness queasiness headache eyestrain blurry vision convulsions and numbness stop viewing them If symptoms still persist consult a doctor View 3D images...

Страница 13: ...rature protector to automatically turn off the projectors power Concerning to the portrait projection please refer Portrait projection on page 155 Example 1 If there are walls on both sides of the pro...

Страница 14: ...nnecting Your Computer Connecting the Power Cord 14 Using the Supplied Power Cords 15 Using the Power Cord Stopper 16 Turning on the Projector 17 Performing Lens Calibration 18 Note on Startup screen...

Страница 15: ...n 66 Things that can be done using multi screen projection 66 Case 1 Using a single projector to project two types of videos PIP PICTURE BY PICTURE 66 Case 2 Using four projectors resolution WUXGA to...

Страница 16: ...CE 1 139 SOURCE 2 140 SOURCE 3 140 SOURCE 4 140 WIRED LAN 141 VERSION 1 141 OTHERS 141 HDBaseT 142 6 Connecting to Other Equipment 143 Mounting a lens sold separately 143 Mounting the lens 143 Removin...

Страница 17: ...65 Compatible Input Signal List 167 Specifications 170 Power Cord 173 Cabinet Dimensions 174 Pin assignments and signal names of main terminals 175 Changing the Background Logo Virtual Remote Tool 177...

Страница 18: ...to remove the lens mounted on the projec tor page 144 Power cord 3 79TM1021 79TQ1001 for AC 120 V 79TQ1011 for AC 200 V For Europe Asia South America For North America 4 Stacking holders 79TM1101 When...

Страница 19: ...the cap To attach the dust cap to the projector locate the catch on the lower end of the dust cap and place it into the opening of the projector with the point of a triangle mark facing downward in t...

Страница 20: ...ness output is set at the maximum brightness will decrease with use Installation Wide range of optional lenses selectable according to the place of installation This projector supports 8 types of opti...

Страница 21: ...ol etc NaViSet Administrator 2 helps you control the projector by a computer via wired LAN connection Virtual Remote Tool helps you perform operations by a virtual remote control such as projector s p...

Страница 22: ...tarted is to take your time and do everything right the first time Take a few minutes now to review the user s manual This may save you time later on At the beginning of each section of the manual you...

Страница 23: ...Remote Sensor located on the front and the rear page 12 Indicator Panel page 8 Intake vent Takes in air to cool the unit page xi 155 Remote Sensor page 12 Stacking Holder fixing section 4 locations In...

Страница 24: ...er Security System Built in Security Slot Security Bar Fixing a theft prevention device The security bar accepts security wires or chains up to 0 18 inch 4 6 mm in diameter Handle located on 4 posi ti...

Страница 25: ...IGHT Indicator page 39 179 5 TEMP Indicator page 179 6 SOURCE Button page 20 7 AUTO ADJ Button page 33 8 3D REFORM Button page 42 9 MENU Button page 80 10 Buttons page 80 11 ENTER Button page 80 12 EX...

Страница 26: ...ontrol codes are on page 183 12 REMOTE Terminal Stereo Mini Use this jack for wired remote control of the projector using a commercially available remote cable with 3 5 stereo mini plug without resist...

Страница 27: ...ton page 37 71 1 3 4 6 14 10 12 16 20 7 2 5 8 9 11 15 18 17 13 21 19 25 28 32 23 22 35 24 30 26 29 34 27 31 36 33 21 AUTO ADJ Button page 33 22 23 COMPUTER 1 2 Button page 20 24 COMPUTER 3 Button This...

Страница 28: ...emote Control Precautions Handle the remote control carefully If the remote control gets wet wipe it dry immediately Avoid excessive heat and humidity Do not short heat or take apart batteries Do not...

Страница 29: ...control and the sensor or if strong light falls on the sensor Weak batteries will also prevent the remote control from properly operating the projector Using the Remote Control in Wired Operation Conn...

Страница 30: ...Step 2 Turning on the projector page 17 Step 3 Selecting a source page 20 Step 4 Adjusting the picture size and position page 22 Correcting keystone distortion CORNERSTONE page 42 Step 5 Adjusting a p...

Страница 31: ...R THE DEVICE TO PREVENT FIRE OR SHOCK DO NOT EXPOSE THIS UNIT TO RAIN OR MOISTURE DO NOT USE THIS UNIT S PLUG WITH AN EXTENSION CORD OR IN AN OUTLET UNLESS ALL THE PRONGS CAN BE FULLY INSERTED Importa...

Страница 32: ...tor is turned off with the POWER button or if the AC power supply is disconnected during normal projector operation Use caution when picking up the projector Using the Supplied Power Cords Select the...

Страница 33: ...oming loose make sure that all the prongs of the power cord are fully inserted into the AC IN terminal of the projector before using the power cord stopper to fix the power cord A loose contact of the...

Страница 34: ...3 Press the main power switch to the OFF position O The projector will be turned off 1 Remove the lens cap from the lens unit 2 Press the main power switch to the ON position I The POWER indicator lig...

Страница 35: ...dy red light Blinking blue light Steady blue light page 178 Performing Lens Calibration After installation or replacement of the lens be sure to perform LENS CALIBRATION by pressing and holding the SH...

Страница 36: ...114 NOTE If one of the following things happens the projector will not turn on If the internal temperature of the projector is too high the projector detects abnormal high temperature In this conditi...

Страница 37: ...Y C COMUPTER HDBaseT SLOT Press it briefly to display the INPUT screen Press the buttons to match the target input terminal and then press the ENTER button to switch the input To delete the menu disp...

Страница 38: ...ce as the default source and press the ENTER button 6 Press the EXIT button three times to close the menu 7 Restart the projector The source you selected in step 5 will be projected NOTE Even when AUT...

Страница 39: ...focus Focus page 26 Finely adjusting the size of an image Zoom page 31 Adjusting the projected image s height and horizontal tilt Tilt foot page 32 NOTE 1 Adjust the projected image s height using the...

Страница 40: ...rs being pinched by the moving lens NOTE The lens shift function is not available on the projector with either NP16FL or NP39ML lens installed For using NP16FL set back the lens to the home position F...

Страница 41: ...or button Use the buttons to move the projected image Returning the lens shift position to the home position Press and hold the LENS SHIFT HOME POSITION button for 2 seconds to return the lens shift...

Страница 42: ...urrence page 178 In this case perform lens calibration Lens calibration procedures 1 Power on the projector 2 Press the SHUTTER CALIBRATION button on the control panel over 2 seconds or keep pressing...

Страница 43: ...for permanent installation Preparation Warm up the projector for one hour 1 Use the FOCUS buttons to make sure you obtain the best focus If you do not move the projector back and forth 2 Select the TE...

Страница 44: ...case the optical axis is at the bottom edge of the projected image Adjusting with buttons on the cabinet Press the FOCUS BUTTON on the control panel Adjusting with the remote control Press the VOL FOC...

Страница 45: ...ch allows you to store adjusted value for Lens Shift Zoom and Focus If you accidentally move the Edge focus ring drawing shown below after having stored adjusted values the adjusted values stored in t...

Страница 46: ...d off temporarily page 36 37 4 Keep pressing the FOCUS button until you obtain the best focus For obtaining the best focus by the remote control press the VOL FOCUS button while holding to press the C...

Страница 47: ...OCUS buttons to make sure you obtain the best focus If you do not move the projector back and forth 2 Select the TEST PATTERN from the menu and display the test pattern page 88 You can also use the TE...

Страница 48: ...31ZL 1 Press the ZOOM button The ZOOM adjustment bar will be displayed on On the remote control while pressing on the CTL button press the D ZOOM ZOOM or button The zoom is adjusted or buttons on the...

Страница 49: ...maximum of 48 mm The tilt foot can be used to tilt the projector by a maximum of 6 NOTE Do not lengthen the tilt foot any more than 50 mm 1 9 Doing so will make the tilt feet s mount section unstable...

Страница 50: ...uality is poor this button can be used to automatically optimize the projection image on the screen Press the AUTO ADJ button to optimize a computer image automatically Poor picture Adjusted picture N...

Страница 51: ...RMAL setting If you do not want to turn off select NO by button and press ENTER 3 Make sure the projector is in STANDBY MODE then turn off the main power switch OFF The POWER indicator will go off and...

Страница 52: ...jector s main power switch a power strip equipped with a switch or a breaker Do not turn off the main power switch or disconnect the AC power supply within 10 seconds of making adjustments or setting...

Страница 53: ...AV MUTE Press the AV MUTE button to turn off the image for a short period of time Press again to restore the image TIP The video will disappear but not the menu display Turning Off the On Screen Menu...

Страница 54: ...cursor either TO HORIZONTAL POSITION or VERTICAL POSITION by pressing or button and then press button to shift the On Screen Menu For finishing the setting on the On Screen Menu press the MENU button...

Страница 55: ...r the function may be restricted To do so 1 Press the D ZOOM button to magnify the picture 2 Press the button The area of the magnified image will be moved 3 Press the D ZOOM button Each time the D ZO...

Страница 56: ...80 The cooling fan will also slow down accordingly Lower power consumption ECO2 Brightness will be at about 50 The cooling fan will also slow down accordingly Lower power consumption considerably To t...

Страница 57: ...dless of the setting for LIGHT MODE This is called Forced ECO MODE Please refer the below table for the conditions and output power in Forced ECO MODE Altitudes Atmospheric temperature 5 25 C 41 77 F...

Страница 58: ...y after the time of power on and the time of power off The CARBON SAVINGS SESSION message will be displayed in the POWER OFF ARE YOU SURE message at the time of power off TIP The formula shown below i...

Страница 59: ...the projected image is rectangular 1 Project an image so that the screen is smaller than the area of the raster Projected image The drawing shows the upper right corner 2 Pick up any one of the corner...

Страница 60: ...ne icon which points in the direction you wish to move the projected image frame 7 Press the ENTER button 8 Use the button to move the projected image frame as shown on the example 9 Press the ENTER b...

Страница 61: ...ned on again the correction values in the previous time has been maintained Carry out either one of the following actions to clear the adjustment value of CORNERSTONE In Step 12 select RESET and then...

Страница 62: ...g the RESET of the menu To enable the Security function 1 Press the MENU button The menu will be displayed 2 Press the button twice to select SETUP and press the button or the ENTER button to select M...

Страница 63: ...utton The SECURITY function has been enabled To turn on the projector when SECURITY is enabled 1 Press the button If using the remote control press the POWER ON button The projector will be turned on...

Страница 64: ...ton The SECURITY KEYWORD screen will be displayed 4 Type in your keyword and press the ENTER button When the correct keyword is entered the SECURITY function will be disabled NOTE If you forget your k...

Страница 65: ...ase consult a doctor if the symptoms persist Please watch a 3D video directly in front of the screen If you watch a 3D video obliquely from the sides this may result in physical and eye fatigue Proced...

Страница 66: ...e display will return to the FORMAT screen Press the MENU button to return to the original screen The 3D caution message screen will be displayed when switching to a 3D video default factory setting w...

Страница 67: ...not be able to be selected Please change the signal in that case Using DLP Link Use DLP Link glasses or other compatible commercially available liquid crystal shutter spectacles 1 Connect a video dev...

Страница 68: ...een in 3D Please turn the L R INVERT in the on screen menu to OFF Due to multiple 3D projectors working at the same time in the vicinity the projectors may interfere with one another Alter natively th...

Страница 69: ...settings of your network Should this happen consult your network administrator The projector may not respond if its buttons are repeatedly pressed in rapid intervals Should this happen wait a moment...

Страница 70: ...pj nec co jp access is gained to the network setting by specifying http pj nec co jp index html for the address or the entry column of the URL Example 2 When the IP address of the projector is 192 16...

Страница 71: ...ut to the projector page 95 SOURCE SELECT This switches the input terminal of the projector HDMI Switches to the HDMI IN terminal DisplayPort Switches to the DisplayPort IN BNC Switch to BNC IN video...

Страница 72: ...ctor from your DHCP server DHCP OFF Set IP address subnet mask and gateway to the projector assigned by your network administrator IP ADDRESS Set your IP address of the network connected to the projec...

Страница 73: ...Mail feature Clearing a checkmark will turn off the Alert Mail feature Sample of a message to be sent from the projector Subject Projector Projector Information THE COOLING FAN HAS STOPPED INFORMATION...

Страница 74: ...jector to the Extron XTP transmitter Placing a checkmark will enable to connect with the XTP transmitter Clearing a checkmark will disable to connect with the XTP transmitter NOTE If you forget your p...

Страница 75: ...adjustable zoom focus and les shift range LENS MEMORY STORE Store the current adjusted values in memory for each input signal MOVE Applies the adjusted values of LENS SHIFT ZOOM and FOCUS to the curre...

Страница 76: ...FORCED MUTE OFF Not turn off the image during les shift ON Turn off the image during les shift SHUTTER SETTINGS POWER ON SHUTTER OPEN When the power is turned on the light source turns on and the pic...

Страница 77: ...of installation two kinds of adjusted values can be stored If no adjusted values are stored in LENS MEMORY adjusted values from the selected profile REF LENS MEMORY will be applied for lens adjustmen...

Страница 78: ...u will be displayed 2 Press the button to select SETUP and press the ENTER button 3 Press the button to select INSTALLATION 2 4 Press the button to select REF LENS MEMORY and press the ENTER button Th...

Страница 79: ...he ENTER button The confirmation screen will be displayed 8 Press the button to select and YES and press the ENTER button Select a PROFILE number and save the adjusted LENS SHIFT ZOOM and FOCUS values...

Страница 80: ...n to select INSTALLATION 2 4 Press the button to select REF LENS MEMORY and press the ENTER button The REF LENS MEMORY screen will be displayed 5 Make sure PROFILE is highlighted then press the ENTER...

Страница 81: ...l shift based on the adjusted values stored in the selected PROFILE 8 Press the button to select and YES and press the ENTER button The adjusted values will be applied to the current signal 9 Press th...

Страница 82: ...umber To automatically apply the stored values at the time of source selection 1 From the menu select SETUP REF LENS MEMORY LOAD BY SIGNAL and press the ENTER button 2 Press the button to select and O...

Страница 83: ...PICTURE BY PICTURE Case 2 Using four projectors resolution WUXGA to project video with a resolution of 2560 1600 pixels TILING Case 1 Using a single projector to project two types of videos PIP PICTUR...

Страница 84: ...o project videos with a resolution of 2560 1600 pixels TILING Connection example and projection image On screen menu operations 1 Four similar videos are displayed when four projectors are projected P...

Страница 85: ...ertical direction 3 In the screen for setting the horizontal order select 1st UNIT or 2nd UNIT look at the screens the one on the left is the 1st UNIT while the one on the right is the 2nd UNIT 4 In t...

Страница 86: ...ey may fall down resulting in damage and failure Installation example when using 3 or more projectors The following installation is recommended when installing a combination of 3 or more projectors fo...

Страница 87: ...can be fine tuned Switch the main display with the sub display Main Display Sub Display Picture by picture function PICTURE BY PICTURE Display the main display and sub display side by side The main di...

Страница 88: ...P PICTURE IN PICTURE or PICTURE BY PICTURE screen set up under MODE is projected page 105 When the signal name is displayed in grey this means that it cannot be selected The signal can also be selecte...

Страница 89: ...ttons and then press the ENTER button Display the screen for switching the display positions 3 Select ON using the button and then press the ENTER button The video of the main display will switch with...

Страница 90: ...r both the main display and sub display These operations cannot be ap plied individually Momentary deletion of video Video pause PIP PICTURE BY PICTURE cannot be used when a 3D video is being displaye...

Страница 91: ...ake optical adjustments lens shift focus and zoom Adjust the brightness of each projector using REF LIGHT ADJUST under LIGHT MODE After adjusting the brightness you can keep the set brightness level b...

Страница 92: ...GE BLENDING 1 Press the MENU button The menu will be displayed 2 Select EDGE BLENDING The EDGE BLENDING screen will be displayed Align the cursor with MODE and then press the ENTER but ton The mode sc...

Страница 93: ...OTTOM to OFF Adjust RANGE and POSITION to determine an area of overlapped edges of images projected from each projector Turning on MARKER will display markers in magenta and green The magenta marker i...

Страница 94: ...ing turn on or off MARKER from the menu BLEND CURVE Adjust the brightness of the overlapped section on the screens According to the necessity adjust the brightness of the overlapped section on the scr...

Страница 95: ...nding on what combination of TOP BOTTOM LEFT and RIGHT are turned on Example Adjusting the Black Level when placing two projectors side by side Width of overlap Adjust CENTER Adjust CENTER Projector A...

Страница 96: ...ENTER CENTER CENTER BOTTOM CENTER TOP RIGHT CENTER RIGHT TOP CENTER TIP The number of black level division screens maximum of nine divisions changes depending on the number of edge blending positions...

Страница 97: ...projector cabinet to select the item you want to adjust or set You can use the buttons on the remote control or the projector cabinet to select the tab you want 5 Press the ENTER button on the remote...

Страница 98: ...d button to select an option in a dialog box Source Indicates the currently selected source Menu mode Indicates the current menu mode BASIC or ADVANCED Off Timer remaining time Indicates the remaining...

Страница 99: ...VIDEO MOVIE GRAPHIC sRGB DICOM SIM EDGE BLENDING DETAIL SETTINGS GENERAL REFERENCE HIGH BRIGHT PRESENTATION VIDEO MOVIE GRAPHIC sRGB DICOM SIM EDGE BLENDING GAMMA CORRECTION 1 SELECT DYNAMIC NATURAL...

Страница 100: ...GHT HORIZONTAL POSITION VERTICAL POSITION SIZE MEDIUM LARGE MEDIUM SMALL BORDER GEOMETRIC CORRECTION MODE OFF KEYSTONE CORNERSTONE HORIZONTAL CORNER VERTICAL CORNER WARP PC TOOL KEYSTONE HORIZONTAL VE...

Страница 101: ...AUTION MESSAGE ON OFF ON DISPLAY TIME AUTO 45 SEC MANUAL AUTO 5 SEC AUTO 15 SEC AUTO 45 SEC MENU 2 MENU ANGLE 0 0 90 270 MENU POSITION HORIZONTAL POSITION 0 10 10 VERTICAL POSITION 0 10 10 RESET INSTA...

Страница 102: ...01 30 01 00 00 30 00 00 00 30 01 00 01 30 02 00 02 30 03 00 03 30 04 00 04 30 05 00 05 30 06 00 06 30 07 00 07 30 08 00 08 30 09 00 09 30 10 00 10 30 11 00 11 30 12 00 12 30 13 00 DATE AND TIME SETTIN...

Страница 103: ...ABLE CONTROLLER IP ADDRESS IP ID Extron XTP OFF ON SOURCE OPTIONS AUTO ADJUST NORMAL OFF NORMAL FINE COLOR SYSTEM BNC VIDEO AUTO AUTO NTSC3 58 NTSC4 43 PAL PAL M PAL N PAL60 SECAM BNC Y C AUTO AUTO NT...

Страница 104: ...EVEL LINK RATE LINK LANE 3D FORMAT SOURCE 3 INPUT TERMINAL RESOLUTION HORIZONTAL FREQUENCY VERTICAL FREQUENCY SYNC TYPE SYNC POLARITY SCAN TYPE SOURCE NAME ENTRY NO SOURCE 4 SIGNAL TYPE VIDEO TYPE BIT...

Страница 105: ...CV video input terminal This projects the composite video signal BNC Y C This projects the video of the device connected to the BNC Y C video input terminal This projects the S video signal COMPUTER T...

Страница 106: ...is then displayed and no additional patterns can be registered You should thus delete adjustment values of signals that are no longer needed Displaying the Entry list 1 Press the MENU button The menu...

Страница 107: ...n to select EDIT and press the ENTER button The Edit window will be displayed SOURCE NAME Enter a signal name Up to 18 alphanumeric characters can be used INPUT The input terminal can be changed Switc...

Страница 108: ...lost after the Entry List is closed Copying and pasting a signal from the Entry List COPY PASTE 1 Press the or button to select a signal you wish to copy 2 Press the or button to select COPY and pres...

Страница 109: ...ach gamma or color Your settings can be stored in PRESET 1 to PRESET 8 HIGH BRIGHT Recommended for use in a brightly lit room PRESENTATION Recommended for making a presentation using a PowerPoint file...

Страница 110: ...iewing MOVIE Recommended for movies GRAPHIC Recommended for graphics sRGB Standard color values DICOM SIM Recommended for DICOM simulation format EDGE BLENDING Recommended for edge blending Selecting...

Страница 111: ...MIC CONTRAST may not be able to be selected Adjusting Brightness LIGHT ADJUST Brightness can be adjusted in 1 increments from 20 to 100 The adjustment is effective when NORMAL is selected for LIGHT MO...

Страница 112: ...ation level HUE Varies the color level from green to blue The red level is used as reference Input signal CONTRAST BRIGHTNESS SHARPNESS COLOR HUE RGB system of COMPUTER Display Port HDMI HDBaseT Yes Y...

Страница 113: ...ion adjusts the clock frequencies that eliminate the horizontal banding in the image This adjustment may be necessary when you connect your computer for the first time PHASE Use this item to adjust th...

Страница 114: ...you project the signal with the same resolution horizontal and vertical frequency its adjustments will be called up and applied To delete adjustments stored in memory from the menu you select RESET C...

Страница 115: ...WXGA 1280 768 15 9 WXGA 1280 800 16 10 HD FWXGA 1366 768 approx 16 9 WXGA 1440 900 16 10 SXGA 1280 1024 5 4 SXGA 1400 1050 4 3 WXGA 1600 900 16 9 UXGA 1600 1200 4 3 WSXGA 1680 1050 16 10 FHD 1080P 19...

Страница 116: ...tched left and right in 4 3 Parts of the displayed image are cropped at the left and right edges and therefore not visible FULL Project to full screen size TIP Image position can be adjusted verticall...

Страница 117: ...selecting ON Selecting Interlaced Progressive Conversion Process Mode DEINTERLACE This function allows you to select an interlaced to progressive conversion process for video signals NORMAL Automatic...

Страница 118: ...vice to the HDMI IN terminal DisplayPort input terminal and HDBaseT input terminal of the projector AUTO The video level is switched automatically based on the information from the device outputting t...

Страница 119: ...ing transmission format Select to match the 3D broadcast and 3D media Nor mally AUTO is selected Please select the 3D input signal format when the 3D detection signal of the format cannot be distingui...

Страница 120: ...from the ENTRY LIST page 89 Note that performing CUT or ALL DELETE in the ENTRY LIST will delete lens memory adjustments as well as source adjust ments This deletion will not take effect until other...

Страница 121: ...automatically apply the adjusted values at the time of source selection 1 From the menu select SETUP INSTALLATION 2 REF LENS MEMORY LOAD BY SIGNAL and press the ENTER button 2 Press the button to sele...

Страница 122: ...er to 4 2 Displaying Two Pictures at the Same Time page 72 for details PIP SETTING Select the display position position adjustment and size of the sub display in the PIP screen START POSITION Selectio...

Страница 123: ...movement is half the resolution of the projector Reference point Adjust using the horizon tal position Sub display Main display Reference point Adjust using the vertical position TOP LEFT TOP RIGHT BO...

Страница 124: ...n when performing trapezoidal correction with the screen moved in the vertical direction using the lens shift THROW RATIO Adjusts according to the projection ratio of the optional lens used Model name...

Страница 125: ...e VERTICAL CORNER Performs correction for projection onto a wall lying at an angle to the vertical direction Reverse angle correction is also possible NOTE When the maximum adjustment range is exceede...

Страница 126: ...er side and Point g are moved the lower side will move in a parallel manner VERTICAL CORNER When Point d in the drawing is moved and the left side and Point e are moved the right side will move in a p...

Страница 127: ...ers or sides of the screen and then press the ENTER The cursor will back to yellow box Explanation for correcting distortion Eight adjustment points can be moved independently For left and right sides...

Страница 128: ...BOTTOM LEFT RIGHT This selects the EDGE BLENDING locations on the left right top and bottom on the screen The following settings can be adjusted when an item is selected page 75 CONTROL Enable TOP BOT...

Страница 129: ...ivide The edge blending width will also be automatically set to that width TILING This assigns the divided screens to the projectors The edge blending function will also be set automatically ZOOM HORI...

Страница 130: ...n position will be automatically extracted and projected If the tiling conditions are not satisfied adjust the video screen of the projector at each installation position using the zoom function Assig...

Страница 131: ...turns on or off input name display such as HDMI DisplayPort BNC BNC CV BNC Y C COMPUTER HDBaseT to be displayed on the top right of the screen Turning messages on and off MESSAGE DISPLAY This option...

Страница 132: ...ng Menu Display Time DISPLAY TIME This option allows you to select how long the projector waits after the last touch of a button to turn off the menu The preset choices are MANUAL AUTO 5 SEC AUTO 15 S...

Страница 133: ...ceiling Never install the projector on your own This may result in the projector falling down and causing injury to people AUTO This automatically detects and projects the DESKTOP FRONT and CEILING FR...

Страница 134: ...in the menu page 98 Using the Wall Color Correction WALL COLOR This function allows for quick adaptive color correction in applications where the screen material is not white Selecting Fan Mode FAN M...

Страница 135: ...for multi screen projection the brightness can be ad justed individually on each projector The adjustment is effective when NORMAL is selected for the LIGHT MODE and OFF is selected for the CONSTANT...

Страница 136: ...er is turned on When the SHUTTER button is pressed the shutter is released and the light source is turned on PICTURE MUTE SHUTTER OPEN The light source is still on when the picture is turned off for s...

Страница 137: ...ed to LENS MEMORY the lens will apply REF LENS MEMORY adjusted values Alternatively if no adjusted values have been saved to REF LENS MEMORY the unit will return to factory default settings FORCED MUT...

Страница 138: ...for the administrator mode MENU MODE Select either BASIC or ADVANCED menu page 82 NOT SAVE SETTING VALUES Placing a check mark will not save your projector settings Clear this check box to save your...

Страница 139: ...in clock The clock will keep working for about two weeks after the main power is turned off If the main power is not supplied to the projector for two weeks or more it requires to set DATE AND TIME S...

Страница 140: ...press the ENTER button You will be returned to the TOOLS screen NOTE Up to 30 different timer settings can be programmed When PROGRAM TIMER is turned on the STANDBY MODE setting is ignored The Progra...

Страница 141: ...een select a program you want to edit and press the ENTER button 2 Change the settings on the EDIT screen 3 Select OK and press the ENTER button The programmed settings will be changed You will be ret...

Страница 142: ...INGS Select your time zone DATE AND TIME SETTINGS Set your current date MM DD YYYY and time HH MM INTERNET TIME SERVER If you place a check mark the projector s built in clock will be syn chronized wi...

Страница 143: ...TY This feature turns on or off the SECURITY function Unless the correct keyword is entered the projector cannot project an image page 45 NOTE Your setting will not be affected even when RESET is done...

Страница 144: ...ill display the menu for canceling the Control ID Assigning or Changing the Control ID 1 Turn on the projector 2 Press the ID SET button on the remote control The CONTROL ID screen will be displayed I...

Страница 145: ...T BACK and HDBaseT NOTE The remote control of the projector will not be able to receive signals if the power supply of the HDBaseT supported transmission device connected to the projector on which HDB...

Страница 146: ...ROFILE 2 Two settings can be set for wired LAN Next turn on or off for DHCP IP ADDRESS SUBNET MASK and GATEWAY and select OK and press the ENTER button page 130 To recall LAN settings stored in the pr...

Страница 147: ...from your network administrator IP ADDRESS Set your IP address of the network connected to the projector when DHCP is turned off Up to 12 numeric characters SUBNET MASK Set your subnet mask number of...

Страница 148: ...rojector name Up to 16 alphanu meric characters and symbols DOMAIN Set a host name and domain name of the projector HOST NAME Set a host name of the projector Up to 15 alphanumeric characters DOMAIN N...

Страница 149: ...projector Up to 60 alphanumeric characters SENDER S AD DRESS Specify the sender s address Up to 60 alphanu meric characters and symbols SMTP SERVER NAME Type in the SMTP server name to be connected t...

Страница 150: ...AMX s NetLinx control system TIP When using a device that supports AMX Device Discovery all AMX NetLinx control system will recognize the device and download the appropriate Device Discovery Module fr...

Страница 151: ...default Set this if the projector cannot identify the signal automatically Selecting Default Source DEFAULT INPUT SELECT You can set the projector to default to any one of its inputs each time the pro...

Страница 152: ...menu disappears OFF This exits the closed caption mode CAPTION 1 4 Text is superimposed TEXT 1 4 Text is displayed Selecting a Color or Logo for Background BACKGROUND Use this feature to display a blu...

Страница 153: ...e projector rotate for the purpose of interior parts protection Sleep mode refers to the mode whereby the functional restrictions due to the STANDBY MODE setting are removed When ON is selected under...

Страница 154: ...ing Power Management AUTO POWER OFF When this option is selected you can enable the projector to automatically turn off at the selected time 0 05 0 10 0 15 0 20 0 30 1 00 if there is no signal receive...

Страница 155: ...CKGROUND EDGE BLENDING MULTI SCREEN SCREEN TYPE GEOMETRIC CORRECTION REF WHITE BALANCE CONTROL PANEL LOCK SECURITY COM MUNICATION SPEED DATE AND TIME SETTINGS CONTROL ID STANDBY MODE FAN MODE LIGHT HO...

Страница 156: ...the remote control will show the INFO menu items USAGE TIME LIGHT HOURS USED H TOTAL CARBON SAVINGS kg CO2 TOTAL CARBON SAVINGS This displays the estimated carbon saving information in kg The carbon f...

Страница 157: ...DEPTH VIDEO LEVEL LINK RATE LINK LANE 3D FORMAT SOURCE 3 INPUT TERMINAL RESOLUTION HORIZONTAL FREQUENCY VERTICAL FREQUENCY SYNC TYPE SYNC POLARITY SCAN TYPE SOURCE NAME ENTRY NO SOURCE 4 SIGNAL TYPE...

Страница 158: ...141 5 Using On Screen Menu WIRED LAN IP ADDRESS SUBNET MASK GATEWAY MAC ADDRESS VERSION 1 FIRMWARE DATA SUB CPU OTHERS DATE TIME PROJECTOR NAME MODEL NO SERIAL NUMBER CONTROL ID when CONTROL ID is set...

Страница 159: ...142 5 Using On Screen Menu HDBaseT SIGNAL QUALITY OPERATION MODE LINK STATUS HDMI STATUS...

Страница 160: ...because of narrow space between the projector and the lens Never touch the lens surface while the projector is operating Be very careful not to let dirt grease etc on the lens surface and not to scrat...

Страница 161: ...e moved to the home position 3 Turn off the main power switch and then unplug the power cord 4 Wait until the projector cabinet is cool enough to handle 1 While pressing the LENS release button on the...

Страница 162: ...attached with a ferrite core When connecting the display output terminal mini D sub 15 pin on the computer to the BNC IN terminal use a conversion cable to convert the BNC cable 5 core to a mini D su...

Страница 163: ...e DisplayPort cable between the computer s DisplayPort output terminal and the projector s DisplayPort IN terminal Select the source name for its appropriate input terminal after turning on the projec...

Страница 164: ...ly available have locks To disconnect the cable press the button on the top of the cable s terminal then pull the cable out Power can be supplied to the connecting device from the DisplayPort IN termi...

Страница 165: ...the cables turn the projector on then select the HDMI Finally turn on your PC Failure to do so may not activate the digital output of the graphics card resulting in no picture being displayed Should...

Страница 166: ...ted device In the case of the HDMI OUT terminal of the projector the theoretical number of units that can be connected in a series is seven The maximum number of units that can be connected may be red...

Страница 167: ...l S video signal connection Select the source name for its appropriate input terminal after turning on the projector Input terminal SOURCE button on the projector cabinet Button on the remote control...

Страница 168: ...ctory setting when shipped the computer signal and component signal are automatically distinguished and switched If the signals cannot be distinguished select COMPONENT under ADJUST VIDEO SIGNAL TYPE...

Страница 169: ...an Normal if HDMI output is switchable between Enhanced and Normal This will provide improved image contrast and more detailed dark areas For more information on settings refer to the instruction manu...

Страница 170: ...hich provides a LAN connection using a LAN cable To use a LAN connection you are required to set the LAN on the projector menu Select SETUP NETWORK SETTINGS WIRED LAN page 129 Example of LAN connectio...

Страница 171: ...s serial LAN and remote control signals IR commands Connection example Ethernet HDBaseT Computer for control use Computer for output use Example of a transmission device Remote control HDMI output vid...

Страница 172: ...of the floor or table on its own If not the projec tor may fall over resulting in injury damage or malfunction A stand for supporting the projector needs to be made for this purpose to keep intake ai...

Страница 173: ...e the 6 screw holes at the back of the projector to secure it to the stand Screw hole center dimension 300 300 pitch 150 mm Screw hole dimension on the projector M4 with the maximum depth 16 mm 4 of t...

Страница 174: ...projectors to distribute signal to two outputs of the two projectors Notes for stacking Ask your service person for setting up and adjusting projectors Set up the projectors in a place or structure i...

Страница 175: ...projector 1 Remove rubber caps and screws at four locations 1 Use your tweezers or nail to pinch and pull up the rubber cap 2 Remove the screw from a square hole 1 2 2 Attach the three stacking holde...

Страница 176: ...projector Put each tilt foot of the upper projector on the stacking holders four locations Each tilt foot has a rubber Place each tilt foot rubber on stacking holders four locations Foot rubber TIP T...

Страница 177: ...solvents such as alcohol or thinner When cleaning the ventilation slits or the speaker using a vacuum cleaner do not force the brush of the vacuum cleaner into the slits of the cabinet Vacuum the dus...

Страница 178: ...3 3 4 1 240 4 1 6 6 9 4 9 1 11 9 11 6 19 3 18 8 28 3 28 0 43 8 4 0 5 0 300 5 1 8 2 11 7 11 3 14 9 14 5 24 1 23 5 35 4 35 0 54 8 5 0 6 2 350 5 8 7 3 400 6 6 8 3 450 7 5 9 4 500 8 3 10 4 TIP Calculation...

Страница 179: ...35 3 00 0 98 200 1 57 0 73 3 95 1 26 250 1 95 1 11 4 90 1 54 300 2 33 1 49 5 85 1 81 350 2 71 1 87 6 81 2 09 TIP Calculation of the throw distance from the screen size NP39ML lens throw distance m H...

Страница 180: ...th Screen height inches cm inches cm 40 33 9 86 2 21 2 53 8 60 50 9 129 2 31 8 80 8 80 67 8 172 3 42 4 107 7 100 84 8 215 4 53 0 134 6 120 101 8 258 5 63 6 161 5 150 127 2 323 1 79 5 201 9 200 169 6 4...

Страница 181: ...en height and H Horizontal refers to the screen width The lens shift range is expressed as a ratio of height and width respectively 100 V 50 V 30 V 100 H 20 H 10 H 10 H 20 H Height of projected image...

Страница 182: ...s screwdriver plus head 1 Turn off the main power switch of the projector 2 Loosen the two screws on the SLOT cover of the terminals Remove the two screws and the SLOT cover NOTE Keep the two screws a...

Страница 183: ...select the optional board source select SLOT as the input NOTE Mounting the optional board may cause the fans to run in the standby mode for the purpose of cooling depending on the optional board The...

Страница 184: ...60 UXGA 1600 1200 2 4 3 60 65 70 75 WSXGA 1680 1050 16 10 60 WUXGA 1920 1200 2 16 10 60 Reduced Blanking 2K 2048 1080 17 9 60 Full HD 1920 1080 2 16 9 60 MAC 13 640 480 4 3 67 MAC 16 832 624 4 3 75 M...

Страница 185: ...80 17 9 60 WQHD iMac 27 2560 1440 16 9 60 WQXGA 2560 1600 16 10 60 Reduced Blanking 4K 3840 2160 16 9 23 98 24 25 29 97 30 4096 2160 17 9 24 HDTV 1080p 1920 1080 16 9 50 60 HDTV 1080i 1920 1080 16 9 5...

Страница 186: ...Side Half Top and Bottom 25 Side By Side Half Top and Bottom 50 Side By Side Half Top and Bottom 59 94 60 Side By Side Half Top and Bottom 1280 720p 50 Side By Side Half Top and Bottom 59 94 60 Frame...

Страница 187: ...Digital 4096 2160 handled with Advanced AccuBlend Input signals R G B H V RGB 0 7Vp p 75 Y 1 0Vp p 75 with Negative Polarity Sync Cb Cr Pb Pr 0 7Vp p 75 H V Sync 4 0Vp p TTL Composite Sync 4 0Vp p TTL...

Страница 188: ...arately The light output value is lower when setting the LIGHT MODE to ECO1 or ECO2 ECO1 about 80 ECO2 about 50 If any other mode is selected as the PRESET mode the light output value may drop slightl...

Страница 189: ...21 3 70 1 F1 86 2 48 f 32 9 54 2 mm Image Size Diagonal 50 300 inches 1 27 7 62 m Projection Distance Min Max 2 36 24 13 m NP20ZL Power zoom and focus throw ratio 3 6 5 4 1 F1 85 2 41 f 52 8 79 1 mm...

Страница 190: ...as shown below For more information contact your dealer Power Cord Electrical Specifications Power supply Power cord electrical specs AC 100 130V 125V 15A or higher 250V 16A or higher AC 200 240V 250V...

Страница 191: ...dimension on the projector M4 with the maximum depth 16 mm 0 63 CAUTION Do not attempt to mount the projector on a ceiling yourself The projector must be installed by qualified technicians in order to...

Страница 192: ...17 19 2 4 6 8 10 12 14 16 18 Pin No Signal Pin No Signal 1 TMDS Data 2 11 TMDS Clock Shield 2 TMDS Data 2 Shield 12 TMDS Clock 3 TMDS Data 2 13 CEC 4 TMDS Data 1 14 Disconnection 5 TMDS Data 1 Shield...

Страница 193: ...6 RxD HDBT1 7 Disconnection HDBT3 8 Disconnection HDBT3 USB Port Type A 1 3 2 4 Pin No Signal 1 VBUS 2 D 3 D 4 Grounding PC CONTROL Port D Sub 9 Pin 1 2 3 4 5 6 7 8 9 Communications protocol Pin No S...

Страница 194: ...Remote Control Window Toolbar For getting the Virtual Remote Tool please visit our web site and download it http www nec display com dl en index html NOTE Logo data graphics that can be sent to the p...

Страница 195: ...ector customer support center for repairs Green twice per cycle Performing the lens calibration Orange once per cycle Network conflict It is not possible to connect the projector s built in LAN and wi...

Страница 196: ...s contact the NEC projector customer sup port center Lit Orange High surrounding tempera ture Forced ECO Mode The surrounding temperature is high Lower the room tempera ture If the temperature protect...

Страница 197: ...232C cannot be used in certain cases as well Both the composite video signal from each input terminal as the computer BNC IN and BNC CV and the S video signal from the BNC Y C Input terminal are not o...

Страница 198: ...ms Cross color in RGB mode Press the AUTO ADJ button on the projector cabinet or the remote control page 33 Adjust the computer image manually with CLOCK PHASE in IMAGE OPTIONS in the menu page 96 For...

Страница 199: ...e projected image may not be displayed correctly Should this happen deactivate the notebook PC s LCD screen when the projector display is in use Each notebook PC has a different way of deactivate reac...

Страница 200: ...URE MUTE ON 02H 10H 00H 00H 00H 12H PICTURE MUTE OFF 02H 11H 00H 00H 00H 13H NOTE Contact your local dealer for a full list of the PC Control Codes if needed Cable Connection Communication Protocol Ba...

Страница 201: ..._________________________ The source connected to the projector is active and available Still no image even though you adjust the brightness and or the contrast Input source s resolution and frequency...

Страница 202: ...creen size inch Screen type White matte Beads Polarization Wide angle High contrast Throw distance feet inch m Orientation Ceiling mount Desktop Power outlet connection Connected directly to wall outl...

Страница 203: ...NEC Display Solutions Ltd 2016 7N952521...

Отзывы: