background image

9

1. Introduction

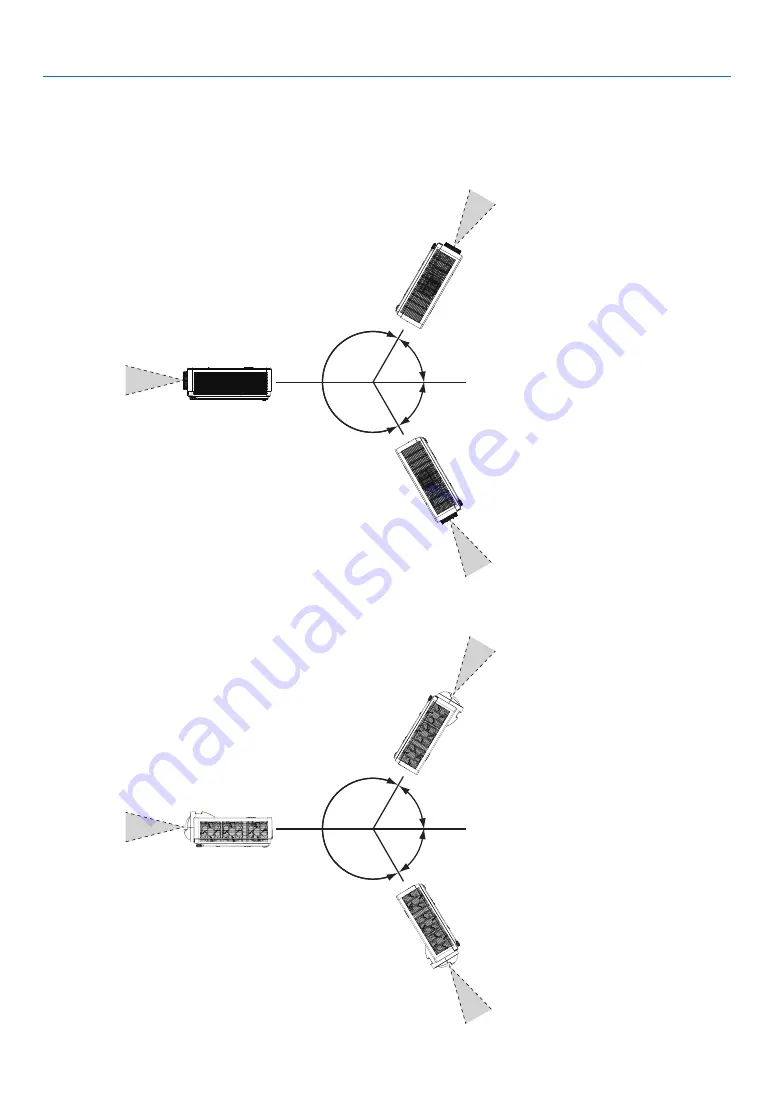
Angle sensor

The installation angle range that the built-in angle sensor of the projector can detect is shown in the figure 
below.

120°

120°

120°

120°

When selecting [Auto ceiling / 
Front] or [Auto ceiling / Rear] as 
projection way, the projector will 
be judged as the front projection 
automatically .

When selecting [Auto ceiling / 
Front] or [Auto ceiling / Rear] as 
projection way, the projector will 
be judged as the front projection 
automatically .

When selecting [Auto ceiling / 
Front] or [Auto ceiling / Rear] as 
projection way, the projector will 
be judged as the front projection 
automatically .

When selecting [Auto ceiling / 
Front] or [Auto ceiling / Rear] as 
projection way, the projector will 
be judged as the front projection 
automatically .

When selecting [Auto ceiling / 
Front] or [Auto ceiling / Rear] as 
projection way, the projextor will 
be judged as the ceiling projection 
automatically .

When selecting [Auto ceiling / 
Front] or [Auto ceiling / Rear] as 
projection way, the projextor will 
be judged as the ceiling projection 
automatically .

60°

60°

60°

60°

[PE456USL/PE456WSL]

[PE506UL/PE506WL]]

Содержание PE456USL

Страница 1: ...E456USL PE506WL PE456WSL User s Manual Please visit our web site for User s Manual in the latest version https www sharp nec displays com dl en pj_manual lineup html Model No NP PE506UL NP PE456USL NP PE506WL NP PE456WSL ...

Страница 2: ...and other countries Other product names and logos mentioned in this user s manual may be the trademarks or registered trademarks of their respective holders GPL LGPL Software Licenses The product includes software licensed under GNU General Public License GPL GNU Lesser General Public License LGPL and others For more information on each software see readme pdf in the about GPL LGPL folder on the s...

Страница 3: ... images being temporarily sustained on the surface of the LCD panel If this should happen continue to use your projector The static background from previous images will disappear Disposing of your used product In the European Union EU wide legislation as implemented in each Member State requires that used electrical and electronic products carrying the mark left must be disposed of separately from...

Страница 4: ...ired to correct the interference at his own expense Supplier s declaration of conformity for USA only This device complies with Part 15 of the FCC Rules Operation is subject to the following two conditions 1 This device may not cause harmful interference and 2 this device must accept any interference received includ ing interference that may cause undesired operation U S Responsible Party Sharp NE...

Страница 5: ...eamy environment on a sheet of paper or cloth rugs or carpets Avoid locations with extremes of temperature and humidity The usage environment of this projector is as follows The operating temperature 0 to 40 C 32 to 104 F humidity 20 to 80 with no condensation The storage temperature 10 C to 50 C 14 to 122 F humidity 20 to 80 with no condensation If you wish to have the projector installed on the ...

Страница 6: ...h as a wire or screwdriver into your projector If something should fall into your projector disconnect it immediately and have the object removed by a qualified service personnel Do not place any objects on top of the projector Do not touch the power plug during a thunderstorm Doing so can cause electrical shock or fire The projector is designed to operate on a power supply of 100 240V AC 50 60 Hz...

Страница 7: ...tor exhibits a distinct change in performance indicating a need for service Disconnect the power cord and any other cables before carrying the projector Turn off the projector and unplug the power cord before cleaning the cabinet Turn off the projector and unplug the power cord if the projector is not to be used for an extended period of time When using a LAN cable For safety do not connect to the...

Страница 8: ...n to the installation and management of the device Outline of laser emitted from the built in light module Wave length 449 461nm Maximum power 105W Radiation pattern from the protective housing Wave length 449 461nm Maximum laser radiation output 66 6mW PE506UL PE506WL 19 04mW PE456USL PE456WSL The laser module is equipped in this product Use of controls or adjustments of procedures other than tho...

Страница 9: ...ote control for starting the projector while in front of the projection lens Notice is given to the user to avoid the use of optical aids such as binoculars or telescopes inside the beam When turning on the projector make sure no one within projection range is looking at the lens Keep any items magnifying glass etc out of the light path of the projector The light path being projected from the lens...

Страница 10: ...For other regions NP PA1004ULG LABEL LASER G PA1004UL 24L8989 T01L636 Abe Lee Utsunom iya Yam ada PJ Biz For USA PE506UL PE506WL Label 2 PE456USL Label 2 For other regions PE506UL PE506WL Label 2 PE456USL PE456WSL Label 2 Important Information ...

Страница 11: ...L Horizontal angle unit degree Zoom Lens position Right most Center Reference value Left most HR HC HL Wide 33 0 22 3 33 0 Tele 21 8 14 2 21 8 Vertical angle unit degree Zoom Lens position Upper most Center Reference value VU VC Wide 29 5 14 4 Tele 19 2 9 0 HC HC HL HR VU VC VC Upper Left Right Important Information ...

Страница 12: ...X PE456USL PE456WSL Horizontal angle unit degree Lens position HC HC HC 49 0 Vertical angle unit degree Lens position VC VC 55 2 Important Information ...

Страница 13: ... installing the cables Precautions for Ceiling Installation Do not install the projector in the following places Attached substances such as oil chemicals and moisture may cause deformation or cracks of the cabinet corrosion of the metal parts or malfunction Outdoors and places with humid or dust Places exposed to oil smoke or steam Places where corrosive gases are generated About Copyright of ori...

Страница 14: ...trol the projector from an external device select OFF for Power management NOTE When 5 Min is selected for Timer you can enable the projector to automatically turn off in 5 Min if there is no signal received by any input or if no operation is performed 360 projection function Our projector support 360 projection Vertical 360 菜单 MEN U 信号 源 SOU RCE 退出 EXIT 决定 ENT ER 横向 360 竖向 360 竖向与横向的组合 Horizontal...

Страница 15: ...r Connecting the Power Cord 11 Turning on the Projector 12 Change the On Screen menu language 13 5 Selecting a Source 14 Selecting the computer source 14 6 Adjusting the Picture Size and Position 15 Adjust the Tilt Foot 17 Zoom 18 Focus 18 Lens shift 19 7 Correcting Keystone Distortion KEYSTONE 21 8 Optimizing Computer Signal Automatically 23 Adjusting the Image Using Auto Adjust 23 9 Turning Up o...

Страница 16: ...st 40 Brightness 40 Color temp 40 Red 40 Green 40 Blue 40 Sharpness 40 6 Menu Descriptions Functions Setting 41 On start 41 Standby mode 42 High altitude 42 Cooling fast 43 Key lock 44 Contrast optimization 44 Baud rate 44 Laser control 45 Sound 46 HDMI setup 46 Menu Descriptions Functions Expand 47 Language 47 Auto setup 48 Keystone 49 Security 52 Power management 53 Filter 54 Test pattern 54 Net...

Страница 17: ...signal 76 Connecting an External Monitor 77 Connecting Component Input 78 Connecting HDMI Input 79 Connecting to a Wired LAN 80 Connecting to a Wireless LAN 80 8 Connecting with MultiPresenter app 83 1 Things you can do by connecting the projector with MultiPresenter app 83 2 Connecting to MultiPresenter 84 9 Maintenance 85 Cleaning the Filter 85 Cleaning the Lens 87 Cleaning the Cabinet 87 10 App...

Страница 18: ...Table of Contents PC Control Codes and Cable Connection 100 Troubleshooting Check List 102 REGISTER YOUR PROJECTOR for residents in the United States Canada and Mexico 104 ...

Страница 19: ...10003100 Computer cable VGA 310002200 Batteries AAA 2 391003200 NEC Projector CD ROM User s manual PDF 510054502 Important Information 510054602 PE506UL PE506WL Quick Setup Guide For North America 510054802 For Other countries than North America 510054701 and 510054802 PE456USL PE456WSL Quick Setup Guide For North America 510066100 For Other countries than North America 510066200 and 510066100 For...

Страница 20: ...rity Function The Security function helps you to ensure security of the projector With the Key lock function you can lock the operation on the control panel PIN code lock function prevents unauthorized use of the projector Color board Function At the time of simple projection on the colored wall you can get the close color image to the color image pro jected on a white screen by selecting the simi...

Страница 21: ...ntake Vent Intake Vent Exhaust Vent Heated air is exhausted from here Exhaust Vent Heated air is exhausted from here Indicators page 5 Indicators page 5 Zoom Lever page 18 Focus Ring page 18 Focus Ring page 18 Adjustable Tilt Foot page 17 Adjustable Tilt Foot page 17 Lens Lens Lens Cap For PE506UL only For protecting lens Make sure to take it off during projection PE456USL PE456WSL ...

Страница 22: ...g Attach an anti theft device The security chain opening accepts security wires or chains up to 0 18 inch 4 6 mm in diameter Rear Remote Sensor page 8 Built in Security Slot Use for the theft prevention measure AC Input Connect the supplied power cord s three pin plug here and plug the other end into an active wall outlet page 11 Terminal Panel page 6 Intake Vent Filter Cover page 85 Adjustable Ti...

Страница 23: ...utton page 12 24 2 LIGHT Indicator page 90 3 STATUS Indicator page 90 4 POWER Indicator page 12 24 25 90 5 INPUT Button page 14 6 MENU Button page 30 7 EXIT Button 8 Volume Buttons Keystone Button page 21 23 9 ENTER Button 4 3 2 7 5 6 1 8 9 ...

Страница 24: ...b 15 Pin page 11 75 78 7 MONITOR OUT Terminal Mini D Sub 15 Pin page 77 8 PC CONTROL Port D Sub 9 Pin page 100 Use this port to connect a PC or control system This enables you to control the projector using serial communication protocol If you are writing your own program typical PC control codes are on page 100 9 AUDIO OUT Mini Jack Stereo Mini page 77 NOTE The AUDIO OUT mini jack does not suppor...

Страница 25: ...n This button does not work on this series of projectors 14 APPS Button page 14 83 15 ID SET Button page 56 16 Numeric Keypad Button CLEAR Button page 56 17 PIP Button PIP button does not work on this series of projectors 18 FREEZE Button page 26 19 AV MUTE Button page 26 20 MENU Button page 30 21 EXIT Button 22 Button 23 ENTER Button 24 D ZOOM Button page 26 27 25 MOUSE L CLICK Button This button...

Страница 26: ...be using the remote control for a long time remove the batteries Ensure that you have the batteries polarity aligned correctly Do not use new and old batteries together or use different types of batteries together Dispose of used batteries according to your local regulations Operating Range for Wireless Remote Control 30 30 30 30 30 30 30 30 22 feet 7 m 22 feet 7 m Remote control The infrared sign...

Страница 27: ...ion automatically When selecting Auto ceiling Front or Auto ceiling Rear as projection way the projector will be judged as the front projection automatically When selecting Auto ceiling Front or Auto ceiling Rear as projection way the projector will be judged as the front projection automatically When selecting Auto ceiling Front or Auto ceiling Rear as projection way the projextor will be judged ...

Страница 28: ...e On Screen menu language page 13 Step 3 Selecting a source page 14 Step 4 Adjusting the picture size and position page 15 Correcting keystone distortion KEYSTONE page 21 Step 5 Adjusting a picture and sound Optimizing a computer signal automatically page 23 Turning up or down volume page 23 Step 6 Making a presentation Step 7 Turning off the projector page 24 Step 8 When Moving the Projector page...

Страница 29: ...he supplied power cord s three pin plug to the AC IN terminal of the projector and then connect another plug of the supplied power cord directly in the wall outlet Do not use any plug converter The projector s power indicator will start blinking orange This will apply for both indicators when NORMAL is selected for STANDBY MODE See the Power Indicator section page 91 COMPUTER IN To wall outlet Mak...

Страница 30: ...e POWER ON button on the remote control The POWER indicator will blink and the projector will become ready to use TIP When the message PIN code is displayed it means that the SECURITY feature is turned on page 52 After you turn on your projector ensure that the computer or video source is turned on Power On or Steady blue light Steady blue light Steady green light Blanking green light Blanking ora...

Страница 31: ...r button to select the Language option 3 Then press button to select the required language page 47 Expand Language Auto setup Keystone Security Power management Test pattern Network setup Control ID Factory default Filter Expand Language 1 3 Deutsch Français Italiano Español Svenska Suomi Norsk Português Nederlands English Expand Language 2 3 Dansk Polski český Magyar Русский Қазақ Tiếng Việt 한글 T...

Страница 32: ...button The projector will search for the available input source and display it The input source will change as follows Computer HDMI1 HDMI2 USB A LAN With the INPUT screen displayed you can press the button to select the input source TIP If no input signal is present the input will be skipped Using the Remote Control Press any one of the Computer HDMI1 HDMI2 USB A or APPS buttons Computer HDMI 1 H...

Страница 33: ... Adjusting the throw angle the height of an image Tilt foot page 17 PE506UL PE506WL A B C PE456USL PE456WSL A B C Adjusting the focus Focus ring page 18 PE506UL PE506WL A B C A B C PE456USL PE456WSL A B C Finely adjusting the size of an image Zoom lever page 18 A B C A B C Adjusting the projected image s vertical and horizontal position Lens shift page 19 A B C A B C NOTE Zoom lever and Lens shift...

Страница 34: ...ng the keystone correction KEYSTONE page 21 PE506UL PE506WL PE456USL PE456WSL Automatic Keystone Correction function is turned off at the time of shipment To perform keystone correction manually see Correcting Keystone Distortion KEYSTONE on page 21 ...

Страница 35: ... make adjust ments to the desired height Rotate the tilt clockwise to raise the projector and counterclock wise to lower the projector or retract the adjustable foot The tilt foot can be extended up to 0 71 inch 18 mm There is approximately 3 5 degrees up of adjustment for the front of the projector CAUTION Do not use the tilt foot for purposes other than originally intended Misuses such as using ...

Страница 36: ...he ZOOM lever to adjust the image size on the screen Focus Use the FOCUS ring to obtain the best focus NOTE Zoom lever functions are only available for PE506UL PE506WL PE506UL PE506WL PE456USL PE456WSL Focus Ring A B C A B C Zoom Lever A B C Focus Ring ...

Страница 37: ...te dial then you can move rightward and leftward the image with a distance up to 26 26 PE506WL and 29 29 PE506UL of the width of the image Len shift H NOTE After turning the lens shift dial to align the projection position turn the lens shift dial slightly to the opposite side to loosen it If the lens shift dial is stopped at the aligned position the lens shift position may drift due to vibrations...

Страница 38: ... range regarding the CEILING FRONT projection see page 73 74 PE506UL Width of projected image 29 H 29 H 100 H 60 V 100 V Height of projected image PE506WL Width of projected image 26 H 26 H 100 H 55 V 100 V Height of projected image Description of symbols V indicates vertical height of the projected image H indicates horizontal width of the projected image ...

Страница 39: ...rojector is keystone distortion of four corners 6 Corner correction Adjust the projected image when the projector is keystone distortion of six corners Curved correction Adjust the projected image when the projector linearity is uneven or the projected images bent vertically and horizontally Grid image tune Adjust the local points of the projected image Reset The correction values will be restored...

Страница 40: ...djustment in existence The arrow mark indicating the adjustment direction turns red The arrow mark disappears when the maximum H V keystone adjustment limit reaches The keystone prompt box will disappear if you press the keystone button again when it is displaying Press the ENTER button again to switch the six correction items The adjustable range is subject to source of signal input For further d...

Страница 41: ...optimize the computer signal try to adjust Fine sync H position V position and H size manually page 35 36 9 Turning Up or Down Volume Sound level from the speaker or audio output can be adjusted Volume Mute Off 19 TIP When no menus appear the and buttons on the projector cabinet work as a volume control When the above volume adjustment menu appears press and buttons to control the mute on and off ...

Страница 42: ...rmal is selected for STANDBY MODE Power On or Steady blue light Steady blue light Steady green light Blanking green light Blanking orange light Standby CAUTION Parts of the projector may become temporarily heated if the projector is turned off with the POWER button or if the AC power supply is disconnected during normal projector operation Use caution when picking up the projector NOTE While the p...

Страница 43: ... Projector Preparation Make sure that the projector is turned off 1 Put on the lens cap For PE506UL only 2 Unplug the power cord 3 Disconnect any other cables Remove the USB memory or the USB Wireless LAN Unit if it is inserted into the projector page 28 80 ...

Страница 44: ...eze a picture Press again to resume motion NOTE The image is frozen but the original video is still playing back This feature can not be used when LAN and USB A is selected as the input terminal Magnifying a Picture You can enlarge the picture up to four times NOTE The maximum magnification may be less than four times depending on the signal This feature can not be used when LAN and USB A is selec...

Страница 45: ... ZOOM button to magnify the picture Each time the D ZOOM button is pressed the image is reduced NOTE The image will be magnified or demagnified at the center of the screen Press the ASPECT button on the remote control or select the Aspect function on the Display menu can cancel the current magnification ...

Страница 46: ...andby screen instantly while the USB memory icon display in the lower left corner of the screen When the USB memory is independent of the partition it will display more than one USB icon 3 Press button to switch required items The root directory of the USB memory is displayed in a thumbnail Play image Only one image show on the screen when you play it 1 Press button to select a image 2 Press the E...

Страница 47: ...data DO NOT remove the USB memory when the light is flashing b Do not insert and remove USB memory frequently Then remove it after the installation of at least 5 seconds After removing at least 5 seconds and then reinsert it c Due to the file format some pictures cannot display thumbnails Precautions on processing and storage of USB memory If smoke or produce abnormal smell close the external devi...

Страница 48: ...ble system signal format with input source 2 Color adjust menu Available options in the Image mode menu are Dynamic Standard Cinema Blackboard Green Color board or User image The available color adjust options Contrast Brightness Color temp Red Green Blue and Sharpness 3 Setting menu Configuration of the basic function operation on the projector On start Standby mode High altitude Cooling fast Key...

Страница 49: ...nt Ceiling Rear Auto ceiling Front Auto ceiling Rear Menu position Upper left Upper right Center Lower left Lower right Background display Black Blue Logo Signal format The selected Signal format displays in the Signal for mat menu Color adjust Image mode Standard Cinema Blackboard Green Color board User image Dynamic Contrast 0 63 32 Brightness 0 63 32 Color temp High Mid Low User Red 0 63 32 Gre...

Страница 50: ...0 0 1023 Sound HDMI Computer Expand Language Projector provides multiple language support English Auto setup Input search On Off Auto PC adj On Off Auto keystone On Off Keystone Keystone Store Reset H V keystone 4 Corner correction 6 Corner correction Curved correction Grid image tune Reset Security PIN code lock On Off PIN code change Power management Ready Shut down Off Timer Ready countdown Fil...

Страница 51: ...reless LAN Setting On Off Network information MAC address IP address Control ID Control ID On Off Control ID number 1 254 1 Factory default USB A Set slide Slide transition effect Slide down Slide right Sort order Extend order Name order Time order Size order Rotate No rotate 270 degree 180 degree 90 degree Best fit On Off Repeat On Off Apply Info Input H sync freq V sync freq Light counter Model ...

Страница 52: ...l signal NOTE When the component input signal is connected to the COMPUTER IN terminal select Computer HDMI1 and HDMI2 Selects the HDMI compatible equipment connected to your HDMI1 or 2 IN terminal USB A This feature enables you to make presentations using a USB memory that contains pictures page 28 4 Using the VIEWER LAN Selects a signal from the LAN port RJ 45 ...

Страница 53: ...uto PC adj function may fail to work if computer models is not compatible with the input signal Auto PC adj function may fail to work if you select the following system signal format 480i 576i 480p 576p 720p 1080i 1080p or signals from the HDMI terminal Fine sync Only for PC signal input Adjust image to the best state When the image jitters or the image outline dims 1 Press button to select Fine s...

Страница 54: ... button to adjust H size level Adjustment range is from 15 to 15 Aspect Adjust the image to fit the screen size while keeping aspect of input signal s unchanged Press the MENU button on the remote control or on the top control panel to display the On Screen menu Press button to select the Display menu then Press the ENTER or button 1 Press button to select Aspect menu 2 Press the ENTER button 3 Pr...

Страница 55: ...option page 9 Auto ceiling Rear When the projector is projected in front of the screen The built in angle sensor detects the angle of the projector automatically and then switches to Rear or Ceiling Rear When rear projec tion please set it to this option page 9 H size Display Auto PC adj Fine sync 0 0 0 0 H position V position Aspect Normal Front Upper left Blue Orientation Menu position Backgroun...

Страница 56: ...ack Logo The entire projection area display NEC PROJECTOR background NOTE This function will be invalid once you select input signal as USB A and LAN H size Display Auto PC adj Fine sync 0 0 0 0 H position V position Aspect Normal Front Upper left Blue Orientation Menu position Background display Signal format Signal format If a PC is selected as the input signal source your projector will detect ...

Страница 57: ...he top control panel to display the On Screen menu Press button to select the Color adjust menu then press the ENTER or button 1 Press button to select required item 2 Press the ENTER button 3 Press button to select adjust set point Image mode Direct operation Press the PICTURE select button on remote control to select required image mode Menu operation Press the MENU button on the remote control ...

Страница 58: ...om 0 63 Press button to increase contrast range from 0 63 Brightness Press button to decrease brightness range from 0 63 Press button to increase brightness range from 0 63 Color temp Press button to select required color temperature Low Mid High and User High temp Become blue gradually Mid temp Suitable natural color Low temp Become red gradually User You can adjust the Red Green Blue and Yellow ...

Страница 59: ...etting menu then press the ENTER or button 1 Press button to select required item 2 Press the ENTER button 3 Press button to set options Setting On start Standby mode High altitude Key lock Contrast optimization Baud rate Laser control Sound HDMI setup Off Normal Off Off Cooling fast 60 Sec Off 9600 On start Set the option to On if selecting this function the projector will automatically turn on w...

Страница 60: ...twork standby Although the power consumption on this mode is higher than on the Normal mode this mode allows you to turn on the projector from standby condition by using the Wake on LAN feature hereafter referred to as WoL via LAN Consult your network administrator for more information about WoL Sleep Although the power consumption on this mode is higher than on the Network standby mode this mode ...

Страница 61: ...hen setting condition is over approximately 2600 meters 8530 feet automatically brightness is reduced to protect unit This unit can be used at approximately 3000 meters 9843 feet once over that altitude units automatically turn down to protect unit Cooling fast Select the cooling time after projector is turned off 1 Press button to select Cooling fast menu 2 Press the ENTER button 3 Press button t...

Страница 62: ...aser control Sound HDMI setup Off Normal Off Off Cooling fast 60 Sec Contrast optimization Baud rate Off 9600 Contrast optimization Select this function to optimize and compensate signal automatically on the basis of the image to get the best contrast image 1 Press button to select Contrast optimization menu 2 Press the ENTER button 3 Press button to adjust Off No optimization On Optimize contrast...

Страница 63: ...on ECO mode Normal Normal brightness the screen becomes brighter Alternatively you can adjust from 50 100 Default is 100 ECO 1 ECO 2 Lower the brightness and reduce energy consumption Full normal The brightness is the same as normal mode but it is not adjustable Laser adjust This function is valid only in Normal mode and the adjustable range is 50 100 And the menu will turn gray on ECO 1 ECO2 and ...

Страница 64: ...onnected to the HDMI terminal of the projector and the images can not be projected normally please switch on the image or sound setting Press the MENU button on the remote control or on the top control panel to display the On Screen menu Press button to select the setting menu then press the ENTER or button to enter the sub menu 1 Press button to select HDMI setup menu 2 Press the ENTER button Dis...

Страница 65: ...uld be output according the connection of AUDIO IN terminal Menu Descriptions Functions Expand The projector has expand function you can select other functions as described below Menu operation Press the MENU button on the remote control or on the top control panel to display the On Screen menu Press button to select the Expand menu then press the ENTER or button 1 Press button to select required ...

Страница 66: ...he ENTER button 3 Press button to select required items Input search Select this function to detect the signal then project images automatically Auto PC adj When Auto PC adj is set to On the projector inputs an analog signal then press the Auto ADJ button on the remote control to adjust Fine sync H Position V position and H size automati cally When Auto PC Adjust is set to Off the Auto ADJ button ...

Страница 67: ...rd Reset Keystone function will be canceled after turning off the projector or unplugging the AC power Expand Language Auto setup Keystone Security Power management Test pattern Network setup Control ID Factory default Filter Expand Keystone Store Keystone H V Keystone 6 Corner correction Grid image tune Reset value Curved correction 4 Corner correction H V Keystone Select this function to correct...

Страница 68: ...ain Press The lines on the left and right sides shrink inward Curved cerrection X Y gain Press The top and bottom lines expand outward Curved cerrection X Y gain Press The top and bottom lines shrink inward Curved cerrection X Y gain Curved correction X offset Press Correct the vertical line on the left Extend the left vertical line outward while maintaining the right area Curved cerrection X Offs...

Страница 69: ...t sides Extend the vertical lines on the left and right sides of the bottom while maintaining the top area Curved cerrection Y Offset Press Correct the vertical lines on the left and right sides Extend the vertical lines on the left and right sides of the top while maintaining the bottom area Curved cerrection Y Offset Press Correct the vertical lines on the left and right sides Extend the vertica...

Страница 70: ...ment value back to the factory default 1 Press button to select Reset option 2 Press the ENTER button Release keystone mode Security Set a PIN code to lock the usage of the projector to prevent unauthorized personnel from operating your projector Once the projector is on the PIN code screen will be displayed 1 Press button to select Security menu 2 Press the ENTER button 3 Press button to switch r...

Страница 71: ...y The power light indicator turns steady green when the light source is fully cooled down The light source turns on again if an input signal is connected or any button except the power button on the top control panel or remote control is pressed during this period of time Shut down The projector shut down after the light source is fully cooled down Off Disable the power management function Timer O...

Страница 72: ...splays the filter usage time Timer Set the time to display a warning icon Filter counter reset Reset filter counter NOTE The screen will display the icon Filter warning Please change the filter when the projector has checks one warning And the the warn ing icon will disappear 30 seconds later automatically while only the Power button is effective during that period The projector will give warning ...

Страница 73: ...tor are flashing after turn on the projector NOTE It is recommended that users use a Category 5 or higher LAN cable Operation steps 1 Turn on your projector 2 Acquire the IP address with DHCP set to on and auto IP allocation set to On You may set DHCP to Off and set up IP address manually if you are somehow familiar with networking 3 Enter the network setup menu 1 Press the MENU button on remote c...

Страница 74: ...ing Control ID Number Select a number from 1 to 254 you wish to assign to your projector NOTE When On is selected for Control ID the projector cannot be operated by using the remote control that does not support the Control ID function In this case the buttons on the projector cabinet can be used Assigning or Changing the Control ID 1 Turn on the projector 2 Press the ID SET button on the remote c...

Страница 75: ...ions Functions USB A The projector has expand function you can select other functions as described below When the USB memory inset into the projector the USB A function can project pictures stored in the USB memory Press the MENU button on the remote control to display the On Screen menu Press the button to select the USB A menu then press the ENTER or button 1 Press button to select required item...

Страница 76: ... Sort order Select this function to set the slide s order 1 Press button to select Sort order menu 2 Press the ENTER button 3 Press button to switch required item Extend order Sort by extend names of file or folder Size order Sort by size of file or folder Time order Sort by the time of file or folder Name order Sort by names of file or folder Rotate Set the rotation direction of images 1 Press bu...

Страница 77: ...ess button to select Repeat menu 2 Press the ENTER or button 3 Press button to switch required item On Replay the first image after playing the last one Off Return to the thumbnail display screen after playing the last image Apply Only be used in playing slides 1 Press button to select Apply menu 2 Press the ENTER or button ...

Страница 78: ... H sync freq of input signal in unit of KHz Show KHz when no signals are in existence V sync freq Display V sync freq of input signal in unit of KHz Show Hz when no signals are in existence Light counter Display the light s usage time and remaining time in percentage Model name Display the projector s model name S N Display the projector s serial number Firmware version Display the projector s fir...

Страница 79: ...setup and press the ENTER button to enter MAC address Display the MAC address of wired LAN IP address Display the IP address of wired LAN 3 Press button select Network setting and press the ENTER button to enter 4 Press button to set DHCP On to obtain an IP address Subnet Gateway and DNS automatically and press the ENTER button to confirm 7C 6F F8 4E B9 2F 192 168 1 100 Expand Network Setup Networ...

Страница 80: ...splay language and available languages are English Japanese Traditional Chinese Simplified Chinese Do not start multiple Web browser settings or control Do not use more than one computer set or control the projector Please change your password If the network does not appear on screen controls please consult your network administrator Please refresh the web page before operating the projector Descr...

Страница 81: ...on status 4 General setup page Enter old password Enter the password for the configuration Enter new password Enter a new password Confirm new password Re enter the new password to confirm Apply Update settings Power Switch on the power of the projector on off Source select Switch the input source of the projector Picture setup page ...

Страница 82: ...the phase of the projected image H position Adjust the horizontal position of the projected image V position Adjust the vertical position of the projected image H size Adjust the horizontal dimension of the projected image Freeze Select the function to switch the screen freeze on and off Auto PC adj Implement the automatic computer adjustment function V keystone Correct trapezoidal distortion in v...

Страница 83: ...DNS Please enter the DNS address when you do not use the DHCP server Available character digital 0 9 a period For example 192 168 0 253 Apply Update settings Crestron control Connect Crestron tool by setting IP address IP ID and PORT options Wireless Setup Wireless LAN Please select wireless LAN on or off ESSID Please enter the ESSID AP AdHoc Encryption Please select password set on or off AP AdHo...

Страница 84: ...r lens center on the projection distance table are for a lens shift of 60 V Reading the Table From the upper table on this page to project wide images on a 150 inch screen install at about 4 0 m from the front Also from the lower table we can see that about 2 2 m are required from the projector s lens center to the upper edge of the screen Use this to see whether or not enough height can be provid...

Страница 85: ... the Table From the upper table on this page to project wide images on a 150 inch screen install at about 4 0 m from the front Also from the lower table we can see that about 2 1 m are required from the projector s lens center to the upper edge of the screen Use this to see whether or not enough height can be provided from the projector to the ceiling and for installing the screen The diagram show...

Страница 86: ...upper table on this page to project wide images on a 80 inch screen install at about 0 768 m from the front Also from the lower table we can see that about 1 066 m are required from the projector s lens center to the upper edge of the screen Use this to see whether or not enough height can be provided from the projector to the ceiling and for installing the screen The diagram shows the projection ...

Страница 87: ... 60 129 2 50 9 80 8 31 8 80 172 3 67 8 107 7 42 4 100 215 4 84 8 134 6 53 0 120 258 5 101 8 161 5 63 6 150 323 1 127 2 201 9 79 5 200 430 8 169 6 269 2 106 0 250 538 5 212 0 336 5 132 5 300 646 2 254 4 403 9 159 0 PE456USL PE456WSL Size inches Screen width Screen height cm inches cm inches 55 118 5 46 6 74 0 29 1 60 129 2 50 9 80 8 31 8 70 150 8 59 4 94 2 37 1 80 172 3 67 8 107 7 42 4 90 193 9 76 ...

Страница 88: ...reen size inches Throw distance L Height H m inches cm inches Wide Tele Wide Tele 0 V 60 V 0 V 60 V 30 0 77 1 26 30 1 49 5 20 2 4 0 7 9 1 6 40 1 03 1 69 40 6 66 5 26 9 5 4 10 6 2 1 60 1 56 2 55 61 6 100 4 40 4 8 1 15 9 3 2 80 2 10 3 41 82 6 134 3 53 8 10 8 21 2 4 2 90 2 36 3 84 93 1 151 3 60 6 12 1 23 8 4 8 100 2 63 4 27 103 6 168 2 67 3 13 5 26 5 5 3 120 3 16 5 13 124 6 202 1 80 8 16 2 31 8 6 4 1...

Страница 89: ...2 2 0 7 9 0 8 40 1 05 1 77 41 4 69 8 26 9 2 7 10 6 1 1 60 1 60 2 68 62 9 105 5 40 4 4 0 15 9 1 6 80 2 14 3 59 84 4 141 1 53 8 5 4 21 2 2 1 90 2 42 4 04 95 2 159 0 60 6 6 1 23 8 2 4 100 2 69 4 49 105 9 176 8 67 3 6 7 26 5 2 6 120 3 24 5 40 127 4 212 5 80 8 8 1 31 8 3 2 150 4 06 6 76 159 6 266 0 101 0 10 1 39 7 4 0 180 4 87 8 12 191 9 319 5 121 2 12 1 47 7 4 8 200 5 42 9 02 213 4 355 2 134 6 13 5 53...

Страница 90: ... NOTE Height from lens center to lower edge of screen with tilt feet screwed in Screen size inches Throw distance L Height H m inches cm inches 55 0 52 20 37 74 04 29 15 60 0 57 22 34 80 77 31 80 70 0 67 26 28 94 23 37 10 80 0 77 30 22 107 70 42 40 90 0 87 34 16 121 16 47 70 100 0 97 38 09 134 62 53 00 130 1 27 49 91 175 01 68 90 ...

Страница 91: ...0 0 Horizontal direction 29 DESKTOP FRONT DESKTOP REAR Width of projected image 29 H 29 H 100 H 60 V 100 V Height of projected image CEILING FRONT CEILING REAR 29 H 29 H 100 H 60 V 100 V Width of projected image Height of projected image Example When using to project on a 150 screen According to the Table of screen sizes and dimensions page 69 H 127 2 323 1 cm V 79 5 201 9 cm Adjustment range in t...

Страница 92: ...e Example When using to project on a 150 screen According to the Table of screen sizes and dimensions page 69 H 127 2 323 1 cm V 79 5 201 9 cm Adjustment range in the vertical direction the projected image can be moved upwards 0 55 79 5 201 9 cm 43 7 111cm when the lens is at the center position Adjustment range in the horizontal direction the projected image can be moved to the left 0 26 127 2 32...

Страница 93: ...ng on the projector Input terminal INPUT button on the projector cabinet Button on the remote control COMPUTER IN COMPUTER COMPUTER HDMI 1 IN HDMI1 HDMI 1 HDMI 2 IN HDMI2 HDMI 2 HDMI 1 IN HDMI 2 IN COMPUTER IN AUDIO IN Computer cable VGA supplied To mini D Sub 15 pin terminal on the projector It is recommended that you use a commercially available distribu tion amplifier if connecting a signal cab...

Страница 94: ...using a DVI signal When the computer has a DVI output terminal use a commercially available converter cable to connect the com puter to the projector s HDMI 1 or HDMI 2 input terminal only digital video signals can be input HDMI 1 IN HDMI 2 IN NOTE When Viewing a DVI Digital Signal Turn off the power of the computer and projector before connecting When a video deck is connected via a scan converte...

Страница 95: ... does not support earphone headphone terminal When audio equipment is connected the projector speaker is disabled The signal output from the MONITOR OUT of this projector is for projecting image on exclusive one display MONITOR OUT function is not available in Standby mode Normal and Standby mode Network standby AUDIO OUT MONITOR OUT Computer cable VGA supplied Computer cable VGA not supplied Ster...

Страница 96: ...RCA 3 cable not supplied Audio cable not supplied DVD player Audio Equipment Select the source name for its appropriate input terminal after turning on the projector Input terminal INPUT button on the projector cabinet Button on the remote control COMPUTER IN COMPUTER COMPUTER NOTE Refer to your DVD player s owner s manual for more information about your DVD player s video output requirements ...

Страница 97: ...e PC to the HDMI IN terminal of your projector Select the source name for its appropriate input terminal after turning on the projector Input terminal INPUT button on the projector cabinet Button on the remote control HDMI 1 IN HDMI1 HDMI1 HDMI 2 IN HDMI2 HDMI2 HDMI 1 IN HDMI 2 IN HDMI cable not supplied Use High Speed HDMI Cable Audio cable not supplied ...

Страница 98: ...nnecting a USB device and a network cable at the same time there is highly possibility of interference when using a USB device that is too large It is recommended that users use smaller USB devices Attaching the USB Wireless LAN Unit NOTE The USB Wireless LAN Unit must be inserted into the USB Wireless LAN Unit port in the correct direction It cannot be inserted in the reverse direction If the USB...

Страница 99: ...OTE Do not force to insert the USB Wireless LAN Unit To remove the USB Wireless LAN Unit disconnect the power cord and use the above procedure NOTE The green LED on the USBWireless LAN Unit flashes to show thatWireless LAN Unit is working If the USB Wireless LAN Unit is incorrectly attached the blue LED will not flash Do not press the button on the USB Wireless LAN Unit The button will not work wi...

Страница 100: ...ss button select Network setting and press the ENTER button to enter 4 Press button to set Wireless LAN Setting On and press the ENTER button to confirm 5 Press button to select Set press the ENTER button to wait until the Please wait message disappears NOTE Data transmission between wireless LAN and wired LAN is not possible up to 20 units can be connected simultaneously Recommend to connect appr...

Страница 101: ...reless LAN from a terminal installed with our MultiPresenter app to the projector and project them onto a screen See our company s website for more details about MultiPresenter https www sharp nec displays com dl en soft multipresenter index html Multiple computers or tablet terminals can be connected at the same time A maximum of 16 units can be con nected ...

Страница 102: ...layed 2 Start MultiPresenter The target device screen is displayed 3 Enter the 4 digit PIN code displayed in the start up screen in the target device screen When connection with the projector is completed the screen of the computer or tablet terminal is projected on the screen When connecting using a Wireless LAN 1 Turn on the projector and press the APPS button on the remote control The start up ...

Страница 103: ...ter The time to clean the filter is set to 1000 H at time of shipment To cancel the message press any button on the projector cabinet or the remote control To clean the filter detach the filter and the filter cover CAUTION Before cleaning the filter turn off the projector disconnect the power cord and then allow the cabinet to cool Failure to do so can result in electric shock or burn injuries 1 P...

Страница 104: ...the filter cover manually to ensure that it is fully installed A A B B Catch 6 Clear the filter usage hours Plug the power cord into the wall outlet and then turn on the projector From the menu select Filter Filter counter reset page 54 The interval time to clean the filter is set to 1000H at time of shipment When using the projector as it is you do not clear the filter usage 4 Attach the filter t...

Страница 105: ...e dust off the cabinet If heavily soiled use a mild detergent Never use strong detergents or solvents such as alcohol or thinner When cleaning the vents or the speaker using a vacuum cleaner do not force the brush of the vacuum cleaner into the slits of the cabinet Vacuum the dust off the vents Clogged vents may cause a rise in the internal temperature of the projector resulting in malfunction Do ...

Страница 106: ...at the AV MUTE image off buttons are not pressed Reset the settings or adjustments to factory default using the Factory default in the Expand Menu page 57 Enter your registered keyword if the Security function is enabled page 52 If the HDMI 1 IN or the HDMI 2 IN signal cannot be displayed try the following Reinstall your driver for the graphics card built in your computer or use the up dated drive...

Страница 107: ...ter s external display Displaying an image on the notebook PC s screen does not necessarily mean it outputs a signalto the projector When using a PC compatible laptop a combination of function keys will enable disable the external display Usually the combination of the Fn key along with one of the 12 function keys gets the external display to come on or off For example NEC laptops use Fn F3 while ...

Страница 108: ...n the state of Standby Standby mode is Normal standby Orange Blink 2 Off Off Standby state Standby mode is Network standby Orange Light Off Off In the state of Standby Standby mode is Sleep standby Orange Blink 1 Off Off Powered state ECO mode On Blue Light Off Green Blink 3 Powered state ECO mode Off Blue Light Off Green Light Green Blink 4 Off Off In the state of Cooling Green Light Off Off In t...

Страница 109: ...ht When LD driver is not ready Please contact your dealer or service personnel Red Blink 4 Green Light Red Blink 3 When LD driver error Please contact your dealer or service personnel Red Blink 4 Green Blink 3 Red Blink 3 When Laser Cover switch Error Please contact your dealer or service personnel When Temperature status is error Ambient temperature is out of the opera tion temperature Check if a...

Страница 110: ... 5 seconds off for 0 5 seconds 4 Repetition to light on for 0 5 seconds off for 0 5 seconds When the thermal protector is activated When inside temperature of the projector becomes too high or low the POWER indicator start to red blink in a short cycle After this happened the thermal protector will activate and the projector may be turned off In this case please take the below measures Pull out th...

Страница 111: ...fective pixels are more than 99 99 2 This is the light output value lumens when the Image mode is set to Dynamic and the ECO mode is set to Normal Compliance with ISO21118 2012 Electrical Model name PE506UL PE456USL PE506WL PE456WSL Inputs 2 HDMI Type A 19P HDMI Terminal HDCP supported 3 1 Stereo Mini Audio 1 Mini D Sub 15pin Outputs 1 RGB D Sub 15 P 1 Stereo Mini Audio PC Control 1 PC Control Por...

Страница 112: ... 3W 200 240V Network stand by for erp 2 0W or less 100V 130V 2 0W or less 200V 240V 2 0W or less 100V 130V 2 0W or less 200V 240V 2 0W or less 100V 130V 2 0W or less 200V 240V 2 0W or less 100V 130V 2 0W or less 200V 240V Normal stand by for erp 0 5W or less 100V 130V 0 5W or less 200V 240V 0 5W or less 100V 130V 0 5W or less 200V 240V 0 5W or less 100V 130V 0 5W or less 200V 240V 0 5W or less 100...

Страница 113: ... 3 120 5 4 7 119 5 4 7 82 3 2 53 2 1 Lens center Cabinet Dimensions Unit mm inch PE506UL 373 14 7 358 14 1 4 M4 10 0 16 M0 16 0 4 144 5 7 56 2 2 405 15 9 135 5 3 120 5 4 7 119 5 4 7 82 3 2 53 2 1 Lens center 150 5 9 130 5 1 4 M4 10 0 16 M0 16 0 4 36 1 4 139 5 5 106 5 4 2 144 5 7 56 2 2 2 1 Lens center ...

Страница 114: ...T AUDIO IN 358 14 1 405 15 9 135 5 3 120 5 4 7 130 5 1 4 M4 1 0 16 M0 16 0 4 144 5 7 56 2 2 150 5 9 373 14 7 358 14 1 4 M4 10 0 16 M0 16 0 4 144 5 7 56 2 2 405 15 9 135 5 3 120 5 4 7 119 5 4 7 82 3 2 53 2 1 Lens center 130 5 1 4 M4 1 0 16 M0 16 0 4 144 5 7 56 2 2 36 1 4 139 5 5 150 5 9 106 5 4 2 ...

Страница 115: ... 130 5 1 106 5 4 2 139 5 5 36 1 4 404 6 5 144 5 7 56 2 2 4 M4 10 0 16 M0 16 0 4 Lens center 405 15 9 404 15 9 150 5 9 130 5 1 106 5 4 2 404 6 5 144 5 7 56 2 2 4 M4 10 0 16 M0 16 0 4 Lens center 150 5 9 130 5 1 106 5 4 2 139 5 5 36 1 4 144 5 7 56 2 2 4 M4 10 0 16 M0 16 0 4 ...

Страница 116: ...6 9 7 8 Pin No RGB Signal Analog YCbCr Signal 1 Red Cr 2 Green or Sync on Green Y 3 Blue Cb 4 Ground 5 Ground 6 Red Ground Cr Ground 7 Green Ground Y Ground 8 Blue Ground Cb Ground 9 Hotplug 10 Sync Signal Ground 11 No Connection 12 Bi directional DATA SDA 13 Horizontal Sync or Composite Sync 14 Vertical Sync 15 Data Clock COMPUTER IN NOTE Pin Nos 12 and 15 are required for DDC CI ...

Страница 117: ...148 352 67 433 59 940 13 1920x1080p 50Hz 148 500 56 250 50 000 14 640x480 60Hz 640x480 25 175 31 469 59 940 15 800x600 56Hz 800x600 36 000 35 156 56 250 16 1024x768 60Hz 1024x768 65 000 48 363 60 004 17 1280x720 60Hz 1280x720 74 500 44 772 59 855 18 1280x768 60Hz 1280x768 79 500 47 776 59 870 19 1280x800 60Hz 1280x800 83 500 49 702 59 810 20 1280x960 60Hz 1280x960 108 000 60 000 60 000 21 1280x960...

Страница 118: ...OFF 02H 13H 00H 00H 00H 15H NOTE Contact your local dealer for a full list of the PC Control Codes if needed Cable Connection Communication Protocol Baud rate 4800 9600 19200 38400 bps Data length 8 bits Parity No parity Stop bit One bit X on off None Communications procedure Full duplex NOTE Depending on the equipment a lower baud rate may be recommended for long cable runs PC Control Terminal D ...

Страница 119: ... CONNECTION INTERFACE 1 Connection thru the serial port Communication Protocol Item Information Baud rate 4800 9600 19200 38400 bps Data length 8 bits Parity bit No parity Stop bit 1 bit Flow control None Communications procedure Full duplex 2 Connection via network Communication Protocol Connection via LAN Item Information Communication speed Set automatically 10 100 Mbps Supported standard IEEE8...

Страница 120: ...even though you adjust the brightness and or the contrast Input source s resolution and frequency are supported by the projector Image is too dark Remains unchanged even though you adjust the brightness and or the contrast Image is distorted Image appears to be trapezoidal unchanged even though you carry out the KEYSTONE adjustment Parts of the image are lost Still unchanged even though you press ...

Страница 121: ...Orange Red Remote control model number Installation environment Screen size inch Screen type White matte Beads Polarization Wide angle High contrast Throw distance feet inch m Orientation Ceiling mount Desktop Power outlet connection Connected directly to wall outlet Connected to power cord extender or other the number of connected equipment______________ Connected to a power cord reel or other th...

Страница 122: ...or warranty and InstaCare service program Visit our web site at https www sharpnecdisplays us click on support center register product and submit your completed form online Upon receipt we will send a confirmation letter with all the details you will need to take advantage of fast reliable warranty and service programs from the industry leader Sharp NEC Display Solutions of America Inc ...

Страница 123: ... Sharp NEC Display Solutions Ltd 2022 ...

Отзывы: