background image

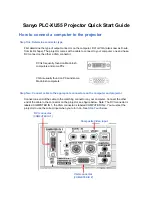
2. Special installation precautions

37

2-2. For portrait projection (vertical orientation) 

Portrait screens from a computer can be projected 
by installing the projector in a vertical orientation. 

 Precautions during installation

•  Please do not install the projector in a vertical orientation on top of the floor or table on its 

own. If not, the projector may fall over, resulting in injury, damage or malfunction. Also, the 
exhaust vent may be obstructed, resulting in the projector getting warm and the possibility 
of fire and malfunction occurring.

•  A stand for supporting the projector needs to be made for portrait projection and for installing 

the projector in universal angle. In this case, the stand must be designed such that the center 
of gravity of the projector is located well within the legs of the stand. If not, the projector may 
fall over and result in injury, damage and malfunction.

Содержание PA1004UL-W

Страница 1: ...Projector PA1004UL W PA1004UL B PA804UL W PA804UL B Installation Manual Model No NP PA1004UL W NP PA1004UL B NP PA804UL W NP PA804UL B...

Страница 2: ...t detachment of parts sold separately 28 1 1 Lens unit 28 1 2 Option cover 32 2 Special installation precautions 35 2 1 For ceiling installation 35 2 2 For portrait projection vertical orientation 37...

Страница 3: ...you use this projector in the United States please refer to the user s manual for the United States on our website https www sharp nec displays com dl en pj_manual pa1004ul html Illustrations and scre...

Страница 4: ...his symbol and handling the product erroneously could result in personal injury or damage to surrounding property Examples of symbols This symbol indicates you should be careful of electric shocks Thi...

Страница 5: ...fies them The power cord you use must be approved by and comply with the safety standards of your country Please refer to the page 184 User s Manual about the power cord specification Forselectinganap...

Страница 6: ...ic shock Do not use in the rain or snow on a seashore or waterfront etc Do not use in a bathroom or shower room Do not place vases or potted plants on the projector Do not place cups cosmetics or medi...

Страница 7: ...g from the projec tor The projector could drop and cause injury When installing suspended from the ceiling use a power outlet that is within reach so the power cord can be easily plugged and unplugged...

Страница 8: ...he projection range is looking at the lens Donotallowchildrentooperatetheprojectoralone Whenachildisoperating the projector an adult should always be present and watch the child carefully The followin...

Страница 9: ...tlet beforehand When moving the projector first be sure to turn off the power unplug the power cord from the power outlet and check that all connection cables con necting the projector to other device...

Страница 10: ...s CAUTION FOR HIGH TEMPERATURE Moving the projector PROHIBITION Formovingtheprojector makesureyouhaveatleasttwopeople Attempting to move the projector alone could result in back pain or other injuries...

Страница 11: ...3D eyeglasses or your 3D compatible content such as Blu ray Discs video games computer s video files and the like To avoid any adverse symptoms heed the following Do not use 3D eyeglasses for viewing...

Страница 12: ...edasClass1ofIEC60825 1Thirdedition2014 05andRG3ofIEC EN62471 5 First edition Obey the laws and regulations of your country in relation to the installation and management of the device Outline of laser...

Страница 13: ...Label Information The caution and the explanatory labels are stuck on the below indicated positions For Canada South America Label 1 Label 2 Label 3 Label 1 Label 2 Label 3 For other regions Label 1...

Страница 14: ...9 7 NP40ZL Tele 31 7 23 8 31 7 Wide 41 0 31 8 41 0 NP41ZL Tele 13 0 9 4 13 0 Wide 27 9 20 7 27 9 NP43ZL Tele 6 8 4 9 6 8 Wide 13 4 9 7 13 4 HC HR HL HC Left Right Vertical angle unit degree Lens unit...

Страница 15: ...Important Information 15 Horizontal angle unit degree Lens unit Zoom Tele Wide NP44ML 55 8 H H Vertical angle unit degree Lens unit Zoom Tele V1 V2 NP44ML 10 7 24 6 V1 V2...

Страница 16: ...an eyes from entering the hazard zone The manager of the projector operator must prevent spectators from entering the hazard zone About the hazard zone Overhead view Hazard zone HD H Screen Side view...

Страница 17: ...0 21 Tele 1 5 0 51 0 32 NP43ZL Wide 1 6 0 51 0 32 Tele 2 9 0 47 0 30 PA804UL W PA804UL B Lens Hazard zone m HD H V NP11FL 0 2 0 29 0 18 NP12ZL Wide 0 2 0 21 0 13 Tele 0 3 0 22 0 14 NP13ZL Wide 0 3 0...

Страница 18: ...recautionary zone is 2 m or less it is necessary to prevent spectators from entering that area Example of downward projection installed on the ceiling Hazard zone Precautionary zone floor Hazard zone...

Страница 19: ...a risk of intrusion into the hazard zone and the precautionary zone when operating the buttons on the projector For safety it is recommended to use the remote control CAUTION Iftheprecautionaryzonecan...

Страница 20: ...e Select an appropriate lens for the installation location and secure the safety zone set for each lens Ensure that appropriate safety measures have been taken when operating the projector adjusting t...

Страница 21: ...attached ferrite cores so as not to interfere with radio and television reception For details please refer to User s Manual Notice Concerning Electromagnetic Interference EMI WARNING Operation of thi...

Страница 22: ...l and electronic products only applies to the current European Union Member States Outside the European Union If you wish to dispose of used electrical and electronic products outside the European uni...

Страница 23: ...ure to set the FAN MODE to HIGH ALTITUDE If not the inside of the projector may get hot leading to malfunction When the projector is used at high altitudes places where the atmospheric pressure is low...

Страница 24: ...screen with care protecting it from volatile substances scratches and dirt Precautions when installing the projector at an angle This projector can be installed universally in every angle When instal...

Страница 25: ...hedinthecurrentinstallationpositioncanbechecked on the INFO screen of the on screen menu OPTION COVER Option cover is not required A Only option cover A needs to be attached B Only option cover B need...

Страница 26: ...ings show the image of installation angle as a reference They are slightly from the actual one Installation angles required to attach the option cover B Option cover B 0 85 Option cover B must be atta...

Страница 27: ...r Ceiling Installation Do not install the projector in the following places Attached substances such as oil chemicals and moisturemaycausedeformationorcracksofthecabinet corrosionofthemetalparts ormal...

Страница 28: ...scouldbesubjecttoshockwhiletheprojectorisbeing moved damaging the lens and the lens shift mechanism Whendismountingthelensfromtheprojector returnthelenspositiontothehomepositionbeforeturningoffthepowe...

Страница 29: ...e If the lens unit with the lens cap remaining on is installed on the projector it may cause of malfunction 3 Insertthelensontotheprojectorfacingthe arrow on the lens label upward Insert the lens slow...

Страница 30: ...ottom of the projector so that the lens cannot be removed easily Attach the enclosed lens mask if you want to hide the gap between the projector and lens ThelensmaskcannotbeattachedwhenusingtheNP44MLl...

Страница 31: ...ne is fitted 1 While pressing the lens release button at thebottomoflensmountingsectiononthe projector sfrontpanelfullyin turnthelens counterclockwise The lens comes off NOTE Check the following areas...

Страница 32: ...e sure to attach the option cover for safety Be sure to attach the option cover to the projector when the projector s power is turned on CAUTION About option cover After attaching the option cover to...

Страница 33: ...the projector Shorten the projector tilt foot to the mini mum height Hang the two hooks of the option cover A on the projector tilt foot Align the two screw fixing parts of the op tion cover A with th...

Страница 34: ...r Option cover B Mounting 1 PressthetwoprotrusionsonoptioncoverB against the slits in the projector s exhaust vent Line up the upper protrusion with the slit at the very top the lower protrusion with...

Страница 35: ...s are generated Make sure if the projector is fixed on the surface that has enough durability to stand the whole projector weight the projector weight the lens unit weight and the ceiling mount weight...

Страница 36: ...pecial installation precautions 36 NaN 216 8 5 262 10 3 150 5 9 150 5 9 134 5 3 599 23 6 300 11 8 150 5 9 6 M4 299 5 11 8 490 19 3 197 7 8 208 8 2 Cabinet Dimensions Unit mm inch Lens center Lens cent...

Страница 37: ...or may fall over resulting in injury damage or malfunction Also the exhaust vent may be obstructed resulting in the projector getting warm and the possibility of fire and malfunction occurring A stand...

Страница 38: ...projector and the floor next page 2 Use the four screw holes at the back of the projector to secure it to the stand Screw hole center dimension width 300 mm lengthwise pitch 150 mm Screw hole dimensio...

Страница 39: ...FrontView SideView Screw holes for 6 M4 use 300 or greater 262 150 150 Horizontal adjuster Exhaust Intake air Intake air Exhaust 150 150 The example shows the right side of the body side where the co...

Страница 40: ...ultiple projectors together for multi screen projection provide sufficient space aroundtheprojectorsforairintakeandexhaust Whentheintakeandexhaustventsareobstructed the temperature inside the projecto...

Страница 41: ...support thedrgroup co nz In Asia Sharp NEC Display Solutions Ltd Address 686 1 Nishioi Oi Machi Ashigarakami Gun Kanagawa 258 0117 Japan Telephone 81 465 85 2369 NEC China Co Ltd Address 6F Landmark d...

Отзывы: