33
3. Projection of Images (Basic Operation)
3-2. Turning your projector on
WARNING
• The projector produces a strong light. When turning on the power, operate from the side or rear of the projector (outside the
Restriction Zone (HD)). Also, when turning on the power, make sure no one within the projection range is looking at the lens.
Preparation:
• Connect the power cable to the projector (see page
26
).
• Supply AC power to the projector.
NOTE
• Turn off the main power switch to the projector when supplying or cutting AC power to the projector.
Supplying or shutting down the AC power while the main power switch is on will damage the projector.
• Turning on and off the projector involves a two-step operation; the “main power switch” and the “POWER
button”.
• Turning power on. (See this page)
[1] Turn on the “main power switch” of the projector.
Your projector is set in a standby state.
[2] If KEY LOCK is on, press the KEY LOCK button for one second or longer.
KEY LOCK is off and buttons on the control panel become operable.
[3] Press the POWER button three seconds or longer.
Your projector is turn on.
• Turning power off. (See page
42
)
[1] Press the POWER button three seconds or longer.
Your projector is set in a standby state.
[2] Turn off the “main power switch” of the projector.
Your projector is turned off.
1
Remove the lens cap.
2
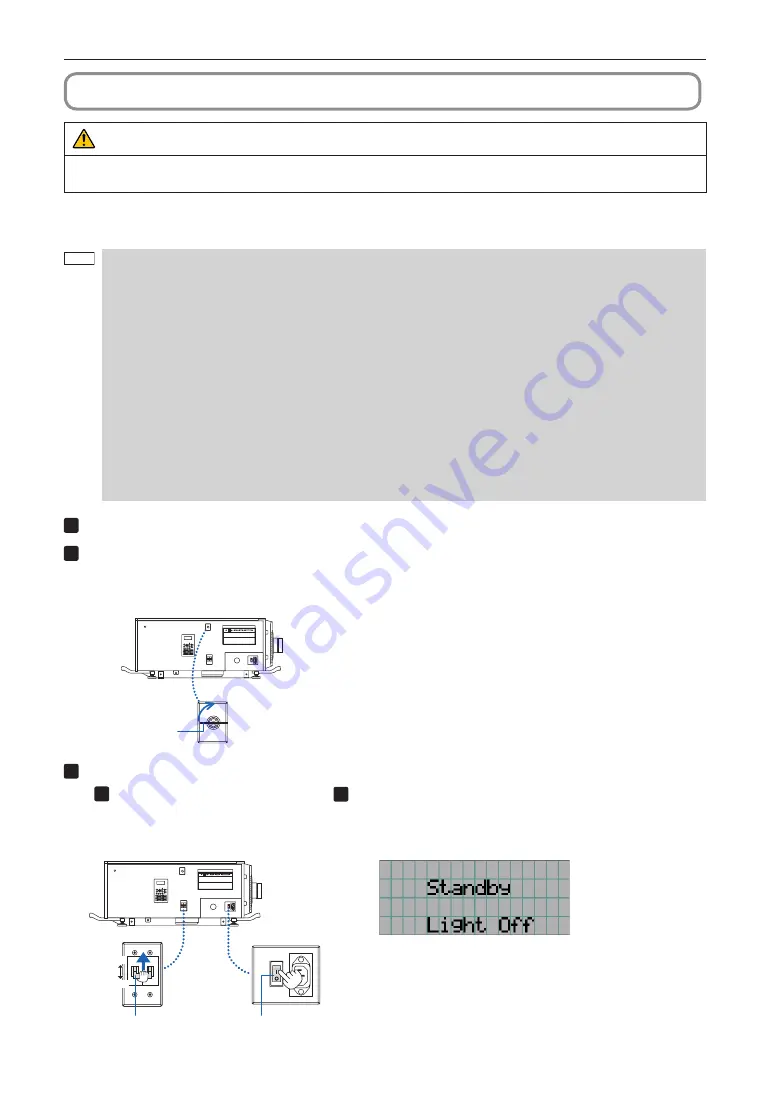
Insert the administrator key horizontally into the administrator switch and turn it clockwise to
the vertical position.
The administrator key can no longer be removed. The projector will not function unless the administrator key is inserted.
Administrator key
Administrator switch
3
Turn on the power switches on the side of the projector in this order: first the light power switch
(
1
) then the projector power switch (
2
).
A buzzer will ring on the projector. The POWER button indicator will blink green and the SYSTEM status indicator will light
orange (standby state). KEY LOCK becomes automatically on if no control panel operation takes place in the standby
state for 30 seconds by default. Buttons on the control panel do not function while KEY LOCK is on. (See page
40
)
ON
OFF
ON
OFF
①
Light power switch
②
Projector power switch
Содержание NC1802ML
Страница 8: ...8 Important Information Label A Lamp Warning Label Label B Laser Explanatory Label ...
Страница 9: ...9 Important Information Label C NP 02HD Label C NP NC2402ML ...
Страница 10: ...10 Important Information Label C NP NC2002ML Label C NP NC1802ML ...
Страница 11: ...11 Important Information Label D Label E ...
Страница 81: ... NEC Display Solutions Ltd 2019 2020 Ver 2 12 20 ...


