background image

English−53

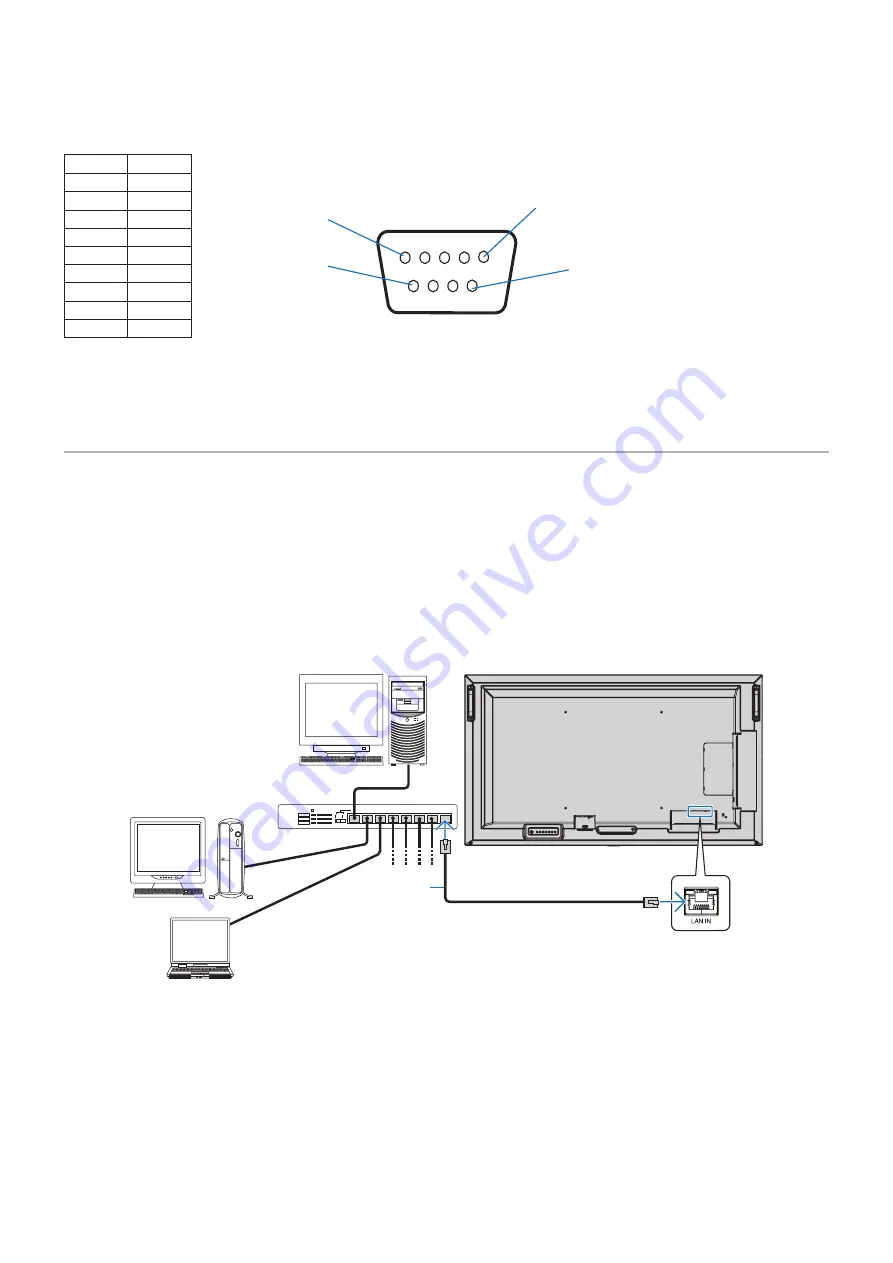
PIN ASSIGNMENT

RS-232C input/output

1

6

5

9

D-SUB 9P (Monitor side)

Pin No

Name

1

NC

2

RXD

3

TXD

4

NC

5

GND

6

NC

7

NC

8

NC

9

NC

This monitor uses RXD, TXD and GND lines for RS-232C control.

Controlling the Monitor via LAN

Connecting to a Network

Using a LAN cable allows you to specify the Network Settings and the Alert Mail Settings by using an HTTP server function.

NOTEN:  

When you use this function, [CONTROL TERMINAL] in [EXTERNAL CONTROL] should be [LAN] (see 

page 89

).

To use a LAN connection, you are required to assign an IP address (see 

page 85

). The monitor will obtain an IP address 

automatically when connected to a DHCP network.

Example of LAN connectionN:

Server

Hub

NOTEN:

Use a category 5 or higher LAN cable.

LAN cable 

Содержание MultiSync ME501

Страница 1: ...ser s Manual Large Format Display MultiSync ME431 MultiSync ME501 MultiSync ME551 MultiSync ME651 MODEL ME431 ME501 ME551 ME651 Please find your model name on the label on the rear side of the monitor...

Страница 2: ...ctions Wiring Diagram 27 Connecting to a Personal Computer 28 Connecting to a Computer with HDMI 28 Connecting a Computer with DisplayPort 28 Connecting to a Media Device with HDMI 29 Connecting to au...

Страница 3: ...e is not properly reproduced 64 Selected resolution is not displayed properly 64 Video contrast is either too high or too low 64 Hardware Issues 64 button does not respond 64 No sound 64 The remote co...

Страница 4: ...dix B External Resources Appendix C OSD Controls List INPUT 76 PICTURE 78 AUDIO 81 SCHEDULE 82 SLOT 83 NETWORK 85 PROTECT 86 SYSTEM 89 Appendix D Manufacturer s Recycling and Energy Information Dispos...

Страница 5: ...ecessary the user should contact the dealer or an experienced radio television technician for additional suggestions The user may find the following booklet prepared by the Federal Communications Comm...

Страница 6: ...mandatory action This symbol indicates that the power cord should be unplugged from the power outlet WARNING 1 UNPLUG THE POWER CORD Unplug the power cord if the product malfunctions Should the produc...

Страница 7: ...to the product or injury to the user or installer 8 Please install the product in accordance with the following information This product cannot be used or installed without the table top stand or oth...

Страница 8: ...or mounting parts and then secure the product with a safety wire The safety wire must not be tight Please make sure the mounting accessories are strong enough to support the product weight and size b...

Страница 9: ...into the cabinet or use your product near water Immediately turn off the power and unplug your product from the wall outlet then refer servicing to qualified service personnel It may cause an electri...

Страница 10: ...of the power cord connected to the earth If the power cord is not connected to the earth it may cause electric shock Please make sure the power cord is earthed properly 2 Do not bind the power cord a...

Страница 11: ...recommend wiping clean the ventilation holes a minimum of once a month Failure to do so could lead to fire or electric shock or damage to the product 11 To ensure the product s reliability please clea...

Страница 12: ...to see and may cause eye fatigue due to insufficient contrast Maintenance Cleaning the LCD Screen When the LCD screen is dusty please gently wipe with a soft cloth Clean the LCD screen surface with a...

Страница 13: ...ion on page 15 Orientation on page 15 Ventilation Requirements on page 16 Mounting on Ceilings on page 16 Attaching Mounting Accessories on page 17 Installing and Removing the Optional Table Top Stand...

Страница 14: ...ries The remote control is powered by two 1 5 V AAA batteries To install or replace batteries NEC recommends the following battery use CAUTION Please refer to CAUTION 8 NOTE If you do not intend to us...

Страница 15: ...signal cable with ferrite core For HDMI and DisplayPort please use a shielded signal cable Use of other cables and adapters may cause interference with radio and television reception 6 Turn on the pow...

Страница 16: ...e Use the button on the main unit or the STANDBY button on the remote control to put the unit in standby mode Use POWER SAVE SETTINGS in the PROTECT OSD menu When there is no input signal the monitor...

Страница 17: ...ST 401 and ST 43M for structure of Prevent Tipping ME651 Cord or chain Before attaching the monitor to the wall make sure that the wall can support the weight of the monitor Changing the Logo Ornament...

Страница 18: ...roved they must comply with the VESA compatible FDMlv1 mounting method NEC recommends mounting interfaces that comply with UL1678 standard in North America Prior to mounting inspect the installation l...

Страница 19: ...position Safety wire for portrait position ME651 only Mounting Location WARNING Please refer to WARNING 8 NOTE Allow for adequate ventilation or provide air conditioning around the monitor so that hea...

Страница 20: ...nt especially when you use monitors in a multiple screen configuration This monitor has internal temperature sensors If the monitor overheats a Caution warning appears If the Caution warning appears s...

Страница 21: ...hat can damage the monitor When using mounting accessories other than those that are NEC compliant and approved they must comply with the VESA Flat Display Mounting Interface Standard FDMI NOTE Prior...

Страница 22: ...ich are included with the optional table top stand For the ST 65M ONLY use thumbscrews and attach the stand holders which are included with the optional table top stand Install the stand so the long e...

Страница 23: ...stment Figure 1 Please adjust the pipe to the lines Figure 1 ME551 High Low Pipe Adjust the pipe to a line ME431 ME501 2 Please install the stand pole and the pipe with included screws Please screw th...

Страница 24: ...English 20 Chapter 2 Parts Names and Functions This Chapter Includes Control Panel on page 21 Terminal Panel on page 22 Wireless Remote Control on page 24...

Страница 25: ...when navigating through the OSD menu options Acts as a minus button to decrease the adjustment of an OSD menu option after it has been selected with the INPUT SET button F r Button up button Opens the...

Страница 26: ...udio equipment can be controlled with the included remote control F LAN Port IN RJ 45 Connect to LAN in order to manage and control the monitor over the network See page 53 G AUDIO OUT Audio signal ou...

Страница 27: ...omputer in order to control RS 232C functions See page 52 L Internal Speaker M Handle Two for ME431 ME501 and ME551 Four for ME651 N Security Slot Security and theft protection lock slot compatible wi...

Страница 28: ...cks the remote control s buttons if they have been locked in the LOCK SETTINGS in the PROTECT menu Press and hold the DISPLAY button for more than five seconds to unlock the remote See page 48 G MENU...

Страница 29: ...tios FULL WIDE 1 1 ZOOM and NORMAL See page 37 NOTE Media Player is not available R STILL Button ON OFF button Activates deactivates still picture mode S REMOTE ID Button Activates the REMOTE ID funct...

Страница 30: ...page 31 Connecting a USB Device on page 32 Connecting External Equipment NOTE Do not connect or disconnect cables when turning on the monitor s main power or other external equipment s power as this...

Страница 31: ...I IN ARC LAN IN AUDIO OUT REMOTE Dotted lines other signal Solid lines video signal Dashed lines audio signal USB storage device HDMI video player or Computer HDMI Blu ray or DVD Player HDMI AV Amplif...

Страница 32: ...r a connected computer is turned on sometimes an image is not shown In this case please turn off the computer then turn it on again When input signal is 4K please use high speed HDMI cable Connecting...

Страница 33: ...DMI1 ARC The HDMI1 ARC does not send an audio signal that is not supported by the input connector of playing pictures Please refer to Specifications for the supported signal of each input connector HD...

Страница 34: ...same language which is selected for the monitor For the Change Language function it is necessary that the connected HDMI CEC compatible device be able to cope with multi language AUTO TURN OFF System...

Страница 35: ...ther USB connection on the monitor see page 22 Option Board for the Monitor When an Option Board or a Raspberry Pi Compute Module Interface Board and Raspberry Pi Compute Module are installed in the m...

Страница 36: ...USB storage device when selecting CLONE SETTING CAUTION Pleaser refer to CAUTION 2 NOTE Please make sure the connector shape and orientation is correctly aligned when connecting the USB device or cab...

Страница 37: ...Range for the Remote Control on page 35 Using Power Management on page 35 Showing the Information OSD on page 36 Switching Between Picture Modes on page 36 Setting the Aspect Ratio on page 37 OSD On...

Страница 38: ...signal input 1 Turn on the monitor using the remote control or the monitor button 2 Send an AV signal input to the monitor 3 3 Disconnect and reconnect a signal cable Blinking amber No AV signal input...

Страница 39: ...consumption of the monitor when it is not in use When connected to a computer power consumption by the monitor reduces automatically if the keyboard or mouse are not used during the time set in the co...

Страница 40: ...UNICATION INFO is ON Green Connected LAN Red Not connected LAN H DP 3840 x 2160 NOTE When the input signal is Media Player the information OSD will not be displayed Switching Between Picture Modes Pre...

Страница 41: ...ure aspect 2 Description 4 3 NORMAL Reproduces the aspect ratio that is sent from the source Squeeze FULL Fills the entire screen Letterbox WIDE Expands a 16 9 letter box signal to fill the entire scr...

Страница 42: ...TION CUSTOM Input source Main Menu Icons Main Menu Item Sub Menu Key Guide Adjustment Settings Remote Control Press or to navigate to a sub menu Press SET POINT ZOOM to select an option Press or or to...

Страница 43: ...ce equalizer and select settings related to the audio SCHEDULE Create auto power on off schedules and set the off timer SLOT Select settings related to an Option Board if installed NETWORK Set network...

Страница 44: ...remote control to close the operation menu Slideshow Operation Navigate to files using the buttons and press the button to start a slideshow Press the button to pause the slideshow To pause the slide...

Страница 45: ...ne or more selected files The selected files are played on a loop in the sorted order Only for video Plays a section of a video in a loop Set the start point with and the stop point with Select to sto...

Страница 46: ...Video MPEG1 40 Mbps 1920x1080 30 Hz MPEG2 40 Mbps 1920x1080 30 Hz MPEG4 40 Mbps 1920x1080 30 Hz H 263 40 Mbps 1920x1080 30 Hz H 264 135 Mbps 3840x2160 60 Hz HEVC H 265 100 Mbps 3840x2160 60 Hz Windows...

Страница 47: ...ncludes Creating a Power Schedule on page 44 Using Picture Modes on page 45 Setting Security and Locking the Monitor Controls on page 46 Password Security on page 46 Locking the Button Controls on pag...

Страница 48: ...input source 5 Use the button to select DATE or EVERY WEEK Press the SET POINT ZOOM button on a menu which is suitable for the schedule If the schedule is to be run on a specific day choose DATE and...

Страница 49: ...ANSPORTATION CUSTOM 1 This input is available when the optional Raspberry Pi Compute Module Interface Board and Raspberry Pi Compute Module are installed See page 73 Picture Mode Types PICTURE MODE PU...

Страница 50: ...gs can also be configured using the monitor s web controls The function names and location in the web controls are the same as the OSD menu See page 55 The menu options for Security and Lock Settings...

Страница 51: ...nable password security PASSWORD o o o o SECURE MODE START UP LOCK CONTROL LOCK PROTECT POWER SAVE SETTINGS THERMAL MANAGEMENT SCREEN SAVER POWER ON DELAY SECURITY SETTINGS LOCK SETTINGS ALERT MAIL 1...

Страница 52: ...T option press the buttons to change the setting to IR 3 Under MODE choose the lock mode you want to enable ALL LOCK all buttons are locked CUSTOM LOCK all remote buttons are locked except for the fol...

Страница 53: ...e keys are locked Select LOCK to prevent volume adjustment When activating the volume lock the monitor volume will immediately change to the MIN VOL value MIN VOL and MAX VOL the and volume keys are u...

Страница 54: ...ntrol to Control all Monitors in Range 1 On the remote control press and hold down the REMOTE ID SET button while using the keypad to input the REMOTE CONTROL ID number 0 2 All monitors within range o...

Страница 55: ...ge 54 Commands on page 60 Proof of Play on page 61 Connecting an external device There are two options to connect an external device to control the monitor RS 232C terminal Connecting an external devi...

Страница 56: ...ed computer first then turn on the monitor s main power If you turn on the computer and monitor in reverse order the com port may not work RS 232C Cable Computer RS 232C NOTE If your computer is equip...

Страница 57: ...LAN cable allows you to specify the Network Settings and the Alert Mail Settings by using an HTTP server function NOTE When you use this function CONTROL TERMINAL in EXTERNAL CONTROL should be LAN se...

Страница 58: ...monitor to the network using a commercially available LAN cable before attempting to use browser operations Operation with a browser that uses a proxy server may not be possible depending on the type...

Страница 59: ...monitor s OSD Please see page 75 for the full list of OSD menu controls INPUT PICTURE AUDIO SCHEDULE SLOT NETWORK PROTECT SYSTEM NOTE The buttons in the monitor web controls function as follows APPLY...

Страница 60: ...network when MANUAL is selected for IP SETTING DEFAULT GATEWAY Set your default gateway for the monitor connected to the network when MANUAL is selected for IP SETTING NOTE Set as 0 0 0 0 to delete t...

Страница 61: ...authentication of the email User Name This sets the user name for logging into the authentication server when authentication is required for the email transmission Up to 60 alphanumeric characters ca...

Страница 62: ...rror code Temperature Temperature abnormal 0xA0 0xA1 0xA2 Fan Cooling fan abnormal 0x80 0x81 Power Power abnormal 0x70 0x71 0x72 0x78 Inverter Backlight Inverter or backlight abnormal 0x90 0x91 No Sig...

Страница 63: ...the monitor which is connected to the network Up to 15 alphanumeric characters can be used DOMAIN NAME Type in the domain name of the network which is connected with the monitor Up to 60 alphanumeric...

Страница 64: ...etting 10 100Mbps ASCII Control command This monitor supports control command which is listed in the External_Control pdf See page 73 but also supports common ASCII control command which is used for c...

Страница 65: ...Audio in or N A d Picture Image Normal Picture or No Picture e AUDIO OUT Normal Audio or No Audio f TIME year month day hour minutes second g EXPANSION DATA 00h Normal Proof of Play event 01h Proof o...

Страница 66: ...e 64 button does not respond on page 64 No sound on page 64 The remote control is not functioning on page 64 The SCHEDULE OFF TIMER function is not working properly on page 64 Snowy picture poor Sound...

Страница 67: ...ight not be shown due to the decision intention of the HDCP community Digital Content Protection LLC Image persistence Please be aware that LCD Technology may experience a phenomenon known as image pe...

Страница 68: ...t Blacks are dark grey and whites are dull change the VIDEO LEVEL to EXPAND Dulling blacks and whites can occur when the VIDEO LEVEL is set to RAW while the source video signal s color levels are RGB...

Страница 69: ...ayer function does not recognize the USB storage device Check that a USB storage device is connected to the USB port Check the file format of the USB storage device if it is not recognized by the moni...

Страница 70: ...English 66 Chapter 8 Specifications This Chapter Includes Compatible Signal List on page 67 ME431 on page 68 ME501 on page 69 ME551 on page 70 ME651 on page 71...

Страница 71: ...840 x 2160 133 3 kHz 60 Hz No No Yes Recommended resolution 3840 x 2160 135 0 kHz 60 Hz No Yes Yes Recommended resolution 4096 x 2160 54 0 kHz 24 Hz Yes Yes Yes Compressed image 4096 x 2160 56 3 kHz 2...

Страница 72: ...emote IN 9 Pin D sub RJ 45 10 BASE T 100 BASE TX Stereo Mini Jack 3 5 mm USB Power supply port 5 V 2 A max Media Player Firmware update port Power Supply 1 9 0 8 A AC 100 240 V 50 60 Hz Power Consumpt...

Страница 73: ...mote IN 9 Pin D sub RJ 45 10 BASE T 100 BASE TX Stereo Mini Jack 3 5 mm USB Power supply port 5 V 2 A max Media Player Firmware update port Power Supply 2 4 1 0 A AC 100 240 V 50 60 Hz Power Consumpti...

Страница 74: ...te IN 9 Pin D sub RJ 45 10 BASE T 100 BASE TX Stereo Mini Jack 3 5 mm USB Power supply port 5 V 2 A max Media Player Firmware update port Power Supply 2 9 1 2 A AC 100 240 V 50 60 Hz Power Consumption...

Страница 75: ...te IN 9 Pin D sub RJ 45 10 BASE T 100 BASE TX Stereo Mini Jack 3 5 mm USB Power supply port 5 V 2 A max Media Player Firmware update port Power Supply 3 6 1 5 A AC 100 240 V 50 60 Hz Power Consumption...

Страница 76: ...ion TILE COMP and TILE MATRIX are trademarks or registered trademarks of NEC Display Solutions Ltd in Japan and other countries Intel and the Intel logo are trademarks of Intel Corporation or its subs...

Страница 77: ...sulates this communications protocol into a Python library for rapid development https github com NECDisplaySolutions necpdsdk Projector Monitor Common ASCII Control Command Reference Manual PDF docum...

Страница 78: ...may require the use of a supported external color sensor Please contact an authorized NEC dealer or see the NEC Display Solutions website in your region for purchase information and availability NaVi...

Страница 79: ...D Controls List This Chapter Includes INPUT on page 76 PICTURE on page 78 AUDIO on page 81 SCHEDULE on page 82 SLOT on page 83 NETWORK on page 85 PROTECT on page 86 SYSTEM on page 89 Default values ca...

Страница 80: ...put connection does not have video signal present the monitor will search for video signal on the other video input connections If a video signal is found the monitor will switch from the current inpu...

Страница 81: ...on range to be shown according to the video signal to improve the whiteout and blackout of the image NOTE This function is available only in HDMI or DisplayPort or OPTION and is selected at INPUT SIGN...

Страница 82: ...NPUT CHANGE 1 This function depends on which Option Board you are using This function is only available when Option Board is installed 2 Depending on the device it may not be detected correctly 3 Exce...

Страница 83: ...ess in relationship to the input signal Press or button to adjust ADVANCED HDR MODE When the monitor detects an HDR signal you can select preferred gamma correction from LOW MIDDLE or HIGH SHARPNESS A...

Страница 84: ...ACKLIGHT level set for the monitor to use when amibient lighting is high BACKLIGHT setting range Dark Bright Room bright condition L ILLUMINANCE level set for the monitor to use when ambient lighting...

Страница 85: ...sition can be adjusted by pressing the or button on the remote control CONFIRM SETTINGS Starts the Tile Matrix RESET Resets all picture menu settings back to factory settings except for PICTURE MODE 1...

Страница 86: ...the SCHEDULE INFORMATION window If multiple schedules are set to start at the same time the conflicting schedule with the highest number is given priority Schedules will not run when the OFF TIMER is...

Страница 87: ...power is turned on AUTO SHUTDOWN 2 4 The installed Option Board is turned off when the monitor is switched into standby mode POWER SUPPLY OFF DELAY When OFF is selected at SLOT POWER this sets the ti...

Страница 88: ...ect to receive a periodic reset command from the Compute Module via the internal UART If the command isn t received for three consecutive timeout periods the monitor will restart the Compute Module ST...

Страница 89: ...twork administrator for the IP address when AUTO is selected for DNS DNS PRIMARY Enter the primary DNS server settings of the network connected to the monitor NOTE Enter 0 0 0 0 to delete the setting...

Страница 90: ...ed device will not turn on automatically To turn on the monitor please press the main power switch on the monitor or the POWER ON button on the remote control or disconnect and reconnect the device s...

Страница 91: ...d or higher to delay power on SECURITY SETTINGS Requires a password to be entered to use the monitor PASSWORD Input the current password to change the settings in this menu The default password is 000...

Страница 92: ...ction INPUT When IR is selected in SELECT UNLOCK Enable to use the input buttons on the remote control LOCK Lock all input buttons on the remote control When KEY is selected in SELECT UNLOCK Enable to...

Страница 93: ...ot reflect changes to the Date and Time settings until SET is pressed on the remote control DAYLIGHT SAVING Automatically changes the real time clock to match Daylight Savings hours NOTE Set the DATE...

Страница 94: ...copy is reset to default when the monitor is powered off ALL INPUT When this option is selected all input terminal settings are copied INPUT Copies the selected settings PICTURE AUDIO SCHEDULE SLOT NE...

Страница 95: ...DISPLAY SOLUTIONS is strongly committed to environmental protection and sees recycling as one of the company s top priorities in trying to minimize the burden placed on the environment We are engaged...

Страница 96: ...in Japan https www necdisplay com in USA Energy Saving This monitor features an advanced energy saving capability When a Display Power Management signal is sent to the monitor the Energy Saving mode...

Страница 97: ...applicable legislation or agreement you may have The mark on electrical and electronic products may only apply to the current European Union Member States Outside the European Union If you wish to di...

Отзывы: