CHAPTER 1 OVERVIEW
17
1.6
Connection between IE-703102-MC and IE-703102-MC-EM1
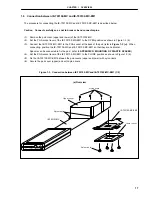
The procedure for connecting the IE-703102-MC and IE-703102-MC-EM1 is described below.
Caution
Connect carefully so as not to break or bend connector pins.
<1> Remove the pod cover (upper and lower) of the IE-703102-MC.
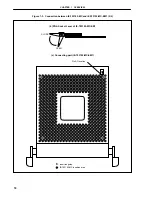
<2> Set the PGA socket lever of the IE-703102-MC-EM1 to the OPEN position as shown in Figure 1-3 (b).
<3> Connect the IE-703102-MC-EM1 to the PGA socket at the back of the pod (refer to Figure 1-3 (c)). When
connecting, position the IE-703102-MC and IE-703102-MC-EM1 so that they are horizontal.
Spacers can be connected to fix the pod. (refer to APPENDIX D MOUNTING OF PLASTIC SPACER)
<4> Set the PGA socket lever of the IE-703102-MC-EM1 to the CLOSE position as shown in Figure 1-3 (b).
<5> Fix the IE-703102-MC-EM1 between the pod covers (upper and lower) with nylon rivets.
<6> Secure the pod cover (upper) end with nylon rivets.
Figure 1-3. Connection between IE-703102-MC and IE-703102-MC-EM1 (1/2)
(a) Overview
IE-703102-MC
Nylon rivets
Upper cover
IE-703102-MC-EM1
Lower cover
Nylon rivets
Nylon rivets
Содержание IE-703102-MC-EM1
Страница 2: ...2 MEMO ...
Страница 10: ...10 MEMO ...
Страница 24: ...24 MEMO ...
Страница 26: ...26 MEMO ...
Страница 34: ...34 MEMO ...
Страница 36: ...APPENDIX A DIMENSIONS 36 2 SC 144SD Unit mm 109 144 72 37 108 1 73 36 43 13 13 40 130 43 213 46 ...
Страница 40: ...40 MEMO ...
Страница 46: ...46 MEMO ...
Страница 48: ...48 MEMO ...

