background image


42  NCB Service Manual 

Version 1.0

Item 

Description

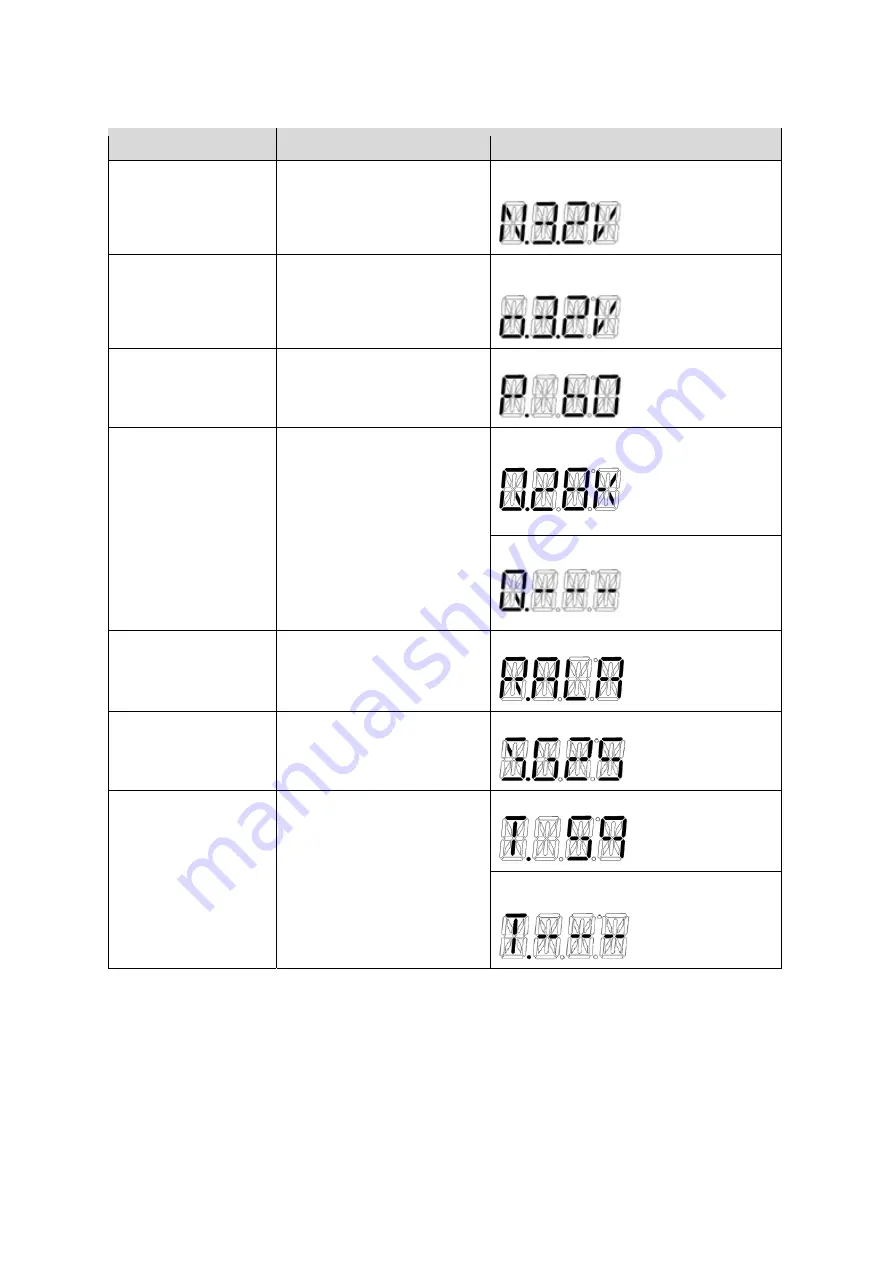
Display 

(N) Target APS 

The target APS voltage (V) is 
displayed. 

Displays the APS voltage value to one decimal place.
Eg.) 3.2 V 

(O) Current APS 

The current APS voltage (V) is   
displayed. 

Displays the APS voltage value to one decimal place. 
Eg.) 3.2 V 

(P) Exhaust Gas Temperature

The current exhaust gas temperature 
(°C) is displayed. 

Eg.) 60


(Q) Model and Capacity 

The currently set model and capacity 
is displayed. 

Eg.) Capacity 28 K 


Eg.) Model or capacity setting error. 


(R) Burner Type 

The currently set burner type is 
displayed. 
ALA: Alantum 
BEK: Bekaert 

Eg.) The setting for Alantum. 

(S) Gas Type 

The current gas type is displayed: 
G20, G25/G27, G30, or G31. 

Eg.) G25/G27 setting

(T) Last maintenance activity 

The number of days since the last 
maintenance activity is displayed. 
 
To reset the day count: 
  - Press [Reset] for 5 seconds.   
  - Clear the day count. 

Eg.) 59 days since the last maintenance activity.

Eg.) Maintenance activity count is disabled. Set to 
“0”. 


Содержание NCB-24LSWE

Страница 1: ...vienuk com Contact a TAS for all warranty claims The technician or company that installed your boiler A registered service provider When you contact a TAS please have the following information availab...

Страница 2: ...njury or death Do not store or use gasoline or other flammable liquid or vapour near this or any other appliance WHAT TO DO IF YOU SMELL GAS Donot use any appliances Donot turn on any electrical devic...

Страница 3: ...NCB Service Manual 1 Version 1 0 Revisions Version Description of changes Date 1 00 First issue Mar 12 2015...

Страница 4: ...hanger 71 4 9 13 DHW Heat Exchanger 72 4 9 14 Circulation Pump 73 4 9 15 3 Way Valve 74 4 9 16 Water Pressure Sensor 75 4 9 17 Dual venturi 76 4 9 18 Expansion tank 77 5 Troubleshooting 78 5 1 Error C...

Страница 5: ...Product from a supplier or distributor not authorised by Navien Failure to perform regular maintenance misuse operation at settings other than those recommended or specified non compliance with instr...

Страница 6: ...LSWE and NCB 40LSWE products NG Natural Gas LP Propane Gas AP Air Pressure APS Air Pressure Sensor DHW Domestic Hot Water FM Fan Motor GARC Gas Air Ratio Control LPM Litre Per Minute MGV Main Gas Valv...

Страница 7: ...minor or moderate injury 1 3 Instructional Symbols IMPORTANT Warns of a risk of damage and environmental pollution NOTE Indicates additional information that is important but not related to personal i...

Страница 8: ...ant that these instructions are followed exactly to avoid fire or explosion property damage personal injury or loss of life DO NOT OPERATE THE BOILER DO NOT CREATE ANY SOURCES OF IGNITION DO NOT OPERA...

Страница 9: ...etting Check the water temperature before allowing children or elderly or disabled people to use it Contact a registered plumber or your local plumbing authority for more information For your safety a...

Страница 10: ...oiler operates safely and correctly after it is serviced or repaired Incorrect adjustments modifications servicing or maintenance can cause property damage personal injury or death To prevent scalding...

Страница 11: ...any other compressed gases near the boiler or flue system including the flue termination Doing so may result in fire or explosion DO NOT operate the boiler with an open front cover Doing so may result...

Страница 12: ...is closed Doing so may damage the boiler DO NOT use the boiler for purposes other than those described in this manual DO NOT remove the front cover unless the power to the boiler is turned off or disc...

Страница 13: ...13384 Chimneys UNE EN 13779 Ventilation UNE EN ISO 16484 Building control systems UNE EN 14336 Heating systems in buildings UNE EN 15502 1 Gas fired heating boilers Part 1 General Requirements and UNE...

Страница 14: ...INPUT NCB 24LSWE 20 0 kW 24 0 kW NCB 28LSWE 24 0 kW 28 0 kW NCB 34LSWE 29 0 kW 34 0 kW NCB 40LSWE 34 0 kW 40 0 kW By default the boiler assigns system priority to DHW supply The NCB Series boiler has...

Страница 15: ...rvice Manual 13 Version 1 0 2 2 Components The following diagram shows the key components of the boiler Component assembly diagrams and particular parts lists are included in the appendices NCB 24 28...

Страница 16: ...14 NCB Service Manual Version 1 0 NCB 24 28 34LSWE...

Страница 17: ...NCB Service Manual 15 Version 1 0 NCB 40LSWE...

Страница 18: ...16 NCB Service Manual Version 1 0 NCB 40LSWE...

Страница 19: ...9 107 8 106 3 107 8 107 3 107 9 106 6 107 9 Partial load 30 efficiency at 30 C return temperature 108 3 108 3 108 6 108 8 Heat Loss via the casing with burner switched on 0 1 0 1 0 1 0 1 Heat Loss vi...

Страница 20: ...Max horizontal coaxial pipe length 60 100 m 20 Max vertical coaxial pipe length 60 100 m 21 Equivalent elbow length at 90 60 100 m 1 3 Equivalent elbow length at 45 60 100 m 1 Max horizontal coaxial...

Страница 21: ...ous connection points Supply Connection Pipe Diameters Re Description Diameter A Flue exhaust Air intake 60 mm 100 mm 80 mm 125 mm B Space heating supply 22 mm C Hot water outlet DHW 15 mm D Gas suppl...

Страница 22: ...ircuit Board DIP Switches 8 way The DIP switches on the circuit board configure the boiler s model and gas settings These configurations are set at the factory and should not be changed The following...

Страница 23: ...Supply Water 1 OFF Return Water 1 ON 4 2 Measuring the Incoming Gas Pressure WARNING The boiler does not function correctly if there is insufficient incoming gas pressure Measuring the inlet gas press...

Страница 24: ...ts obstruct the PCB before proceeding 5 Loosen the screw indicated in the figure below and connect a manometer to the pressure port Reset the manometer to zero before use 6 Re open the manual gas valv...

Страница 25: ...ed in and is responsible for the connection installation repair or servicing of gas equipment or accessories Qualified service agents are experienced in gas appliance work familiar with all safety pre...

Страница 26: ...llustration below 7 Remove the PCB assembly 8 With the internal components exposed locate the gas inlet pipe and the gas valve inthe middle ofthe unit asshown in Figure 2 1 and Figure 2 2 Figure 2 1 N...

Страница 27: ...24 28 34LSWE Figure 3 2 Detaching Gas Inlet Pipe from Gas Valve and Fan Motor Assembly NCB 40LSWE When the gas orifice is exposed remove the two screws that hold it in place Remove the orifice from it...

Страница 28: ...of Gas Pipe Assembly NCB 40LSWE DANGER See Figure 5 1 Inspect the O ring each time the connection between the venturi and gas valve inlet adapter is disassembled The O ring must always be installed a...

Страница 29: ...and accessing the DIP switches Figure 6 Set the DIP switches Switch Function Setting 1 2 Gas type G20 LNG 1 OFF 2 OFF G25 G27 LNG 1 OFF 2 ON G30 LPG 1 ON 2 OFF G31 LPG 1 ON 2 ON G20 LNG 1 OFF 2 OFF T...

Страница 30: ...ckwise to decrease the CO2 value Figure 8 Set screw location The set screw is located behind a removable cover To access the set screw loosen the screws and remove the cover d Fully open several hot w...

Страница 31: ...or information about setting modes Measure the offset value at a low flame setting and compare it to the values in Table 3 If the offset value is outside the range adjust the gas valve set screw If se...

Страница 32: ...is activated DHW mode DHW mode is activated outdoor reset Outdoor reset in progress ECO mode Quick DHW in progress Digital display Visual display Return water control Return water control status Freez...

Страница 33: ...y and parameters INIT Factory reset TEC Maintenance alarm RC OT remote controller in use 4 4 2 Buttons Short Key Function Remarks Reset Error code release and cancellation ECO Quick DHW activated Acce...

Страница 34: ...atus information ECO Summer Winter Space Heating long key 5 sec Enters test information menu ECO Summer Winter Space Heating DHW long key 5 sec Factory reset Available only when power is OFF RESET lon...

Страница 35: ...F start Normal Operation mode by pressing the Power button 2 The current supply or return water temperature is displayed depending on the selected heating mode supply or return temperature mode 3 If a...

Страница 36: ...1 error has occurred The current water temperature and the space heating icon and the error code are alternately displayed for a second In this example the current water temperature 60 C and the erro...

Страница 37: ...re available from Error display mode 6 Press the Reset button while the error code is displayed and RST is displayed for 3 seconds If the boiler s status meet predefined conditions the error is releas...

Страница 38: ...perature carefully read To prevent burns on page 5 Water temperatures above 52 C can cause instant scalding severe burns or fatality To adjust the water temperature 1 Ensure that all hot water taps ar...

Страница 39: ...are detected for 5 minutes the system automatically returns to Normal operation mode Item Description Display A Space heating water temperature The current outgoing space heating water temperature is...

Страница 40: ...curve Outdoor reset control can be configured for various types of heating systems 1 Finned tube baseboard 2 Fan coil 3 Cast iron baseboard 4 Low mass radiant 5 High mass radiant 6 Radiator 7 Custom...

Страница 41: ...tory mode when CLR is displayed all of the error history is deleted 5 Press Reset again to return to Normal operation mode 6 If no buttons are pressed for 5 minutes the system automatically returns to...

Страница 42: ...to Normal operation mode 5 If no buttons are pressed for 1 hour the system automatically returns to Normal operation mode Item Description Display A Space heating supply water temperature The current...

Страница 43: ...Eg If outdoor reset control is not used H Boost interval time The boost interval duration is displayed If the boost interval duration is 30 minutes I Space heating water pressure The current water pr...

Страница 44: ...l and Capacity The currently set model and capacity is displayed Eg Capacity 28 K Eg Model or capacity setting error R Burner Type The currently set burner type is displayed ALA Alantum BEK Bekaert Eg...

Страница 45: ...r of space heating cycles is displayed Messages are displayed sequentially at 1 sec intervals Eg The boiler has performed 13 700 space heating cycles C Total Space heating duration The total time hour...

Страница 46: ...third ignition The number of successful third ignitions is displayed Eg Three successful third ignitions have occurred J Successful fourth ignition The number of successful fourth ignitions is display...

Страница 47: ...minutes 4 Enter the password to enter Parameter setting mode Refer to Password Setting Mode for information about setting passwords Entering the Password A When PASS is displayed press ECO The display...

Страница 48: ...er setting value 6 After making changes to parameter settings press ECO to save the changes and exit Parameter setting mode The display returns to Parameter setting display mode 7 In Parameter setting...

Страница 49: ...ass radiant 26 5 to 48 5 21 0 to 38 0 6 Radiator 48 5 to 76 5 38 0 to 59 0 7 Custom CH supply control absolute min max set points CH return control absolute min max set points User defined Heating sys...

Страница 50: ...fixed value 5 None Return fixed value 3 None Boost interval time set at 30 minutes F Maximum heating capacity This menu configures the desired space heating capacity When the boiler operates in Normal...

Страница 51: ...n for 5 minutes and then repeats the cycle Range Default 3 to 40 minutes 40 minutes Eg CH pump overrun set at 40 minutes K Maximum DHW capacity This menu configures the desired DHW capacity When the b...

Страница 52: ...bsolute MIN set point This menu changes the minimum supply temperature range when Supply Control mode is used When configuring Custom mode in Outdoor Reset Control mode the supply temperature changes...

Страница 53: ...min If low burner time is set at 15 minutes U Burner acceleration time This menu sets the burner s acceleration time Range Default 0 to 20 min 3 min If burner acceleration time set at 3 minutes V LCB...

Страница 54: ...arameter setting mode To set a new password 1 Move to PSC and press ECO The current password is displayed and the first digit flashes 2 Press or to change the value 3 Press Summer Winter to change pos...

Страница 55: ...component s values by pressing or to increase or decrease the settings 4 Press ECO once When WAIT is displayed start the component checks for the relevant item and then return to Error checking mode...

Страница 56: ...ed five times for a total of 75 sec Displays ON or OFF based on the pump s status 3 way valve Turn ON the 3 way valve when the test mode opens By pressing or converts the valve s state from On Off or...

Страница 57: ...t 2 OPR is displayed 6 If there is no button activity for 3 hours the system automatically returns to 2 OPR 24K 28K 34K models Mode Description Display a NORMAL operational condition Operates in Norma...

Страница 58: ...ting the boiler refer to the Troubleshooting section of this manual or contact a TAS 1 In Power off mode press and hold ECO Summer Winter S H DHW buttons for more than 5 sec to initialise the system t...

Страница 59: ...heating DHW or ECO are pressed to indicate that their functions are disabled Heat Demand DIP S W 4 5 Panel OFF OFF OT Room thermostat ON OFF Thermostat OFF ON Panel ON ON 4 7 Error Codes Error Code C...

Страница 60: ...58 NCB Service Manual Version 1 0 4 8 Electrical Diagnostic Contacts and Wiring Diagram...

Страница 61: ...D 3P RED BLACK DC 5 V RED BLACK DC 5 V constant WHITE Feedback WHITE WHITE BLACK DC 0 3 to 3 5 V variable BLACK APS2 CONF1 1 3 4 RED 3P RED BLACK DC 5 V Feedback YELLOW RED BLACK DC 5 V constant YELLO...

Страница 62: ...mance of the unit Fault PCB malfunction Symptoms A system component may not operate and generate an error code In most PCB failures the boiler will not operate until the fault is resolved Error codes...

Страница 63: ...anger will activate the high limit switch Fault Unable to detect high water temperature conditions if the switch malfunctions Symptoms Unable to shut down the boiler if the water temperature from the...

Страница 64: ...Diagnostics 1 Visual inspection Check wire connections are secure and inspect for wire damage 2 Test the resistance of the sensor Before testing shut down the boiler and allow it to cool Testing inspe...

Страница 65: ...oximately 0 rpm 2 A fan assembly screw is loose and or the fan is disassembled 3 Disconnected or defective fan connection terminal assembly Symptoms 1 Erratic combustion 2 Vibration and noise coming f...

Страница 66: ...s 2 Results in multiple unsuccessful ignition attempts Symptoms 1 The boiler does not ignite and error code E003 or E004 is displayed 2 The durability of the igniter reduces Error codes E003 E004 E012...

Страница 67: ...to Symptoms 1 The boiler does not ignite and error code E003 or E004 is displayed 2 Durability of the transformer wears down Error codes E003 E004 Diagnostics 1 Visual inspection Check wire connectio...

Страница 68: ...ns are generated Error codes E110 Diagnostics 1 Visual inspection Check wire connections are secure and inspect for wire damage 2 Voltage test Test the voltage meets the specifications shown below 3 C...

Страница 69: ...supply to prevent unsafe situations Fault Unable to open close Symptoms 1 No flame 2 The boiler does not operate Error codes E003 E012 Diagnostics 1 Visual inspection Check wire connections are secure...

Страница 70: ...he correct level of heat during combustion Fault 1 Unable to initiate or sustain combustion 2 Dust or soot deposits form on the burner s surface 3 Gas leakage from the burner Symptoms 1 Abnormal combu...

Страница 71: ...lt 1 Unable to detect or measure water flow rate 2 Damage to and or leakage from the water flow sensor Symptoms 1 Ignition does not start 2 Boiler operation stops when water leakage is detected Error...

Страница 72: ...stion chamber are used to minimise heat loss Fault 1 Water and or exhaust gas leaks 2 Scale deposits in the heat exchanger can cause water in the boiler to bubble Symptoms 1 Exhaust gas leaks 2 Overhe...

Страница 73: ...inside the combustion chamber which minimises heat loss Fault 1 Water and or exhaust gas leaks 2 Scale deposits in the heat exchanger can cause water in the boiler to bubble Symptoms 1 Exhaust gas lea...

Страница 74: ...t exchanger filters the water in the space heating system to prevent faults in other parts of the heating system Fault 1 Water leaks 2 Low temperature water in the heat exchanger Symptoms DHW leaks an...

Страница 75: ...or measure water flow Symptoms 1 Water inside the boiler system freezes 2 Water temperature fluctuations when the boiler is set to internal recirculation 3 Hot water takes a long time to be available...

Страница 76: ...ode Symptoms DHW supply stops and flow continues in the space heating system when the space heating water temperature is lower than the set point Error codes E016 Diagnostics 1 Visual inspection Check...

Страница 77: ...Unable to detect or measure changes of water pressure Symptoms The water top up system does not operate automatically Error codes E351 E352 E353 Diagnostics 1 Visual inspection Check the circulation p...

Страница 78: ...phases for mixing gases Fault 1 Blades will not close 2 Blades will not open Symptoms 1 Boiler operation starts and stops frequently because of excessive heat supply 2 Set point temperature is not rea...

Страница 79: ...k Item Description Function 1 Removes air from the system during heating 2 Relieves system pressure caused by expansion as the water temperature increases 3 Uses a built in low level water sensor to m...

Страница 80: ...ctivity error Manual reset E110 3 Exhaust blockage Manual reset E127 2 3 APS error open short initial value or no response Auto reset Manual reset CH system E205 2 H E outlet error thermistor open or...

Страница 81: ...re 4 Check the power supply 5 Tighten the ground terminals on the heat exchanger 6 Adjust the anti short cycle time E016 0 Heat exchanger overheat 1 Turn OFF the boiler wait at least 30 min and then r...

Страница 82: ...Check the incoming water pressure and activity at the PRV E352 0 High water pressure 1 Check the feeder valve 2 Check the incoming water pressure and activity at the PRV E353 1 Water pressure sensor o...

Страница 83: ...nections 2 Check the pressure sensor s output voltage E740 1 Outdoor temperature sensor open error appears only when outdoor reset is enabled 1 Ensure that outdoor reset curve is correctly configured...

Страница 84: ...cycle 3 If the overheat error is repeated consecutively three times E001 will be displayed until the boiler is manually reset Checklist 1 Check the operation of the circulation pump Run it in test mo...

Страница 85: ...by debris 2 Identify the type of debris caught in the strainer aluminium oxidised steel etc to help identify the cause of the obstruction Heating or DHW heat exchanger is obstructed 1 Disconnect the i...

Страница 86: ...on transformer ignition state input power AC 230 V 4 Check the operation of the gas control valve DC 24 V coil short circuit solenoid valve 5 Check the flame rod wiring and grounding 6 Check if the ai...

Страница 87: ...NCB Service Manual 85 Version 1 0 Scenario2...

Страница 88: ...e boiler 4 If a CSST connector is used ensure that it has not been overtightened An overtight connection can deform the seal and obstruct the flow of gas 5 Check the class of pressure meter Electrode...

Страница 89: ...cracks in the insulator Adjust the gap if discharge is visible Ensure that the insulating gasket is fitted between the electrode and burner casing Check the input voltage at the ignition transformer...

Страница 90: ...he YELLOW WHITE wires and verify the voltage is DC 24 V 2 If there is no voltage replace the PCB 3 If the voltage is correct check if the coil is open Check the resistance refer to page 67 Check if th...

Страница 91: ...the case Use a multimeter to test the spark current normally 3 4 A Test the spark current connectors Ground connection Flame loss and noise occurs at ignition Check for obstructions in the gas orific...

Страница 92: ...2 Check if a spark of sufficient intensity is discharged by the electrode 3 Check if gas is supplied within the correct pressure range 4 Check the PCB and replace if faulty Testing method Error Cause...

Страница 93: ...Then the system adds the instance to the flame loss count If flame loss occurs 20 times consecutively error code 012E is displayed manually cleared on the front panel Checklist 1 Use a manometer to m...

Страница 94: ...ensure that it has not been overtightened An overtight connection can deform the seal and obstruct the flow of gas 4 Check the gas meter rating Flame loss and noise occurs after ignition PCB DIP switc...

Страница 95: ...Flame loss will occur if the gas orifices in the dual venturi are clogged Remove the gas inlet pipe and check for debris inside the dual venturi Remove and clean the orifice plate if necessary Other...

Страница 96: ...e system displays 016E manually cleared on the front panel The boiler switches to Lock out mode and performs a continuous post purge and starts the circulation pump Checklist 1 Check the overheat cont...

Страница 97: ...is measured at levels lower than it actually is test to confirm if the temperature sensor is faulty Check the output temperature displayed on the front panel 2 Measure the temperature sensor resistanc...

Страница 98: ...eating controller operates when the temperature exceeds 110 C for 10 minutes or over 1 When the controller detects the exceeding temperature of 110 C for 10 minutes or more E030 is displayed and a pos...

Страница 99: ...anger if it is damaged or cannot be unclogged Defective part Defective overheat controller Faulty terminals on the exhaust gas overheat controller 110 C max Check the overheat controller s wiring conn...

Страница 100: ...98 NCB Service Manual Version 1 0 5 2 7 Error 046 Error Conditions and Checklist 5 2 8 Error 047 Error Conditions and Checklist...

Страница 101: ...is disconnected or the dual venturi malfunctions The boiler switches to Lock out mode performs a continuous post purge continuously and starts the circulation pump Checklist 1 Check that the dual vent...

Страница 102: ...n Auto Adjusting is complete 4 Enter the dual venturi test mode and perform a test 1 Repeat the test at least twice Turning the unit ON and OFF once is one test cycle ON OFF ON OFF is the minimum sequ...

Страница 103: ...low speed signal or one that is close to 0 is detected for 3 sec during combustion the system stops combustion and the boiler switches to Lock out mode The air volume sensor should be normal Checklis...

Страница 104: ...w the instructions below to replace the fan 1 Unplug the boiler s power cable and wait 10 sec for all remaining SMPS voltage to completely discharge 2 Disconnect the fan cable and then re connect it 3...

Страница 105: ...e standard value Checklist 1 Check the venturi burner hole for obstruction 2 Check the condensation drain line and drain for obstruction 3 Check the flue and exhaust are installed correctly and have a...

Страница 106: ...lue for damage and obstructions 2 Check if rainwater has accumulated in vertically installed sections of the air intake Exhaust gas enters the air supply pipe If exhaust gas enters the air supply pipe...

Страница 107: ...The sensor is faulty if the resistance is 30 k or higher Replace the temperature sensor if the resistance value is abnormal Check the temperature displayed on the front panel Possible issues Circulat...

Страница 108: ...10 C or lower heat exchanger input temperature sensor is detected the system displays 218E on the front panel If this occurs the boiler initiates shutdown Checklist 1 Check if the heat exchanger input...

Страница 109: ...of the temperature sensor The sensor is faulty if the resistance is 30k or higher Replace the temperature sensor if the resistance value is abnormal refer to page 62 Check the temperature displayed o...

Страница 110: ...atically cancelled if water pressure returns to 0 5 bar or above Checklist 1 Check if the input water pressure sensor is wet for any reason including leakage 2 Check the auto feeder 3 Check the contro...

Страница 111: ...lly cancelled if the water pressure returns to 3 9 bar or lower Checklist 1 Check if the input water pressure sensor is wet for any reason including leakage 2 Check the controller Testing method Fault...

Страница 112: ...ys E353 When this error occurs the boiler shuts down Checklist 1 Check if the input water pressure sensor is wet due to any reason including leakage 2 Replace the water pressure sensor 3 Check the con...

Страница 113: ...or short If an error open 10 C or lower in the DHW Outlet Elbow input temperature sensor is detected the system displays the 407E error on the front panel Check items 1 Check if the hot water temperat...

Страница 114: ...her Replace the temperature sensor if the resistance value is abnormal refer to page 62 Check the temperature displayed on the front panel refer to page 37 Possible Issues Defective PCB If the issues...

Страница 115: ...or short If an error open 10 C or lower in the DHW Outlet Elbow input temperature sensor is detected the system displays the 421E error on the front panel Check items 1 Check if the cold water tempera...

Страница 116: ...the resistance of the temperature sensor Defective if it is 40k or higher Replace the temperature sensor if the resistance value is abnormal refer to page 62 Check the temperature displayed on the fro...

Страница 117: ...3 Check the wire connection 4 Disconnect the ground wire then check the PCB Check method Fault Possible Causes Check method PCB or Electrical supply Defective PCB Replace the PCB if there is an error...

Страница 118: ...s Fault Possible Causes Check method E594 Error Abnormal communicatio n by PCB 1 Click the Reset button on Front panel 2 Turn the POWER to the unit OFF then ON Disconnect then reconnect power if neces...

Страница 119: ...an error under 2 2k or over 122 2k in the outdoor sensor is detected continuously for 3 seconds The system displays the error message E740 on the front panel If this occurs the boiler changes the con...

Страница 120: ...118 NCB Service Manual Version 1 0 5 2 24 782Error Error occurrence conditions and check items...

Страница 121: ...nit at MIN 1 refer to page 55 If noise occurs at standard value adjust setting above below the standard 2 Gas supply error due to defective air pressure sensor 3 If the same error is repeated it is du...

Страница 122: ...d by the boiler The cold water temperature sensor may not be working properly Low hot water temperature Hot water setting error Check the hot water temperature setting on the front panel Water mixed w...

Страница 123: ...main gas valve Check if the wire is fixed and properly attached on the main side of the heat exchanger Normal assembly Short circuit due to defective assembly Wiring near the heat exchanger Circuit b...

Страница 124: ...tc from entering back into the boiler 6 After reassembling check for gas and water leakage Then test for proper ignition Make sure that there is no gas leakage from the gas connections by testing with...

Страница 125: ...arness connections to the PCB should match in colour and pin types Do not use excessive force when removing the connectors as this may cause damage to the PCB 6 2 2 Fuse 1 Turn off the gas supply to t...

Страница 126: ...the assembly 11 Reinstall the fan assembly to the bracket by using the mounting screw 12 Attach the gas valve connection back to the fan assembly by using the 3 screws as shown in figure 6 13 Reconnec...

Страница 127: ...as supply to the unit 2 Disconnect the unit from the power supply 3 Turn off the water supply to the unit 4 Remove the Ignition Transformer insulated cables from the flame rod 5 Refer to figure 9 and...

Страница 128: ...e air pressure sensor hose 10 Connect the air pressure sensor wiring connector 11 Place the front panel back onto the unit and secure it using the 4 screws 12 Turn on water supply power supply and gas...

Страница 129: ...the unit 2 Disconnect the unit from the power supply 3 Turn off the water supply to the unit 4 Remove the pin that secures the condensate drain cap and then remove the cap Use a bucket to collect the...

Страница 130: ...using the four screws 10 Turn on water supply power supply and gas supply to the unit 11 Open a hot water tap and ensure that there are no leaks at the pump connections 12 Open the air vent on top of...

Страница 131: ...t the 3 way valve wire housing 8 Turn on water supply power supply and gas supply to the unit 6 2 12 Water Pressure Sensor 1 Turn off the gas supply to the unit 2 Turn off the 230V power supply to the...

Страница 132: ...igure 16 6 Replace with the new DHW Exchanger 6 2 14 Expansion tank 1 Turn off the gas supply to the unit 2 Turn off the 230V power supply to the unit 3 Turn off the water supply to the unit Drain all...

Страница 133: ...14038A 2 Panel KDC 820 1P NCB CE PANEL 30013543A 3 Panel Bracket Top 20030440A 34 40K NG 20030321A 24 28K NG 4 PCB KDC 820 XM NCB CE MAIN 30013542A 5 Base Clamp 20030601A 6 Air Pressure Sensor APS APS...

Страница 134: ...3 FAN B K FRONT 20022095A 4 FAN B K BACK 20022096A 5 Mixing Chamber 20033575A 24 28K NG 20031254A 34 40K NG 6 Mixing Chamber Packing 20027108A 24 28K NG 20022743A 34 40K NG 7 Burner 30011854A 24 28K N...

Страница 135: ...A 3 Adapter SC OUT 20030566A 4 H E MIDDLE PIPE 30013744A 24 28K NG 30011916A 34 40K NG 5 FLAME ROD ASS Y 30014183A 24 28K NG 30012226A 34 40K NG 6 Adapter COND OUT 20030564A 7 FASTENER F 20007853A 8 a...

Страница 136: ...37A 34K NG 30014538A 40K NG 2 Water Pressure Sensor WPS HUBA TIPO 505 30014542A 3 Air Vent Ass y 30014543A 4 CIR Pump GRUNDFOS UP015 60 CESAO3 30014554A 5 THERMISTOR 30008366A 6 Motor 3way valve 220 2...

Страница 137: ...5 Version 1 0 7 5 Gas Assembly Description Part Remark 1 VENTURY INLET ADP 30009921A 40K NG 2 O RING 20006934A 40K NG 3 Gas Pipe Ass y 30013571A 24 28K NG 30013592A 34K NG 30013604A 40K NG 4 GAS VALVE...

Страница 138: ...01A 24 28 34K NG 3 Inlet Pipe FAN 30013553A 24 28K NG 30013554A 34K NG 30015141A 40K NG 4 Single Venturi 30014044A 24 28 34K NG DUAL Venturi 20022118A 40K NG 5 Orifice NOZZLE 20031101A 40K NG 20031096...

Страница 139: ...the Inlet Water Filter YES NO Cleaning the Return Filter YES NO Checking the Intake Air Filter YES NO Flushing the Heat Exchanger YES NO Replacement of Parts 8 3 Maintenance Schedules Owner maintenanc...

Страница 140: ...138 NCB Service Manual Version 1 0 Memo...

Страница 141: ...NCB Service Manual 139 Version 1 0 Memo...

Страница 142: ...140 NCB Service Manual Version 1 0 Memo...

Страница 143: ...NCB Service Manual 141 Version 1 0 Memo...

Страница 144: ...142 NCB Service Manual Version 1 0 Memo...

Отзывы: