Index
I-2
|
ni.com
peripheral module installation, 2-9
PXI Express system controller installed
in a PXIe-1066DC chassis
(figure), 2-9
PXI trigger bus routing, 2-17
PXI-1 configuration in MAX, 2-16
rack mounting, 2-6
setting fan speed, 2-5
site considerations, 2-2
slot blocker installation, 2-5
testing power up, 2-6
trigger configuration in MAX, 2-17
unpacking the PXIe-1066DC, 1-1
installing a PXI Express system controller
interoperability with CompactPCI, 1-5
K
key features, 1-1
kit contents, 1-1
L
local bus, routing (figure), 1-8
M
main chassis LED behavior (table), 2-13
maintenance of PXIe-1066DC chassis, 3-1
exterior cleaning, 3-2
interior cleaning, 3-1
fan assembly, replacing, 3-6
power supply, replacing, 3-2
preparation, 3-1
service interval, 3-1
static discharge damage (caution), 3-1
O
P
peripheral module installation, 2-9
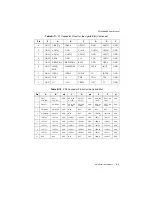
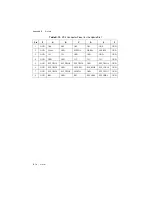
peripheral slot pinouts
P1 connector (table), B-6
P2 connector (table), B-7
pinouts, B-1
power drawer (figure), 3-4
power source, connecting to, 2-6
power supply
connecting to, 2-6
LED behavior (table), 2-14
removing (figure), 3-3
replacing, 3-2
power up, testing, 2-6
power-on test, 2-7
PXI differential star trigger specifications
(PXIe-DSTARA, PXIe-DSTARB,
PXIe-DSTARC), A-8
PXI Express configuration in MAX, 2-15
PXI Express peripheral slots, description, 1-6
PXI Express system controller, 2-7
figure, 2-8
installing in a PXIe-1066DC chassis
PXI local bus, routing, 1-8
PXI peripheral slots, description, 1-6
PXI star trigger specifications, A-8
PXI star, routing, 1-7
PXI-1 configuration in MAX, 2-16
PXIe_DSTAR, routing (figure), 1-7
PXIe_SYNC_CTRL, 1-11
specifications, A-7
using as restart (figure), 1-12
PXIe-1066DC
fan assembly, replacing, 3-6
fan speed, setting, 2-5
front view (figure), 1-3
installation.


