
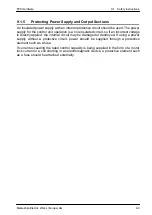


FP0 Hardware
Wiring
9-16
Matsushita Electric Works (Europe) AG
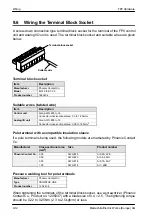
9.8
Wiring the RS232C Port
When using the RS232C port, use the screw-down connection type terminal and the
wire according to the following procedures.
Item
Specification
Baud rate
300/600/1200/2400/4800/9600/19
200bps
Transmission
distance
3m/9.84ft.
Terminal block
Made by Phoenix Contact Co.
(3-pin)
Product number: MKDS 1/3-3.5
Communication
method
half-duplex
Settings when shipped from the factory
These are changed using system registers
412 to 414. The settings in effect when the
unit is shipped from the factory are noted
below.
412
RS232C port is not used.
413
ÁÁÁÁÁÁÁÁÁÁÁÁ
ÁÁÁÁÁÁÁÁÁÁÁÁ
ÁÁÁÁÁÁÁÁÁÁÁÁ
ÁÁÁÁÁÁÁÁÁÁÁÁ
ÁÁÁÁÁÁÁÁÁÁÁÁ
Character bit: 8 bits
Parity check: odd
Stop bit: 1 bit
Header: without STX code
Terminator: CR
414
Baud rate: 9600bps
Suitable wires (twisted wire)
Size: AWG #28 to 16
Conductor cross-sectional area: 0.08 to 1.25mm
2
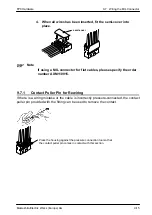
Use a shielded wire of the above wiring. We recommend grounding the shield section.
Also, if using a pole terminal,
When tightening the RS232C port, use a screwdriver (Phoenix Contact Co., Product no.
1205037) with a blade size of 0.4
×
2.5. The tightening torque should be 0.22 to 0.25
Nm (2.3 to 2.5kgfcm) or less.
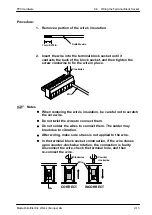
Procedure:
1.
Remove a portion of the wire’s insulation.
7mm/0.276in.
Suitable wire
RS232C port
terminal layout
SG: Signal Ground
RD: Receive Data
SD: Send Data
FP0 Control unit with RS232C port
(FP0 C10CRS/C14CRS/C16CT/C16CP/C32CT/C32CP/T32CP)
Содержание FP Series
Страница 12: ...Chapter 1 Overview...
Страница 21: ...FP0 Hardware Overview 1 10 Matsushita Electric Works Europe AG...
Страница 22: ...Chapter 2 Control Units...
Страница 44: ...Chapter 3 Expansion I O Units...
Страница 67: ...FP0 Hardware Expansion I O Units 3 24 Matsushita Electric Works Europe AG...
Страница 68: ...Chapter 4 Analog I O Unit...
Страница 87: ...FP0 Hardware Analog I O Unit 4 20 Matsushita Electric Works Europe AG...
Страница 88: ...Chapter 5 FP0 I O Link Unit MEWNET F...
Страница 102: ...Chapter 6 Power Supply Unit...
Страница 105: ...FP0 Hardware Power Supply Unit 6 4 Matsushita Electric Works Europe AG...
Страница 106: ...Chapter 7 I O Allocation...
Страница 112: ...Chapter 8 Installation...
Страница 122: ...Chapter 9 Wiring...
Страница 139: ...FP0 Hardware Wiring 9 18 Matsushita Electric Works Europe AG...
Страница 140: ...Chapter 10 Trial Operation...
Страница 143: ...FP0 Hardware Trial Operation 10 4 Matsushita Electric Works Europe AG...
Страница 144: ...Chapter 11 Self Diagnostic and Troubleshooting...
Страница 156: ...Appendix A System Registers...
Страница 170: ...Appendix B Special Internal Relays...
Страница 174: ...Appendix C Special Data Registers...
Страница 183: ...FP0 Hardware Special Data Registers C 10 Matsushita Electric Works Europe AG...
Страница 184: ...Appendix D Dimensions...
Страница 195: ...FP0 Hardware Dimensions D 12 Matsushita Electric Works Europe AG...