background image

ENGLISH

5

INTRODUCTION

GETTING STARTED

WHAT’S IN THE BOX 

Packed with your M33 you will find 

• 

Two detachable mains power cord 

• 

HTRM 2 remote control with 4 AA batteries

• 

Mic Assembly with Ferrite Base 

• 

USB MIC Sound Adaptor 

• 

USB flash drive 

• 

Four pieces of magnetic feet

• 

Cleaning cloth 

• 

Quick Setup Guide 

NOTE 


Follow supplied Quick Setup Guide to help you get started with your 
M33. 

SAVE THE PACKAGING 

Please save the box and the packaging that came with the M33. Should 
you move or need to transport your M33, this is the safest container to use. 
We’ve seen too many otherwise perfect components damaged in transit 
for lack of a proper shipping carton. So please, save that box! 

FACTORY RESET 

Factory Reset is recommended if your M33 is not functioning or internet 
firmware upgrade has failed. All customization including Wi-Fi network 
configuration, file shares and saved playlists or settings will be lost. They 
have to be re-created once factory reset is completed. 

M33 can be factory reset or restored to factory default settings using any of 
the following methods. 

1  Via Front Panel Display 

Go to 

Settings - Other

 menu option and select 

Factory Reset

 to initiate 

restoring of the M33 to factory default settings. Follow the prompt 
commands. 

2  Force Factory Reset 

Press and hold rear panel RESET tact switch and while doing so, turn 
ON the rear panel POWER switch. Do not release hold of the RESET 
tact switch. 

Hold down the RESET tact switch - STATUS INDICATOR (NAD logo) 
alternately blinks red and white.

Release the RESET tact switch as soon as the front panel display 
shows “Factory Reset…” 

Successful Factory Reset is indicated by the unit rebooting. 
-  For wireless connection, M33 returns to Hotspot mode and 
STATUS INDICATOR (NAD logo) indicator turns into solid white. 
-  For wired connection, M33 will simply connect as if it was a new 
player and NAD logo indicator turns into solid white. 

IMPORTANT 


Releasing the Standby button switch at any time before the STATUS 
INDICATOR (NAD logo) begins flashing red will cancel the factory reset 
and leave the M33 at Upgrade Mode. Just start again the procedure for 
Factory Reset.

Содержание M33

Страница 1: ...Owner s Manual ENGLISH BluOS Streaming DAC Amplifier M33 NAD M33...

Страница 2: ...urges and built up static charges Article 810 of the National Electrical Code ANSI NFPA 70 provides information with regard to proper grounding of the mast and supporting structure grounding of the le...

Страница 3: ...g measures Reorient or relocate the receiving antenna Increase the separation between the equipment and receiver Connect the equipment into an outlet on a circuit different from that to which the rece...

Страница 4: ...1 DIRAC LIVE 16 MASTER QUALITY AUTHENTICATED 16 MAKING THE MOST OUT OF YOUR M33 16 USING THE HTRM 2 REMOTE CONTROL 17 CONTROLLING THE M33 17 LEARNING CODES FROM OTHER REMOTES 17 PUNCH THROUGH 18 COPY...

Страница 5: ...eted M33 can be factory reset or restored to factory default settings using any of the following methods 1 Via Front Panel Display Go to Settings Other menu option and select Factory Reset to initiate...

Страница 6: ...d select OK 3 Enter the Player Name you prefer your M33 to be customized for easier identification in the Player Drawer Network setup connection proceeds automatically 4 Network setup connection is co...

Страница 7: ...ch must be set to ON position 2 STATUS INDICATOR NAD LOGO This indicator will be amber when M33 is in standby mode When M33 is powered up from standby mode this indicator will change from amber to sol...

Страница 8: ...he BluOS App 2 HDMI ARC Connect to TV that supports HDMI Control CEC and Audio Return Channel ARC functions Both functions are possible if external devices that also support both features are intercon...

Страница 9: ...t of sources such as CD or BD DVD players digital cable box digital tuners and other applicable components The sources will appear as Optical 1 Optical 2 Coaxial 1 and Coaxial 2 in the navigation draw...

Страница 10: ...y of your M33 20 GROUND TERMINAL Ensure that the M33 is plugged in to a grounded AC wall outlet If necessary use this ground terminal to connect to ground a phono or turntable source for PHONO input I...

Страница 11: ...ARC etc 3 Album art cover 4 Source list is displayed where one can select desired Source to access or playback contents Refer also to SOURCES item below 5 Display Play Queue that was setup via the Blu...

Страница 12: ...ndicator Brightness Adjust NAD logo indicator brightness level from 0 to 2 9 Speaker Output Turn On or Off speaker output 10 Bluetooth Set Bluetooth connection to Manual Automatic Guest or Disable Blu...

Страница 13: ...e library code with 1 to indicate association with IR Channel 1 Load then the AMP library table using the code 1100 Source Setup Select and configure Source 1 Sources Select Source to configure 2 Name...

Страница 14: ...Use the Lip sync delay slider below the A V Mode setting to manually adjust the lower end of this delay to better suit the speed of your network Disabled When your M33 is connected to an audio source...

Страница 15: ...dress MAC Address Ethernet and MAC Address Wi Fi Temperature Left Temperature Right If the internal temperature of either left or right amplifier channel reaches 91 degrees centigrade M33 will turn of...

Страница 16: ...computer programs that may make any noise Download Dirac Live App for Windows macOS and smartphone iOS and Android devices via M33 software download page at nadelectronics com dirac live Launch Dirac...

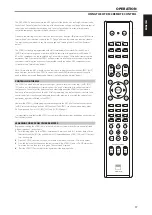
Страница 17: ...keys to a page of commands to control a particular component A Device Select key determines only what component the HTRM 2 will command it does not perform any function on the M33 All of the remainin...

Страница 18: ...again to exit the learning mode COPY A COMMAND FROM ANOTHER KEY You may copy a command from any HTRM 2 key to any other key COPY A KEY FUNCTION 1 Enter Learning Mode 2 Press the key that will contain...

Страница 19: ...teries A short key illumination timeout will extend battery life appreciably turning it off altogether set it to 0 seconds will lengthen it still further CONFIGURING KEY ILLUMINATION Keys to Press for...

Страница 20: ...202 5170 5240 5340 603 L70 L73 BD 203 5325 604 L56 204 5060 605 T513 T514 T515 T517 T524 T533 T534 205 M5 606 L53 BD SEARCH MODE If none of the codes from the table work turn on the component and try...

Страница 21: ...unded end of a pointed tool to push open the pin of the battery cover 2 Open the battery hatch 3 Insert the supplied four AA batteries 4 Push the battery hatch until it clicks close 5 Restore the batt...

Страница 22: ...are protocol Server Message Block SMB USB 1 xType A port for connection to USB memory stick FAT32 or NTFS formatted and supported peripherals Bluetooth quality aptX HD 5 0 Bluetooth connectivity Two W...

Страница 23: ...ENGLISH 23...

Страница 24: ...ENGLISH 24...

Страница 25: ...ENGLISH 25...

Страница 26: ...onal a division of Lenbrook Industries Limited No part of this publication may be reproduced stored or transmitted in any form without the written permission of NAD Electronics International While eve...

Отзывы: