background image

7.0  Knife Installation/Changing 


16


3.  With the knife at its extreme up position, lift the hood. 


4.  Remove the two knife bolts that are mounted in open slots in the knife bar. 


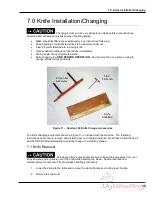
5.  Install the knife lifter onto the knife holder.  Screw the handles into the holes from which the 

two, knife bolts were removed.  Firmly tighten each handle. 


6.  Remove the remaining knife bolts. 


7.  Place an empty knife scabbard on a nearby flat surface. 


8.  Slowly loosen the handles until the knife can be freed from the knife bar.  Move the knife to 

the right or left and remove it from the machine at an angle. 


9.  Place the knife on the scabbard and remove the knife lifter.  Carefully slide the knife to line up 

holes in the knife with holes in the scabbard.  Secure the knife to the scabbard using the 
scabbard screws. 


10.  Send dull knives to a knife grinder – do not attempt to sharpen your own knives!  Knives that 

do not have a minimum height of 1-1/2” (3.8 cm) will not function properly and should be 
carefully discarded.  See the Knife Care Tips Section below for additional information. 


7.2 Knife Installation 

   Knives are always very sharp!  Be sure to keep the edge away from your 

body and keep other people out of the area while handling the blade.  Severe lacerations or 
dismemberment could result from careless handling procedures. 
 

1.  If a knife is currently installed or the top cover is installed, see the previous section for 

instructions on knife removal.  The clamp should be lowered to the table.  The clamp handle 
and top cover should be removed from the machine. 


2.  Raise the hood.  Pull out the cut stick and turn it to a new surface or replace with a new one. 


3.  Remove the retainer screws from the new blade and screw the knife lifters into the new 

blade.  Screw the lifters about half way into the knife. 


4.  Insert the knife assembly into position under the knife bar.  Raise the knife into the knife bar 

slot as high as it will go.  Check all view holes to make sure knife is all the way up.  Tighten 
the lifters. 


NOTE:  If the blade will not go in, make sure the lifters are not screwed into the blade too far. 


5.  Insert and tighten (4) knife bolts into the knife. 


6.  Loosen the knife lifter handles and remove the knife lifter. 


7.  Insert and tighten the remaining (2) knife bolts. 


8.  Reinstall the top cover, clamp handle, and lever-arm handle. 


9.  Adjust depth of cut by placing sheets of paper across the entire width of the cutting area.  

Clamp the paper and make a cut.  Adjust the knife depth adjustment screw just until the 

Содержание Challenge Spartan 150M

Страница 1: ...Instruction Manual Provided By http www MyBinding com http www MyBindingBlog com CHALLENGE SPARTAN 150M PAPER CUTTER...

Страница 2: ...07 SPARTAN 150 M DIGITAL LEVER PAPER CUTTER Sold and Serviced by The Challenge Machinery Company 6125 Norton Center Drive Norton Shores MI 49441 www challengemachinery com Serial Numbers 041001 Up OPE...

Страница 3: ...turn it DIRECTLY TO CHALLENGE If you bought a used machine it is important to have the following information on record at Challenge Copy this page fill in the information and send it care of The Chall...

Страница 4: ...ook Up 9 5 5 Mounting to Optional Stand 9 6 0 Operation 10 6 1 Main Power 10 6 2 Backgauge Control 11 6 3 Jogging Aid 12 6 4 Line Light 13 6 5 Making a Cut 13 6 6 Adjusting the Knife Depth 14 6 7 Oper...

Страница 5: ...rly grounded Be sure there is sufficient power to operate the cutter properly Observe all caution plates mounted on this cutter Keep foreign objects off table and away from cutter blade BE EXTREMELY C...

Страница 6: ...from the machine it should be replaced HAZARDOUS AREA Disconnect power before cleaning servicing or making adjustments not requiring power Do not alter safety guards or devices they are for your prote...

Страница 7: ...das en esta guillotina No permita que objetos estranos esten en la mesa o cerca de la cuchilla cortadora TENGA SUMO CUIDADO al tocar y cambiar la cuchilla Heridas severas y hasta desmembramiento puede...

Страница 8: ...60057 Cutting Stick 1 F 150M O Operator Manual 1 60058 Jogging Aid 1 60061 Knife Lifter Assembly 1 61036 Lever Handle 1 5064 Cut Stick Puller 1 W 189 5 32 Hex T Allen Wrench 1 W 190 1 8 Hex Wrench Sh...

Страница 9: ...th Optional Stand 45 1 4 115 cm Table Height with Optional Stand 36 91 4 cm Overall Length 27 1 4 69 2 cm Overall Width 28 1 8 71 4 cm Approx Net Weight 80 lbs 36 kg Approx Shipping Weight 110 lbs 50...

Страница 10: ...frame and lift it straight up over the cutter Remove the wooden uprights and cut the plastic straps Carefully lift machine off skid and set on to work surface or optional stand see section 5 5 Mounti...

Страница 11: ...E ANY QUESTIONS Figure 3 Machine Controls 6 1 Main Power Power is enabled when the A C adapter is plugged in and when the connector is plugged into the socket at the back left table Figure 4 The displ...

Страница 12: ...ward most position If the backgauge is already at the forward most position move the backgauge back by a few turns then bring it forward again Now the display should show the actual position of the ba...

Страница 13: ...ent with the Spartan 150 This tool allows the operator to load and align paper without the need to place hands or arms under the knife or clamp To use load the paper against the side and backgauge usi...

Страница 14: ...mp hand wheel located on top of the machine Close the front shield Move the red capped knife latch lever and pull the cutting lever to the left Once the cutting lever has moved slightly the knife latc...

Страница 15: ...e sheet If the sheet will be folded be sure grain of the paper is running in the same direction as the fold or you will get a rough edge on the fold If an accurate cut is necessary for close register...

Страница 16: ...ange knives invites accidents Figure 11 Spartan 150 Knife Change Accessories The knife changing equipment shown in Figure 11 is included with the machine The following instructions show how to remove...

Страница 17: ...m your body and keep other people out of the area while handling the blade Severe lacerations or dismemberment could result from careless handling procedures 1 If a knife is currently installed or the...

Страница 18: ...ckly dull the knife blade A knife can last between 2 000 and 5 000 cuts before it needs to be sharpened Cutting soft paper such as newsprint paper or paper with high post consumer recycled content can...

Страница 19: ...rinder If the machine seems to strain but the cut quality is still good reduce the pile height You may also carefully apply glycerin to the bevel when cutting hard coated paper Tie a cloth to the end...

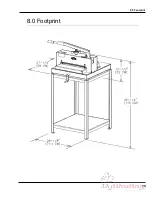
Страница 20: ...8 0 Footprint 19 8 0 Footprint...

Страница 21: ...ightly to the left Attempt to lift the hood The machine requires service if the hood lifts more than approximately 1 inch If the machine fails this test do not use it until a qualified technician has...

Страница 22: ..._ ______ ______ ______ ______ ______ ______ ______ ______ ______ ______ Date ______ ______ ______ ______ ______ ______ ______ ______ ______ ______ ______ Test 1 ______ ______ ______ ______ ______ ____...

Отзывы: