background image

11

EN.

Never obstruct the ventilation openings of the container com-

partment.

Wear protective gloves when handling the hot components.

HOSE AND REGULATOR 

These items are not included with the barbecue. Only use hose 

and regulators approved for LP gas at the above pressures. The 

estimated life expectancy of the regulator is 10 years. Change 

the regulator within 10 years of the date of manufacture. 

The use of the wrong hose or regulator is unsafe; always check 

that you have the correct items before operating the barbecue. 

The hose used must conform to the relevant standard for the 

country of use. The length of the hose must be 1.2 metres 

(maximum) and the inner diameter 10 mm. A worn or dam-

aged hose must be replaced. Ensure that the hose is not bent, 

clogged, or in contact with any part of the barbecue other than 

at its connection. 

Storage of the Barbecue 

Storing the appliance indoors is only permissible if the LP gas 

cylinder is disconnected and removed from the appliance. 

When the appliance is not to be used for a long period of time, 

it should be placed in its original packaging and stored in a dry, 

dust free environment.

LP GAS CYLINDER 

The LP gas cylinder should not be dropped or handled roughly! 

If the barbecue is not in use, the cylinder must be disconnected 

from the appliance. Place the protective cap on the cylinder 

after disconnecting the cylinder from the appliance. 

The LP cylinder must be stored outdoors in an upright position 

and out of the reach of children. The cylinder must never be 

stored in an environment where temperatures can reach over 

50°C. Do not store the cylinder near flames, ignition flames, or 

other sources of ignition. 

DO NOT SMOKE NEAR THE LP GAS CYLINDER.

This barbecue is designed for use outdoors, away from any 

flammable materials. It is important that there are no overhead 

obstructions and that there is a minimum distance of 1 m 

from the side or rear of the appliance. It is important that the 

ventilation openings of the barbecue are not obstructed. The 

barbecue must be used on a level, stable surface. The appliance 

should be protected from direct airflow and shall be positioned 

or protected against direct penetration by any trickling water 

(e.g. rain). 

No modifications should be made to any part of this barbecue 

and repairs and maintenance should only be carried out by a 

registered gas service company. 

Connecting the LP gas cylinder to the barbecue

Before connection, ensure that there is no debris or dirt caught 

in the head of the LP gas cylinder, regulator, burner, and burner 

ports. Spiders and insects can nest within and clog the burner 

and its inlet. A clogged burner can lead to a fire beneath the 

barbecue. 

Clean burner holes with a heavy-duty pipe cleaner. 

Fit the hose to the appliance using a spanner to tighten it 

onto the connection thread. If the hose is replaced, it must be 

secured to the barbecue and regulator connections with hose 

clips. Disconnect the regulator from the cylinder according to 

the directions when the barbecue is not in use. 

The Barbecue must be operated in a well-ventilated area. Do 

not obstruct the flow of combustion air to the burner when the 

barbecue is in use. ONLY USE THIS BARBECUE OUTDOORS.

BEFORE USE, CHECK FOR LEAKS IN THE HOSE AND/OR CONNEC-

TION THREADS.

Never check for leaks with a naked flame, always use a soapy 

water solution.

CHECKING FOR LEAKS 

Make 2-3 fluid ounces (6-9 dl) of leak detecting solution by 

mixing one part dishwashing liquid with 3 parts water. 

Ensure that the control valve is “OFF”. 

Connect the regulator to the LP gas cylinder and ON/OFF valve 

to the burner. Ensure that the connections are secure and then 

turn the gas ON. 

Brush the soapy solution onto the hose and all joints. If bubbles 

appear you have a leak, which must be rectified before use. 

Retest after fixing the fault.

Turn the gas OFF at the LP gas cylinder after testing. 

If leakage is detected and cannot be rectified, consult your gas 

dealer in order to fix the leak.

Содержание 228869

Страница 1: ...SE INSTRUCTIONS CAREFULLY BEFORE ASSEMBLY RETAIN THIS MANUAL FOR FUTURE REFERENCE ET MÕELDUD AINULT VÄLISTINGIMUSTES KASUTAMISEKS ENNE GRILLAHJU KOKKUPANEMIST LUGEGE JUHEND HOOLIKALT LÄBI HOIDKE SEE JUHEND EDASPIDISEKS KASUTAMISEKS ALLES LV LIETOŠANAI ĀRA APSTĀKĻOS PIRMS MONTĀŽAS UZMANĪGI IZLASIET INSTRUKCIJU SAGLABĀJIET ŠO INSTRUKCIJU TURPMĀKAI ATSAUCEI ko0415 LT SKIRTA NAUDOTI TIK LAUKE PRIEŠ SU...

Страница 2: ...saattavat aiheuttaa vakavan palovamman Siirrä kaasuletkut mahdollisimman etäälle kuumista pinnoista ja tippuvasta kuumasta rasvasta Pidä kaikki sähköjohdot etäällä kuumasta savustimesta Sulje kaasupullon kaasunsyöttö käytön jälkeen Älä koskaan peitä säiliöosaston ilmanvaihtoaukkoja Käytä aina suojakäsineitä käsitellessäsi kuumia osia LETKU JA PAINEENSÄÄDIN Eivät sisälly toimitukseen Käytä savustim...

Страница 3: ...la alustalla Savustin täytyy suojata suoralta ilmavirralta ja sijoittaa tai suojata niin ettei sen päälle pääse satamaan tai valumaan vettä millään tavalla Savustimen osiin ei saa tehdä minkäänlaisia muutoksia ja savustimen saa huoltaa tai korjata vain hyväksytty kaasuasennusliike NESTEKAASUPULLON KYTKEMINEN SAVUSTIMEEN Varmista ennen kytkemistä ettei nestekaasupullon suun päällä paineensäätimessä...

Страница 4: ...en Kiinnitä kahva 3 pakkauksen mukana tulleilla ruuveilla 3 Kiinnitä jalat 4 savustuslaatikon 2 alapuolelle 4 Ripusta ohjaustaulu 6 polttimeen 11 ja kiinnitä se pakka uksen mukana tulleilla ruuveilla 5 Polttimen 11 kummassakin sivussa sekä etupuolella on kolme reikää Kiinnitä poltin 11 ruuveilla näistä kohdista savustuslaatikkoon 2 6 Kiinnitä pidike 10 polttimeen 11 ja aseta sen jälkeen puru säili...

Страница 5: ... voi maustaa oman maun mukaan pippurilla paprikalla currylla tai muilla mausteilla Anna sen jälkeen lihan ilmakuivua noin 36 tuntia Toista kylmäsavustus 4 5 kertaa viiden päivän sisällä Ennen lihan leik kaamista sitä on säilytettävä viileässä paikassa ei kuitenkaan jääkaapissa noin kahden viikon ajan Makkara savusta kahdesti älä liota vedessä Juusto savusta vain kerran Siipikarja lohi tai liha voi...

Страница 6: ...tända eller använda sidobrännaren när locket ligger på eftersom detta kan leda till fara och skada röken Använd endast lågtrycksregulator och gasslang som är godkända i användningslandet Om det är nödvändigt att byta ut dessa delar kontakta vår kundtjänst eller din återförsäljare Användning av icke godkända delar i röken kan leda till farliga situationer och en farlig användningsmiljö INFORMATION ...

Страница 7: ... användas på ett plant och stabilt underlag Röken ska skyddas från direkt vind och placeras så att det inte kan regna eller rinna vatten på den på något sätt Inga ändringar får utföras på någon del av röken och reparationer och underhåll får endast utföras av ett godkänt gasinstallationsföretag Anslutning av gasolbehållaren till röken Innan anslutning av gasolbehållaren se till att det inte finns ...

Страница 8: ...dningen Fäst handtaget 3 med de med följande skruvarna 3 Montera benen 4 på undersidan av grillen 2 4 Montera kontrollpanelen 6 på brännaren 11 och fäst den med skruvar 5 På båda sidor samt på framsidan av brännaren 11 finns tre hål Använd dessa för att fästa brännaren 11 i grillen 2 med hjälp av de medföljande skruvarna 6 Sätt stället 10 i brännaren 11 och placera sedan behållaren för rökspån 8 o...

Страница 9: ...tnet flera gånger Efter saltning en kan det saltade köttet kryddas efter egen smak med peppar paprika curry eller andra kryddor Låt sedan köttet lufttorka i ca 1 5 dagar Kallrök köttet 4 till 5 gånger i intervaller om fem dagar Låt sedan hänga kallt i ca 14 dagar ej i kylskåp innan uppskärning Korv röks två gånger utan vattenbad Ost ska endast rökas en gång Fågel lax eller kött kan grillas eller s...

Страница 10: ...ght the appliance with the lid in the closed position Never attempt to light or use the side burner with the lid in the closed position as a hazardous condition could arise and damage can occur to the appliance The low pressure regulator and gas hose must be of a type approved by the country of use If these parts need to be replaced contact your customer service or retailer Using unauthorised part...

Страница 11: ...of 1 m from the side or rear of the appliance It is important that the ventilation openings of the barbecue are not obstructed The barbecue must be used on a level stable surface The appliance should be protected from direct airflow and shall be positioned or protected against direct penetration by any trickling water e g rain No modifications should be made to any part of this barbecue and repair...

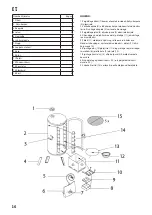
Страница 12: ...he front of the burner 11 Attach the burner 11 through these holes to the smoker box 2 using screws 6 Attach the holder 10 to the burner 11 and then place the smoking dust container and its lid 9 on top of the holder 10 7 Place the base of the drip pan 13 on the lowest level of the smoker box 2 8 Place the drip pan 12 on the base 13 9 Place the 5 wire trays 15 on the desired levels Number Descript...

Страница 13: ...heit Preparing the brine Pour water into a bowl and add a raw potato Add salt until the potato starts to float Place the meat fish in the brine for 2 to 8 days depending on the thickness of the meat Then steep the meat fish in water for 4 20 hours The longer you steep the meat in water the milder the salty taste becomes Change the water several times Salted meat can be seasoned according to your o...

Страница 14: ...lgpõletit süüdata või kasutada su letud kaanega sest see võib tingida ohtliku olukorra või seadet vigastada Kasutage suitsuahjus ainult tootja poolt heakskiidetud ma dalrõhu reguleerimisseadet ja gaasivoolikut Kui neid osasid peab vahetama võtke ühendust klienditeenidu se või edasimüüjaga Mitte heakskiidetud osade kasutamine võib tekitada ohuolu korra ja ohtliku keskkonna MÄRKUS KASUTAJALE Hoidke ...

Страница 15: ...uge et seadme tuulutusavad ei oleks ummistunud Suitsuahju tohib kasutada ainult horisontaalsel stabiilsel pinnal Seadet tuleb kaitsta ot sese tuuletõmbe eest ja see tuleb paigutada kohta kus see on kaitstud igasuguse pealelangeva vee nt vihm eest Suitsuahju mis tahes osade konstruktsiooni ei tohi muuta Suitsuahju võib hooldada ja parandada ainult gaasifirma ohtus spetsialist GAASIBALLOONI ÜHENDAMI...

Страница 16: ...nitage käepide 3 vastavate kruvidega 3 Paigaldage jalad 4 ahju korpuse 2 alumisele küljele 4 Ühendage nüüd juhtimisseade 6 põletiga 11 ja kinnitage see kruvide abil 5 Põleti 11 mõlemal küljel ning selle ees asub kolm ava Nendest ühendage vastavate kruvide abil põleti 11 ahju korpusega 2 6 Riputage alus 10 põletisse 11 ning asetage seejärel saepu ru mahuti 8 ja selle kate 9 alusele 10 7 Riputage ka...

Страница 17: ...leotamist maitsestada pipra paprika karri või teiste maitseainetega Seejärel laske lihal u 1 5 päeva õhu käes kuivada Külmsuitsuta ge liha viiepäevase vahega 4 kuni 5 korda Seejärel laske sellel enne lahti lõikamist u 14 päeva külmas kohas rippuda mitte külmkapis Vorst suitsutada kaks korda mitte leotada Juust suitsutada ainult üks kord Linnuliha lõhe või muud liha võib pärast ühekordset suitsuta ...

Страница 18: ...u ja vāks ir aizvērts Nemēģiniet aizdedzināt vai izmantot sānu degli ja vāks ir aiz vērts jo var rasties bīstama situācija un ierīce var tikt sabojāta Zema spiediena regulatora un gāzes šļūtenes tipam jābūt apstiprinātam izmantošanas valstī Ja šīs detaļas ir jānomaina sazinieties ar klientu servisu vai mazumtirgotāju Neapstiprinātu kūpinātavas detaļu izmantošana var radīt bīsta mu situāciju un ned...

Страница 19: ...t veres Kūpinātava jānovieto uz līdzenas stabilas virsmas Ierīce jāaizsargā no tiešas gaisa plūsmas un jānovieto vai jāaizsargā tā lai tajā tieši nevarētu iekļūt pilošs ūdens piemēram lietus Nevienu šīs kūpinātavas detaļu nav atļauts pārveidot remontu un apkopi drīkst veikt vienīgi reģistrēti gāzes servisa uzņēmumi Sašķidrinātās gāzes balona pievienošana kūpinātavai Pirms pievienošanas pārbaudiet ...

Страница 20: ...sē piemetinā tajā stiprinājumā Ar komplektā esošajām skrūvēm nostipriniet rokturi 3 3 Pie kūpinātavas korpusa 2 pamatnes piestipriniet kājas 4 4 Regulēšanas paneli 6 savienojiet ar degli 11 un nostipriniet ar komplektā esošajām skrūvēm 5 Degļa 11 sānos un priekšpusē ir trīs caurumi Caur šiem caurumiem ar skrūvēm piestipriniet degli 11 pie kūpinātavas korpusa 2 6 Degļa 11 kamerā ievietojiet paliktn...

Страница 21: ...dedziniet degli Kūpināšanas procesā kūpinātavas temperatūra jāuztur 0 30 C robežās Sālījuma sagatavošana ielejiet bļodā ūdeni un ielieciet zaļu kartupeli Pievienojiet sāli līdz kartupelis uzpeld Atkarībā no gaļas zivs biezuma atstājiet gaļu sālījumā 2 8 dienas Tad 4 20 stundas mērcējiet gaļu zivi ūdenī Jo ilgāk gaļu mērcēsiet jo sāļā garša kļūs maigāka Vairākas reizes nomainiet ūdeni Sālītajai gaļ...

Страница 22: ...met neuždekite prietaiso kai dangtis uždarytas Niekuomet nebandykite uždegti ar naudoti šoninio degiklio kai dangtis uždarytas nes gali susidaryti pavojingos sąlygos ir galite sugadinti rūkyklą Mažo slėgio reguliatorius ir dujų žarna turi būti šalyje patvirtin to naudoti tipo Jei reikia šias dalis pakeisti kreipkitės į klientų aptarnavimo tarnybą arba pardavėją Naudodami rūkyklai nepatvirtintas da...

Страница 23: ... sioginio oro srauto jį reikia saugoti nuo vandens pvz lietaus patekimo Negalima keisti jokios šios rūkyklos dalies remontą ir techninę priežiūrą gali atlikti tik registruota dujinės įrangos priežiūros bendrovė SUSKYSTINTŲ DUJŲ BALIONO PRIJUNGIMAS PRIE RŪKY KLOS Prieš prijungdami įsitikinkite ar dujų cilindro galvutėje regulia toriuje degiklyje ar degiklio angose nėra šiukšlių ar purvo Vorai ir va...

Страница 24: ...lį iš išorės privirintą prie rūkyklos talpos Pritvirtinkite rankeną naudodami prideda mus varžtus 3 Prijunkite kojas 4 prie rūkyklos talpos 2 apačios 4 Užkabinkite valdymo skydelį 6 ant degiklio 11 ir pritvirtin kite pridedamais varžtais 5 Degiklis 11 šonuose ir priekyje turi tris skyles Per šias skyles degiklį 11 varžtais pritvirtinkite prie rūkyklos talpos 2 6 Laikiklį 10 prijunkite prie degikli...

Страница 25: ...rėtų būti 0 30 C Sūrymo paruošimas į dubenį įpilkite vandens ir įdėkite žalią bulvę Pilkite druskos kol bulvė ims plūduriuoti Mėsą žuvį sudėkite į sūrymą ir laikykite 2 8 dienas priklauso mai nuo mėsos storio Tada mėsą žuvį 4 20 valandų palai kykite vandenyje Kuo ilgiau mirkysite mėsą vandenyje tuo švelnesnis taps sūrus skonis Kelis kartus pakeiskite vandenį Pasūdytą mėsą pagal skonį galima pagard...

Страница 26: ... вас возникнут вопросы относительно сборки или использования коптильни обратитесь к своему розничному торговцу Убедитесь что при использовании устройства как коптиль ня так и газовый баллон находятся на ровной поверхности в устойчивом положении Никогда не разжигайте огонь при закрытой крышке Никогда не пытайтесь зажечь или включить боковую горел ку при закрытой крышке так как это небезопасно и чре...

Страница 27: ...тильня предназначена для использования на открытом воздухе и на безопасном расстоянии от легковос пламеняющихся материалов Важно чтобы выше коптильни не располагалось никаких предметов и чтобы зазор между сторонами коптильни и ближайшими предметами или кон струкциями был не менее одного метра Ни в коем случае не блокируйте вентиляционные отверстия расположенные на корпусе коптильни Коптильню следу...

Страница 28: ...е коптильной камеры При крепите рукоять 3 используя прилагающиеся винты 3 Прикрепите ножки 4 к нижней части коптильной камеры 2 4 Повесьте панель управления 6 на камеру сгорания 11 и прикрепите её используя прилагающиеся винты 5 На обеих сторонах и передней части камеры сгорания расположено три отверстия 11 Прикрепите камеру сгорания 11 к коптильной камере 2 винтами сквозь эти отверстия 6 Прикрепи...

Страница 29: ...атура внутри печи должна равняться 0 30 градусам по Цельсию Подготовка рассола Налейте воды в миску и положите в неё сырую картофелину Добавляйте соль пока картофе лина не всплывёт Положите мясо или рыбу в рассол на срок от 2 до 8 дней в зависимости от толщины куска Затем положите мясо или рыбу в воду на срок от 4 до 20 часов Чем дольше мясо остаётся в воде тем менее солёным будет его вкус Смените...

Отзывы: