background image

16

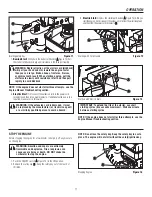
Start the engine as follows: 

1. Check the oil level. See the “Check/Add Oil” section in the ENGINE

MANUAL. 

2. Make sure equipment drive controls are disengaged.

3. Push the ON /OFF switch (A

A, Figure 10) to the ON position.

Starting Engine                                                                                          

Figure 10

4. Insert the safety key (A

A, Figure 11) into the safety key slot and push

fully in to the RUN position. 

5. Turn the choke knob (B

B) fully clockwise if engine is cold.

NOTE: Do not use the choke to start a warm engine.

6. Push the primer button (C

C) two times. 

NOTE: Do not use the primer to start a warm engine.

NOTE: Ensure that electric extension cord is removed from the
power receptacle.

FILL THE FUEL TANK

This engine is certified to operate on gasoline. Exhaust Emission Control
System: EM (Engine Modifications).

Fill the fuel tank with fresh, clean, unleaded regular, unleaded premium, or re-
formulated automotive gasoline with a minimum of 85 octane along with a
fuel stabilizer (follow instructions on fuel stabilizer package). D

DO NOT use

leaded gasoline. We recommend that fuel stabilizer be added to the fuel
each time that gasoline is added to the fuel tank.

NOTE: Winter grade gasoline has higher volatility to improve
starting. Be certain container is clean and free from rust or
other foreign particles. Never use gasoline that may be stale
from long periods of storage in the container.

CAUTION: DO NOT use gasoline containing any
amount of alcohol as it can cause serious damage to
the engine or significantly reduce the performance.

START THE ENGINE

Be sure that engine oil is at FULL mark on the oil fill cap/dipstick. The snow
thrower engine is equipped with an A.C. electric starter and recoil starter. Before
starting the engine, be certain that you have read the following information.

If engine floods, set the choke to the OPEN/RUN position and crank until the en-
gine starts.

WARNING: The electric starter is equipped with a

three−wire power cord and plug designed to operate on AC
house hold current. The power cord must be properly

grounded at all times to avoid the possibility of electric shock
which can cause injury to the operator. Follow all instructions
carefully as set forth:

Make sure your house has a three−wire grounded system.        

If you are not sure, ask a licensed electrician. If your house does
not have a three−wire grounded system, do not use this electric
starter under any condition.

If your house has a three−wire grounded system but a three-hole
receptacle is not available to connect the electric starter, have a
three−hole receptacle installed by a licensed electrician.

WARNING: To connect power cord, always connect the
power cord first to the switch box located on the
engine and then plug the other end into a three−hole
grounded receptacle.

WARNING: To disconnect the power cord, always
unplug the end connected to the three−hole grounded
receptacle first.

WARNING: Gasoline is flammable. Always use
caution when handling or storing gasoline. Turn

engine off and let engine cool at least two minutes before
removing the gas cap. Do not add gasoline to the fuel tank
while snow thrower is running, hot, or when snow thrower
is in an enclosed area.  Keep away from open flame,
electrical sparks and DO NOT SMOKE while filling the fuel
tank. Never fill the fuel tank completely; but fill the fuel
tank to within 1-1/2 inches (3.8 mm) from the top to
provide space for the expansion of the fuel. Always fill fuel
tank outdoors and use a funnel or spout to prevent spilling.
Make sure to wipe up any spilled fuel before starting the
engine. 

Store gasoline in a clean, approved container, and keep
the cap in place on the container. Keep gasoline in a cool
well ventilated place; never in the house. Never buy more
than a 30 day supply of gasoline to assure volatility.
Gasoline is intended to be used as a fuel for internal
combustion engines; therefore, do not use gasoline for any
other purpose. Since many children like the smell of
gasoline, keep it out of their reach because the fumes are
dangerous to inhale, as well as being explosive.

A

OPERATION

Содержание 1695720

Страница 1: ...Manual Part No 1737921 Revision B Rev Date 04 2009 Walk Behind Snow Thrower Mfg No Description 1695720 Dual Stage Snow Thrower 14 5 TP 29 Inch Operator s Manual ...

Страница 2: ... Follow the instructions completely Save these instructions for future reference Where to Find Us You never have to look far to find Briggs Stratton support and service for your snow thrower Consult your Yellow Pages There are over 30 000 Briggs Stratton authorized service dealers worldwide who provide quality service You can also contact Briggs and Strat ton Customer Service by phone at 800 528 5...

Страница 3: ...RVICE RECOMMENDATIONS 19 AFTER EACH USE 19 LUBRICATE AUGER GEAR BOX 20 LUBRICATE AUGER SHAFT FITTINGS 20 CHECK LUBRICATE FREE HAND LINKAGE 20 LUBRICATE CHUTE ROTATION GEAR 20 ADUST THE DRAG ON THE CHUTE ROTATION 20 ENGINE MAINTENANCE 21 CHANGE THE SPARK PLUG 22 ADJUST SKID HEIGHT 23 BELT ADJUSTMENT 24 BELT GUIDE ADJUSTMENT 25 CHECK AND ADJUST THE CABLES 25 EASY TURNTM CABLE ADJUSTMENT 27 AUGER SHE...

Страница 4: ...ards that can result in personal injury Operator s Manual Read and understand before performing any activity or running snow thrower Rotating Impeller Keep a Safe Distance from Snow Thrower Rotating Auger Rotating Gears Never Reach into Rotating Parts Thrown Objects Fire Explosion Shock Toxic Fumes Hot Surface Recommended Ear Protection for Extended Use Shut off engine and remove spark plug connec...

Страница 5: ...wer can result in hazardous operation equipment damage and voiding of the product warranty DANGER Read understand and follow all the instructions on the snow thrower and in the operator s manual before operating this unit Failure to observe the safety instructions in this manual will result in death or serious injury Read the Manual TO SAFELY CLEAR A CLOGGED DISCHARGE CHUTE DANGER Hand contact wit...

Страница 6: ... safety instructions can cause a fire or explosion which will result in severe burns or death Fuel Handling Keep the area of operation clear of all persons particularly small children and pets Thoroughly inspect the area where the snow thrower will be used and remove all doormats sleds boards wires and other foreign objects Do not operate the snow thrower without wearing adequate winter clothing W...

Страница 7: ...e chute or jam in the auger Use extreme caution when operating on or crossing gravel drives walks or roads Adjust the collector housing height to clear gravel or crushed rock surface Never operate the snow thrower near glass enclosures automobiles window wells drop offs and the like without proper adjustment of the discharge chute angle Familiarize yourself with the area in which you plan to opera...

Страница 8: ...hen specifically recommended by the factory WARNING This snow thrower must be properly maintained to ensure safe operation and performance Failure to observe the safety instructions in this manual could result in death or serious injury Maintenance and Storage If there is natural or LP gas leakage in area do not start engine Do not use pressurized starting fluids because vapors are flammable WARNI...

Страница 9: ...XXX XXXXXX XXXXXX IMPORTANT ENGINE INFORMATION BRIGGS STRATTON CORPORATION Part No 278297 Part No 277953 Part No 1737869 Auger Control Decal Part No 1737870 Traction Control Decal 1 2 2 Part No 1738153 Easy TurnTM Traction Control Decal Look for this symbol to indicate important safety precautions This symbol indicates Attention Become Alert Your Safety Is At Risk WARNING I If any safety decals be...

Страница 10: ... Engine Run Stop symbol location SNOW THROWER CONTROLS A Speed Select Lever Allows the operator to use one of six 6 forward and two 2 reverse speeds see Figure 3 To shift move speed select lever to desired position NOTICE Do not move speed select lever while Traction Drive Clutch is engaged This may result in severe damage to drive system ENGINE AND SNOW THROWER CONTROLS NOTICE Read this OPERATOR ...

Страница 11: ...rn chute to left F Skid Shoe Used to adjust ground clearance of auger housing Snow Thrower Controls Figure 3 G Clean Out Tool Used to remove snow and debris from the dis charge chute and the auger housing H Free HandTM Control After engaging the traction control left hand and auger control right hand allows the operator to release the auger control lever to use the other controls I Remote Chute Co...

Страница 12: ...ressure in the tires with an accurate gauge see Figure 4 CAUTION Avoid Injury Explosive separation of tire and rim parts is possible when they are serviced incorrectly Do not attempt to mount a tire without the proper equipment and experience to perform the job Do not inflate the tires above the recommended pressure Do not weld or heat a wheel and tire assembly Heat can cause an increase in air pr...

Страница 13: ...ns CARBON MONOXIDE an ODORLESS and DEADLY GAS Keep hands feet hair and loose clothing away from any moving parts on engine and snow thrower Temperature of muffler and nearby areas can exceed 150 F 66 C Avoid these areas DO NOT allow children or young teenagers to operate or be near snow thrower while it is operating 7 Use the speed select lever E E to select the forward drive speed Set the speed s...

Страница 14: ...M lever auto matically engages both drive wheels for full traction see Figure 7 NOTE The Easy TurnTM will be more difficult to activate under a heavy load Activate the lever before beginning a turn Easy TurnTM Control Figure 6 Full Traction Figure 7 Traction Lock Pins Figure 8 A A TRACTION LOCK PINS The right traction wheel can be completely released using the locking pin A A Figure 8 This allows ...

Страница 15: ...necessary add oil until the oil reaches the FULL mark on the oil fill cap dipstick Do not add too much oil 6 Tighten the oil fill cap dipstick securely each time you check the oil level NOTE For extreme cold operating conditions of 0 F 18 C and below use a synthetic 5W30 motor oil for easier starting NOTE S A E 5W30 motor oil may be used to make starting easier in areas where the temperature is 20...

Страница 16: ...ug designed to operate on AC house hold current The power cord must be properly grounded at all times to avoid the possibility of electric shock which can cause injury to the operator Follow all instructions carefully as set forth Make sure your house has a three wire grounded system If you are not sure ask a licensed electrician If your house does not have a three wire grounded system do not use ...

Страница 17: ...rson to avoid a hazard Starting with Electric Start Figure 13 IMPORTANT To extend the life of the starter use short starting cycles five seconds maximum Wait one minute between starting cycles NOTE If the engine does not start after three attempts see the Engine Manual Troubleshooting section Starting with Cord Handle Figure 12 A B C A B STOP THE ENGINE Before stopping the engine for a few minutes...

Страница 18: ... Adjust Skid Height in the MAINTENANCE section of this manual Rocks and gravel must not be picked up and thrown by the machine 6 After the snowthrowing job has been completed allow the engine to idle for a few minutes to melt snow and ice accumulated on the engine 7 Clean the snow thrower thoroughly after each use 8 Remove ice and snow accumulation and all debris from the entire snow thrower and f...

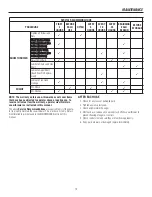
Страница 19: ...ot cover items that have been subjected to operator abuse or negligence To receive full value from the warranty operator must maintain snow thrower as instructed in this manual The above Service Recommendations are supplied to assist the opera tor to properly maintain the snow thrower This is a check list only Adjust ment referred to will be found in the MAINTENANCE section of this manual AFTER EA...

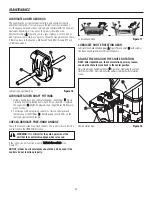
Страница 20: ... pins and lubricate auger shaft fittings B B Rotate augers several times on the shaft and reinstall the shear pins CHECK LUBRICATE FREE HAND LINKAGE Check the function of the Free Hand controls The controls should function as described in the OPERATION section WARNING It is critical for the safe operation of the unit that the controls disengage when released If the controls do not function properl...

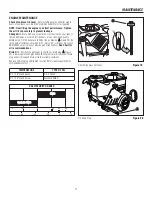
Страница 21: ...dipstick A A Figure 19 Be sure original container is marked A P I service SF or higher Do not use SAE10W40 oil as it may not provide proper lubrication See Chart for oil recommendations Drain Oil Position snow thrower so that the oil drain plug A A Figure 20 is lowest point on engine When the engine is warm remove oil drain plug and oil fill cap and drain oil into a suitable container Replace oil ...

Страница 22: ...ow hood first make sure that the primer button hose and the ignition wire are connected 7 Mount the snow hood to the engine and secure with the mounting screws 8 Connect the choke control knob A A Figure 23 with the choke shaft on the carburetor B B Make sure the choke control knob is properly installed If the choke control knob is not installed correctly the choke will not operate 9 Install the s...

Страница 23: ...id Height Figure 25 A B WARNING Be certain to maintain proper ground clearance for your particular area to be cleared Objects such as gravel rocks or other debris if struck by the impeller may be thrown with sufficient force to cause personal injury property damage or damage to the snow thrower Check and Replace Spark Plug Check the spark plug every twenty five 25 hours Replace the spark plug Figu...

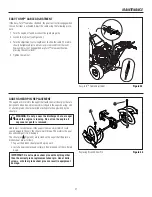
Страница 24: ...ft the lever and cause the auger drive to be engaged without depressing the auger control 4 Tighten nut 5 With the aid of an assistant engage the auger drive clutch Check ten sion on belt which is opposite idler pulley B B Figure 27 Belt should deflect about 1 2 inch 12 5 mm with moderate pressure You may have to move idler pulley more than once to obtain the correct ten sion 6 Release the auger d...

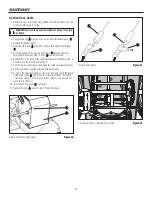
Страница 25: ... auger drive control lever released the hook A A Figure 29 should barely touch the lever B B without raising it There can be a maximum of 1 32 0 8 mm clearance 2 To adjust loosen the nut C C by holding the adjusting flats D D and turning the nut Then turn the adjusting flats and hold the adjust ment screw E E The adjustment screw is a phillips screw and the head can be held or turned by inserting ...

Страница 26: ...e Z hook from the cable adjustment bracket Move the Z hook down to the next adjustment hole 7 Pull the traction drive cable up through the cable adjustment bracket 8 Put the cable boot over the cable adjustment bracket 9 To check the adjustment depress the drive lever and check the length of the drive spring A A Figure 32 In correct adjustment the length of the drive spring is a minimum 3 inches 7...

Страница 27: ...ear pin with a pin punch 2 Install a new shear pin and cotter pin Bend the ends of the cotter pin down IMPORTANT Do not replace shear pins with anything other than the correct grade replacement shear pin Use of bolts screws or harder grade shear pins can result in equipment damage Replacing Broken Shear Pin Figure 34 A A Easy TurnTM Cable Adjustment Figure 33 EASY TURN CABLE ADJUSTMENT If the Easy...

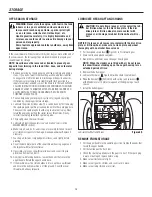
Страница 28: ...tened Inspect all visible moving parts for damage breakage and wear Replace if necessary 7 Touch up all rusted or chipped paint surfaces sand lightly before painting 8 Cover the bare metal parts of the snow thrower housing auger and the impeller with rust preventative 9 If possible store your snow thrower indoors and cover it to give protection from dust and dirt 10 On models with folding handles ...

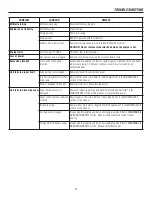
Страница 29: ...lace drive belt See authorized dealer Incorrect adjustment of traction drive cable Adjust traction drive cable Refer to Cable Adjustment in the MAINTENANCE section of this manual Worn or damaged friction disc Replace friction disc See authorized dealer Unit fails to discharge snow Auger drive belt loose or damaged Replace or adjust auger drive belt Refer to Drive Belt Adjustment in the MAINTENANCE...

Страница 30: ...nd or workmanship only To avoid misunderstanding which might occur between the customer and the Dealer listed below are some of the causes of product failure that the warranty does not cover Normal Wear Small Engine Powered Equipment like all mechanical devices needs periodic parts and service to perform well Warranty does not cover repair when normal use has exhausted the life of the product or p...

Страница 31: ...ine is originally purchased The warranty on emissions related parts is as follows Any warranted part that is not scheduled for replacement as required maintenance in the owner s manual supplied is warranted for the warranty period stated above If any such part fails during the period of warranty coverage the part will be repaired or replaced by B S at no charge to the owner Any such part repaired ...

Страница 32: ...abeled in accordance with SAE Society of Automotive Engineers code J1940 Small Engine Power Torque Rating Procedure and rating performance has been obtained and corrected in accordance with SAE J1995 Revision 2002 05 Torque values are derived at 3060 RPM horsepower values are derived at 3600 RPM Actual gross en gine power will be lower and is affected by among other things ambient operating condit...

Страница 33: ...33 ...

Страница 34: ......

Страница 35: ...Manuel n 1737921 Rév B Rev Date 04 2009 Manuel d Utilisation Souffleuses à neige à pousser Réf fab Description 1695720 Souffleuse à neige à double détente 14 5 TP 29 po ...

Страница 36: ...illez suivre attentivement les directives Sauvegardez ces instructions pour votre référence Où nous trouver Vous n avez pas besoin de chercher bien loin pour trouver le support et service Briggs Stratton pour votre souffleuse à neige Consultez les Pages jaunes Il y a plus de 30 000 distributeurs autorisés Briggs Stratton dans le monde entier qui offrent un service de qualité Vous pouvez également c...

Страница 37: ...ISATION 19 GRAISSAGE DE LA BOÎTE D ENGRENAGE DE VIS SANS FIN 20 GRAISSAGE DE L ARBRE DE VIS SANS FIN 20 CONTRÔLER LUBRIFIER LA TRINGLERIE MAIN LIBRE 20 LUBRIFIER LE PIGNON DE ROTATION DE GOULOTTE 20 RÉGLER LE TIRAGE SUR LA GOULOTTE DE ROTATION 20 ENTRETIEN DU MOTEUR 21 CHANGER LA BOUGIE D ALLUMAGE 22 RÉGLAGE LA HAUTEUR DES PATINS 23 AJUSTEMENT DES COURROIES 24 AJUSTEMENT DU GUIDE DE COURROIE 25 CO...

Страница 38: ...ute activité ou de faire fonctionner la souffleuse à neige Turbine rotative Maintenez la souffleuse à neige à une distance de sécurité Tarière rotative Engrenages rotatifs Ne cherchez jamais à atteindre les éléments rotatifs Objets projetés Incendie Explosion Choc Gaz toxiques Surface chaude Protection des oreilles recommandée pour une utilisation prolongée Arrêtez le moteur et retirez le connecte...

Страница 39: ...îner un fonctionnement dangereux endommager l équipement et annuler la garantie du produit DANGER Lisez comprenez et suivez toutes les instructions sur la souffleuse à neige et dans le manuel de l utilisateur avant d utiliser cette unité Le fait de ne pas observer les instructions de sécuritédans ce manuel provoquera de graves blessures voire la mort Lecture du Manuel POUR DÉBLOQUER EN TOUTE SÉCUR...

Страница 40: ...s vapeurs sont extrêmement inflammables et explosifs Manipulez toujours avec extrême soin Le fait de ne pas observer ces instructions de sécurité peut causer un incendie ou une explosion entraînant de graves brûlures voire la mort Manipulation de carburant Maintenez la zone d intervention débarrassée de toutes personnes en particulier des petits enfants et des animaux domestiques Inspectez attenti...

Страница 41: ...preuve d une extrême prudence lorsque vous utilisez la souffleuse ou lui faites traverser des chemins des allées ou des routes de gravier Réglez la hauteur du carter du collecteur pour déblayer les surfaces en gravier ou en pierre concassée N utilisez jamais la souffleuse à neige près d enceintes vitrées d automobiles de puits de fenêtre de fossés et de tout ce qui peut s y comparer sans avoir pro...

Страница 42: ...assurer un fonctionnement et des performances en toute 0 Le fait de ne pas observer les instructions de sécurité de ce manuel provoquera de graves blessures voire même la mort Entretien et remisage S il y a une fuite de gaz naturel ou de GPL dans les environs ne démarrez pas le moteur N utilisez pas de fluides de démarrage sous pression en raison de l inflammabilité des vapeurs AVERTISSEMENT Le dé...

Страница 43: ...T ENGINE INFORMATION BRIGGS STRATTON CORPORATION Réf 278297 Réf 277953 Réf 1737869 Étiquette de la commande de tarière Réf 1737870 Étiquette de la com mande de traction 1 2 2 Réf 1738153 Étiquette Easy Turn tm de la traction Ce symbole signale des consignes de sécurité importantes Il signifie Attention Prenez garde Votre sécurité est menacée AVERTISSEMENT Si des étiquettes de sécurité sont usées o...

Страница 44: ...n bouchon H Bouchon d huile I Marche Arrêt du moteur emplacement du symbole COMMANDES DE LA SOUFFLEUSE À NEIGE A Levier du sélecteur de vitesse Permet de choisir un rapport de vitesse parmi les six 6 en marche avant et deux 2 en marche arrière voir Figure 3 Pour changer de vitesse amener le levier du sélecteur de vitesse jusqu à la position souhaitée REMARQUE Ne pas déplacer le levier de vitesse a...

Страница 45: ...goulotte vers la gauche Commandes de la soufleuse à neige Figure 3 F Patin Sert à ajuster la hauteur au sol du carter de vis sans fin G Outil de nettoyage Sert à enlever la neige et les débris de la goulotte d éjection et du carter de la tarière H Commande Free Hand tm manuelle Permet à l opérateur de relâcher le levier de commande de tarière afin d utiliser les autres contrôles après l engagement...

Страница 46: ...xplosion Soudage structurellement peuvent affaiblir ou déformer la roue Ne pas en avant ou sur le pneu lorsqu un gonfler Utilisez un approprier outil vous permettre un stand à côté REMARQUE Vérifier la pression de gonflage maximale sur le flanc du pneu NE PAS dépasser le maximum Vérifier la pression d air des pneus Figure 4 AVANT D UTILISATION SOUFFLEUSE À NEIGE Contrôler la visserie Vérifier que ...

Страница 47: ...rer dangereuse Ne jamais utiliser la souffleuse à neige sans tous es capots grilles et autres protections en place Ne jamais diriger l éjection vers des fenêtres ni laisser des personnes s approcher de la machine alors que le moteur est en marche Toujours arrêter le moteur avant de quitter la position de conduite Débrancher la bougie avant de déboucher le carter de vis sans fin ou la goulotte d éj...

Страница 48: ...enir à la traction normale voir Figure 7 REMARQUE Le levier Easy Turn tm est plus difficile à action ner en présence de charge importante Actionner ce levier avant de commencer à tourner Levier Easy Turn tm engagé Figure 6 Levier Easy Turn tm relâché Figure 7 Traction goupille de sûreté Figure 8 A TRACTION GOUPILLE DE SÛRETÉ Le droit de traction des roues peut être complètement libéré en utilisant...

Страница 49: ...cas échéant ajouter de l huile jusqu au repère FULL Plein sur le bouchon jauge d huile Ne pas ajouter trop d huile 6 Bien serrer le bouchon jauge d huile après chaque contrôle du niveau d huile REMARQUE Par très grand froid au dessous de 18 C 0 F utiliser une huile moteur 5W30 synthétique pour faciliter le démarrage REMARQUE L huile moteur S A E 5W30 peut être utilisée pour faciliter le démarrage ...

Страница 50: ...avec terre ne pas utiliser le démarreur électrique Si la maison comporte un circuit électrique à trois fils avec terre mais qu aucune prise n est disponible pour brancher le démarreur électrique faire installer une prise avec terre par un électricien agréé AVERTISSEMENT Pour brancher le cordon d alimentation toujours raccorder d abord le cordon au boîtier de commutateur sur le moteur puis brancher...

Страница 51: ... danger A B C Poignée du cordon de lanceur Figure 12 A Démarrage électrique Figure 13 A B ARRÊTER LE MOTEUR Faire tourner le moteur pendant quelques minutes pour faire évaporer toute humidité présente sur le moteur AVERTISSEMENT L essence et ses vapeurs sont extrêmement inflammables et explosives Le feu ou l explosion peuvent provoquer des brûlures graves ou la mort NE PAS utiliser le starter pour...

Страница 52: ... après chaque utilisation 8 Nettoyer les dépôts de neige et tous les débris de l ensemble de la souffleuse à neige puis la rincer à l eau si possible pour éliminer tout le sel et autres substances chimiques Essuyer la souffleuse à neige 9 Avant de démarrer la souffleuse à neige toujours vérifier l absence dans la vis sans fin et la turbine de glace ou de débris susceptibles d endommager la machine...

Страница 53: ... ne couvre pas les éléments ayant subi un emploi abusif ou des négligences Pour bénéficier pleinement de la garantie veiller à entretenir la souffleuse à neige conformément aux instructions de ce manuel Les Conseils d entretien ci dessus ont pour objet de permettre un entretien correct de la souffleuse à neige Il ne s agit que d une liste récapitulative Les réglages mentionnés sont décrits dans la...

Страница 54: ...pilles de cisaillement déposer les goupilles et lubrifier les graisseurs zerk de l arbre de vis sans fin B B Faire tourner la vis sans fin plusieurs fois sur son arbre et remettre les goupilles de cisaillement en place CONTRÔLER LUBRIFIER LA TRINGLERIE MAIN LIBRE Vérifier le fonctionnement des commandes main libre Les commandes doivent fonctionner conformément aux indications de la section UTILISA...

Страница 55: ... l huile a un indice A P I SF ou supérieur Ne pas utiliser d huile SAE 10W40 car la lubrification peut être insuffisante Voir les huiles recommandées dans le tableau ci contre Vidanger l huile Placer la souffleuse à neige de telle façon que le bouchon de vidange d huile soit au point le plus bas Lorsque le moteur est chaud déposer le bouchon de vidange et le bouchon de remplissage et vidanger l hu...

Страница 56: ...le tuyau du bouton d amorçage et le câble d allumage sont branchés 7 Poser le capot à neige sur le moteur et l attacher avec les vis de fixation 8 Raccorder le bouton de commande de starter A A Figure 23 à l arbre de starter sur le carburateur B B Vérifier que le bouton de commande de starter est correctement remonté Si le bouton de commande de starter n est pas posé correctement le starter ne fon...

Страница 57: ...es les vingt cinq 25 heures de marche Changer la bouge Figure 24 si les électrodes sont piquées ou brûlées ou si la porcelaine est fissurée 1 Déposer le capot à neige Voir la section DÉPOSER LE CAPOT À NEIGE 2 Nettoyer la bougie et régler l écartement à intervalles réguliers 3 Nettoyer la surface qui entoure la base de la bougie avant de la déposer afin d éviter de faire tomber de la saleté dans l...

Страница 58: ...VERTISSEMENT Ne pas trop serrer car cela peut relever le levier et forcer l engagement de l entraînement de vis sans fin alors que la commande de vis sans fin n est pas actionnée 4 Serrer l écrou 5 Avec l aide d un assistant engager l embrayage de vis sans fin B B Figure 27 Vérifier la tension sur la courroie du côté opposé au galet tendeur La courroie doit fléchir d environ 12 5 mm 1 2 pouce sous...

Страница 59: ...it à peine toucher le levier B B sans le relever Il peut y avoir un espacement de 0 8 mm 1 32 pouce maximum 2 Pour ajuster desserrer l écrou C C en tenant le manchon à méplats D D tout en faisant tourner l écrou Ensuite faire tourner le manchon à méplats en tenant la vis de réglage E E La vis de réglage est une vis cruciforme et sa tête peut être tenue ou tournée avec un tournevis introduit à trav...

Страница 60: ...le crochet en Z de la ferrure de réglage de câble Placer le crochet en Z dans le trou de réglage suivant 7 Tirer le câble de commande de traction vers l arrière de la ferrure de réglage de câble 8 Remettre la gaine de câble sur la ferrure de réglage de câble 9 Pour vérifier le réglage serrer le levier de commande et observer la longueur du ressort de commande A A Figure 32 Lorsque le réglage est c...

Страница 61: ... cassée de la manière suivante 1 Extraire la goupille de cisaillement cassée avec un chasse goupille 2 Poser une goupille de cisaillement neuve et une goupille fendue Rabattre les extrémités de la goupille fendue IMPORTANT Ne pas remplacer les goupilles de cisaillement par quoi que ce soit d autre que des goupilles de cisaillement de rechange de dureté correcte L emploi de boulons de vis ou de gou...

Страница 62: ...l de l état et du degré d usure de toutes les pièces mobiles visibles Les changer le cas échéant 7 Retoucher toutes les surfaces peintes rouillées ou écaillées poncer légèrement avant de peindre 8 Couvrir toutes les parties métalliques nues du carter de vis sans fin et de la turbine de la souffleuse à neige d un produit antirouille 9 Si possible remiser la souffleuse à neige à l intérieur et la co...

Страница 63: ...uteur homologué Réglage incorrect du câble de commande de traction Régler le câble de commande de traction Se reporter à Contrôle et réglage des câbles dans la section ENTRETIEN de ce manuel Roue de friction usée ou endommagée Changer la roue de friction Consulter le distributeur homologué La machine n éjecte pas la neige Courroie de vis sans fin détendue ou endommagée Changer ou ajuster la courro...

Страница 64: ...er tout malentendu susceptible entre le client et le concessionnaire une liste de certaines causes de défaillances de produit non couvertes par la garantie figure ci dessous Usure normale Le petit matériel motorisé tel que tous les dispositifs mécaniques nécessite des pièces et un service périodiques pour une bonne performance La garantie ne couvre pas les réparations lorsque l usure normale a épu...

Страница 65: ... Board qu il est exempt de tout défaut de matière ou de construction susceptible d entraîner la défaillance d une pièce garantie et qu il est matériellement identique en tous points au moteur décrit dans la demande de certification du fabricant La période de garantie démarre à la date de l achat initial du moteur La garantie sur les pièces liées aux émissions est comme suit Toute pièce garantie do...

Страница 66: ...est indiquée conformément au code J1940 procédure de calcul de la puissance et du couple des petits moteurs de la SAE Society of Automotive Engineers et les performances théoriques ont été obtenues et corrigées selon SAE J1995 révision 2002 05 Les valeurs de couple sont calculées sur la base de 3060 tr min et celles de puissance sur la base de 3600 tr min La puissance brute réelle du moteur peut ê...

Страница 67: ...33 ...

Страница 68: ......

Отзывы: