background image

1
2
3
4
5
6

7

Device Settings

Registering Destinations    7-7

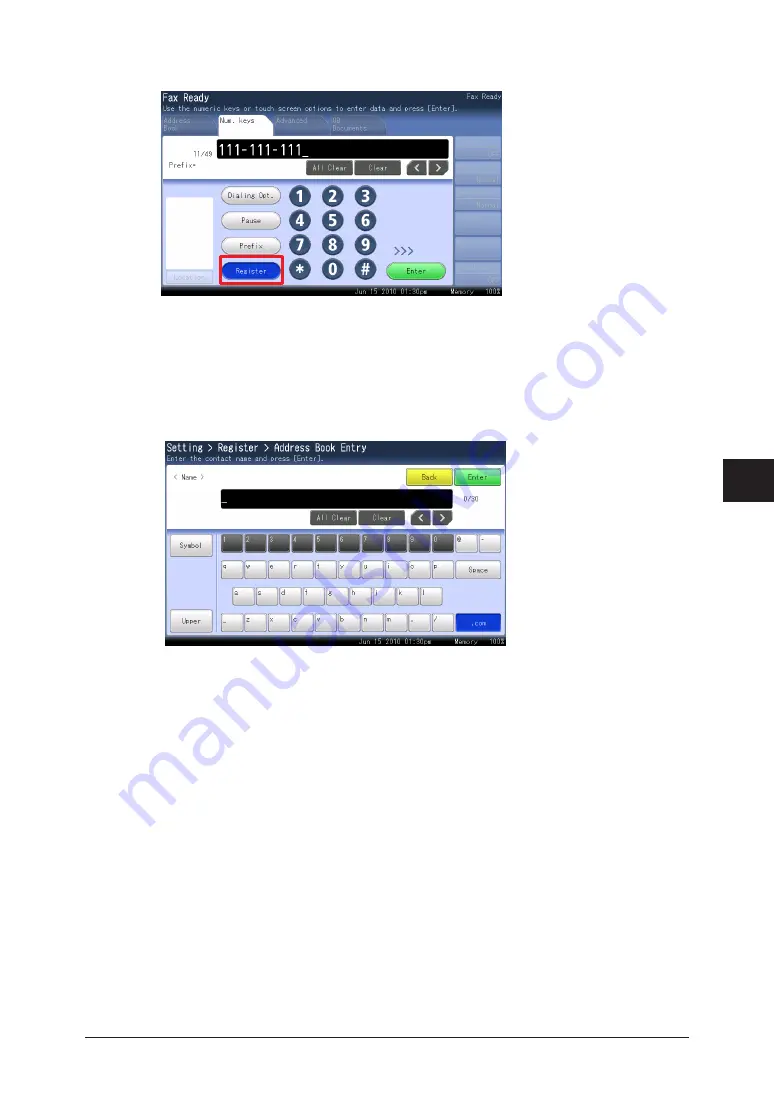
Press [Register].

I

f “Mode 1” is set for the pin mode, Use the numeric keys to enter the PIN. Then 

press [Enter].

Otherwise proceed to step 6.

Enter the name, and press [Enter].


Up to 30 characters can be entered.

The procedure is then the same as for registering an address book destination. 

Continue from step 10 of “ 

Registering / Editing

(See page 7-5.)


„

Useful Registration Method 3   
Registering an Entered E-mail Address

Press <Scan> or <Fax>.

Press the [Advanced] tab.

Press [Mail Address].

Содержание MFX-2590

Страница 1: ...Scanner and Fax Guide Plain paper digital Fax Copier Printer Scanner Please read this guide before operating this machine After you finish reading this guide keep it handy for easy reference ...

Страница 2: ...pter 1 Basic Scan Functions Chapter 2 Advanced Scan Functions Chapter 3 Basic Fax Functions Chapter 4 Advanced Fax Functions Chapter 5 Specifying Destinations Chapter 6 Communication Management Chapter 7 Device Settings ...

Страница 3: ...d Functions 2 2 Advanced Scan Features 2 4 Checking a Scanned Image Preview 2 4 Specifying the Scan Size Scan Size 2 6 Zoom Scanning Zoom 2 7 Transmitting to Multiple Destinations Broadcast 2 9 Scanning the Next Document Next Doc 2 11 Duplex Scan 2 12 Adjusting the Scan Color Color Adjustment 2 14 Editing the Message for Transmission E Mail Subject 2 22 Setting the File Name File Name 2 25 Transmi...

Страница 4: ... Numeric Keys 3 41 Making a Phone Call 3 43 Making a Phone Call 3 43 Receiving a Phone Call 3 44 Adjusting the Speaker Volume 3 44 Transmitting Faxes from a Computer 3 45 Transmitting With the Simple Mode 3 45 Transmitting With the Advanced Mode 3 51 Internet Fax Transmission Internet Fax 3 59 Transmitting Internet Faxes 3 59 Receiving Internet Faxes 3 61 Chapter 4 Advanced Fax Functions Introduct...

Страница 5: ...t 4 71 Useful Internet Fax Functions 4 72 Editing the Message for Transmission e mail Subject 4 72 Transmitting Scanned Data as Individual Files Batch Transmission 4 75 Selecting the File Format File Format 4 76 Offramp Transmission 4 77 Creating a TIFF File for an Internet Fax 4 78 Chapter 5 Specifying Destinations Specifying Destinations 5 2 Selecting from the Address Book 5 2 Searching for Serv...

Страница 6: ...stering a Color Printer 7 25 Registering Favorite Destinations 7 31 Specifying Default Settings 7 34 Specifying Default Scanner Settings 7 34 Specifying Default E mail Transmission Settings 7 38 Specifying Default Fax Settings 7 41 Registering Other Settings 7 45 Registering Editing Templates 7 45 Registering Editing File Names 7 48 Registering Editing Document Categories 7 50 Registering Editing ...

Страница 7: ...jury if you handle the machine incorrectly For safe operation please follow instructions carefully Caution Notes a caution to protect yourself and others from personal injury or damage to properties if you handle the machine incorrectly For safe operation please follow instructions carefully IMPORTANT Describes important conditions or restrictions you should carefully observe to avoid problems cau...

Страница 8: ...anel are shown in and the key names on the touch panel are in Keys on the control panel Enclosed in for example Job Confirm Fax Cancel Touch panel keys Enclosed in for example Auto Screens This manual uses the screens of the MFX 2590 standard model unless otherwise stated The screens you see may differ depending on the options installed ...

Страница 9: ...viii How to Read This Manual ...

Страница 10: ...Shared PC Folder 1 4 Scanning to a User 1 7 Scanning to USB Memory 1 9 Scanning to an FTP Server 1 12 Scanning to a Printer 1 16 Basic Scan Settings 1 19 Setting the Document Type 1 19 Setting the Contrast 1 20 Setting the Resolution 1 21 Setting the Scan Format 1 22 Scanning on the Basic View 1 24 ...

Страница 11: ...et Load the document and press Scan 11 For details on loading documents refer to Chapter 1 Loading Documents in the User s Guide Set the document type contrast and resolution as necessary See page 1 19 Change the file format 22 see page 2 30 and specify advanced settings such as entering a message see page 2 22 as necessary Press the Send to E mail tab 33 ...

Страница 12: ...om the address book this step is not required If you loaded the document in the ADF this concludes the procedure If you loaded the document on the document glass load the next document and 66 press Next Doc To finish scanning press Complete Repeat step 6 to scan all the documents 77 To finish scanning press Complete Note You can register often used destinations in the Faves Destination tab See pag...

Страница 13: ...egister must have shared folder settings specified on the computer you are using in advance Load the document and press Scan 11 For details on loading documents refer to Chapter 1 Loading Documents in the User s Guide Set the document type contrast and resolution as necessary See page 1 19 Specify advanced settings such as changing the file format as necessary 22 See page 2 4 ...

Страница 14: ...n registered as a shortcut in advance select it from the list of shortcuts If the target folder is registered in the Faves Destination tab you can select it from the Faves Destination tab Specify the shared folder to save the data to and press Enter 55 Press Root to return to the list of networks Press Back to return to the previous screen Press Cancel to close the screen ...

Страница 15: ...document and 88 press Next Doc To finish scanning press Complete Repeat step 8 to scan all the documents 99 To finish scanning press Complete Note You can register often used destinations in the Faves Destination tab See page 7 31 For details on registering shortcuts refer to Registering Editing Folder Shortcuts see page 7 15 or Registering Shortcuts in Chapter 3 of the OfficeBridge Guide You can ...

Страница 16: ...es These are the boxes that belong to each registered user Shared box This is the shared box that all users can use Inside the memory of the machine Box for User A Shared box Box for User B User A User B Download Network E mail Load the document and press Scan 11 For details on loading documents refer to Chapter 1 Loading Documents in the User s Guide Set the document type contrast and resolution ...

Страница 17: ...can also select a destination from the Faves Destination tab If you loaded the document in the ADF this concludes the procedure If you loaded the document on the document glass load the next document and 55 press Next Doc To finish scanning press Complete Repeat step 5 to scan all the documents 66 To finish scanning press Complete Note You can register often used destinations in the Faves Destinat...

Страница 18: ...ot meet the USB standards are all unsupported If the USB memory becomes full while the data is being saved the data that is being written is all deleted Therefore make sure that the USB memory has enough free space in advance If you want to connect the USB memory via an extension cable use a cable that is shorter than 3 meters Load the document and press Scan 11 For details on loading documents re...

Страница 19: ...essary 44 See page 2 4 Press Start 55 If you loaded the document in the ADF this concludes the procedure If you loaded the document on the document glass load the next document and 66 press Next Doc To finish scanning press Complete Proceed to step 8 Repeat step 6 to scan all the documents 77 To finish scanning press Complete ...

Страница 20: ...n Ready is displayed on the screen remove the USB 88 memory Note If you connect USB memory when the machine is in the ready state the Scan to USB Memory and USB Memory to Print buttons are displayed Press Scan to USB Memory and perform the procedure in steps 4 to 7 ...

Страница 21: ...TP Server Network Load the document and press Scan 11 For details on loading documents refer to Chapter 1 Loading Documents in the User s Guide Set the document type contrast and resolution as necessary See page 1 19 Specify advanced settings such as changing the file format as necessary 22 See page 2 4 Press the PC USB tab and then FTP 33 ...

Страница 22: ...t of shortcuts If the target FTP server is registered in the Faves Destination tab you can select it from the Faves Destination tab Press Link 55 Enter the link to the FTP server and press Enter 66 Start the link with two slashes For details on entering characters refer to Chapter 1 Entering Characters in the Administrator s Guide Press User Name 77 ...

Страница 23: ...Up to 28 characters can be entered For details on entering characters refer to Chapter 1 Entering Characters in the Administrator s Guide Press Enter 111 Repeat steps 4 to 11 to specify all the destinations 111 You can also specify e mail addresses shared folders user boxes and the shared box as destinations To confirm a specified destination press Location For details on confirming destinations r...

Страница 24: ...s Complete Note You can register often used destinations in the Faves Destination tab See page 7 31 For details on registering shortcuts refer to Registering Editing FTP Server Shortcuts see page 7 20 or Registering Shortcuts in Chapter 3 of the OfficeBridge Guide You can press Add Edit on the screen in step 3 to register edit or delete shortcuts For details on registration refer to Registering fr...

Страница 25: ...inter See page 7 25 Even if the Scan to Print Monitor is not started you may be able to use the Scan to Print function In this case the printed documents will be printed again when the Scan to Print Monitor is started If you press Scan to Print the scan format is automatically set to color Load the document and press Scan 11 For details on loading documents refer to Chapter 1 Loading Documents in ...

Страница 26: ...ss the Application tab and then Scan to Print 33 Select the printer 44 To sort the output press Sort 55 Enter the number of copies to print using the numeric keys 66 Press Start 77 If you loaded the document in the ADF this concludes the procedure ...

Страница 27: ...Scanning If you loaded the document on the document glass load the next document and 88 press Next Doc To finish scanning press Complete Repeat step 8 to scan all the documents 99 To finish scanning press Complete ...

Страница 28: ...t Type Set the document type to scan with according to the document Text Select this when you want to scan text Auto Select this when you want to set the document type automatically Photo Select this when you want to scan photos Load the document and press Scan 11 For details on loading documents refer to Chapter 1 Loading Documents in the User s Guide Press Doc Type 22 If Doc Type is not displaye...

Страница 29: ...canning press Complete Setting the Contrast Set the contrast to scan with according to the document Lightest Select to scan with the lightest contrast Lighter Select to scan with a contrast between the normal contrast and the lightest contrast Normal Select to scan with the normal contrast Darker Select to scan with a contrast between the normal contrast and the darkest contrast Darkest Select to ...

Страница 30: ...1 2 If you loaded the document in the ADF this concludes the procedure If you loaded the document on the document glass load the next document and press Next Doc To finish scanning press Complete Setting the Resolution You can set the resolution for scanning If you set a high resolution the document will be scanned clearly but the size of the created data will be large Load the document and press ...

Страница 31: ... to Basic Scanning See page 1 2 If you loaded the document in the ADF this concludes the procedure If you loaded the document on the document glass load the next document and press Next Doc To finish scanning press Complete Setting the Scan Format You can set whether to scan the document in color or monochrome Load the document and press Scan 11 For details on loading documents refer to Chapter 1 ...

Страница 32: ...splayed press the Advanced tab and then select Color Specify the destination and press Start 33 For details on the procedure refer to Basic Scanning See page 1 2 If you loaded the document in the ADF this concludes the procedure If you loaded the document on the document glass load the next document and press Next Doc To finish scanning press Complete ...

Страница 33: ...ering e mail addresses refer to Registering Editing Address Book Destinations See page 7 2 Load the document and press 11 Scan For details on loading documents refer to Chapter 1 Loading Documents in the User s Guide Press 22 Basic Advanced View If the Basic view is already displayed this operation is not required Specify the destination 33 If you are setting broadcast transmission you can select ...

Страница 34: ...p 3 If you do not want to confirm the destinations proceed to step 5 To delete a specified destination select the destination to delete and press Delete and then Enter When there are too many destinations press or to check all the destinations P 55 ress Start You can also start scanning by pressing Start on the screen ...

Страница 35: ...1 26 Scanning on the Basic View ...

Страница 36: ... Subject 2 22 Setting the File Name File Name 2 25 Transmitting Scanned Data as Individual Files Batch Scan 2 27 Attaching a File Attachment 2 28 Selecting the File Format File Format 2 30 Receiving File Path Notification E mail Scan Path Notification 2 33 Setting Document Categories Category 2 34 Setting the Hold Time Hold Time 2 36 Adding Comments Comments 2 38 Using ScanTag 2 39 Setting the sta...

Страница 37: ...n transmit or save separate documents scanned in a row as a single set of data Since you can scan using both the document glass and the ADF this is useful for transmitting saving a combination of documents such as an invoice and a map together See page 2 11 Duplex Scan You can transmit or scan both sides of a document See page 2 12 Color Adjustment When performing color scanning you can adjust the...

Страница 38: ...ed in the list of documents saved in a box and enables you to search for documents via their category See page 2 34 Hold Time You can set the storage period hold time for documents saved in a box See page 2 36 Comments You can enter comments for documents saved in a box See page 2 38 Using ScanTag The ScanTag feature allows you to enter and send a metadata tag automatically to a network computer S...

Страница 39: ...ocument Document size The size of the displayed document Document type The type of the displayed document Contrast The contrast of the displayed document Ratio The zoom ratio of the displayed document Load the document and press Scan 11 Press Preview 22 If Preview is not displayed press the Advanced tab and then select Preview The preview function is enabled disabled each time you press Preview Sp...

Страница 40: ...you press Delete and then Yes while the second page or later of document is displayed the image will be deleted Then the machine asks you whether to continue or complete the operation To continue the operation press Next Doc To complete press Complete Press Close 44 If there is another document scanning of the next document will begin If there is not another document transmitting saving will begin...

Страница 41: ... from the reference setting position equal to the set scan size is scanned When you scan using the ADF only an area from the center with a width equal to the set scan size is scanned The whole length of the document is scanned Document glass Reference setting position ADF A A4 A5 F4 A Reference setting position A Legal Letter Half letter Half letter Letter Legal A Reference setting position Refere...

Страница 42: ...u can transmit or save an image scanned with an enlargement ratio or reduction ratio Note When enlarging the scan you can only use the document glass You can set a zoom ratio between 50 and 400 when using the document glass and between 50 and 100 when using the ADF Depending on the selected zoom ratio some of the image may be left out or there may be extra blank areas on the paper Load the documen...

Страница 43: ...rgement ratio or reduction ratio and press Enter 44 You can press and to set a free zoom ratio You can use the numeric keys to set a free zoom ratio Specify the destination and press Start 55 For details on the procedure refer to Basic Scanning See page 1 2 ...

Страница 44: ...t to specify destinations using other methods you can specify multiple destinations even if the Broadcast function is disabled You can change the default value to always have broadcast transmission enabled See page 3 7 The number of destinations that can be transmitted to for a single broadcast is indicated below Destinations Number Address book destinations and groups 2000 Manually entered e mail...

Страница 45: ...page 5 2 For details on specifying other destinations refer to Basic Scanning See page 1 2 Repeat step 5 to specify all the destinations 66 If you specify a registered destination that destination will be canceled if you select it again Press Location to confirm or delete the specified destinations For details refer to Confirming Specified Destinations See page 5 17 Press Start 77 ...

Страница 46: ...ce and a map together Note The next document settings can be set separately for the ADF and the document glass FBS Load the document and press Scan 11 Press the Advanced tab 22 Press Next Document Setting 33 Select ON and press Enter 44 If you select OFF the next document setting is disabled Specify the destination and press Start 55 For details on the procedure refer to Basic Scanning See page 1 ...

Страница 47: ... you want to scan another document repeat steps 6 to 7 88 When you have finished scanning all the documents press Complete 99 Duplex Scan You can easily scan a two sided document using this mode Just load the duplex document in the ADF and press Start Load the document in the ADF and press Scan 11 Press the Advanced tab 22 P 33 ress Duplex Scan ...

Страница 48: ...stination and press Start 55 For details on the procedure refer to Basic Scanning See page 1 2 Note Refer to the illustration below to select the binding type Document Image Binding position Letter Legal A4 F4 or other portrait document Long edge Short edge Half letter A5 or other landscape document Long edge Short edge ...

Страница 49: ...t See page 1 22 Images shown in this manual are sample data which may be different from the actual images Adjusting the Contrast You can set the image contrast the difference between light and dark to seven different levels from 3 low to 3 high The difference between brightness and darkness reduces and the whole image becomes dark The light parts become lighter and the dark parts darker 3 2 1 0 1 ...

Страница 50: ...Press Close 66 Specify the destination and press Start 77 For details on the procedure refer to Basic Scanning See page 1 2 Adjusting the Sharpness You can set the image sharpness the sharpness or softness to seven different levels from 3 low to 3 high Softens texts and lines Sharpens texts and lines 3 2 1 0 1 2 3 ...

Страница 51: ...d press Scan 11 Press the Advanced tab 22 Press Color Adjustment 33 Press Sharpness 44 Select the sharpness and press Enter 55 Press Close 66 Specify the destination and press Start 77 For details on the procedure refer to Basic Scanning See page 1 2 ...

Страница 52: ...entered on light orange to seven different levels from 3 red to 3 green Turns the color tone red Turns the color tone green 3 2 1 0 1 2 3 Note To Adjust hue set the contrast to Normal See page 1 20 Load the document and press Scan 11 Press the Advanced tab 22 Press Color Adjustment 33 Press Hue 44 Select the hue and press Enter 55 ...

Страница 53: ...e image saturation the color vibrancy to seven different levels from 3 low to 3 high Lessens the color to make the image closer to grayscale Enhances the color to make the color of the image more vibrant 3 2 1 0 1 2 3 Note To Adjust saturation set the contrast to Normal See page 1 20 Load the document and press Scan 11 Press the Advanced tab 22 Press Color Adjustment 33 Press Saturation 44 ...

Страница 54: ...e refer to Basic Scanning See page 1 2 Adjusting the Lightness You can set the image lightness brightness and darkness to seven different levels from 3 low to 3 high Darkens the entire image Lightens the entire image 3 2 1 0 1 2 3 Note To Adjust lightness set the contrast to Normal See page 1 20 Load the document and press Scan 11 Press the Advanced tab 22 Press Color Adjustment 33 ...

Страница 55: ...5 Press Close 66 Specify the destination and press Start 77 For details on the procedure refer to Basic Scanning See page 1 2 Adjusting the RGB You can set the ratio of R red to seven different levels from 3 to 3 Lessens red and enhances cyan Enhances red and lessens cyan 3 2 1 0 1 2 3 ...

Страница 56: ...sens green and enhances magenta Enhances green and lessens magenta 3 2 1 0 1 2 3 You can set the ratio of B blue to seven different levels from 3 to 3 Lessens blue and enhances yellow Enhances blue and lessens yellow 3 2 1 0 1 2 3 Load the document and press Scan 11 Press the Advanced tab 22 Press Color Adjustment 33 Press RGB 44 ...

Страница 57: ...ransmitting a scanned image via e mail you can edit the body and subject of the e mail you re sending You can also enter the body of the e mail using a template registered in advance Note For details on registering e mail templates refer to Registering Editing Templates see page 7 45 or Setting Templates in Chapter 3 of the OfficeBridge Guide This function can be used with Scan to e mail Load the ...

Страница 58: ...ng a template select a box with nothing registered in it If all the boxes already have a template registered select any box from 01 to 10 If you selected Auto Subject Text you cannot edit the subject and mail text Proceed to step 10 If you selected Auto Subject you can only edit the mail text Proceed to step 8 Press Subject 66 If you do not want to edit it proceed to step 8 ...

Страница 59: ...e mail text and press Enter 99 Up to 1024 characters can be entered for the message Press to enter a line break A line break takes up two characters Press ViewText to confirm the mail text that has been entered After confirming press Edit to return to the entry screen For details on entering characters refer to Chapter 1 Entering Characters in the Administrator s Guide Press Enter 111 Specify the ...

Страница 60: ...for a TIFF file created at 1 30 30 pm on the 15th of June 2010 will be 20100615133030 tif For details on registering filenames refer to Registering Editing File Names see page 7 48 or Setting Templates in Chapter 3 of the OfficeBridge Guide Entering a New File Name Load the document and press Scan 11 Press File Name 22 If File Name is not displayed press the Advanced tab and then select File Name ...

Страница 61: ...etails on the procedure refer to Basic Scanning See page 1 2 Using a Registered File Name Load the document and press Scan 11 Press File Name 22 If File Name is not displayed press the Advanced tab and then select File Name Press List 33 Select the file name you want to use 44 ...

Страница 62: ...proceed to step 6 Specify the destination and press Start 66 For details on the procedure refer to Basic Scanning See page 1 2 Transmitting Scanned Data as Individual Files Batch Scan When the Batch Scan function is on it means that all scanned pages will be saved as one file If you turn this function off each scanned page will be saved as an individual file Load the document and press Scan 11 Pre...

Страница 63: ...s on the procedure refer to Basic Scanning See page 1 2 Attaching a File Attachment You can attach a file on the network Word Excel etc when transmitting or scanning a document Note This function can be used in the following cases Scan to e mail Scan to PC Folder Scan to FTP Server Load the document and press Scan 11 Press the Advanced tab 22 Press Attachment 33 ...

Страница 64: ...to display detailed information for the file To close the detailed information screen press Close To continue to attach files press Shortcut and repeat steps 4 to 5 of the 66 operation If you do not want to attach another file proceed to step 7 Press Close 77 Specify the destination and press Start 88 For details on the procedure refer to Basic Scanning See page 1 2 Note The limits on the files th...

Страница 65: ...d PDF file Up to 28 alphanumeric characters and symbols can be entered for the password Set the password after pressing Start Permissions Password If you set this password the password must be entered when printing or editing the created PDF file The operations for which the password is required can be set in Printing Allowed Editing Allowed and Copying Allowed Up to 28 alphanumeric characters and...

Страница 66: ...s File Format 33 Select the file format 44 The selectable file formats differ according to the selected scan format color or monochrome If you selected encrypted PDF in step 4 press PDF w Password to change the 55 encryption settings Otherwise proceed to step 8 ...

Страница 67: ...e password and press 111 Enter If you do not want to set a password for opening the document press Enter without entering a password Enter the password set in step 10 again and press Enter 111 If you did not enter a password in step 10 this screen is not displayed To set a permissions password enter the password and press Enter 111 If you do not want to set a permissions password press Enter witho...

Страница 68: ...user login before using this function For details on logging in refer to Chapter 1 Logging In Logging Out in the Administrator s Guide This function can be used with the Scan to PC Folder Scan to Box and Scan to FTP Server functions Load the document and press Scan 11 Press the Advanced tab 22 Press Scan to Path Notification 33 Select ON and press Enter 44 If you select OFF the scan path notificat...

Страница 69: ...cument Setting a document category enables you to filter the documents displayed in the list of documents saved in a box and enables you to search for documents via their category You can also set the document category using a document category registered in advance Note This function can be used with Scan to Box The data is not classified unless you enter a document category The document category...

Страница 70: ...For details on entering characters refer to Chapter 1 Entering Characters in the Administrator s Guide Specify the destination and press Start 55 For details on the procedure refer to Scanning to a User See page 1 7 Using a Document Category Load the document and press Scan 11 Press the Advanced tab 22 Press Category Name 33 Press List 44 ...

Страница 71: ... and press Start 77 For details on the procedure refer to Scanning to a User See page 1 7 Setting the Hold Time Hold Time You can set the storage period hold time for documents saved in a box Note This function can be used with Scan to Box You can set a storage period of 1 to 99 days or unlimited The day the data is saved is not included in the storage period This means that if you set a storage p...

Страница 72: ...Select ON to set the storage period or OFF to not set it 44 If you selected OFF press Enter and proceed to step 6 Enter the storage period and press Enter 55 You can use and the numeric keys Specify the destination and press Start 66 For details on the procedure refer to Scanning to a User See page 1 7 ...

Страница 73: ...22 Press Comments 33 Enter the comments and press Enter 44 Up to 1024 characters can be entered Press ViewText to confirm the mail text that has been entered Press Edit to return to the entry screen For details on entering characters refer to Chapter 1 Entering Characters in the Administrator s Guide Specify the destination and press Start 55 For details on the procedure refer to Scanning to a Use...

Страница 74: ...the image file in a single scan The image data and metadata will be sent automatically to a network computer Note Set ScanTag before using this function For details refer to Chapter 3 Setting ScanTag in the OfficeBridge Guide Entering a tag metadata at the machine Load the document and press Scan 11 Press the Application tab and then ScanTag 22 Select the 33 ScanTag setting you wish to use ...

Страница 75: ...If the text string is defined as editable the character entry screen will appear Change the value if needed and then press Enter If the tag entry was set to character entry enter the appropriate text string manually and then press Enter Confirm the entered values and press Enter 55 If you want to correct a value go back to the previous screen by pressing Back Press 66 Start Press Yes to scan anoth...

Страница 76: ...t has been scanned using the ADF and check it has been scanned Note This setting is only available with the ADF The stamp function is optional Letter size documents are stamped around the position shown below Stamp Load the document on the ADF and press Scan 11 Press 22 the Advanced tab Select Stamp 33 ...

Страница 77: ...2 42 Advanced Scan Features Select O 44 N and press Enter Press OFF to set the stamp off Specify the destination and press Start 55 For details on the procedure refer to Basic Scanning See page 1 2 ...

Страница 78: ...ed in a TWAIN box and then imported by the application software Note Install the TWAIN driver to the computer in advance For details on installing the driver refer to Chapter 2 Installing to Windows in the Printer Guide You can also connect the computer and the machine with a USB cable to retrieve data Storing Documents in a TWAIN Box Load the document and press Scan 11 Press the Advanced tab 22 P...

Страница 79: ...et for the TWAIN box enter the I D code and press Enter 66 If an I D code has not been set proceed to step 7 Press Yes or Start 77 Note Up to 99 files can be stored in a single box Up to 9 999 pages of documents can be stored as a single file Deleting Stored Documents Press Scan 11 Press the Advanced tab 22 Press TWAIN Box 33 ...

Страница 80: ...nts you want to delete are stored 55 If an I D code is set for the TWAIN box enter the I D code and press Enter 66 If an I D code has not been set proceed to step 7 Select the data you want to delete 77 To delete all the data stored in the box press All Clear Press Yes 88 Press No to close the screen without deleting the data ...

Страница 81: ...N Box Press Close 99 To continue deleting data repeat the operation from step 5 Changing the Settings for a TWAIN Box You can register a name and I D code for a TWAIN box Press Setting 11 Press the Register tab 22 Press TWAIN Scan Box 33 ...

Страница 82: ...AIN box enter the I D code and press Enter 55 If no I D code is set proceed to step 6 To register or edit the name press Box Name 66 If you do not want to register or edit the name proceed to step 8 Register or edit the name and press Enter 77 Up to 16 characters can be entered For details on entering characters refer to Chapter 1 Entering Characters in the Administrator s Guide ...

Страница 83: ...the data stored in a TWAIN box using application software that supports TWAIN The procedure for using Microsoft Office Document Scanning is described here as an example Since the operation procedure differs according to the application software you are using refer to the documentation for the application software for details Note Install the TWAIN driver to the computer in advance For details on i...

Страница 84: ...N Box 2 49 Click Scan and select Muratec MFX 25xx NW Scan 22 If you connected the computer and the machine with a USB cable select Muratec MFX 25xx Scan Click OK 33 Start scanning 44 Select the TWAIN box 55 If an I D code is set enter the I D code and press OK ...

Страница 85: ...ct to when the IP address of the machine has changed etc This is for network scanning only Refresh Updates the list of files Save Saves the current settings This cannot be clicked unless the settings have been changed Default Returns the settings to the factory defaults Exit Closes Muratec MFX 25xx NW Scan Resolution Pixel type Fixed image size These settings may be required depending on the appli...

Страница 86: ... Faxes 3 31 Operations During Reception 3 34 Storing Received Documents 3 36 Faxing on the Basic View 3 39 Using the Address Book 3 39 Using the Numeric Keys 3 41 Making a Phone Call 3 43 Making a Phone Call 3 43 Receiving a Phone Call 3 44 Adjusting the Speaker Volume 3 44 Transmitting Faxes from a Computer 3 45 Transmitting With the Simple Mode 3 45 Transmitting With the Advanced Mode 3 51 Inter...

Страница 87: ...ng and faxing cannot be performed See page 3 6 Automatic daylight saving time detection Adjust the clock automatically in the summer time period See page 3 7 Broadcasting Set the broadcast transmission option See page 3 7 Fax reception mode Select the desired reception mode from the Fax mode Tel Fax mode Fax Tel mode Answering Fax mode or Tel mode options See page 3 8 For details on reception mode...

Страница 88: ...ee page 3 14 These settings can be changed at any time Note You can also register or edit User Install using a web browser For details refer to Chapter 3 Specifying Device Settings in the OfficeBridge Guide Print out the Settings List to insure that your settings are correct For the procedure for printing refer to Chapter 1 Checking the Machine Information in the Administrator s Guide Registering ...

Страница 89: ...l 33 Press Language 44 Select the language and press Enter 55 If The language was changed Try to turn on power is displayed on the screen 66 turn the power of the machine OFF and then ON again If the message is not displayed this step is not required ...

Страница 90: ...tes 2 digits Press Setting 11 Press 22 the Management tab If an administrator password is set enter the password and press Enter Press User Install 33 Press Time Setting 44 Press the entry box and enter the current date 55 You can use the numeric keys Select AM or PM and enter the current time 66 Enter the time in the entry box in the 12 hour format You can use the numeric keys Press Enter 77 ...

Страница 91: ...ialing type needed for the fax machine either Tone or Pulse Press Setting 11 Press the Management tab 22 If an administrator password is set enter the password and press Enter Press User Install 33 Press Communication Line 44 Select the dialing type and press Enter 55 ...

Страница 92: ...33 Press Set Daylight Saving 44 Select ON or OFF and press Enter 55 Setting the Broadcast Transmission Option Select whether to start transmission when registered destination is selected OFF or when Start is pressed with all destinations selected ON Note The broadcast setting is enabled for both scan transmission and fax transmission Press Setting 11 Press 22 the Management tab If an administrator...

Страница 93: ...press Enter 55 Setting the Fax Reception Mode Select the reception mode that best matches the machine usage Press Setting 11 Press 22 the Management tab If an administrator password is set enter the password and press Enter Press User Install 33 Press Fax Reception Mode 44 ...

Страница 94: ...ne detection Select OFF normally Press Setting 11 Press 22 the Management tab If an administrator password is set enter the password and press Enter Press User Install 33 Press Dial 44 Tone Detect Select ON 55 or OFF to detect or not detect the dial tone and press Enter If you select ON you cannot transmit the faxes through a line that cannot acquire a dial tone ...

Страница 95: ... or Company Name TTI You can register three TTI s Transmit Terminal Identifier Press Setting 11 Press 22 the Management tab If an administrator password is set enter the password and press Enter Press User Install 33 Press TTI Enter Edit 44 Press TTI 1 55 ...

Страница 96: ...ring characters refer to Chapter 1 Entering Characters in the Administrator s Guide To register TTI 77 2 and TTI 3 press TTI 2 or TTI 3 and repeat the operation in step 6 Selecting the Default TTI Select the TTI that will be used most often Press Setting 11 Press 22 the Management tab If an administrator password is set enter the password and press Enter Press User Install 33 Press Default TTI 44 ...

Страница 97: ... Install Select the TTI and press Enter 55 Entering Your Fax Number Press Setting 11 Press 22 the Management tab If an administrator password is set enter the password and press Enter Press User Install 33 Press TTI Number 44 ...

Страница 98: ...lear To change just one number press or to move the cursor then press Clear to erase the number Then re enter the correct number Ti me Zone Time zones refer to the difference in time up to 12 hours between countries from the Greenwich Observatory in England which is taken to be standard time and to regions that use the same difference Press Setting 11 Press 22 the Management tab If an administrato...

Страница 99: ...urgh Lisbon London GMT 01 00 Amsterdam Berlin Bern Rome Stockholm Vienna GMT 01 00 Belgrade Bratislava Budapest Ljubljana Prague GMT 01 00 Brussels Copenhagen Madrid Paris GMT 09 00 Osaka Sapporo Tokyo Seoul GMT 10 00 Guam Setting Caller ID Set this mode to ON to display the caller number Caller ID on the display while the machine is being called This is an optional service provided by your teleph...

Страница 100: ...1 2 3 Basic Fax Functions Initial Setup User Install 3 15 Press Caller ID 44 Select ON or OFF and press Enter 55 ...

Страница 101: ...g documents refer to Chapter 1 Loading Documents in the User s Guide Set the resolution and contrast as necessary See page 3 21 Press the Num keys tab 22 Enter the number of the destination 33 Dialing options can be inserted See page 3 24 Destinations can also be selected from the address book For details on specifying other destinations refer to Specifying Destinations See page 5 2 ...

Страница 102: ...ine is communicating The reserved transmission will start when the current job is completed Up to 100 transmissions can be reserved Manual Transmission Use this method when the other fax machine uses manual reception or when you want to transmit after having a telephone conversation Note The optional handset is required when picking up the handset to transmit Manual transmission cannot be performe...

Страница 103: ...he handset of the external phone Specify the destination 44 For details on specifying the destination refer to Specifying Destinations See page 5 2 If the other party is using manual reception ask them to start the fax reception 55 procedure When you hear the beep from the other fax machine press Start 66 Press Monitor If you picked up the optional handset to dial hang up the handset If you picked...

Страница 104: ...erformed with real time transmission The automatic redialing frequency and interval can be set from 0 to 14 times and 0 to 5 minutes respectively For details on changing the settings refer to List of Other Default Settings See page 7 43 For details on canceling a transmission waiting for redialing refer to Canceling Checking Reserved Documents See page 3 28 Transmitting to Multiple Recipients Broa...

Страница 105: ...roadcast function is enabled disabled each time you press Broadcast Specify the destination 44 For details on specifying the destination refer to Selecting from the Address Book See page 5 2 Repeat step 4 to specify all the destinations 55 If you specify a destination in the address book that destination will be canceled if you select it again Press Location to confirm or delete the specified dest...

Страница 106: ... the resolution and contrast in accordance with the document and its text and insert a dial number Note You can also change the default settings as necessary See page 7 43 Setting the Resolution Set the resolution to scan with according to the document Normal Select to scan a document with normal text Fine Select to scan a document with small text such as a newspaper S Fine Select to scan a docume...

Страница 107: ...efer to Selecting from the Address Book See page 5 2 If you loaded the document in the ADF this concludes the procedure If you loaded the document on the document glass load the next document and press Next Doc Press Tx Start to start transmission Note The Super Fine mode may not be supported by the destination machine In this case the optimal resolution will be automatically selected The communic...

Страница 108: ...n with the darkest contrast Load the document and press Fax 11 Press the Address Book tab or the Num keys tab 22 Press Contrast 33 If Contrast is not displayed press the Advanced tab and then select Contrast Select the desired contrast and press Enter 44 Specify the destination and press Start 55 For details on specifying the destination refer to Selecting from the Address Book See page 5 2 If you...

Страница 109: ... a prefix number A prefix number can only be used when specifying the destination using the numeric keys To use a prefix number it is necessary to register it in advance See page 7 44 Example N333 3333 3333 To enter dialing options in PC faxes or in OfficeBridge enter the options indicated in the Option column Load the document and press Fax 11 Press the Num Keys tab 22 Enter the desired dialing o...

Страница 110: ...mory Transmission starts after the transmission operation which allows you to easily confirm that the fax is sent to the other machine Memory transmission transmits the document after scanning the document into memory This allows you to take the document and leave without waiting for the transmission to end enabling you to save time Load the document and press Fax 11 For details on loading documen...

Страница 111: ...erved transmissions You can also check the communication result of the latest fax jobs If there is a reserved fax Job Confirm Fax Cancel illuminates Illuminated Canceling Checking the Current Document You can cancel or check the current document On the Review Jobs screen the following statuses are displayed for each destination Reserved Displayed for a destination that has not yet started transmis...

Страница 112: ...een To individually check or delete destinations for the broadcast proceed to the next step Transmission will not be canceled if you press Close The display switches to the Fax Ready screen Press Detail 33 Select the destination you want to cancel and press Delete You can select 44 multiple destinations If you do not want to cancel a destination press Close This ends the procedure Press Close 55 ...

Страница 113: ...d information for the 22 current destinations is displayed If there are no documents currently being transmitted proceed to step 4 Press the Delayed job tab 33 Check the reserved documents To cancel a reserved document select the 44 document to cancel and press Delete Reserved documents are displayed in chronological order To switch the screen press or When performing broadcast transmission Broadc...

Страница 114: ...edure You can select multiple destinations Press Close twice 99 Checking Printing the Transmission Result You can check or print the transmission history for the past 100 jobs This enables you to check the result of transmitting via Scan to Folder or Scan to FTP in addition to checking the result of transmitting via fax and e mail Note The transmission history of jobs older than the last 100 jobs ...

Страница 115: ...escribed as an example Press Fax Tx To display the fax reception history press Fax Rx To display the transmission history for Internet Faxes and Scan to E Mail jobs press e mail Tx To display the reception history for Internet Faxes press e mail Rx To display the transmission history for Scan to Folder jobs press Folder Tx To display the transmission history for Scan to FTP jobs press FTP Tx The t...

Страница 116: ...eception methods according to your needs Operating Tips Set the reception mode in the initial setup See page 3 2 To receive a phone call an external phone or an optional handset needs to be connected See Chapter 1 Connection and Main Settings in the User s Guide how to connect an external phone The machine can be set to ring even if a handset is not installed For details refer to Chapter 1 Specify...

Страница 117: ...imes For details refer to List of Other Default Settings See page 7 43 Since the machine rings after the call is received when the other party is using a phone the other party will be made to wait and call charges will increase Prioritizing Call Reception Tel Fax Ready Reception starts Pick up the optional handset or the external phone handset and talk to the other party The machine rings The mach...

Страница 118: ...on the type of answering machine Automatic reception may not be possible depending on the other fax machine If the answering machine does not answer the fax cannot be received Primarily Using the Phone Tel Ready Reception starts The machine rings Press Start Pick up the optional handset or the external phone handset and talk to the other party When the other party sent you a fax When the other par...

Страница 119: ...1 Manual reception This method receives faxes after Start is pressed For details refer to Primarily Using the Phone Tel Ready See page 3 33 Press Fax 11 Press the Advanced tab 22 Press Auto Rx 33 Select ON or OFF and press Enter 44 Select ON to set automatic reception or OFF to set manual reception Operations During Reception The information lamp on the control panel flashes during reception When ...

Страница 120: ...t in memory when paper has run out or when performing security reception When the problem preventing the document from being printed is resolved the stored document is automatically printed When a document is stored in the memory of the machine the information lamp is illuminated green Note Leave the power of the machine ON when replacing paper or toner A maximum of 250 transmissions can be stored...

Страница 121: ...ed and merged to fit onto one sheet Merged onto one sheet keeping each original size Standard size document As with original size Might be slightly reduced As with original size Long original When the length exceeding the effective recording area is within the reduction margin Reduced to fit onto one sheet Received in each original size with the area that does not fit onto one sheet cut off When t...

Страница 122: ... longer than the reduction margin the page is divided into multiple sheets For details refer to List of Recording Methods See page 3 36 Note Set the reduction margin to a value between 0 and 3 3 in 85 mm according to the length of the margin for the type of documents that are received most frequently For details on setting the reduction margin refer to List of Other Default Settings See page 7 43 ...

Страница 123: ...ng Function Note Duplex Reception Front Back Two documents received in succession can be printed on both sides of the paper For details on setting Duplex Reception refer to List of Other Default Settings See page 7 43 ...

Страница 124: ...number using the numeric keys Note If you use both the address book and the numeric keys all the destinations are displayed on the screen for confirming the destinations For details on registering destinations refer to Registering Destinations Using the Address Book Load the document and press Fax 11 For details on loading documents refer to Chapter 1 Loading Documents in the User s Guide Press Ba...

Страница 125: ... select two or more destinations See page 3 7 Press 44 Location to confirm or delete the destinations selected in step 3 If you do not use Location proceed to step 5 To delete a destination select the destination to delete and press Delete When there are too many destinations press or to check all the destinations Press 55 Start You can also start faxing by pressing Start on the screen ...

Страница 126: ...ed Enter the fax number using the numeric keys 33 You can use the keys on the screen or the numeric keys To specify multiple destinations press Enter after entering a fax number and repeat this operation Press Clear to delete one of the entered numbers or symbols Press All Clear to delete all of the entered numbers and symbols Press Address Book to switch to the address book selection screen See p...

Страница 127: ... selected in step 3 If you do not use Location proceed to step 5 To delete a destination select the destination to delete and press Delete When there are too many destinations press or to check all the destinations Press Start 55 You can also start faxing by pressing Start on the screen ...

Страница 128: ... connect an external phone Making a Phone Call Pick up the optional handset or the external phone handset Or press Fax 11 and then Monitor If Monitor is not displayed press the Advanced tab and then select Monitor Specify the destination 22 For details on specifying the destination refer to Specifying Destinations See page 5 2 When the connection is established talk with the other party 33 When Mo...

Страница 129: ...y 22 If you hear a beeping sound from the other party or hear nothing it signifies a fax Press Start to receive the fax Adjusting the Speaker Volume Press F 11 ax Press 22 the Address Book tab or the Num keys tab Press Monitor 33 If Monitor is not displayed press the Advanced tab and then select Monitor Press Volume 44 Select the desired volume and press Enter 55 Press Monitor to hang up 66 ...

Страница 130: ... can be set with the simple mode enables you to specify the fax transmission time and edit the subject and text of the e mail You can also save the created document in a user box in order to transmit it together with other documents later Note Install the Muratec Fax to the computer before using this function For details on installing the driver refer to Chapter 2 Installing to Windows in the Prin...

Страница 131: ... Transmitting Faxes from a Computer Select Muratec Fax as the printer 33 Open the detailed settings screen 44 When using Microsoft Office Word 2007 click Printing Preferences The fax settings are displayed ...

Страница 132: ...mitted with the same paper size as the document size Resolution 200 200 dpi Equivalent to setting the resolution to Fine when transmitting from the machine 400 400 dpi Equivalent to setting the resolution to Super Fine when transmitting from the machine 600 600 dpi Equivalent to setting the resolution to Super Fine when transmitting from the machine Advanced Options The processing of the image dat...

Страница 133: ... to display the personal address book or shared address book and the address book by company name or name Address Book The address book is displayed in alphabetical order according to the company name or name as selected in Filter Address Book Enter Destination Fax Number Enter the fax number of the destination E mail Address Enter the e mail address of the destination Name When attaching a cover ...

Страница 134: ...r Settings tab Send Click Send to start transmission Cancel Click this to close the screen Enter the fax number for the destination in the Fax Number entry box and 111 click FAX To enter the destination name and company name on the cover page also specify the Name and Company Name entry boxes and click FAX Pauses and other dialing options can be also entered using the keyboard For details on diali...

Страница 135: ...cannot receive TIFF files use this file format PDF The PDF format Documents can be sent in this format when the destination is a computer or our machine using the internet fax function Transmission Report Sets whether to print a transmission report Sending Destinations FAX Displays the specified fax destinations TO Displays the specified e mail destinations CC Displays the specified e mail CC dest...

Страница 136: ...nter the content to insert in the cover page 111 Set the file format 222 Sets whether to print a transmission report 222 Check the destinations in the Sending Destinations field 222 To delete a destination select the destination to delete and click Delete Click Send 222 Transmitting With the Advanced Mode The procedure for a document created with Microsoft Office Word 2007 is described here as an ...

Страница 137: ...x as the printer 33 To change the detailed print settings open the detailed settings screen 44 When using Microsoft Office Word 2007 click Printing Preferences To transmit without changing the detailed settings proceed to step 8 The fax settings are displayed ...

Страница 138: ...document will be transmitted with the same paper size as the document size Resolution 200 200 dpi Equivalent to setting the resolution to Fine when transmitting from the machine 400 400 dpi Equivalent to setting the resolution to Super Fine when transmitting from the machine 600 600 dpi Equivalent to setting the resolution to Super Fine when transmitting from the machine Advanced Options The proce...

Страница 139: ... after transmitting or saving the document Click OK 77 Start printing 88 When using Microsoft Office Word 2007 click OK The Transmission Settings screen is displayed If you select Save in user box or Save in shared box for the execution type the document properties screen is displayed Edit the detailed information for the document as necessary and press Forward For the procedure for transmitting t...

Страница 140: ...t User Select this to specify a user or user group for the destination You can set a user as the destination when a fax destination or an e mail destination is set Fax Destination Displayed when Direct Entry is selected as the method for specifying destinations E mail Destination Displayed when Direct Entry is selected as the method for specifying destinations Cover Page ON OFF Sets whether to att...

Страница 141: ...en scanning PDF The PDF format Documents can be sent in this format when the destination is a computer or our machine using the internet fax function Document s after transmission Set whether to delete the document without saving it after transmission Delete To delete a set destination select the destination to delete and click Delete If you select the check box at the top of Destination s you can...

Страница 142: ... Specify the destinations from the search results and click Fax to transmit via 111 fax or TO CC or BCC to transmit via e mail Proceed to step 15 If you selected Select User in step 9 click Add after selecting the users or 111 user groups to transmit to For details on the selection method refer to Chapter 2 Transmitting Documents in the OfficeBridge Guide Press Back to return to the screen in step...

Страница 143: ...ed settings For details on the settings refer to Chapter 2 Transmitting Documents in the OfficeBridge Guide Check the destinations in the Destination s field 222 To delete a destination select the destination to delete and click Delete If you select the check box at the top of Destination s you can delete all the destinations Click Send 222 ...

Страница 144: ... PDF data attached to the e mail PDF data created by the machine Note Color documents cannot be transmitted or received using the internet fax function A notification e mail is transmitted to the sender when data cannot be received If you set to forward e mails you cannot receive with the internet fax function in advance you can receive them using e mail software etc For details on setting this fu...

Страница 145: ...le destinations repeat steps 3 to 4 Up to 50 characters can be entered for an e mail address Destinations can also be specified using other methods For details refer to Specifying Destinations See page 5 2 Press Start 55 If you loaded the document in the ADF this concludes the procedure If you loaded the document on the document glass load the next document and press Next Doc Press Tx Start to sta...

Страница 146: ... and manual reception performed by the user Manual Reception If you receive only a few documents each day or you want to check the reception immediately use manual reception Press Fax 11 Press the Advanced tab 22 Press Check Mail 33 Automatic Reception For details on setting to automatically receive e mail at a specified interval refer to Chapter 3 Setting the Connection Environment in the OfficeB...

Страница 147: ...3 62 Internet Fax Transmission Internet Fax ...

Страница 148: ...F Code Transmission 4 37 Storing Documents in a Bulletin Box 4 40 Security Functions 4 47 Restricting Fax Destinations Closed Transmission 4 47 Checking the Destination Machine s Number Before Transmission 4 48 Entering the Destination Twice Before Transmission Confirmation Dial 4 49 Security Reception 4 51 PIN Masking 4 53 Useful Reception Functions 4 55 Automatically Distributing Received Docume...

Страница 149: ...tically attached to the documents You can either enter a subject and message or use a template registered in advance to insert the cover page document See page 4 13 Delayed Transmission You can use this function to specify the date and time to perform transmission See page 4 19 E mail Gateway You can transmit to a fax server as if you were transmitting to a regular telephone line See page 4 20 Pol...

Страница 150: ...an dial a number plus a PIN but the PIN will not appear in the journal error message printout delayed command list or transmission report See page 4 53 Auto Distribution When a fax is received it is distributed to a specified destination if its information matches the conditions registered in advance Up to 200 distribution settings can be registered See page 4 55 Separator Page You can change the ...

Страница 151: ...er of pages for the displayed document Document size The size of the displayed document Document type The type of the displayed document Contrast The contrast of the displayed document Ratio The zoom ratio of the displayed document Load the document and press Fax 11 Press 22 the Address Book tab or the Num keys tab Press 33 Preview If Preview is not displayed press the Advanced tab and then select...

Страница 152: ...splayed the operation will be canceled When you press Delete and then Yes while the second page or later of document is displayed the image will be deleted Then the machine asks you whether to continue the operation or start the transmission To continue the operation press Next Doc To start the transmission press Tx Start Press Close 55 If there is another document scanning of the next document wi...

Страница 153: ... area from the reference setting position equal to the set scan size is scanned When you scan using the ADF only an area from the center with a width equal to the set scan size is scanned The whole length of the document is scanned Document glass Reference setting position ADF A A4 A5 F4 A Reference setting position A Legal Letter Half letter Half letter Letter Legal A Reference setting position R...

Страница 154: ...o Specifying Destinations See page 5 2 Scanning the Next Document Next Document Setting You can scan a series of separate documents and transmit them as a single document For example this enables you to scan an invoice using the ADF and a map using the document glass and send them together in a single transmission Note The next document settings can be set separately for the ADF and the document g...

Страница 155: ... press Start 55 If you do not set the next document settings this completes the procedure For details on specifying the destination refer to Specifying Destinations See page 5 2 Load the next document to scan 66 Set the resolution and contrast as necessary Press Next Doc or Start 77 When the loaded documents have been scanned the message Set next document is displayed ...

Страница 156: ...ex Scan You can transmit both sides of a document Note This setting is only available with the ADF Load the document on the ADF and press Fax 11 Press 22 the Advanced tab Select DuplexScan 33 Select Long Edge or Short Edge and press Enter 44 To confirm the binding type of your document see page 2 13 Specify the destination and press Start 55 For details on specifying the destination refer to Speci...

Страница 157: ...tted using the ADF and check it has been scanned or transmitted Note This setting is only available with the ADF The stamp function is optional Letter size documents are stamped around the position shown below Stamp Load the document on the ADF and press 11 Fax Press 22 the Advanced tab Select Stamp 33 ...

Страница 158: ...ctions Scan Related Settings 4 11 Select O 44 N and press Enter Press OFF to set the stamp off Specify the destination and press Start 55 For details on specifying the destination refer to Specifying Destinations See page 5 2 ...

Страница 159: ...out adding a sender name For details on registering sender names refer to Registering Your Name or Company Name TTI See page 3 10 Load the document and press Fax 11 Press the Advanced tab 22 Press TTI 33 Select ON 44 Press OFF to perform transmission without adding a sender name If you selected OFF press Enter and proceed to step 6 Select the sender name and press Enter 55 ...

Страница 160: ...book destination the information registered in the address book such as the company name department name fax number and e mail address is entered in the destination field TTI field If you have performed a user login the information registered for the user such as the user name and telephone number is entered in the TTI field If you have not performed a user login the TTI name and TTI number regist...

Страница 161: ...ng a New Document Load the document and press Fax 11 Press the Advanced tab 22 Press Cover Page 33 Select ON 44 If you select OFF the cover page setting is disabled If you selected OFF press Enter and proceed to step 12 Press Format 55 ...

Страница 162: ...n the thumbnail screen and the file list To confirm the details of the format press Preview See page 4 18 Press Subject 77 Enter the subject and press Enter 88 For details on entering characters refer to Chapter 1 Entering Characters in the Administrator s Guide Up to 80 characters can be entered for the subject Press Text 99 ...

Страница 163: ... 111 Specify the destination and press Start 111 For details on specifying the destination refer to Specifying Destinations See page 5 2 When you go back to step 6 and press Preview in advance to press Start you can confirm all the entered information on the cover page Using a Template Load the document and press Fax 11 Press the Advanced tab 22 Press Cover Page 33 Select ON 44 If you select OFF t...

Страница 164: ...s refer to Chapter 1 Entering Characters in the Administrator s Guide To edit the message press Text 111 If you do not want to change it proceed to step 13 Change the message and press Enter 111 Up to 1024 characters can be entered for the mail text Press to enter a line break A line break takes up two characters Press ViewText to confirm the mail text that has been entered Press Edit to return to...

Страница 165: ...sender information subject or mail text etc Perform the operation from step 1 to 5 on 11 Creating a New Document page 4 14 or Using a Template page 4 16 Select the format and press Preview 22 Key Supplementary explanation Displays the top side of the document Displays the bottom side of the document Displays the left side of the document Displays the right side of the document Rotates the document...

Страница 166: ...stored in memory until the specified time at which point transmission will start If real time transmission is specified the document will remain loaded until the specified time so you will not be able to copy scan or transmit other faxes This function can be also specified in combination with other functions such as broadcast polling F Code transmission and F Code polling Load the document and pre...

Страница 167: ... Cancel See page 3 28 To change the specified time after scheduling the transmission you need to delete the scheduled transmission and then set it again Transmitting Faxes to a Fax Server E mail Gateway You can transmit to a fax server as if you were transmitting to a regular telephone line The e mail gateway settings need to be registered in advance For details on registering an e mail gateway re...

Страница 168: ... to use the machine to request a document that is stored on another machine The phone call is charged to the receiving party this machine side Also if polling documents are stored in the machine they can be transmitted automatically when requested by another machine The phone call is charged to the other party Note Passcode polling limits polling to that with machines that have a security function...

Страница 169: ...Storing Polling Documents Load the document and press Fax 11 Press the Advanced tab 22 Press Polling Doc 33 Press Store 44 Press Yes 55 Deleting Stored Polling Documents Press Fax 11 Press the Advanced tab 22 Press Polling Doc 33 ...

Страница 170: ...Various Fax Functions 4 23 Press Delete 44 Press Yes 55 Press No to close the screen without deleting the data Printing Stored Polling Documents Press Fax 11 Press the Advanced tab 22 Press Polling Doc 33 Press Print 44 Press Yes 55 ...

Страница 171: ...inting the Stored Document List Press Setting 11 Press the List tab 22 Press Stored Doc List 33 Select ON to enable duplex printing or OFF to disable it 44 Select ON to enable combined printing or OFF to disable it 55 Press Yes 66 ...

Страница 172: ...ng Document Press Fax 11 Press the Advanced tab 22 Press Polling 33 Select ON and press Enter 44 If you select OFF the polling setting is disabled Specify the destination and press Start 55 For details on specifying the destination refer to Specifying Destinations See page 5 2 ...

Страница 173: ...b address is displayed Up to 16 characters can be entered Sub Address Must be registered Must be registered Sub addresses are numbers used to distinguish the F code boxes that have been set in memory Up to 20 digits can be entered Numerals and can be registered Password Register if necessary Register if necessary A password is important to prevent documents from being transmitted received by mista...

Страница 174: ... 35 Up to 20 F code boxes can be registered Registering Editing Secure F Code Boxes This section describes the procedure for registering secure F code boxes When editing select the box you want to edit in step 4 and press Edit Enter the I D Code and press Enter and then select the item you want to edit Press Setting 11 Press the Resister tab 22 Press F Code Box 33 ...

Страница 175: ...4 28 F Code Communications Press Add 44 When editing select the box you want to edit and press Edit Press Secure Box 55 Enter the sub address using the numeric keys and press Enter 66 ...

Страница 176: ...To set the box name press Box Name 88 If you do not want to set it proceed to step 10 Enter the box name and press Enter 99 For details on entering characters refer to Chapter 1 Entering Characters in the Administrator s Guide To set the storage period press Hold Time 111 If you do not want to set it proceed to step 12 ...

Страница 177: ...s Enter 111 Press Close 111 To continue to register or edit Secure F code boxes repeat the procedure in steps 4 to 13 Registering Editing F Code Bulletin Boxes This section describes the procedure for registering F code bulletin boxes When editing select the box you want to edit in step 4 and press Edit If an I D code is set enter the I D code Select the item you want to edit Press Setting 11 Pres...

Страница 178: ...ns 4 31 Press Add 44 When editing select the box you want to edit and press Edit Press Bulletin Box 55 Enter the sub address using the numeric keys and press Enter 66 To set the box name press Box Name 77 If you do not want to set it proceed to step 9 ...

Страница 179: ...entering characters refer to Chapter 1 Entering Characters in the Administrator s Guide To set a password press Password 99 If a password is not set proceed to step 11 Enter the password using the numeric keys and press Enter 111 To set the Rx Protect function press Rx Protect 111 ...

Страница 180: ...is disabled If you select ON proceed to step 17 To set the Auto Print function press Auto Print 111 If you do not want to set it proceed to step 15 Select ON and press Enter 111 If you select OFF the Auto Print setting is disabled To enable the Overwrite setting press Overwrite 111 If you do not want to set it proceed to step 17 ...

Страница 181: ...e Tx Doc function press Erase Tx Document 111 If you do not want to set it proceed to step 19 Select ON and press Enter 111 If you select OFF the Erase Tx Doc setting is disabled To set an I D code press I D Code 111 If you do not want to set it proceed to step 21 Enter the I D code using the numeric keys and press Enter 222 ...

Страница 182: ...tting 11 Press the Resister tab 22 Press F Code Box 33 Select the box you want to delete and press Delete 44 If an I D code is set enter the I D code using the numeric keys and press 55 Enter If an I D code is not set proceed to the next step Press Yes 66 Press No to close the screen without deleting the box To continue to delete F code boxes press Enter and repeat the procedure in steps 4 to 6 ...

Страница 183: ...sister tab 22 Press F Code Box 33 Press List 44 Select ON to enable duplex printing or OFF to disable it 55 Select ON to enable combined printing or OFF to disable it 66 Press Yes 77 Note The F code box list can also be printed from F Code Box List in the List tab after pressing Setting ...

Страница 184: ...e F code box transmission and F code bulletin box transmission to be performed First check the sub address and password of the box registered in the other machine Load the document and press Fax 11 Press the Advanced tab 22 Press F Code Tx 33 Select ON 44 Press OFF to disable the F code communication settings Press Enter to complete the procedure Press the sub address entry box 55 ...

Страница 185: ... digits can be entered for a password Numerals and can be entered Press Enter 99 Press F Code Tx again to return to the screen in step 4 where you can correct the sub address and or password if entered incorrectly Specify the destination and press Start 111 For details on specifying the destination refer to Specifying Destinations See page 5 2 F Code Polling Enter the sub address and password to r...

Страница 186: ...igits press Clear To delete all of the entered digits press All Clear If a password is set press the password entry box 77 If a password is not set proceed to step 9 Enter the password using the numeric keys 88 Up to 20 digits can be entered for a password Numerals and can be entered Press Enter 99 Press F Code Polling again to return to the screen in step 4 where you can correct the sub address a...

Страница 187: ...storage methods are available Overwrite Overwrites documents in the box Add Adds to the documents in the box Note Up to 30 documents can be stored in each box The F code bulletin box must be registered in advance See page 4 30 Storing Documents Load the document and press Fax 11 Press the Advanced tab 22 Press F Code Doc 33 Press Store 44 ...

Страница 188: ...x in which you want to store the document 55 If an I D code is set enter the I D code using the numeric keys and press 66 Enter If it is not set proceed to step 7 Select the storage method for the document 77 Press Yes 88 Press No to close the screen without storing the document ...

Страница 189: ...ts stored in the bulletin boxes If documents have been received in the F code boxes F code reception information will be printed out Check the box number listed and print out the stored documents Press Fax 11 Press the Advanced tab 22 Press F Code Doc 33 Press Print 44 Select the F code box in which the documents you want to print are stored 55 ...

Страница 190: ...r If a password is not set proceed to the next step Select the file 77 Press All stored documents to print all the documents stored in the F code box This step is not required for a secure box Press Yes 88 Press No to close the screen without printing the documents Security reception documents are automatically deleted after being printed ...

Страница 191: ...44 F Code Communications Deleting Stored Documents Press Fax 11 Press the Advanced tab 22 Press F Code Doc 33 Press Delete 44 Select the F code box in which the documents you want to delete are stored 55 ...

Страница 192: ...t enter the I D code using the numeric keys and press 66 Enter If a password is not set proceed to the next step Select the file 77 Press All stored documents to delete all the documents stored in the F code box Press Yes 88 Press No to close the screen without deleting the data ...

Страница 193: ...inting the Stored Document List Press Setting 11 Press the List tab 22 Press Stored Doc List 33 Select ON to enable duplex printing or OFF to disable it 44 Select ON to enable combined printing or OFF to disable it 55 Press Yes 66 ...

Страница 194: ...tion and have the same passcode registered Note For details on passcodes refer to Chapter 2 Closed Communication in the Administrator s Guide You can also set to always enable closed transmission For details refer to Chapter 2 Closed Communication in the Administrator s Guide When using manual transmission transmission using an optional handset an external phone handset or the Monitor function the...

Страница 195: ...those registered in the destination machine match Transmission is allowed only when the passcodes are matched Note If a fax number is not registered for the destination a communication error occurs and transmission fails You can also set to always enable ID check transmission For details refer to Chapter 2 Setting ID Check Transmission in the Administrator s Guide When using manual transmission tr...

Страница 196: ...n dial function is set a screen requiring you to reenter the destination will be displayed before starting transmission Transmission is allowed only when the first and second numbers match Entering the destination twice enables you check whether there has been a mistake when entering the number For details on setting the confirmation dial function refer to Chapter 2 Confirming the Destination Befo...

Страница 197: ...dial screen is displayed reenter the destination you 44 entered in step 3 To specify multiple destinations repeat the operation in steps 3 and 4 until all the destinations are entered twice When specifying the destination with the numeric keys press Enter after specifying the destination Press Start 55 Note The following screen is displayed when the first and second numbers entered do not match Re...

Страница 198: ...ure for manually enabling the security reception function set in advance and printing the received documents Note How to set up security reception refer to Security Reception in the Administrator s Guide When documents have been received during security reception the message Security Reception document exists is displayed and the information lamp illuminates green Turning on Security Reception in ...

Страница 199: ...y Reception Documents Press Fax 11 Press the Advanced tab 22 Press Security Reception 33 Enter the protect passcode using the numeric keys and press Enter 44 To delete one of the entered digits press Clear To delete all of the entered digits press All Clear Select OFF and press Enter 55 The security reception documents are printed ...

Страница 200: ...st or transmission report The PIN may contain up to eight characters including the or symbols You can enter them from the numeric keys Note Set the PIN mode in advance For details on setting the PIN mode refer to Chapter 2 Activating the PIN mask in the Administrator s Guide Dialing in PIN Mask Mode 1 Note To set Mode 1 register the PIN to the fax number of the destination when registering the des...

Страница 201: ...ab 22 Specify the destination 33 If the destination was specified using the numeric keys and or address book number proceed to step 4 If you specify multiple destinations proceed to step 4 If the destination was specified using the address book proceed to step 5 Press Start 44 Use the numeric keys to enter the PIN number 55 and press Enter ...

Страница 202: ...ibution settings registered with OfficeBridge cannot be changed from the control panel Registering Editing Individual Distributing Conditions You can register individual distributing conditions to determine whether to forward a received fax Enter as follows Setting Select whether to enable this distributing condition individually when automatic distribution is set If disabled distribution will not...

Страница 203: ...ed for the F code box if required Up to 20 digits can be entered Numerals and can be entered Schedule Distribution starts at the specified time and day of the week You can also register the time only or day of the week only If nothing is registered distributing is performed regardless of the time Enter the time in the entry box in the 12 hour format using two digits Auto Print Enable to also print...

Страница 204: ...on Functions 4 57 Press Add 44 When registering proceed to step 8 When editing select the distributing condition you want to edit and press Edit Press Setting 55 Select ON and press Enter 66 If you select OFF the setting is disabled Press Name 77 ...

Страница 205: ...ressing Speed 111 Dial and press Enter If you press Speed Dial you can select a destination using a search number For details on selecting search numbers refer to Specifying Using Search Numbers See page 5 12 If you press Search you can search a destination For details on searching destination refer to Searching for Server Destinations See page 5 6 When registering this ends the procedure Proceed ...

Страница 206: ...level and press Enter 111 Press Conditions 111 If you do not want to register distribution conditions proceed to step 25 Press Fax Number 111 If you do not want to register a fax number proceed to step 18 Enter the fax number using the numeric keys and press Enter 111 Press Equal 111 ...

Страница 207: ...b Address 111 If you do not want to forward F code reception documents proceed to step 22 Enter the sub address and press Enter 111 Press Password 222 Enter the password and press Enter 222 To delete one of the entered digits press Clear To delete all of the entered digits press All Clear ...

Страница 208: ...ter 222 Press Schedule 222 Press Weekday 222 If you do not want to specify a day of the week proceed to step 26 Select the day of the week and press Enter 222 You can select multiple days of the week Press Time 222 If you do not want to specify the time proceed to step 29 ...

Страница 209: ...mat You can use the numeric keys Press Enter 222 Press Close 222 Press Auto Print 333 Select ON and press Enter 333 If you select OFF the Auto Print setting is disabled Press Close 333 To continue to register distributing conditions and repeat the procedure from steps 5 to 32 It is necessary to set auto distribution to enable it See page 4 65 ...

Страница 210: ... Start Time and 11 59p m as End Time Condition 2 Select Saturday and Sunday in Weekday and no time setting Condition 3 Select Monday in Weekday 00 00a m as Start Time and 07 00a m as End Time Set the three conditions same other than the schedule Deleting Distributing Conditions Press Setting 11 Press the Resister tab 22 Press Auto Distribute 33 Select the distributing condition you want to delete ...

Страница 211: ...s the Resister tab 22 Press Auto Distribute 33 Press List 44 Select ON to enable duplex printing or OFF to disable it 55 Select ON to enable combined printing or OFF to disable it 66 Press Yes 77 Note The auto distribution settings list can also be printed from Auto Distribute in the List tab after pressing Setting ...

Страница 212: ...t easier to separate received documents For example if you use colored paper for the separator page it is easy to identify each individual fax job Separator Cassette Select the cassette or tray to use for the first sheet of paper Print Document Set whether to insert a blank page in the start of the received document 1 2 1 2 1 2 1 2 Separator page separates each received document Print Document OFF...

Страница 213: ...4 66 Useful Reception Functions Press Setting 11 Press the 22 Paper Settings tab Press 33 Separate Rx Page Press 44 Setting Select ON and press Enter 55 Press OFF to disable the separator page function ...

Страница 214: ...ul Reception Functions 4 67 Press Separator Cassette 66 Select 77 the paper source to print the separator page and press Enter Press 88 Print Document Select ON to print on the first page or OFF to insert a blank page and press 99 Enter ...

Страница 215: ...method is set to Network Transmitted and received documents inside a box are only displayed after performing a user login For details on performing a user login refer to Chapter 1 Logging In Logging Out in the Administrator s Guide Some boxes may not be able to be used depending on the document box settings For details on document box settings refer to Chapter 3 Specifying Document Box Settings in...

Страница 216: ...h between the thumbnail screen and the file list For details on previewing documents refer to Chapter 8 Printing OfficeBridge Box Documents in the Printer Guide Select the document you want to transmit and press Transmit 77 The document details are displayed when you double click the document or press Preview while it is selected Press Yes 88 Press No to close the screen without transmitting the d...

Страница 217: ... displayed when you double click the document or press Preview while it is selected Enter the number of copies to print using the numeric keys 55 Select the paper 66 For details on selecting paper refer to Chapter 1 Basic Copying in the Copier Guide To perform sorting press Sort 77 If you do not want to perform sorting proceed to step 9 Select the type of sorting and press Enter 88 You can also se...

Страница 218: ...nt box settings If a screen for entering the administrator password is displayed after the screen in step 5 enter the administrator password and press Enter For details on document box settings refer to Chapter 3 Specifying Document Box Settings in the OfficeBridge Guide Press Fax 11 Press the OB Documents tab 22 The shared reception box is displayed Select Shared Rx Box Rx Box or Tx Box 33 Select...

Страница 219: ... body and subject of the e mail to send You can also enter the body of the e mail using a template registered in advance Note For details on registering e mail templates refer to Registering Editing Templates see page 7 45 or Setting Templates in Chapter 3 of the OfficeBridge Guide Load the document and press Fax 11 Press the Advanced tab 22 Press e mail Subject 33 Press Template 44 ...

Страница 220: ...t If all the boxes already have a template registered select any box from 01 to 10 If you selected Auto Subject Text you cannot edit the subject and mail text Proceed to step 10 If you selected Auto Subject you can only edit the mail text Proceed to step 8 Press Subject 66 If you do not want to edit it proceed to step 8 For details on entering characters refer to Chapter 1 Entering Characters in t...

Страница 221: ...e mail text and press Enter 99 Up to 1024 characters can be entered for the mail text Press to enter a line break A line break takes up two characters Press ViewText to confirm the mail text that has been entered Press Edit to return to the entry screen For details on entering characters refer to Chapter 1 Entering Characters in the Administrator s Guide Press Enter 111 Specify the destination and...

Страница 222: ... transmit a scanned document with each page as a separate file Load the document and press Fax 11 Press the Advanced tab 22 Press Batch Transmission 33 Select OFF and press Enter 44 If you select ON the batch transmission setting is enabled Specify the destination and press Start 55 For details on specifying the destination refer to Specifying Destinations See page 5 2 ...

Страница 223: ...TIFF files use this file format TIFF The full mode TIFF format Documents are transmitted with the document size and resolution set when scanning PDF The PDF format Documents can be sent in this format when the destination is a computer or this product Load the document and press Fax 11 Press the Advanced tab 22 Press File Format 33 Select the file format and press Enter 44 Specify the destination ...

Страница 224: ... page 4 78 Only PDF files of monochrome scans created using this machine can be forwarded There are restrictions on the senders that can perform forwarding For details refer to Chapter 3 Setting the Connection Environment in the OfficeBridge Guide Up to 30 faxes can be transmitted Create the e mail 11 Attach a file as necessary 22 Enter FAXNO followed by the fax number for the destination enclosed...

Страница 225: ...ffMaker to the computer before using this function For details on installing the driver refer to Chapter 2 Installing to Windows in the Printer Guide The procedure for a document created with Microsoft Office Word 2007 is described here as an example Create and edit the document to transmit 11 Execute a print command in the application software 22 When using Microsoft Office Word 2007 click Print ...

Страница 226: ...by specifying the document size and paper size Paper Size Select the paper size to print with at the destination Resolution 200 200 dpi Equivalent to setting the resolution to Fine when transmitting from the machine 400 400 dpi Equivalent to setting the resolution to Super Fine when transmitting from the machine 600 600 dpi Equivalent to setting the resolution to Super Fine when transmitting from ...

Страница 227: ...ul Internet Fax Functions Start printing 77 When using Microsoft Office Word 2007 click OK The Save As dialog box is displayed Enter the filename to save with 88 Specify the location to save to 99 Click Save 111 ...

Страница 228: ...s Book 5 2 Searching for Server Destinations 5 6 Entering Destinations 5 10 Specifying Using Search Numbers 5 12 Selecting From the History 5 14 Confirming Specified Destinations 5 17 Checking the Specified Destinations 5 17 Checking Destinations with the Confirm Destination Function 5 18 ...

Страница 229: ...r or fax number group E mail address or e mail address group Folder shortcut User FTP shortcut Selecting from the Address Book If you register a destination in the address book in advance you can select that destination from the address book displayed on the screen When you have registered groups they are also displayed in the address book When you specify a destination from the address book trans...

Страница 230: ...s the E mail tab to display destinations registered with an e mail address or the All tab to display all destinations If you enable the Broadcast function in advance you can specify multiple destinations See page 2 9 and 3 19 Press or to switch the displayed pages To use the personal address book press Personal Mode to switch to the personal address book Perform a user login before using the perso...

Страница 231: ... a fax number You can also press the E mail tab to display destinations registered with an e mail address or the All tab to display all destinations If you enable the Broadcast function in advance you can specify multiple destinations See page 2 9 and 3 19 Press or to switch the displayed pages To use the personal address book press Personal Mode to switch to the personal address book Perform a us...

Страница 232: ...rom the Group When transmitting a fax or Internet Fax you can specify a destination group without using Index Press Fax 11 Press the Address Book tab 22 Select the 33 Group tab from the index tab Select the groups 44 indicates fax number group indicates e mail address group ...

Страница 233: ... the procedure for registering servers refer to Chapter 2 Specifying the Network Settings in the Administrator s Guide Simple Searching Enter part of the name or e mail address to search for Press Scan or Fax 11 Press Search on the Send to E mail tab of the scanner screen or Search on 22 the fax screen Enter part of the name or the e mail address to search for and press Execute 33 Up to 30 charact...

Страница 234: ...D OR AND Searches for destinations that meet all the specified conditions OR Searches for destinations that meet at least one of the specified conditions Search Items Name Enter to search for destinations by name Fax Enter to search for destinations by fax number e mail Enter to search for destinations by e mail address Co Enter to search for destinations by company name Cannot be specified as a s...

Страница 235: ...or the search condition you want to enter 33 In this example e mail is selected You can press Server on the search screen to change the server to perform searching Normally perform searching using the specified server Enter the search condition and press Enter 44 For details on entering characters refer to Chapter 1 Entering Characters in the Administrator s Guide ...

Страница 236: ...earch condition box 55 next to the search item you entered If you do not want to change the search condition proceed to step 7 Select the search condition and press Enter 66 To continue entering search conditions repeat the operation in steps 3 to 6 77 If the search condition is set proceed to step 8 Press Execute 88 ...

Страница 237: ...List and repeat steps 3 to 8 To perform another search press NewSearch and repeat steps 3 to 8 Regarding Search Results An icon is displayed in front of destinations in the search results Icon Description A fax number on an LDAP server An e mail address on an LDAP server A fax number registered in the address book An e mail address registered in the address book Note Press to check the details for...

Страница 238: ...vance See page 7 44 Dialing options can be entered For details on dialing options refer to Dialing Options See page 3 24 When there are multiple destinations repeat step 3 44 Note You can press Register after entering a fax number to register the displayed fax number in the address book See page 7 6 Entering E mail Addresses When transmitting with Internet Fax or Scan to E Mail enter the e mail ad...

Страница 239: ...g Characters in the Administrator s Guide When there are multiple destinations repeat steps 3 to 4 55 Note You can press Register after entering an e mail address to register the displayed e mail address in the address book See page 7 7 Specifying Using Search Numbers You can enter destinations by specifying registered search numbers Press Scan or Fax 11 Press the Advanced tab 22 ...

Страница 240: ...nd If you pressed Scan in step 1 proceed to step 6 Select Fax if transmitting a fax or e mail if transmitting an internet fax and 55 press Enter This screen is only displayed if both a fax number and e mail address are registered in the address book When there are multiple destinations repeat steps in 3 to 5 66 Note You cannot use prefixes when selecting a destination using the search number ...

Страница 241: ...d using the numeric keys You can also edit the selected history before using it as a destination Note Transmission using destinations registered in the address book are not displayed in the dial history Press Fax 11 Press the Address Book tab or the Num keys tab 22 Press Redial 33 If Redial is not displayed press the Advanced tab and then select Redial Select the destination you want to specify 44...

Страница 242: ... 66 Selecting E mail Addresses From the Transmission History When transmitting an Internet Fax or using Scan to E Mail you can select a destination from the history of the last 10 e mail addresses entered You can also edit the selected history before using it as a destination Note Transmission using destinations registered in the address book are not displayed in the e mail history Press Scan or F...

Страница 243: ...e mail address edit the address and press Enter 55 To use the displayed e mail address as it is press Enter without editing it For details on entering characters refer to Chapter 1 Entering Characters in the Administrator s Guide When there are multiple destinations repeat steps 2 and 5 66 ...

Страница 244: ...estination it is set as a To destination To set the destination as a Cc or Bcc destination change the setting on the destination confirmation screen If you entered the destination using the numeric keys or the keyboard an icon is not displayed Fax number or fax number group E mail address set as a To destination E mail address set as a Cc destination E mail address set as a Bcc destination Folder ...

Страница 245: ...art after specifying the destinations Note For details on setting the confirm destination function refer to Chapter 2 Confirming the Destination Before Transmission in the Administrator s Guide A screen for confirming or deleting the destinations is displayed when you press 11 Start after specifying the destinations Confirm the destinations and press Start again Example Scanner screen To delete a ...

Страница 246: ...ssion Result Transmission Report 6 2 Issuing the Transmission Report 6 2 Reading the Transmission Report 6 4 Managing the Communication History 6 5 Manually Printing Journal Reports 6 6 Automatically Printing Journal Reports 6 7 Reading Journal Reports 6 11 ...

Страница 247: ... e mail the transmission results of faxes and Internet Faxes Note You can also set to always print a transmission report For details refer to Specifying Default Fax Settings See page 7 42 Issuing the Transmission Report Load the document and press Fax 11 Press the Advanced tab 22 Press Tx Report 33 Press Tx Report Setting 44 ...

Страница 248: ...pecify the destination for transmission report and 66 press Enter Up to 50 characters can be entered To delete one of the entered characters press Clear Press Close 77 Specify the destination and press Start 88 For details on specifying the destination refer to Specifying Destinations See page 5 2 Note You can change the transmission report settings while scanning Press Tx Report on the screen dis...

Страница 249: ...he type of communication is printed for the following types of communication Manual Tx Polling Tx F Code Tx Broadcast Tx PC Fax Tx PC Fax F code Tx Archive Tx Rerouted Fax Tx 8 Result OK Completed normally ECM Mode transmission Super G3 transmission Code The communication error code 1 9 Details Blank when the communication ends without an error When a communication error occurs the error message i...

Страница 250: ...the daily communication report for the previous day has not yet been printed because it has not yet reached the specified time the daily communication report is also printed when the number of jobs reaches 1 000 Types of Journal Reports The following types of journal reports are printed by the machine When manually printing a report you can select the type of journal report to print When a daily c...

Страница 251: ...lly Printing Journal Reports You can print the history of the latest 100 jobs for the specified type of communication Press Setting 11 Press the List tab 22 Press Journal List 33 Select the type of communication to print the journal report for 44 ...

Страница 252: ...to disable it 66 Press Yes 77 For information on reading the reports refer to Reading Journal Reports See page 6 11 Automatically Printing Journal Reports You can set to print the report when there is transmission history for 100 jobs or set to print the transmission history every day at a set time for a daily communication report Press Setting 11 Press the Default Settings tab 22 ...

Страница 253: ...6 8 Managing the Communication History Press Fax Settings 33 Press Other Settings 44 Press Auto Print Journal 55 ...

Страница 254: ... 66 time press Reserve print If you selected ON proceed to step 12 If you selected OFF the procedure is complete when you press Enter Press Print Reservation 77 Enter the printing time and press Enter 88 You can use the numeric keys Enter the time in the entry box in the 12 hour format Select the type of communication to print the journal report for 99 ...

Страница 255: ...elect OFF the print setting is disabled To continue selecting types of communication repeat the operation in steps 9 and 10 Press Close 111 Select ON to enable duplex printing or OFF to disable it 111 Select ON to enable combined printing or OFF to disable it 111 Press Enter 111 ...

Страница 256: ...as the archive transmission or scan path notification function 8 Result OK Completed normally ECM Mode transmission Super G3 transmission Code The communication error code 1 9 Note The type of communication is printed for the following types of communication Nothing is printed for other types of communication Manual Tx Polling Tx F Code Tx Broadcast PC Fax Tx PC Fax F code Tx Archive Tx Rerouted F...

Страница 257: ...ror code 1 8 Note The type of communication is printed for the following types of communication Nothing is printed for other types of communication Manual Rx Polling Rx F code polling Rx Received in F code Secure Box Received in F code Bulletin Box 9 Printed date 2 The date and time that the journal report was printed 10 The date and time that the journal report was printed or the date and time th...

Страница 258: ...rmed transmission with a function such as the archive transmission or scan path notification function 6 Result OK Transmission complete Code The communication error code 1 7 Number of addresses The number of destinations transmitted to 8 Printed date 2 The date and time that the journal report was printed 9 The date and time that the journal report was printed or the date and time that communicati...

Страница 259: ...orwarding A reception error occurred and the received e mail was forwarded Error Mail Reply A reception error occurred and the received e mail was replied to Error Mail Size over A reception error occurred due to the e mail size being too large and a notification e mail was transmitted Erase A reception error occurred and the received e mail was erased 7 Printed date 2 The date and time that the j...

Страница 260: ...e machine performed transmission with a function such as the archive transmission or scan path notification function 6 Result OK Completed normally Code The communication error code 1 7 Printed date 2 The date and time that the journal report was printed 8 The date and time that the journal report was printed or the date and time that communication history started to be stored for a daily communic...

Страница 261: ...6 16 Managing the Communication History ...

Страница 262: ... a Color Printer 7 25 Registering Favorite Destinations 7 31 Specifying Default Settings 7 34 Specifying Default Scanner Settings 7 34 Specifying Default E mail Transmission Settings 7 38 Specifying Default Fax Settings 7 41 Registering Other Settings 7 45 Registering Editing Templates 7 45 Registering Editing File Names 7 48 Registering Editing Document Categories 7 50 Registering Editing Domain ...

Страница 263: ...e destination Pause and other dialing options can be entered in addition to numerals and See page 3 24 Also register the prefix number if you want to use a prefix Up to 40 digits can be entered e mail The e mail address of the destination Up to 50 characters can be entered Super G3 Set whether to perform transmission with Super G3 PIN If Mode 1 is set for the PIN mode register a PIN Note Either a ...

Страница 264: ...ing This section describes the procedure for registering address book destinations When editing select the destination you want to edit in step 4 and press Edit After select the item to change Press Setting 11 Press the Register tab 22 Press Address Book Entry 33 44 Press Add ...

Страница 265: ...er fax number proceed to next step If you do not want to register an e mail address press Enter and proceed to step 8 66 Press e mail Enter the e mail address and press Enter 77 Up to 50 characters can be entered 88 If Mode 1 is set for the PIN mode enter the PIN and press Enter Otherwise proceed to step 9 ...

Страница 266: ... search number and press Enter 111 You can not overwrite the search number that has already been registered Press Super G3 111 Select ON to enable transmission with Super G3 or OFF to disable it and 111 press Enter Press Close 111 To continue to register address book destinations repeat the procedure for steps 4 to 14 Note Refer to Chapter 2 Activating the PIN mask in the Administrator s guide how...

Страница 267: ... screen press 22 the Address Book tab Example Scan screen Press Add Edit 33 The procedure is then the same as for registering an address book destination 44 Continue from step 4 of Registering Editing See page 7 3 Useful Registration Method 2 Registering a Number Entered With the Numeric Keys Press Fax 11 Press the Num keys tab 22 Use the numeric keys to enter the destination fax number 33 ...

Страница 268: ...Otherwise proceed to step 6 Enter the name and press Enter 66 Up to 30 characters can be entered The procedure is then the same as for registering an address book destination 77 Continue from step 10 of Registering Editing See page 7 5 Useful Registration Method 3 Registering an Entered E mail Address Press Scan or Fax 11 Press the Advanced tab 22 Press Mail Address 33 ...

Страница 269: ...tails on entering characters refer to Chapter 1 Entering Characters in the Administrator s Guide Press Register 55 Enter the name and press Enter 66 Up to 30 characters can be entered The procedure is then the same as for registering an address book destination 77 Continue from step 10 of Registering Editing See page 7 5 ...

Страница 270: ...ching for Server Destinations for how to search destinations See page 5 6 Press 22 on the screen displaying the search results Press Register 33 Press Yes 44 Press No to close the screen without registering the data The procedure is then the same as for registering an address book destination 55 Continue from step 10 of Registering Editing See page 7 5 ...

Страница 271: ...ect the destination you want to delete then press Delete 44 Press Yes 55 Press No to close the screen without deleting the data To continue deleting data repeat the operation from step 4 Press Close 66 Printing the Address Book Destination List Press Setting 11 Press the Register tab 22 Press Address Book Entry 33 ...

Страница 272: ...ss Number or Alphabet 55 Select ON to enable duplex printing or OFF to disable it 66 Select ON to enable combined printing or OFF to disable it 77 Press Yes 88 Note The address book destination list can also be printed from Address Book List in the List tab after pressing Setting ...

Страница 273: ... button on the screen Up to 50 characters can be entered Group Members The destinations registered in the group Up to 1000 address book destinations can be specified Note If you register a group two group buttons are created in the address book a fax number button and e mail address button Registering Editing Press Setting 11 Press the Register tab 22 Press Group 33 Press Add 44 To edit a register...

Страница 274: ...peed Dial you can select a destination using a search number For details on selecting search numbers refer to Specifying Using Search Numbers See page 5 12 If you press Search you can search a destination For details on searching destination refer to Searching for Server Destinations See page 5 6 Press Close 77 To continue to register or edit groups repeat the procedure in step 4 to 7 Deleting Pre...

Страница 275: ... Delete 44 Press Yes 55 Press No to close the screen without deleting the data To continue deleting groups repeat the operation in steps 4 to 5 Printing a Group List Press Setting 11 Press the Register tab 22 Press Group 33 Select the group you want to print and press List 44 ...

Страница 276: ...ting Registering Editing Folder Shortcuts Up to 300 frequently used shared folders can be registered as shortcuts Note The folder to register must have shared folder settings specified on the computer you are using in advance Shortcuts can also be registered from OfficeBridge For details refer to Chapter 3 Registering Shortcuts in the OfficeBridge Guide You can register personal folder shortcuts F...

Страница 277: ...o the folder enter the link manually or browse to the desired folder The link must be registered Up to 128 characters can be entered User Name Register a user name when it is required to access the folder Up to 64 characters can be entered Password Register a password when it is required to access the folder Up to 28 characters can be entered Automatic Network Login You can set whether to perform ...

Страница 278: ...it Browse to the folder you want to register specify the folder and press Enter 55 Press Keypad to manually enter or edit the link After entry press Enter Start the link with two slashes Press Root to return to the list of computers or networks Press Back to return to the previous screen 66 Press Shortcut Name If you do not want to register or edit the shortcut name proceed to step 8 ...

Страница 279: ... Enter 99 For details on entering characters refer to Chapter 1 Entering Characters in the Administrator s Guide Press Password 111 Enter or edit the password and press Enter 111 For details on entering characters refer to Chapter 1 Entering Characters in the Administrator s Guide Press Automatic Network Login 111 Select ON to set the automatic network login function or OFF to disable it 111 and p...

Страница 280: ...Delete 44 Press Yes to proceed with the deletion 55 Press No to close the screen without deleting the shortcut To continue deleting shortcuts repeat the operation in steps 4 to 5 Registering a Browsed Folder Specify a folder 11 See Scanning to a Shared PC Folder step 1 to 5 See page 1 4 Press Register 22 Press Yes to proceed 33 Press No to close the screen without registering the shortcut ...

Страница 281: ...istering a shortcut to an FTP server from OfficeBridge you can also register the PASV mode default ON and port number For details refer to Chapter 3 Registering Shortcuts in the OfficeBridge Guide Registering Editing The following items can be registered for each FTP server shortcut Item Description Shortcut Name This is the button name displayed on the screen Up to 24 characters can be entered If...

Страница 282: ...Press Setting 11 Press the Register tab 22 Press FTP Shortcut 33 44 Press Add To change a shortcut that is already registered select the name of the shortcut you want to change and press Edit Press Link 55 If you do not want to change the link proceed to step 7 ...

Страница 283: ... 66 Start the link with two slashes Press Shortcut Name 77 If you do not want to register or edit the shortcut name proceed to step 9 Register or edit the shortcut name and press Enter 88 For details on entering characters refer to Chapter 1 Entering Characters in the Administrator s Guide Press User Name 99 ...

Страница 284: ...racters in the Administrator s Guide Press Password 111 Enter or edit the password and press Enter 111 For details on entering characters refer to Chapter 1 Entering Characters in the Administrator s Guide Press Close 111 To continue to register or edit shortcuts repeat the procedure in steps 4 to 13 Deleting Press Setting 11 Press the Register tab 22 Press FTP Shortcut 33 ...

Страница 285: ...55 Press No to close the screen without deleting the shortcut To continue deleting shortcuts repeat the operation in steps 4 to 5 Registering from an Operation Screen On the screen for specifying an FTP server press Add Edit 11 Refer to the procedure in steps 5 to 13 of Registering Editing to register the 22 shortcut See page 7 21 ...

Страница 286: ...color printer to use in Scan to Print Monitor Set the following items in Scan to Print Monitor Setting Description Reference page Folder Settings Register the shared folder and printer to use with the Scan to Printer function Must be registered 7 26 General You can set the following four items Print Log Display print errors in popup window Delete printed document Limit memory size 7 29 Network Set...

Страница 287: ...r that is separate from the folder used for the Scan to Folder function Be sure that the shared folder allows Full control at Permissions for Everyone in security setting Printer Register the printer You can register a printer installed in the computer you are using Margin With some printers the document may be reduced when printed to avoid the margin where printing cannot be performed You can reg...

Страница 288: ... To register a new printer select an unregistered item and click Register Edit 33 If the message Cannot connect to the server is displayed specify the Network Settings first See page 7 30 To change registered information select the item you want to change and click Register Edit Click Browse 44 ...

Страница 289: ...click OK 55 Click the Printer list button and select a color printer registered in the 66 computer Click Margin and register the margin if necessary 77 Click OK to close the screen 88 Place the cursor in the Name entry box and register the printer name 99 Change the account name as necessary 111 ...

Страница 290: ...Limit memory size May enable you to perform printing when printing cannot be performed correctly due to the document size or resolution settings Right click the task tray icon of the Scan to Print Monitor and select 11 Configuration Press the General tab 22 Select the required items 33 Click OK 44 Note If Delete printed document is not selected printed image files will remain in the program instal...

Страница 291: ...ort number set in OfficeBridge This is normally set to 433 Perform secure communications Select this to perform SSL communications Right click the task tray icon of the Scan to Print Monitor and select 11 Configuration Select the Network Settings tab 22 To change the IP address of the machine enter the IP address 33 Click Search to automatically search for copiers on the network and select the MFP...

Страница 292: ...d Registering Favorite Destinations You can register up to 10 destinations to display in the Faves Destination tab Note Destinations registered in the Faves Destination tab must already be registered in the address book or as a shortcut Destinations registered in the Faves Destination tab cannot be deleted without first deleting them from the Faves Destination tab Registering Editing Press Setting...

Страница 293: ...nt to register and press Enter 55 To continue to register or edit favorites repeat the procedure in steps 4 to 5 Note You can press Add Edit in the Faves Destination tab to jump to the procedure for registering or editing favorites Perform steps 4 and 5 to register the favorite Deleting Press Setting 11 Press the Register tab 22 Press Favorite Address 33 ...

Страница 294: ... Destinations 7 33 Select the favorite you want to delete and press Delete 44 Press Yes to proceed with the deletion 55 Press No to close the screen without deleting the data To continue to delete favorites repeat the procedure in steps 4 to 5 ...

Страница 295: ...te You can set the time it takes to return to the default settings For details refer to Chapter 1 Specifying Default Settings in the Administrator s Guide Specifying Default Scanner Settings You can change the default values and other settings for the scanner function For information on the items and settings that can be specified refer to List of Default Scanner Settings see page 7 36 and List of...

Страница 296: ... For details on the settings that can be specified refer to List of Default Scanner Settings see page 7 36 and List of Other Settings see page 7 37 Select the function to set 55 In this example Contrast is selected Select the default value and press Enter 66 Press Close 77 To continue to change other default values repeat steps 3 to 6 of the operation ...

Страница 297: ...fault scan size setting Letter Legal H LTR A4 F4 A5 2 6 Stamp 1 You can stamp a document that has been scanned using the ADF and check it has been scanned OFF ON 2 41 Next Document Setting You can scan a series of separate documents and transmit them as a single document ADF ON OFF FBS Document glass ON OFF 2 11 Color Adjustment Set the default color adjustment setting Contrast 3 2 1 0 1 2 3 0 Sha...

Страница 298: ...ed 2 30 Option Note Underlined values are the default settings specified at the time of shipment For details on these settings refer to Setting Example See page 7 34 List of Other Settings Function Description Settings Reference page JPEG Compression This sets the compression rate used when performing color scanning with the JPEG file format Low Decreases the compression rate This option reduces i...

Страница 299: ...ge 7 40 Setting Example Here the procedure for changing the default file format used when attaching a scanned document to an e mail for transmission Scan to E Mail is described as an example Press Setting 11 Press the Default Settings tab 22 Press e mail Settings 33 Press e mail Internet Fax or Template 44 In this example e mail is selected For information on the items and settings that can be spe...

Страница 300: ...s for PDF w Password you can set the encryption level and restrictions with a permissions password Note If you have changed the file format in the default scanner settings that setting is also changed See page 7 37 Mono TIFF PDF PDF w Password Color JPEG PDF PDF w Password PDF w Password Encryption Level Low 40 bit RC4 High 128 bit RC4 High 128 bit AES Printing Allowed Not allowed Editing Allowed ...

Страница 301: ...ote Underlined values are the default settings specified at the time of shipment For details on these settings refer to Setting Example See page 7 38 List of Default Template Settings Function Description Settings Reference page Auto Subject Text You can change the default e mail subject and message settings used with the Internet Fax and Scan to E Mail functions Frequently used text can be regist...

Страница 302: ...gs that can be specified refer to List of Default Transmission Settings see page 7 42 and List of Other Default Settings see page 7 43 Setting Example Here the procedure for changing the resolution is described as an example Press Setting 11 Press the Default Settings tab 22 Press Fax Settings 33 Select the default setting to specify 44 In this example Default Settings is selected ...

Страница 303: ...und 3 21 Contrast Option This sets the default contrast when a document is scanned Lightest Lighter Normal Darker Darkest 3 23 Stamp 1 You can stamp a document that has been scanned or transmitted using the ADF and check it has been scanned or transmitted ON OFF 4 10 Next Document Setting You can scan a series of separate documents and transmit them as a single document ADF ON OFF FBS ON OFF 4 7 T...

Страница 304: ...ng interval used when the pause option is input 0 10 seconds 2 seconds 3 24 S Fine Resolution This sets the scanning resolution to use when super fine resolution is set for transmission When set to 600 dpi the image quality will be higher than with 400 dpi but the machine may run out of memory when performing the transmission 600 dpi 400 dpi 3 21 Rx Reduction Rate Select from Auto which automatica...

Страница 305: ... Stamp Prints the time that documents are received This enables you to accurately manage the arrival time of received documents ON OFF Auto Print Journal You can print a list of communication jobs ON OFF Reserve print 6 7 Journal Line Up You can select whether to arrange printed journal reports in order of job or in order of communication number OFF ON 6 6 Note Underlined values are the default se...

Страница 306: ... the following three items Title The title of the registered template Up to 40 characters can be entered Subject The subject entered here is used as the subject for the e mail to transmit Up to 80 characters can be entered Text The text entered here is used as the message for the e mail to transmit Up to 1024 characters can be entered This section describes the procedure for registering templates ...

Страница 307: ...e template you want to edit and press Edit Press Title 55 Edit the title and press Enter 66 For details on entering characters refer to Chapter 1 Entering Characters in the Administrator s Guide To enter a subject press Subject 77 If you do not want to enter a subject proceed to step 9 ...

Страница 308: ...ide To enter the message press Text 99 If you do not want to enter the message proceed to step 11 Enter or edit the message and press Enter 111 For details on entering characters refer to Chapter 1 Entering Characters in the Administrator s Guide Press to enter a line break A line break takes up two characters Press Close 111 To continue to register or edit templates repeat the procedure in steps ...

Страница 309: ...mplate you want to delete and press Delete 44 Press Yes 55 To continue deleting templates repeat the operation in steps 4 to 5 Registering Editing File Names You can register up to 20 file names to use for scanned image data in advance Registering Editing Press Setting 11 Press the Register tab 22 Press File Name 33 ...

Страница 310: ...the file name and press Enter 55 Up to 80 characters can be entered For details on entering characters refer to Chapter 1 Entering Characters in the Administrator s Guide To continue to register or edit file names repeat the procedure in steps 4 to 5 Deleting Registered file names can be deleted from OfficeBridge For details refer to Chapter 3 Setting Templates in the OfficeBridge Guide ...

Страница 311: ...0 document categories to use when saving scanned documents in the box in advance Registering Editing Press Setting 11 Press the Register tab 22 Press Document Category 33 Select a new button 44 To change a document category that is already registered select the document category you want to change ...

Страница 312: ...tegories repeat the procedure in steps 4 to 5 Deleting Registered document categories can be deleted from OfficeBridge For details refer to Chapter 3 Setting Templates in the OfficeBridge Guide Registering Editing Domain Names The domain name buttons displayed in the Alphanumeric Display screen on the character entry screen can use registered domain names You can register up to 10 types of domain ...

Страница 313: ...nter or edit the domain name and press Enter 55 Up to 20 characters can be entered For details on entering characters refer to Chapter 1 Entering Characters in the Administrator s Guide To continue to register or edit domain names repeat the procedure in steps 4 to 5 Deleting Delete all the characters in step 5 of Registering Editing and press Enter ...

Страница 314: ... G component 3 2 1 0 1 2 3 in RGB adjustment 010 019 B RFine adjustment for the B component 3 2 1 0 1 2 3 in RGB adjustment 020 029 Contrast Density Fine adjustment for the contrast setting 3 2 1 0 1 2 3 040 043 Contrast Brightness level Fine adjustment for this contrast setting 3 2 1 0 1 2 3 060 065 Lightness Fine adjustment for the lightness setting 3 2 1 0 1 2 3 066 071 Hue Fine adjustment for ...

Страница 315: ...s Yes 66 Press Register Change 77 Press Initialize and then Yes to return the adjustment values to the factory default settings Press 88 and to select the item to adjust Enter the adjustment value using 99 and press Enter Press Close 111 ...

Страница 316: ...rt about limitations on overlapping settings for the color adjustment function Color Fine Adjustment Contrast Density Contrast Brightness level Sharpness RGB Lightness Saturation Hue Contrast Density Contrast Brightness level Sharpness RGB Lightness Saturation Hue Cannot be set simultaneously Blank Can be set simultaneously ...

Страница 317: ...7 56 Registering Other Settings ...

Отзывы: