background image

1

Unpacking

Unpacking

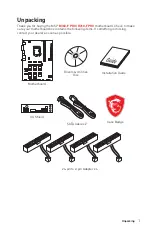
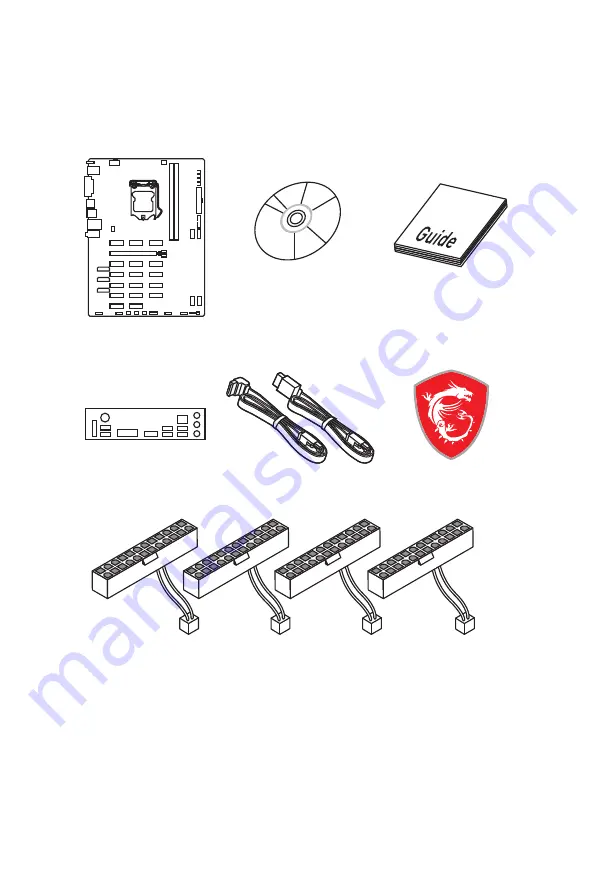
Thank you for buying the MSI

®


B360-F PRO/ H310-F PRO


motherboard. Check to make 

sure your motherboard box contains the following items. If something is missing, 

contact your dealer as soon as possible.

SATA Cable x2

24-pin to 2-pin  Adapter x4

Drivers & Utilities 

Disc

Installation Guide

I/O Shield

Motherboard

Case Badge

Содержание B360-F PRO

Страница 1: ... F PRO motherboard Check to make sure your motherboard box contains the following items If something is missing contact your dealer as soon as possible SATA Cable x2 24 pin to 2 pin Adapter x4 Drivers Utilities Disc Installation Guide I O Shield Motherboard Case Badge ...

Страница 2: ... computer before installation is completed This could cause permanent damage to the components as well as injury to the user y If you need help during any installation step please consult a certified computer technician y Always turn off the power supply and unplug the power cord from the power outlet before installing or removing any computer component y Keep this user guide for future reference ...

Страница 3: ...TX_PWR1 GPU_PWR1 3 optional Power Connectors 21 CPU_FAN1 SYS_FAN1 Fan Connectors 22 SATA1 4 SATA 6Gb s Connectors 23 JFP1 JFP2 Front Panel Connectors 23 JAUD1 Front Audio Connector 24 JTPM1 TPM Module Connector 24 JUSB1 USB 2 0 Connector 25 JUSB2 USB 3 1 Gen1 Connector 25 JCI1 Chassis Intrusion Connector 26 JCOM1 Serial Port Connector 26 POWER1 RESET1 Power Button Reset Button 27 CLR_CMOS1 Clear C...

Страница 4: ...ASH 49 OC PROFILE 50 HARDWARE MONITOR 51 Software Description 52 Installing Windows 10 52 Installing Drivers 52 Installing Utilities 52 APP MANAGER 53 LIVE UPDATE 6 54 COMMAND CENTER 56 X BOOST 60 DPC LATENCY TUNER 62 SMART TOOL 63 RAMDISK 65 NETWORK MANAGER 66 Troubleshooting 68 ...

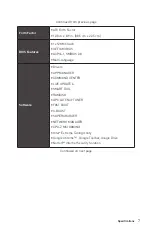
Страница 5: ...Ie 3 0 x1 slots B360 F PRO 12x PCIe 2 0 x1 slots H310 F PRO Onboard Graphics y 1x DVI D port supports a maximum resolution of 1920x1200 60Hz y 1x HDMI port 1 4 supports a maximum resolution of 4096x2160 30Hz Storage Intel B360 Chipset y 4x SATA 6Gb s ports USB Intel B360 Chipset y 4x USB 3 1 Gen1 SuperSpeed USB ports 2 Type A ports on the back panel 2 ports available through the internal USB conne...

Страница 6: ...onnectors y 4x SATA 6Gb s connectors y 1x USB 3 1 Gen1 connector supports additional 2 USB 3 1 Gen1 ports y 1x USB 2 0 connector supports additional 2 USB 2 0 ports y 1x 4 pin CPU fan connector y 1x 4 pin system fan connector y 1x Front panel audio connector y 2x Front panel connectors y 1x TPM module connector y 1x Chassis Intrusion connector y 1x Serial port connector y 1x Clear CMOS jumper y 1x...

Страница 7: ...OS y ACPI 6 1 SMBIOS 2 8 y Multi language Software y Drivers y APP MANAGER y COMMAND CENTER y LIVE UPDATE 6 y SMART TOOL y RAMDISK y DPC LATENCY TUNER y FAST BOOT y X BOOST y SUPER CHARGER y NETWORK MANAGER y CPU Z MSI GAMING y Intel Extreme Tuning Utility y Google Chrome Google Toolbar Google Drive y Norton Internet Security Solution Continued on next page ...

Страница 8: ...s Continued from previous page Special Features y Audio Audio Boost y Network Intel LAN with Network Manager y Fan Smart Fan Control y LED EZ DEBUG LED y Stability 7000 Quality Test y VR VR Ready y BIOS Click BIOS 5 ...

Страница 9: ...Diagram 2 Channel DDR4 Memory USB 3 1 Gen1 PCI_E1 PCI_E2 6 PCI_E7 13 USB 2 0 P S2 Mouse Keyboard Audio Jacks DMI 3 0 B360 H310 CPU NV5567 Super I O ASM1187E Realtek ALC887 PCIe x16 HDMI PCI_E14 18 B360 only DVI D SATA 6Gb s ...

Страница 10: ...n Green 100 Mbps connection Orange 1 Gbps connection LAN Port LED Status Table Debug LED Table LAN USB 2 0 USB 3 1 Gen1 Mic Line Out Line In DVI D PS 2 USB 2 0 Debug LED LED Description CPU Indicates CPU is not detected or fail DRAM Indicates DRAM is not detected or fail VGA Indicates GPU is not detected or fail BOOT Indicates the booting device is not detected or fail ...

Страница 11: ...ut device y Main Volume controls the volume or balance the right left side of the speakers that you plugged in front or rear panel by adjust the bar y Profiles toggles between profiles y Advanced Settings provides the mechanism to deal with 2 independent audio streams y Jack Status depicts all render and capture devices currently connected with your computer y Connector Settings configures the con...

Страница 12: ...nents B360 F PRO PCI_E1 18 GPU_PWR1 GPU_PWR2 GPU_PWR3 JTPM1 CLR_CMOS1 POWER1 RESET1 JCOM1 CPU Socket CPU_PWR1 ATX_PWR1 JPS_ON1 JPS_ON2 JPS_ON3 JPS_ON4 JUSB1 JUSB2 JBAT1 DIMMA1 DIMMB1 JCI1 SATA3 SATA4 SATA2 SATA1 CPU_FAN1 SYS_FAN1 JFP2 JFP1 JAUD1 ...

Страница 13: ...310 F PRO PCI_E1 13 GPU_PWR1 GPU_PWR2 JTPM1 CLR_CMOS1 POWER1 RESET1 JCOM1 CPU Socket CPU_PWR1 ATX_PWR1 JPS_ON1 JPS_ON2 JPS_ON3 JPS_ON4 JUSB1 JUSB2 JBAT1 DIMMA1 DIMMB1 JCI1 SATA3 SATA4 SATA2 SATA1 CPU_FAN1 SYS_FAN1 JFP2 JFP1 JAUD1 ...

Страница 14: ...1 DIMM Slots 17 JAUD1 Front Audio Connector 24 JBAT1 Clear CMOS Reset BIOS Jumper 27 JCI1 Chassis Intrusion Connector 26 JCOM1 Serial Port Connector 26 JFP1 JFP2 Front Panel Connectors 23 JPS_ON1 4 Multiple Power Supplies Turn On Connectors 20 JTPM1 TPM Module Connector 24 JUSB1 USB 2 0 Connector 25 JUSB2 USB 3 1 Gen1 Connector 25 PCI_E1 18 PCIe Expansion Slots 19 POWER1 RESET1 Power Button Reset ...

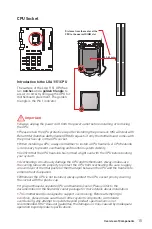
Страница 15: ... before booting your system y Overheating can seriously damage the CPU and motherboard Always make sure the cooling fans work properly to protect the CPU from overheating Be sure to apply an even layer of thermal paste or thermal tape between the CPU and the heatsink to enhance heat dissipation y Whenever the CPU is not installed always protect the CPU socket pins by covering the socket with the p...

Страница 16: ...16 Overview of Components https youtu be 4ce91YC3Oww Installing a Processor 1 2 3 6 4 5 7 8 9 ...

Страница 17: ...he memory address limitation Therefore we recommended that you to install 64 bit Windows OS if you want to install more than 4GB memory on the motherboard y Some memory may operate at a lower frequency than the marked value when overclocking due to the memory frequency operates dependent on its Serial Presence Detect SPD Go to BIOS and find the Memory Try It to set the memory frequency if you want...

Страница 18: ...18 Overview of Components Installing DDR4 memory http youtu be T03aDrJPyQs 1 1 2 2 3 3 ...

Страница 19: ...install multiple grahics cards for mining system and connect as shown below Connect PCIe power cables from PSU to graphics cards and PCIe x16 risers power jacks Install graphics cards on PCIe x16 risers Install one graphics card in PCIe x16 slot of the motherboard or you can also install the graphics card with PCIe Riser Kit Connect PCIe x1 risers and PCIe x16 risers with USB 3 1 Gen1 cables Insta...

Страница 20: ...N The graphics card works normally OFF The slot is empty or the graphics card has an error JPS_ON1 4 Multiple Power Supplies Turn On Connectors These connectors use to turn on the multiple power supplies at the same time Each connector can be connected to an additional power supply with a 24 pin to 2 pin adapter JPS_ON1 JPS_ON2 JPS_ON3 JPS_ON4 1 1 JPS_ON 2 Ground Additional power supply 24 pin con...

Страница 21: ... 12 3 3V 24 Ground 5 4 1 8 CPU_PWR1 1 Ground 5 12V 2 Ground 6 12V 3 Ground 7 12V 4 Ground 8 12V Important Please connect the CPU_PWR1 ATX_PWR1 GPU_PWR1 3 SSDs and System Fans to the same main PSU to prevent unexpected problems CPU_PWR1 ATX_PWR1 GPU_PWR1 3 optional Power Connectors These connectors allow you to connect the ATX power supply unit PSU GPU_PWR1 GPU_PWR2 GPU_PWR3 optional 1 1 12V 3 Grou...

Страница 22: ...nstruction below to adjust the fan connector to PWM or DC Mode PWM Mode pin definition 1 Ground 2 12V 3 Sense 4 Speed Control Signal DC Mode pin definition 1 Ground 2 Voltage Control 3 Sense 4 NC Default PWM Mode fan connectors Default DC Mode fan connectors Switching fan mode and adjusting fan speed You can switch between PWM mode and DC mode and adjust fan speed in BIOS HARDWARE MONITOR Select P...

Страница 23: ... cables have identical plugs on either sides of the cable However it is recommended that the flat connector be connected to the motherboard for space saving purposes SATA3 SATA1 SATA4 SATA2 JFP1 JFP2 Front Panel Connectors These connectors connect to the switches and LEDs on the front panel 1 2 10 9 JFP1 1 HDD LED 2 Power LED 3 HDD LED 4 Power LED 5 Reset Switch 6 Power Switch 7 Reset Switch 8 Pow...

Страница 24: ...ead Phone L 10 Head Phone Detection 1 2 14 13 1 LPC Clock 2 3V Standby power 3 LPC Reset 4 3 3V Power 5 LPC address data pin0 6 Serial IRQ 7 LPC address data pin1 8 5V Power 9 LPC address data pin2 10 No Pin 11 LPC address data pin3 12 Ground 13 LPC Frame 14 Ground JTPM1 TPM Module Connector This connector is for TPM Trusted Platform Module Please refer to the TPM security platform manual for more...

Страница 25: ...e your iPad iPhone and iPod through USB ports please install MSI SUPER CHARGER utility JUSB2 USB 3 1 Gen1 Connector This connector allows you to connect USB 3 1 Gen1 ports on the front panel 1 10 11 20 1 Power 11 USB2 0 2 USB3_RX_DN 12 USB2 0 3 USB3_RX_DP 13 Ground 4 Ground 14 USB3_TX_C_DP 5 USB3_TX_C_DN 15 USB3_TX_C_DN 6 USB3_TX_C_DP 16 Ground 7 Ground 17 USB3_RX_DP 8 USB2 0 18 USB3_RX_DN 9 USB2 ...

Страница 26: ...t and then press the Enter key to select Yes 6 Once the chassis cover is opened again a warning message will be displayed on screen when the computer is turned on Resetting the chassis intrusion warning 1 Go to BIOS Settings Security Chassis Intrusion Configuration 2 Set Chassis Intrusion to Reset 3 Press F10 to save and exit and then press the Enter key to select Yes Normal default Trigger the ch...

Страница 27: ...on JBAT1 Clear CMOS Reset BIOS Jumper There is CMOS memory onboard that is external powered from a battery located on the motherboard to save system configuration data If you want to clear the system configuration set the jumpers to clear the CMOS memory Keep Data default Clear CMOS Reset BIOS Resetting BIOS to default values 1 Power off the computer and unplug the power cord 2 Use a jumper cap to...

Страница 28: ...owing methods to enter BIOS setup y Press Delete key when the Press DEL key to enter Setup Menu F11 to enter Boot Menu message appears on the screen during the boot process y Use MSI FAST BOOT application Click on GO2BIOS button and choose OK The system will reboot and enter BIOS setup directly Click on GO2BIOS Function key F1 General Help F2 Add Remove a favorite item F3 Enter Favorites menu F4 E...

Страница 29: ...erboard Name shows the name of the motherboard y Mining Mode Indicator shows whether Mining Mode is ON or OFF y Hotkey Description describes the available hotkeys Ctrl M Switch between Mining Mode and Standard Mode Pause Break Suspend the system POST for 5 seconds Del key Enter BIOS setup F11 Enter boot menu for selecting boot device Ctrl F5 Enter M Flash mode to reflash BIOS Mining Mode The BIOS ...

Страница 30: ...nsert the USB flash drive that contains the update file into the computer 2 Press Ctrl F5 key during POST 3 Click on Yes to reboot the system and enter the flash mode 4 Select a BIOS file to perform the BIOS update process 5 After the flashing process is 100 completed the system will reboot automatically Updating the BIOS with Live Update 6 Before updating Make sure the LAN driver is already insta...

Страница 31: ...Mode switch press this tab or the F7 key to switch between Advanced mode and EZ mode y Screenshot click on this tab or the F12 key to take a screenshot and save it to USB flash drive FAT FAT32 format only y Search click on this tab or the Ctrl F keys and the search page will show It allows you to search by BIOS item name enter the item name to find the item listing Move the mouse over a blank spac...

Страница 32: ...the fan speed by percentage y Favorites menu press the F3 key to enter Favorites menu It allows you to create personal BIOS menu where you can save and access favorite frequently used BIOS setting items Default HomePage allows you to select a BIOS menu e g SETTINGS OC etc as the BIOS home page Favorite1 5 allows you to add the frequently used favorite BIOS setting items in one page To add a BIOS i...

Страница 33: ...Z Mode Overview section y BIOS menu selection the following options are available SETTINGS allows you to specify the parameters for chipset and boot devices OC allows you to adjust the frequency and voltage Increasing the frequency may get better performance M FLASH provides the way to update BIOS with a USB flash drive OC PROFILE allows you to manage overclocking profiles HARDWARE MONITOR allows ...

Страница 34: ...The date from 1 to 31 can be keyed by numeric function keys year The year can be adjusted by users f System Time Sets the system time Use tab key to switch between time elements The time format is hour minute second f SATA PortX M2_X Shows the information of connected SATA M 2 devices Important If the connected SATA device is not displayed turn off computer and re check SATA cable and power cable ...

Страница 35: ...u to utilize more than 4x GPUs Disabled Disables this function f ACPI Settings Sets ACPI parameters of onboard power LED behaviors Press Enter to enter the sub menu fPower LED Blinking Sets shining behaviors of the onboard Power LED Dual Color The power LED turns to another color to indicate the S3 state Blinking The power LED blinks to indicate the S3 state fCPU Over Temperature Alert Auto Enable...

Страница 36: ...HCI mode for SATA storage devices AHCI Advanced Host Controller Interface offers some advanced features to enhance the speed and performance of SATA storage device such as Native Command Queuing NCQ and hot plugging fSATAx Hot Plug Disabled Allows user to enable or disable the SATA hot plug support Enabled Enables hot plug support for the SATA ports Disabled Disables hot plug support for the SATA ...

Страница 37: ...mode Disabled The USB devices will be unavailable under legacy mode f Power Management Setup Sets system Power Management of ErP and AC Power Loss behaviors Press Enter to enter the sub menu fErP Ready Disabled Enables or disables the system power consumption according to ErP regulation Enabled Optimize the system power consumption according to ErP regulation It will not support S4 S5 wake up by U...

Страница 38: ...section for details fFast Boot Enabled Enables or disables the fast boot feature for Windows 10 This item will only be available when MSI Fast Boot is disabled Enabled Enables the Fast Boot configuration to accelerate system boot time Disabled Disables the Fast Boot configuration fInternal GOP Configuration Manages the onboard Graphics Output Protocol GOP Press Enter to enter the sub menu This sub...

Страница 39: ...e settings fResume By PCI E Device Disabled Enables or disables the wake up function of installed PCI E expansion cards integrated LAN controllers or USB devices which are supported by third party integrated chips Enabled Enables the system to be awakened from the power saving modes when activity or input signal of PCIe device is detected Disabled Disables this function fResume By Onboard Intel LA...

Страница 40: ...etwork Stack is enabled Boot Sets the sequence of system boot devices f Full Screen Logo Display Enabled Enables or disables to show the full screen logo while system POST Enabled Shows the logo in full screen Disabled Shows the POST messages f GO2BIOS Disabled Allows system to enter BIOS setup directly by pressing the Power button for 4 sec pon bootup Enabled The system boots straight to the BIOS...

Страница 41: ...sword will be requested for booting the system f Password Clear Enabled Enables or disables the clear CMOS behavior to clear a set password Enabled The password will be erased after clear CMOS Disabled The password will always be kept Important When selecting the Administrator User Password items a password box will appear on the screen Type the password then press Enter The password typed now wil...

Страница 42: ...ing the message please return to Enabled or Disabled Disabled Disables this funcion Save Exit f Discard Changes and Exit Exit BIOS setup without saving any change f Save Changes and Reboot Save all changes and reboot the system f Save Changes Save current changes f Discard Changes Discard all changes and restore to the previous values f Restore Defaults Restore or load all default values f Boot Ov...

Страница 43: ...o This item only appears when a CPU that supports Turbo Boost is installed All Core Enables the CPU Ratio All CPU cores will run the same CPU ratio that be set in CPU Ratio Per Core Enables the Core X X of X xxxx MHz Sets each CPU core ratio separately Turbo Ratio Enables the X Core Ration Limit This option only appears when a CPU that supports this function is installed f X Core Ratio Limit Auto ...

Страница 44: ...d core frequency dynamically It can decrease average power consumption and average heat production Disabled Disables EIST fIntel Turbo Boost Enabled Enables or disables the Intel Turbo Boost This item appears when the installed CPU supports this function Enabled Enables this function to boost CPU performance automatically above rated specifications when system request the highest performance state...

Страница 45: ...So the memory will not be initialed and trained when booting to accelerate the system booting time Disabled The memory will be initialed and trained every booting f CPU Voltages control Auto These options allows you to set the voltages related to CPU If set to Auto BIOS will set these voltages automatically or you can set it manually f DRAM Voltages control Auto These options allows you to set the...

Страница 46: ...s you to select the number of active CPU cores fLimit CPUID Maximum Disabled Enables or disables the extended CPUID value Enabled BIOS limits the maximum CPUID input value to circumvent boot problems with older operating system that do not support the processor with extended CPUID value Disabled Use the actual maximum CPUID input value fIntel Virtualization Tech Enabled Enables or disables Intel V...

Страница 47: ...is setting will be configured automatically by BIOS Enabled Detects the idle state of system and reduce CPU power consumption accordingly Disabled Disable this function fC1E Support Disabled Enables or disables the C1E function for power saving in halt state This item appears when Intel C State is enabled Enabled Enables C1E function to reduce the CPU frequency and voltage for power saving in halt...

Страница 48: ...s over the specified value the CPU will automatically reduce the core frequency for reducing the current fFCLK Frequency Auto Sets FCLK frequency Lower FCLK frequency may help you to set higher base clock frequency fDMI Link Speed Auto Sets DMI speed fSW Guard Extensions SGX Software Control Enables or disables Intel SGX ...

Страница 49: ... steps below to update BIOS 1 Insert the USB flash drive that contains the update file into the computer 2 Click on M FLASH tab a demand message will be prompted Click on Yes to reboot and enter the flash mode 3 The system will enter the flash mode and a file selection menu will appear after rebooting 4 Select a BIOS file to perform the BIOS update process 5 After the flashing process is 100 compl...

Страница 50: ...urrent overclocking profile fLoad Overclocking Profile 1 2 3 4 5 6 Load the current overclocking profile fClear Overclocking Profile 1 2 3 4 5 6 Clear the current overclocking profile f OC Profile Load from ROM Load OC profile from BIOS ROM f OC Profile Save to USB Save OC profile to the USB flash drive The USB flash drive should be FAT FAT32 format only f OC Profile Load from USB Load OC profile from ...

Страница 51: ...can control the fan speed automatically depending on the CPU temperature to keep it with in a specific range If the current CPU temperature reaches to the target value the Smart Fan function will be activated Important y The changing will achieve after you save the changes and reboot the system y Make sure fans are working properly after switching the PWM DC mode f Settings Buttons All Full Speed ...

Страница 52: ...ur computer in Windows 10 2 Insert MSI Driver Disc into your optical drive 3 The installer will automatically appear and it will find and list all necessary drivers 4 Click Install button 5 The software installation will then be in progress after it has finished it will prompt you to restart 6 Click OK button to finish 7 Restart your computer Installing Utilities Before you install utilities you m...

Страница 53: ... been installed successfully and it is available Double click on desired icon to access the application A refresh icon shows to inform you that the application has a update version Gray icon the icon with gray painting means that the application is not available and you have to install it if necessary Double click on the gray icon and the update information will show Click on the INSTALL button to...

Страница 54: ...mation tabs at the top You can click the tab to switch the control panel y Live Update When you launch LIVE UPDATE 6 you will see the Live update tab at first This tab allows you to select files to download You can also read the relevant information by clicking the information icon on the right of the item listed y History shows the downloading history y Setting allows you to specify the frequency...

Страница 55: ...the bottom 6 When Save Path prompt you can specify a download directory 7 When downloading you will see the screen below It may take several moments to complete the process 8 To install the applications simply unpack the packages and install Total Installer Total Installer is a convenient feature to simplify frequent installing procedure To use Total Installer 1 2 3 1 Scan updates in Live Update t...

Страница 56: ...ntrol Panel Previous Feature Next Feature Profile Buttons Option Buttons Page Indicator Resize Corner Profile Buttons y Default load the default values for the current feature y Apply apply your changes y Save store values in the file with individual file extension y Load load the values from the file Important Every time you shut down the system the configured setting will be restored to the fact...

Страница 57: ... temperature The white dot will create strip chart in real time y System Fan Button to open the system fan control panel in new window y Fan Tune Button to automatically optimize the smart fan setting Manual Mode Smart Mode IGP Frequency GT Voltage y IGP Frequency Allows you to adjust the IGP ratio and shows the IGP clock ratio and frequency y GT Voltage Allows you to adjust the GT voltage The ris...

Страница 58: ...ption Buttons Setting When click the Setting button The Record Warning and Mobile Control icons will appear y Record allows you to monitor the status of voltage fan speed and temperature in real time To filter record charts select the check box next to the items When click the Play button the chart pane will start to show the recording chart If you want to check the value of a specific spot on cha...

Страница 59: ...ivate Wi Fi on your mobile device and connect to SoftAP with the SSID 6 Run MSI COMMAND CENTER APP on your mobile device 7 Find the IP address on the SoftAP Management Setting area and enter the IP address on your MSI COMMAND CENTER APP to link your system 8 Press Refresh on the MSI COMMAND CENTER APP to verify that monitoring and OC functions are working properly Option Buttons Information When c...

Страница 60: ... meet your current system environment or support faster storage access speed for your external storage or memory cards Easy In Easy page you can select one system performance mode to meet the current system environment Setting Performance information Performance mode y Performance mode moves over the mouse to any one of performance mode and click on the ON button to enable it Important The Customi...

Страница 61: ... y USB SPEED UP supports faster data transfer rates of the USB storage devices y STORAGE BOOST supports faster access speed of storage device y VR BOOST provides the optimized settings to boost the system for better VR experience y OPTANE BOOST supports faster access speed of Intel Optane memory require a reboot Important y Please note that you can only select one mode at a time from Easy or Advan...

Страница 62: ...en playing different games The higher iGPU frequency multiplication can bring well image resolution Also different games have their own appropriate core and you can change it to All Core Turbo Ratio and Per Core by adjusting the CPU Ratio Apply Mode to acquire the best gaming experience Install and open the DPC LATENCY TUNER control panel it allows you to set CPU memory and iGPU settings After the...

Страница 63: ... have your Windows Installation DVD or ISO file and also have a minimum of a 8GB USB flash drive to create your installer Be sure to backup files on the USB drive this process will erase it To create the Windows installation USB drive Step1 Choose source folder y In the Source folder box click Browse button and select the file from the dialog box This option will copy all Windows installation file...

Страница 64: ...AID in Windows system To create a super RAID 1 Use checkboxs to select the disks you want included in your RAID 2 Choose Speed Up or Backup for RAID type y Speed Up RAID0 y Backup RAID1 3 Click Start 4 When prompt Finish click OK Important SUPER RAID can t includ the system disk ...

Страница 65: ...Letter Name Size and Format of the RAM disk y Option select browser temporary files to save load on the RAM disk You can also add software files to improve reading speed y Backup specify backup and restore settings to prevent data loss All files will be lost each time the RAMDISK is stopped if you do not backup Browse Button set the path to the image file Backup Right Now Button manually backup fi...

Страница 66: ...pplications by total traffic and allows you to monitor application bandwidth usage y Network Test allows you to setup bandwidth control y Advanced Setting allows you to expand RWIN to accelerate download speed You can also block IP address and setup virtual access point y Information shows version information Configuring Bandwidth This section describes how to configure Internet Provider Speed You ...

Страница 67: ...ow the steps below 1 3 4 2 1 Click the Network Test block in NETWORK MANAGER 2 Click Test Network Speed button The test takes several minutes to test your network speed 3 Enter the testing results into Upload Speed and Download Speed fields 4 Check the Enable Bandwidth Control to allow the NETWORK MANAGER to manage the bandwidth ...

Страница 68: ... then restart the computer y If 1 long 2 short beeps are heard remove and reinstall the graphics card and then restart the computer y Test with another known working graphics card The computer does not boot after updating the BIOS y Clear the CMOS y Use the secondary BIOS to bootup the system Only for motherboard with Dual BIOS Lost BIOS password y Clear the CMOS but that will cause you to lose al...

Страница 69: ...06 5692 ER Son B급 기기 가정용 방송통신기자재 이 기기는 가정용 B급 전자파적합기기로서 주 로 가정에서 사용하는 것을 목적으로 하며 모 든 지역에서 사용할 수 있습니다 クラスB情報技術装置 この装置は クラスB情報技術装置です この 装置は 家庭環境で使用することを目的として いますが この装置がラジオやテレビジョン受 信機に近接して使用されると 受信障害を引き起こすこと があります 取扱説明書に従って 正しい取り扱いをして下さい VCCI B C Tick Compliance Battery Information European Union Batteries battery packs and accumulators should not be disposed of as unsorted household waste Please use...

Страница 70: ...a MSI estará comprometido con los términos de recogida de sus productos vendidos en la Unión Europea al final de su periodo de vida Usted debe depositar estos productos en el punto limpio establecido por el ayuntamiento de su localidad o entregar a una empresa autorizada para la recogida de estos residuos NEDERLANDS Om het milieu te beschermen wil MSI u eraan herinneren dat De richtlijn van de Eur...

Страница 71: ...odotti appartenenti alla categoria dei Materiali Elettrici ed Elettronici non possono più essere eliminati come rifiuti municipali i produttori di detti materiali saranno obbligati a ritirare ogni prodotto alla fine del suo ciclo di vita MSI si adeguerà a tale Direttiva ritirando tutti i prodotti marchiati MSI che sono stati venduti all interno dell Unione Europea alla fine del loro ciclo di vita ...

Страница 72: ...rved The MSI logo used is a registered trademark of Micro Star Int l Co Ltd All other marks and names mentioned may be trademarks of their respective owners No warranty as to accuracy or completeness is expressed or implied MSI reserves the right to make changes to this document without prior notice Technical Support If a problem arises with your system and no solution can be obtained from the use...

Отзывы: