

— 1 —
— 2 —
— 3 —
NPort W2004 Series
Quick Installation Guide
Second Edition, June 2008
1. Overview
The NPort W2004 Series of Wireless Serial Device Server extends
wireless networking capabilities to printers, scales, medical equipment,
manufacturing machinery, bar code readers, card readers, point-of-sale
equipment, and other data collection devices. The 3-in-1
RS-232/422/485 serial interface of NPort W2004’s 4 serial ports gives
you a convenient means of linking most serial devices to your wireless
network.
NPort W2004 Wireless Serial Device Servers have the following
features:
•
Link any serial device to a Wi-Fi 802.11g/b network
•
4 RS-232/422/485 ports, at up to 460.8 Kbps
•
Web-based configuration interface
•
Supports Windows COM and Linux tty drivers
•
Supports TCP Client/Server and UDP modes
•
Secure data access via standard WEP
•
Enhanced remote configuration via HTTPS and SSH
2. Package Checklist
Before installing NPort W2004 products, verify that the package
contains the following items:
•
NPort W2004 x 1
•
Documentation & Software CD
•
RJ45 to RJ45 Ethernet crossover cable
•
RJ45 to male DB9 cable (CBL-RJ45M9-150)
•
RJ45 to female DB9 cable (CBL-RJ45F9-150)
•
Warranty booklet
•
Quick Installation Guide
Optional Accessories
CBL-RJ45M9-150
CBL-RJ45F9-150
CBL-RJ45M25-150
CBL-RJ45F25-150
RJ45 (8-pin) to DB9 (M) cable, 150 cm
RJ45 (8-pin) to DB9 (F) cable, 150 cm
RJ45 (8-pin) to DB25 (M) cable, 150 cm
5RJ45 (8-pin) to DB25 (F) cable, 150 cm
Notify your sales representative if any of the above items is missing or
damaged.
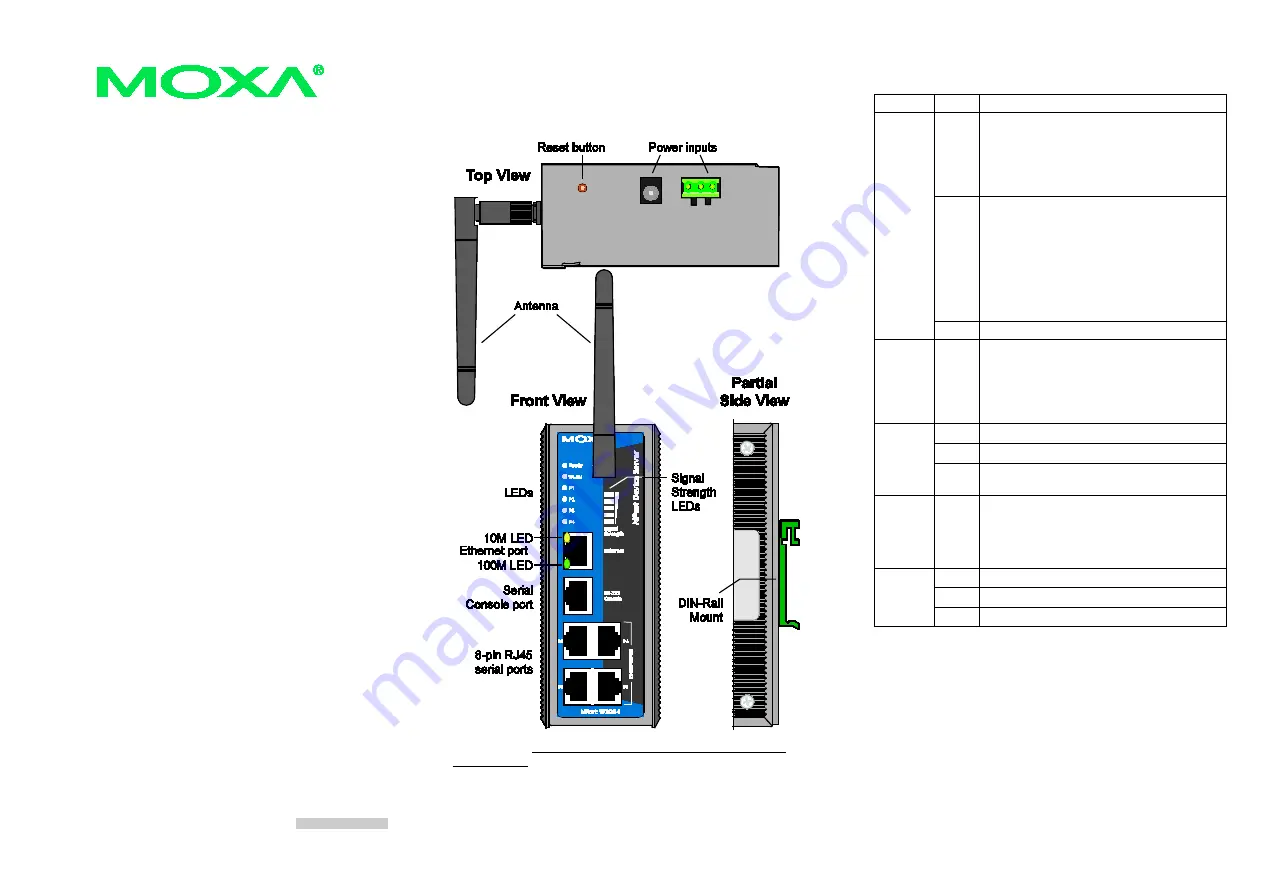
3. Hardware Introduction
As shown in the following figures, NPort W2004 has six 8-pin RJ45
ports, four for the RS-232/422/485 interface, one for the RS-232 serial
console, and one for the 10/100M Ethernet port interface.
Reset Button
—Press the
Reset button
continuously for
5 sec to load
factory defaults
: Use a pointed object, such as a straightened paper clip or
toothpick, to press the reset button. This will cause the Ready LED to
blink on and off. The factory defaults will be loaded once the Ready LED
stops blinking (after about 5 seconds). At this point, you should release
the reset button.
LED Indicators
—
The front panel of NPort W2004 has 11 LED
indicators, as described in the following table.
Name
Color
Function
Ready
red
Steady on
—
Power is on and NPort is booting up.
Blinking fast
(once every 0.5 sec.)
—
Indicates a
LAN IP conflict.
Blinking slowly
(once every 1.0 sec.)
—
Looking
for an IP when no DHCP server is available.
green
Steady on
—
Power is on and NPort is functioning
normally.
Blinking fast
(once every 0.5 sec.)
—
Loading
configuration to factory default after holding
down the reset button for 5 seconds.
Blinking slowly
(once every 1.0 sec.)
—
The
device server has been located by the NPort
Search utility.
off Power is off, or a power error condition exists.
WLAN
green
Steady on
—
Wireless enabled.
Blinking fast
(once every 0.5 sec.)
—
Indicates an
IP conflict with another network host.
Blinking slowly
(once every 1.0 sec.)
—
Looking
for an IP when no DHCP server is available.
P1, P2,
P3, P4
orange Serial port is receiving data.
green Serial port is transmitting data.
off No data is being transmitted or received through
the serial port.
Signal
Strength
(5 LEDS)
green
The number of lit LEDS indicates the WLAN
signal strength. When [ 0 / 1 / 2 / 3 / 4 / 5 ] LEDs
are lit, the corresponding WLAN status is
[ Connection Fail / Bad / Fair / Good / Very Good
/ Excellent ].
Ethernet
orange 10 Mbps Ethernet connection.
green 100 Mbps Ethernet connection.
off Ethernet cable is disconnected, or has a short.
4. First-time Hardware Installation Procedure
STEP 1: After removing NPort W2004 from the box, use a cross-over
Ethernet cable to connect the NPort’s RJ45 Ethernet port
directly to your computer’s Ethernet port.
STEP 2: Attach the power adaptor to the NPort and then plug the
adaptor into an electrical outlet.
STEP 3: Configure the NPort W2004 via the Ethernet port. See the
next section for software installation information.
P/N: 18020200100