background image

ioLogik 2500 Series 

Overview 


1-3 

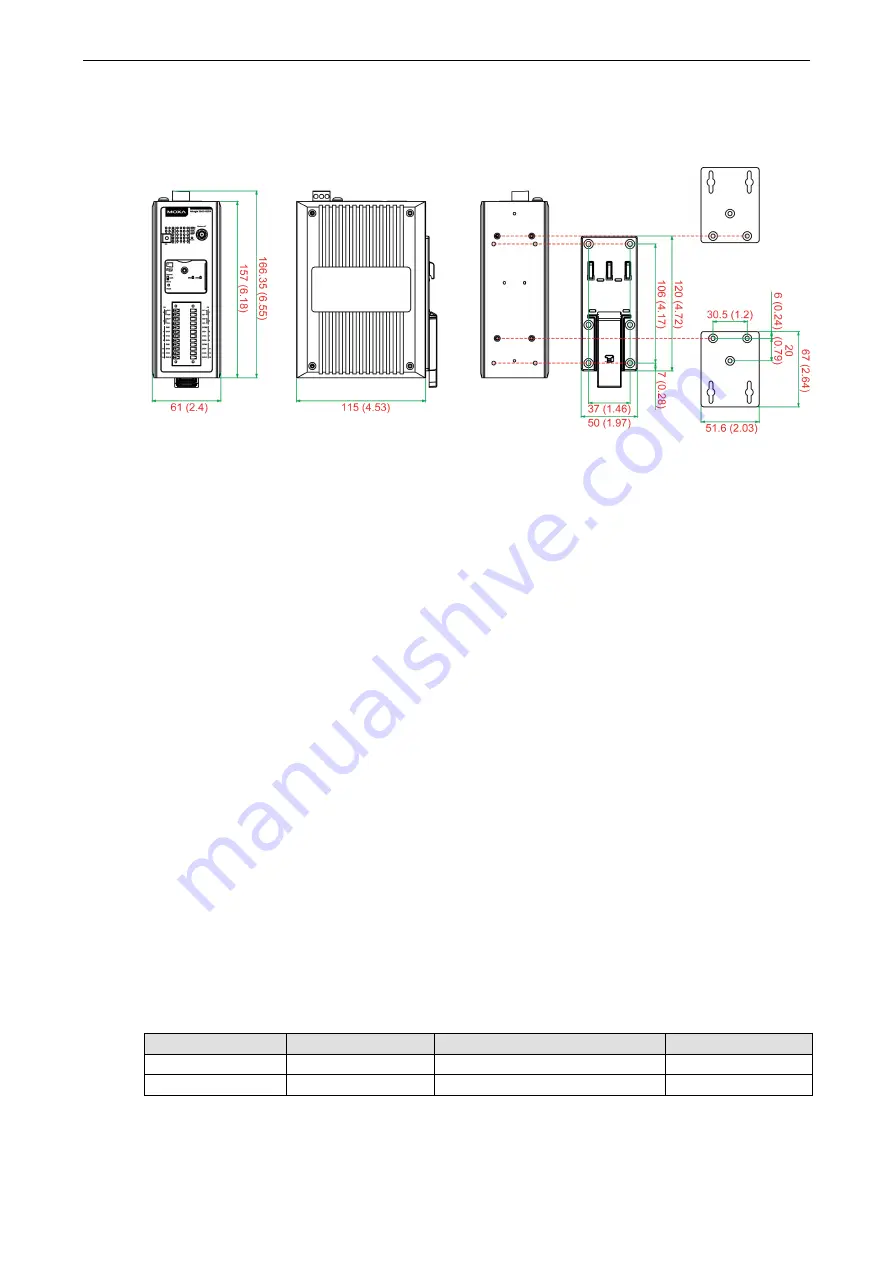
Dimensions Diagram 

Units: mm (in) 


Package Checklist 

The ioLogik 2500 is shipped with the following items: 


ioLogik 2500 device 


2 RJ45-to-DB9 connection cables (CBL-RJ45M9-150) 


1 antenna (only for wireless models) 


Quick installation guide (printed) 

NOTE: Please notify your sales representative if any of the above items are missing or damaged.


Product Features 


Supports cellular (HSPA/GPRS), Ethernet, and serial communication (ioLogik 2500-HSPA/GPRS only) 


New Click&Go Plus logic provides powerful front-end intelligence 


Supports wireless LAN communication (ioLogik 2500-WL1 only) 


4-port unmanaged switch built in for linking to Ethernet devices 


Optimized I/O expansion port for daisy chaining up to 8 ioLogik E1200 units 


2 serial ports (RS-232/422/485) for connecting field devices 


Built-in data logger supports an FTP server/client and microSD™ card with up to a 32 GB 


Transforms Modbus RTU into Modbus TCP or Active Tags 


Active communication with patented MX-AOPC UA Server 


Smart alarm management: Email, SNMP traps, TCP, UDP, SMS 


Wide operating temperature: -40 to 75°C (-40 to 167°F) 

I/O Channels Available on ioLogik 2500 Models 

Model Name 

Digital Inputs 

DI/DO (DIO) Configurable 

Analog Inputs 

ioLogik 2512 

– 

ioLogik 2542 

– 

12 

Содержание ioLogik 2512

Страница 1: ...ioLogik 2500 Series User s Manual Edition 7 0 March 2018 www moxa com product 2018 Moxa Inc All rights reserved ...

Страница 2: ...s to this manual or to the products and or the programs described in this manual at any time Information provided in this manual is intended to be accurate and reliable However Moxa assumes no responsibility for its use or for any infringements on the rights of third parties that may result from its use This product might include unintentional technical or typographical errors Changes are periodic...

Страница 3: ...I O Wiring 2 4 DI Channel 2 4 DO Channel Sink Type 2 5 AI Channel 2 5 LED Indicators 2 6 Daisy Chaining for I O Expansion 2 7 Reset to Factory Defaults 2 8 Network Installation 2 8 Ethernet Communication 2 8 TCP IP Settings 2 8 Serial Communication 2 9 Software Installation IOxpress Utility 2 10 System Requirements 2 10 Installing IOxpress 2 10 3 The IOxpress Utility 3 1 Application Interface 3 2 ...

Страница 4: ...0 Menu Panel and Web Pages 5 10 6 Cellular Network Setup and Configuration for cellular models 6 1 IOxpress Settings for a Cellular Network 6 2 Select Network Interface 6 2 Cellular 6 3 Cellular Network Connection 6 10 MX AOPC Server for SCADA HMI users 6 10 With DDNS for SCADA HMI users 6 11 Moxa Cellular Data Access Utility for mobile devices PCs 6 11 7 Wireless LAN Network Setup and Configurati...

Страница 5: ... perfect solution for industrial field sites that have an insufficient number of IP addresses For cellular connections the ioLogik 2500 supports Moxa s patented MX AOPC Server with push communications technology and provides an economical solution for accessing multiple remote I O devices connected to the same private IP network which itself links to the outside world over a cellular connection us...

Страница 6: ...icro SD card supports cards with up to 32 GB of storage space and the ioLogik 2500 can be programmed with Moxa s convenient Click Go Plus control logic which can be used to easily construct customized control systems As a rugged industrial device the ioLogik 2500 operates reliably at a wide range of temperatures and is well suited for hard to wire remote monitoring and alarm applications at unmann...

Страница 7: ...ont end intelligence Supports wireless LAN communication ioLogik 2500 WL1 only 4 port unmanaged switch built in for linking to Ethernet devices Optimized I O expansion port for daisy chaining up to 8 ioLogik E1200 units 2 serial ports RS 232 422 485 for connecting field devices Built in data logger supports an FTP server client and microSD card with up to a 32 GB Transforms Modbus RTU into Modbus ...

Страница 8: ...32 422 485 software selectable RJ45 ports Parity None Odd Even Data Bits 5 6 7 8 Stop Bits 1 2 Flow Control None RTS CTS XON XOFF Baudrate 300 to 115200 bps Protocols Modbus RTU master gateway serial tunnel mode client server Physical Characteristics Wiring I O cable max 14 AWG Dimensions 61 x 157 x 115 mm 2 4 x 6 18 x 4 53 in Weight Under 1265 g 2 79 lb Mounting DIN rail standard wall with option...

Страница 9: ...igital Inputs 8 channels Configurable DIOs by software 8 channels Isolation 3k VDC or 2k Vrms Digital Input Sensor Type Wet Contact NPN or PNP and Dry Contact I O Mode DI or Event Counter Dry Contact On short to GND Off open Wet Contact DI to COM On 10 to 30 VDC Off 0 to 3 VDC Common Type 8 points per COM Counter Frequency 2 5 kHz Digital Filtering Time Interval Software configurable Digital Outpu...

Страница 10: ... Frequency 5 kHz Over Voltage Protection 45 VDC Over Current Protection 1 5 A per channel 25 C Over Temperature Shutdown 175 C min Current Rating 500 mA per channel 25 C DIO Output Leakage Current 1 mA 30 VDC Analog Input Type Differential input Resolution 16 bits I O Mode Voltage Current software selectable Input Range 10 V 0 to 10 V 0 to 20 mA 4 to 20 mA 4 to 20 mA burnout detection Accuracy 0 1...

Страница 11: ...U 2 412 to 2 472 GHz 13 channels Security 64 bit and 128 bit WEP encryption Full WPA WPA2 Personal Transmission Rates 802 11b 1 2 5 5 11 Mbps 802 11g 6 9 12 18 24 36 48 54 Mbps TX Transmit Power 802 11b Typ 18 1 5 dBm 1 to 11 Mbps 802 11g Typ 18 1 5 dBm 6 to 24 Mbps Typ 17 1 5 dBm 36 Mbps Typ 16 1 5 dBm 48 Mbps Typ 16 1 5 dBm 54 Mbps RX Sensitivity 802 11b 97 dBm 1 Mbps 94 dBm 2 Mbps 92 dBm 5 5 Mb...

Страница 12: ...000 m Note Please contact Moxa if you require products guaranteed to function properly at higher altitudes Standards and Certifications Safety UL 508 EMC EN 61000 6 2 6 4 EMI CISPR 32 FCC Part 15B Class A EMS IEC 61000 4 2 ESD Contact 4 kV Air 8 kV IEC 61000 4 3 RS 80 MHz to 1 GHz 3 V m IEC 61000 4 4 EFT Power 1 kV Signal 0 5 kV IEC 61000 4 5 Surge Power 2 kV IEC 61000 4 6 CS 3 V IEC 61000 4 8 Rad...

Страница 13: ...328 mA 24 VDC MTBF mean time between failures Time HSPA model 378 154 hrs GPRS model 403 452 hrs WL1 model 400 469 hrs Standard Telcordia SR332 ioLogik 2542 HSPA GPRS WLAN Specifications Inputs and Outputs Configurable DIOs by software 12 channels Analog Inputs 4 channels Isolation 3k VDC or 2k Vrms Digital Input Sensor Type Wet Contact NPN or PNP and Dry Contact I O Mode DI or Event Counter Dry C...

Страница 14: ...t detection Accuracy 0 1 FSR 25 C 0 3 FSR 10 and 60 C 0 5 FSR 30 and 70 C Sampling Rate All channels 400 samples sec Per channel 100 samples sec Input Impedance 1M ohms min Built in Resistor for Current Input 120 ohms Power Requirements Input Voltage 9 to 48 VDC Input Current HSPA Model 442 mA 24 VDC GPRS Model 494 mA 24 VDC WL1 Model 406 mA 24 VDC MTBF mean time between failures Time HSPA model 3...

Страница 15: ...l Removing the ioLogik 2500 from a DIN Rail Powering on the ioLogik 2500 Grounding the Unit Installing a microSD Card and SIM Cards cellular models only I O Wiring Diagrams I O Wiring DI Channel DO Channel Sink Type AI Channel LED Indicators Daisy Chaining for I O Expansion Reset to Factory Defaults Network Installation Ethernet Communication TCP IP Settings Serial Communication Software Installat...

Страница 16: ...p and down a few millimeters in each direction STEP 2 Insert the top of the rail into the upper lip of the attachment plate s slot STEP 3 The attachment unit should now snap into place along the rail as shown below Removing the ioLogik 2500 from a DIN Rail To remove the ioLogik 2500 from a DIN rail use a screwdriver to pull down the spring loaded bracket until it locks in place as shown in the dia...

Страница 17: ...Observe all electrical codes dictating the maximum current allowable for each wire size If currents exceed the maximum rating the wires will overheat and may cause serious damage to the equipment For safety reasons wires connecting the power supply should be at least 2 mm in diameter e g 12 gauge Installing a microSD Card and SIM Cards cellular models only The ioLogik 2500 supports a single microS...

Страница 18: ...wo categories of DI contact Dry Contact and Wet Contact Follow the wiring diagram for the particular component you are using A Dry Contact is a contact that works without a power source buttons switches etc A Wet Contact is a contact that requires a power source to work proximity sensors motion sensors etc Check the sensor type NPN PNP and follow the corresponding wiring shown below DI Dry Contact...

Страница 19: ...allation 2 5 DI Wet Contact NPN DI Wet Contact PNP DO Channel Sink Type The DIO channels of this series can be used as DI channels or DO channels The wiring diagram for DO channels which are sink type is shown below AI Channel ...

Страница 20: ...Blinking Data is being transmitted Off Disconnected Serial Port P1 P2 Green Tx Amber Rx Blinking Data is being transmitted Off Disconnected SD Micro SD Green SD card inserted Off SD card not inserted I O Channel Status 0 to 15 Green Channel ON or Counter Pulse signal Off Channel OFF or No Counter Pulse signal W Link Green Wireless connection established Off Off Signal Status Off No signal or No SI...

Страница 21: ...o trigger the ioLogik 2500 to refresh its connection with the expansion units If the DIP switch is already in the up position move it down and then back up again 5 The expansion unit will start running NOTE Expansion units must be replaced with the same model of expansion unit If you would like to use a different expansion unit model you must first change the relevant IOxpress settings The followi...

Страница 22: ... Plus logic settings that have already been configured Network Installation Ethernet Communication Connections to the LAN port are made through an RJ45 connector on the ioLogik 2500 device The wiring and pin connections for these connectors are described in separate sections below ATTENTION The maximum cable length of a 10 100BaseT connection is 100 m 350 feet but the actual limit could be shorter...

Страница 23: ...is equipped with two 3 in 1 software selectable RS 232 422 485 serial ports making it more convenient to connect serial devices If required the RJ45 to 8 pin male DB9 converter cables can be used to connect to serial devices NOTE The ioLogik 2500 is shipped with 2 RJ45 to DB9 connection cables If you need additional cables contact your Moxa sales representative The model name of the connection cab...

Страница 24: ...ded Network Interface 10 100 Ethernet Software Requirements Operating System Microsoft Windows 2000 XP or later Installing IOxpress The software can be downloaded from Moxa s website To do this first click on the following link to access the website s search utility http www moxa com support search aspx type soft When the web page opens enter the model name of your product in the search box Click ...

Страница 25: ...IOxpress graphical user interface which provides easy access to all status information and settings IOxpress can also be used to configure Click Go Plus rules to handle front end events The following topics are covered in this chapter Application Interface Main Screen Menu Bar Using IOxpress Configuration Flowchart Configuration Library Device Library ...

Страница 26: ...ojects Device For accessing functions to manage online devices Configuration For performing configurations offline Options Network interface and options Help Version information NOTE If the host computer has multiple interfaces be sure to select the correct network interface before searching for online devices If you select the incorrect interface or do not enable an interface the search action wi...

Страница 27: ...ored on the user s computer See Chapter 4 for a detailed explanation Device Library The operator uses IOxpress to export the configuration to devices on the network That is settings that were configured offline are exported over the network to online devices This can be done either in batch mode or on a case by case basis IOxpress can also be used to access online devices directly to check I O sta...

Страница 28: ...ntroduction Saving Configurations as a Project Adding an ioLogik 2500 Device to a Project Adding E1200 I O Expansion Modules to a Project Duplicate Device Configuration for Mass Deployment Setting Up a Device Settings Tab System Security Network I O AOPC SNMP Modbus TCP Slave Modbus TCP Master Serial Port Port1 Port2 Data Logging Click Go Plus Click Go Plus Tab Click Go Plus Simulator Tab Peer to ...

Страница 29: ...er the network during the online configuration phase discussed in Chapter 5 Device Library Projects are automatically saved in the following folder C Users Public Documents Moxa IOxpress Database The first time you use offline configuration create a new project by clicking New from the dropdown menu under the Project tab Click Configuration Library and then select Configuration from the toolbar Yo...

Страница 30: ...an be found in the I O settings Tag selection and data logging profile areas The expansion status 0 disconnect 1 Good can be monitored via Modbus AOPC tag SNMP and RESTful API ioLogik 2500 ioLogik E1200 ioLogik E1200 ioLogik E1200 ioLogik E1200 ioLogik E1200 ATTENTION If the IOxpress project includes expansion devices the L1 slave port will automatically run in expansion mode ATTENTION The IP addr...

Страница 31: ...fied An example is shown below x Duplicate Device Configuration for Mass Deployment Use the Duplicate function to quickly duplicate a configuration First use Duplicate is to save your first configuration as a template and then use the duplicate function to duplicate the configuration template to devices that have a different name serial number and IP address To do this right click on a configurati...

Страница 32: ...sed to set up devices System Click System to configure the following items Device Name During offline configuration the device name will appear in the list of ioLogik 2500 units During online configuration the device name will appear in the mass deployment list IOxpress supports long device names up to 30 characters Time Settings The iologik 2500 will synchronize its time with the time server indi...

Страница 33: ...ctory defaults and access rights of the three user types are described below User Type Factory Default Access Right Administrator admin Full control including the ability to configure the device Operator operator Can control I O status through the web console User user Can check I O status through the web console The characteristics of the username and password are described below Username Length ...

Страница 34: ...guration enables Web Server Auto Search and IOxpress Service Enable other services e g Modbus TCP Slave if additional services are required NOTE If all services are disabled this device will no longer be accessible and you will need to load the factory default configuration to access the device NOTE MX AOPC UA Server Service runs through the PC s AOPC data communication ports 9500 9900 User Accoun...

Страница 35: ...ccess Control Use IP Address Netmask combinations to control which devices can use the Modbus TCP protocol to access your ioLogik device Network There are three sub pages under Network General LAN Cellular applies to the ioLogik 2500 GPRS HSPA only and Wi Fi applies to the ioLogik 2500 WL1 only General There are two columns under General Select Network Interface and General Settings Select Network...

Страница 36: ...l continue to wait for a response from the host causing the TCP port to be occupied indefinitely by the host Private IP for the First Expansion Module An array of up to 8 modules can be connected to the ioLogik 2500 Private IP for First Expansion Module assigns an IP to the first E1200 module The IPs for subsequent modules in the chain will be automatically assigned consecutively For example if th...

Страница 37: ...commend configuring the I O Mode Settings first Setting Functions IO Mode Setting Channel Mode Name DI Setting Filter Counter Setting Filter Initial Value Trigger Mode Power Off Storage Power On Value Power On Status Scaling Enable Scaling Slope Scaling Offset Scaling Interval DO Setting Enable Communication Watchdog for Safe Mode Enable Auto Clear Safe Mode Power On Status Power On Delay Safe Mod...

Страница 38: ... Since the ioLogik 2500 does not have AO channels the AO setting will only show up when the project contains E1200 AO modules such as the E1241 Name The name will be attached to the AOPC tag to help users identify channel information in MX AOPC DI Setting Filter Software filtering is used to avoid switch bounces The filter is configurable in multiples of 100 μs and accepts values between 1 and 655...

Страница 39: ... the watchdog is enabled any disconnection from the network will activate a safe state In the safe mode DO channels can be configured to turn on turn off or commence pulse output during the safe state If the watchdog is not enabled then DO channel status will remain unchanged during a network disconnection To configure a DO for safe mode set the corresponding value in the Safe Mode Status column t...

Страница 40: ...us When the device is first powered on the status of each pulse output channel is set to OFF by default You can set a pulse output channel to turn ON when the ioLogik is powered on or to commence pulse output Power On Delay The time delay from tuning Pulse channels when the power is turned on Safe Mode Status If the Communication Watchdog is enabled a network disconnection will activate a safe sta...

Страница 41: ...BO 4 0 User defined default 2 mA Burnout State 0 AI BO mA Modbus output 0000h Under Range BO AI 4 mA Modbus output raw data Normal Range 4 AI 20 00 mA Modbus output raw data until FFFEh Over Range XX 20 00 mA Modbus output FFFFh Scaling Slope Scaling Offset Scaling Unit Enabling the Scaling functions will linearly convert the actual current or voltage value into other user defined units such as pe...

Страница 42: ...nable Communication Watchdog for Safe Mode allows you to control how an AO channel acts when the network is disconnected If the Communication Watchdog is enabled a network disconnection will activate a safe state The AO channel can be configured to a defined value during the safe state NOTE Since the ioLogik 2500 does not have AO channels the AO setting will only show up when the project contains ...

Страница 43: ...Next set the Accumulation flag and configure the Time Interval to 24 hours This will set up the virtual channel to log the total water flow volume over a period of 24 hours Status Enable Disable virtual channels Slot No If you have connected E1200 expansion modules select the device you would like to configure here Channel No Virtual channels are required to configure AI or counter channels Functi...

Страница 44: ... Series Configuration Library 4 17 Average The average value within Z sec with sampling done every 10 ms Instantaneous The instantaneous value when a sample is taken Incremental The difference Δ between two samples ...

Страница 45: ...ection You can set the ioLogik 2500 to connect to MX AOPC UA Server Each ioLogik 2500 series can connect to two MX AOPC UA servers You can also set different modes to send active tags Enable connection to AOPC Server with heartbeat interval The Heartbeat Interval can be used to determine the connection status between the ioLogik 2500 and MX AOPC Server and to ensure that the ioLogik 2500 is connec...

Страница 46: ...network failure The ioLogik 2500 supports a data buffer function that stores transmitted data on an inserted SD card when the connection between MX AOPC UA Server and the ioLogik 2500 was down MX AOPC UA Logger will automatically retrieve the buffering data after the connection between MX AOPC UA Server and the ioLogik 2500 is back up and running The network data buffer can store up to 20 000 000 ...

Страница 47: ...mple if the AI is configured to 0 to 10 V On Change 1 means the ioLogik will update to the MX AOPC Server every time there is 0 1 V change Interval for Counter AI RTD TC IR FIR VC Serial Tags The ioLogik will update the tag value to MX AOPC UA Server when the interval time elapses The interval time can be configured to between 1 and 65535 seconds the default is 5 seconds NOTE A shorter interval ti...

Страница 48: ...ams update the start address of each item and to map data to the configured address Enable Modbus Service Enable Disable the Modbus service setting to turn the Modbus TCP slave protocol on or off Enable host connection timeout Enable the host connection timeout setting to monitor the Modbus connection status between the Modbus Master and the ioLogik 2500 Modbus service The connection status can be...

Страница 49: ...e Modbus data collection Device Name Name the slave device e g Flow Meter IP Address Fill in the IP address of the slave device Port Fill in the Modbus communication port of the slave device default 502 Delay between polls Set the delay time between polls default 502 Click the Advanced button to display the advanced fields for timeout retry settings Refer to the connection cycle diagram below for ...

Страница 50: ...le Name Name this address setting Start Address Set the start address of the data to be collected Length Set the length of the data to be collected Start Internal Register Set the internal register data type and start number for storing data collected by the ioLogik 2500 Data Conversion Select a data conversion option Register Type Data Conversion Option WORD 1 HiByte LoByte 2 LoByte HiByte DWORD ...

Страница 51: ... 4 Use the auto naming function to append the serial number to the names of the Internal Registers Step 1 Start Postfix No is the first number that will be appended to the first IR and Length is how many registers you would like to apply the append function to Step 2 Select the Internal Register Name column that will start internal register and set the register name Step 3 Click Auto naming to aut...

Страница 52: ...00 2400 4800 9600 19200 38400 57600 115200 bps Stop Bits Supports 1 2 Flow Control Supports None RTC CTS XON XOFF Data Bits Supports 5 6 7 8 Parity Supports Even Odd None Operation Mode Each port supports 4 operation modes Transparent Serial Tunnel TCP Client Transparent Serial Tunnel TCP Server MODBUS TCP Gateway and Modbus Serial Tag Transparent Serial Tunnel TCP Client Server Transparent Serial...

Страница 53: ...1 to 65535 min s default 10 Modbus TCP Gateway This function allows users to attach a serial Modbus RTU meter to the ioLogik 2500 s serial port Modbus TCP Gateway Serial Response Timeout The timeout setting for waiting for a response from a connected serial device 30 to 65535 ms default 2500 Modbus Serial Tag This function allows users to attach a serial Modbus RTU meter to the ioLogik 2500 s seri...

Страница 54: ...is 03 or 04 the serial tag can be set to HiByte LoByte or LoByte HiByte If the data type of the serial tag is DWORD or Float and the function code is 03 or 04 the serial tag can be set to HiWord LoWord or LoWord HiWord Start Address Define the start address of the Modbus register for the ioLogik to poll Add Click the add button after you finish the above settings Apply Click the serial tag you wan...

Страница 55: ...rk failures Note this function requires 2 GB of external memory The following values are available for data logging I O channels Internal registers virtual channels and serial tags Profile A total of 10 profiles can be created and multiple duplicate channels can be included in different profiles Step1 Define this data logging profile s name Step2 Use the Select Tag panel shown below to select chan...

Страница 56: ...e ftp IP address of device port profile name yyyy mmddhhxx csv yyyy year mm month dd date hh hour 24 hour clock xx sequence number 00 to 99 Name The profile name will also be used as the folder name on the microSD card for storing logged data Enable at Power On Enable this function to start data logging at power on You can also use ClicK Go Plus rules to enable disable the logging features of each...

Страница 57: ...e to enable and then click Apply to All The On Change enable setting will be applied to all AI channels Log Method On Change for DI DO Pulse System Tags The ioLogik will log tag values to the file whenever the tag status changes On Change for AI Tag If the AI is configured to log on change the percentage settings represent the percentage of the full analog range For example if the AI is configured...

Страница 58: ... year mm month dd date hh hour 24 hour clock xx sequence number 00 to 99 Enable FTP server To enable or disable the FTP server function Username The FTP server s username Password The FTP server s password NOTE Default username admin Default password moxa Click Go Plus Click Go Plus provides the functional elements that can be used in Click Go Plus rules including Timer SNMP trap TCP UDP message E...

Страница 59: ... Click Go Plus User s Manual Peer to Peer Tab In some remote automation implementations the control room and field sensors may be located far apart from each other often with only a single remote I O module to collect data from all the sensors Peer to peer communication has little or no limitation since it replaces cable by integrating multiple I O signals over a single network cable to transmit i...

Страница 60: ...d alive 0 to 65535 sec default 5 NOTE If the heartbeat interval is set and the network between the Peer to Peer devices is down the ioLogik 2500 will detect lack of heartbeat and then disconnect the Peer to Peer connection Tolerance Sec Tolerance allows you to define an additional timeout interval to wait for a heartbeat signal from Peer to Peer devices 0 to 65535 sec default 10 Port The listen po...

Страница 61: ...ddress of the remote device that collects and sends signals Slot Index An integer used to represent the remote ioLogik 2500 and its E1200 expansion units 0 the ioLogik 2500 head unit 1 to 8 the ioLogik E1200 expansion units Module Type The model name of the remote device Channel Type The input channel type of the remote device Channel Index The input channel index of the remote device Local Slot I...

Страница 62: ... defined percentage Interval Triggers the peer to peer signal transmission when the interval time elapses 500 to 65535 ms default 1000 NOTE Up to 16 Peer to Peer rules can be set a set of ioLogik 2500 up to 8 x ioLogik E1200 NOTE You only need to configure peer to peer rules for output channels on the local ioLogik device The peer to peer channels at the remote field site will be mapped to automat...

Страница 63: ...status upgrade firmware export configurations and restart devices The following topics are covered in this chapter Introduction Auto Searching for Online Devices First Time Searching for Devices Conducting another Search for Online Devices Deployment Update Configuration to Device Get Configuration from Device Update Firmware Set Device Date Time Retrieve System Log Restart Device Load Factory Def...

Страница 64: ...interface Online device management can be used to update export configurations to from multiple ioLogik 2500 devices It provides a variety of functions to help you manage multiple devices at the same time including Locate device Update configuration to device Get configuration from device Update firmware Set device date time Retrieve system log Restart Device Load Factory Default Change IP address...

Страница 65: ...arch information popup window Click Yes to start searching for devices Uncheck Enable Search Reminder if you don t want to show this message again This can be enabled again under Option Options Search Reminder Settings The search information will be displayed in the Log Conducting another Search for Online Devices If you would like to conduct another search for online devices click Search under th...

Страница 66: ...hing for devices on the local area network LAN use the filters located on the LAN tab to narrow your search to specific devices By Product Series By Product Model By MAC Address By IP Address WAN For devices on the wide area network WAN click the WAN tab and then enter the IP address username and password to add the device ...

Страница 67: ...vice by cellular data access to add a device registered in the Cellular Data Access server Detailed configuration instructions can be found in Chapter 6 Cellular Network Setup and Configuration for cellular models After configuring the CDA the CDA server IP and port number can be used on the CDA tab to search for devices Follow these steps to conduct a search 1 Type in the server s IP address and ...

Страница 68: ...the drop down menu on the right to select the deployment function Nine different functions can be used for mass deployment Locate Device Update configuration to device Get configuration from device Update firmware Set device date time Retrieve system log Restart Device Load Factory Default Change IP address Change Device Name NOTE If you do not want to change a device s network settings uncheck th...

Страница 69: ...wn using the Device Name that was set during the offline configuration Configurations from a File You can update a configuration from a configuration file saved on your computer NOTE If the device is Locked you must log in as administrator to gain access to the ioLogik s configuration options If you have not updated the username and password use the defaults Default User Name admin Default passwor...

Страница 70: ...estart Device Select this command to restart a selected ioLogik 2500 Load Factory Default Select this command to reset all settings on the selected ioLogik including the password and all configuration settings to factory default values Change IP Address Use this function to change the IP address of an ioLogik 2500 Change Device Name Use this function to change the server name Change IP Address and...

Страница 71: ...tly please ensure that version 9 or above of Microsoft Internet Explorer is installed on your computer NOTE Default user name admin Default password moxa Note The user name and password are case sensitive Web Console Functions You can check the device status and also import export configurations from the web console The following section introduces how to use these web console functions User Inter...

Страница 72: ...mber of slots that appear will depend on the number E1200 modules connected to the ioLogik 2512 Click any of the slots Slot 0 Slot 1 Slot 8 to check the I O status of the device Use the Locate function to identify the physical location of the selected device The device s RDY LED will continuously blink green Use the DI Counter channels to check the DI Counter status and reset start stop the counte...

Страница 73: ...tion status of ioLogik 2500 GPRS HSPA units You can check VPN status There are four cellular connection stages While a particular stage is in process the icon of the stage will be green Upgrade Click this icon to upgrade the firmware You can choose the FWR file you would like to use for the upgrade Import Click this icon to import a device configuration You can choose the config file you would lik...

Страница 74: ... your ioLogik 2500 GPRS HSPA device The following topics are covered in this chapter IOxpress Settings for a Cellular Network Select Network Interface Cellular Cellular Network Connection MX AOPC Server for SCADA HMI users With DDNS for SCADA HMI users Moxa Cellular Data Access Utility for mobile devices PCs ...

Страница 75: ...t Network Interface Configure your device s cellular network settings on the Select Network Interface page which is located under the Network General sub page Cellular Only You can configure under what conditions the ioLogik 2500 GPRS HSPA will connect to the cellular network For example the device could be triggered by a Click Go Plus rule or by wake on call Cellular Always On This mode allows th...

Страница 76: ...specify a public IP or URL and the number of retries that are allowed If the Ethernet is disconnected the cellular connection will be triggered as a backup Dest IP URL This option which can be configured to either an AOPC server IP or any public URL will be used by the device to determine whether or not it is connected to the Internet Continuous Check Until 3 failures The ioLogik 2500 GPRS HSPA co...

Страница 77: ... Remote Endpoint IP Enter the WAN IP of the remote VPN server endpoint Remote Subnet IP Enter the remote VPN server subnet LAN IP of the remote network Remote Subnet netmask Enter the remote VPN server subnet netmask of the remote network Local subnet IP Enter the ioLogik 2500 s subnet LAN IP Local Subnet netmask Enter the ioLogik 2500 s subnet netmask Manual Key SPI Set the VPN manual key for inc...

Страница 78: ... 256bit 32 Authentication mode Select the incoming outgoing authentication mode Authentication key Enter the incoming outgoing authentication key Authentication mode Length bytes MDS 16 SHA1 20 ISAKMP PSK ISAKMP Key Management Pre shared key PSK Sets the VPN ISAKMP Pre Shared key settings Perfect forward secrecy PFS default Disable Enable or disable the Perfect Forward Secrecy PFS as an additional...

Страница 79: ...lt 86400 Enter the number of seconds for the VPN ISAKMP phase 1 Lifetime This is the period of time that passes before establishing a new IPSec security association SA with the remote endpoint ISAKMP phase 2 Encryption mode Select the VPN ISAKMP phase 2 encryption mode Authentication mode Select the VPN ISAKMP phase 2 authentication mode Diffie Hellman group Select the VPN ISAKMP phase 2 DH group ...

Страница 80: ...vated when two SIMs are installed Reconnect cellular network after 3 ping failures The device will keep pinging Dest IP URL after an Internet connection is established If the ping fails three times the ioLogik 2500 GPRS HSPA will start the GSM reconnection process Dest IP URL Can either be an AOPC server IP or any public URL for the device to check its connection with the internet NOTE If using a ...

Страница 81: ...et packages from public ports will be forwarded to the assigned Internal IP and Internal Port In the example shown above Ethernet packets from the ioLogik 2500 s port 80 will be forwarded to 192 168 127 50 8000 IP 192 168 127 50 Port 8000 Enable Port Forwarding Enable or disable the port forwarding function Index The port forwarding rules index for identification cannot be changed Protocol Choose ...

Страница 82: ...he remote device Service Provider default DynDns org Currently DynDns org is the only option available for Server address Host name Enter the name you created on www dyndns com in this field The ioLogik 2500 GPRS HSPA will update the DynDNS server with this host name Username This is the user name used for updating DDNS Server authentication Password This is the password used for updating DDNS Ser...

Страница 83: ... purchased from an MVNO Mobile Virtual Network Operator Even with DDNS technology SCADA systems need to assign resources to manage the DDNS servers As an alternative Moxa s Cellular remote I O devices use Moxa s proprietary push technology called MX AOPC Server With Moxa s powerful MX AOPC Server support communications efficiency between ioLogik 2500 GPRS HSPA devices and the central SCADA are sub...

Страница 84: ...thods to connect devices Step1 Installing Cellular Data Access Utility on a server PC Cellular Data Access Utility is a Windows utility provided for connecting and managing the ioLogik 2500 GPRS HSPA over a cellular network Cellular Data Access Utility can be used from anywhere on the network to monitor and configure the ioLogik 2500 GPRS HSPA Downloading from Moxa s Website Click the following li...

Страница 85: ...ice that you would like to connect to and then click submit 6 The selected devices have been added to the online device list and you can start to upload configure your devices over the cellular network Using a browser URL 1 Check the port number in the cellular data access utility Once the devices are connected the utility will automatically assign URL ports to the devices 2 Access the device via ...

Страница 86: ...guration for wireless LAN models In this chapter we introduce how to set up your ioLogik 2500 WL1 device The following topics are covered in this chapter Deploying the ioLogik 2500 WL1 IOxpress Settings for a Wireless LAN Network Wireless LAN ...

Страница 87: ... should set the IP address of the computer to 192 168 127 xxx Step 2 Use the IOxpress utility to configure the ioLogik 2500 WL1 See the following section to learn how to use IOxpress to configure the ioLogik 2500 WL1 s functions ATTENTION Be sure to eliminate loops from networks that consist of wireless bridges Ethernet switches Ethernet links and Wireless LAN links If any loops exist packets will...

Страница 88: ...oLogik 2500 WL1 is shown as ioLogik 2500 WL XX in IOxpress where XX indicates the country code The country code indicates the ioLogik 2500 WL1 version and which bandwidth it uses We use ioLogik 2500 WL1 US as an example in the following figures The country code and model name that appear on your computer screen may be different than the ones shown here Security The ioLogik 2500 WL1 provides four s...

Страница 89: ...ifies WEP keys in ASCII format Key length Setting Description Factory Default 64 bits Uses 40 bit secret keys with 24 bit initialization vector 64 bits 128 bits Uses 104 bit secret key with 24 bit initialization vector Key index Setting Description Factory Default 1 4 Specifies which WEP key is used Open WEP key 1 4 Setting Description Factory Default A string that can be used as a WEP seed for th...

Страница 90: ...S Specifies Tunneled Transport Layer Security PEAP Specifies Protected Extensible Authentication Protocol or Protected EAP WPA WPA2 Enterprise Also called WPA WPA2 EAP Extensible Authentication Protocol In addition to device based authentication WPA WPA2 Enterprise enables user based authentication via IEEE 802 1X The ioLogik 2500 WL1 can support three EAP methods EAP TLS EAP TTLS and EAP PEAP By ...

Страница 91: ...s referred to as outer authentication The TLS tunnel is then used to encrypt an older authentication protocol that authenticates the user for the network As you can see digital certificates are still needed for outer authentication in a simplified form Only a small number of certificates are required which can be generated by a small certificate authority Certificate reduction makes TTLS and PEAP ...

Страница 92: ...elp you set up your wireless network in detail Advanced Settings Transmission Rate Setting Description Factory Default Auto The device senses and adjusts the data rate automatically Auto Transmission Power Setting Description Factory Default 3 dBm to 20 dBm The device adjusts the transmission power 10 dBm Fragmentation threshold Setting Description Factory Default 256 to 2346 Specifies the maximum...

Страница 93: ...e current connection quality SNR or Signal Strength is lower than the specified threshold the ioLogik will start background scanning and look for next hop candidates Roaming Difference Determines if roaming should be executed After a background scan has been triggered the roaming will only occur if the AP candidate s provide a better Roaming difference connection quality than the current connectio...

Страница 94: ...CP 587 Serial Tunnel Server TCP 4001 Auto Search Function UDP 4800 TCP UDP Message TCP 9000 UDP 9000 Remote Action Function TCP 9010 Peer to peer Function TCP 9300 IOxpress TCP 10124 AOPC Protocol TCP 9500 TCP 9900 The ioLogik 2500 series only supports MX AOPC UA server NOTE Client refers to when the ioLogik 2500 is acting as a client to connect other services Server refers to when the ioLogik 250...

Страница 95: ... 0 00001 8 1 BIT DIO Counter Value 03 HOLDING REGISTER Read Write 100 40101 8 2 WORDS DIO Pulse Status 01 COIL STATUS Read Write 100 00101 8 1 BIT Internal Register 03 HOLDING REGISTER Read Write 500 40501 48 1 WORDS Float Internal Register 03 HOLDING REGISTER Read Write 1000 41001 48 2 WORDS DI Counter Start Stop 01 COIL STATUS Read Write 1200 01201 8 1 BIT DIO Counter Start Stop 01 COIL STATUS R...

Страница 96: ...LDING REGISTER Read Write 200 40201 4 2 WORDS AI max Value Float 03 HOLDING REGISTER Read Write 300 40301 4 2 WORDS Internal Register 03 HOLDING REGISTER Read Write 500 40501 48 1 WORDS Float Internal Register 03 HOLDING REGISTER Read Write 1000 41001 48 2 WORDS DIO Counter Start Stop 01 COIL STATUS Read Write 1200 01201 12 1 BIT P2P Connection Status 02 INPUT STATUS Read only 1400 11401 16 1 BIT ...

Страница 97: ...nsionStatusSlot2 i o expansion status slot 2 read only api slot 0 sysInfo device ioExpansionStatusSlot3 i o expansion status slot 3 read only api slot 0 sysInfo device ioExpansionStatusSlot4 i o expansion status slot 4 read only api slot 0 sysInfo device ioExpansionStatusSlot5 i o expansion status slot 5 read only api slot 0 sysInfo device ioExpansionStatusSlot6 i o expansion status slot 6 read on...

Страница 98: ...verflowFlagClear DI Counter mode clear overflow flag 1 Clear read write api slot 0 io di 0 diStatus diStatus DI DI mode status 0 OFF 1 ON read only api slot 0 io di 0 diCounterV alue diCounterValue DI Counter mode value read only api slot 0 io di 0 diCounterR eset diCounterReset DI Counter mode reset to initial value 1 RESET read write api slot 0 io di 0 diCounterS tatus diCounterStatus DI Counter...

Страница 99: ...dth unit 100 us read only api slot 0 io dio dioDoPulseOffWidth DIO DO Pulse mode OFF width unit 100 us read only api slot 0 io dio dioDoPulseStatus DIO DO Pulse mode status 0 Stop 1 Start read write api slot 0 io dio 0 dioDiStat us dioDiStatus DIO DI mode status 0 OFF 1 ON read only api slot 0 io dio 0 dioDiCoun terValue dioDiCounterValue DIO Counter mode value read write api slot 0 io dio 0 dioDi...

Страница 100: ... only api slot 0 io ai aiValueScaledMin AI minimum scaled value read only api slot 0 io ai aiValueScaledMax AI maximum scaled value read only api slot 0 io ai aiResetMinValue AI reset minimum value 1 Reset read only api slot 0 io ai aiResetMaxValue AI reset maximum value 1 Reset read only api slot 0 io ai aiStatus AI status 0 normal 1 burnout 2 over range 3 under range read only api slot 0 io ai a...

Страница 101: ...ad only api slot 0 io bir api slot 0 io bir birIndex BIR index read only api slot 0 io bir birName BIR BOOL internal register name read only api slot 0 io bir birValue BIR BOOL internal register value read write api slot 0 io wir api slot 0 io wir wirIndex WIR index read only api slot 0 io wir wirName WIR WORD internal register name read only api slot 0 io wir wirValue WIR WORD internal register v...

Страница 102: ... Channel Order 400 Bad Request The I O channels are disordered 300 Content Failed 400 Bad Request One of the channel content in the request could not be set Please refer to the detail information 301 Content Failed To Set 400 Bad Request The content in the request could not be set invalid value N A Successful Request 200 OK Successful requests N A Resource Not Found 404 Bad Request This resource c...

Отзывы: