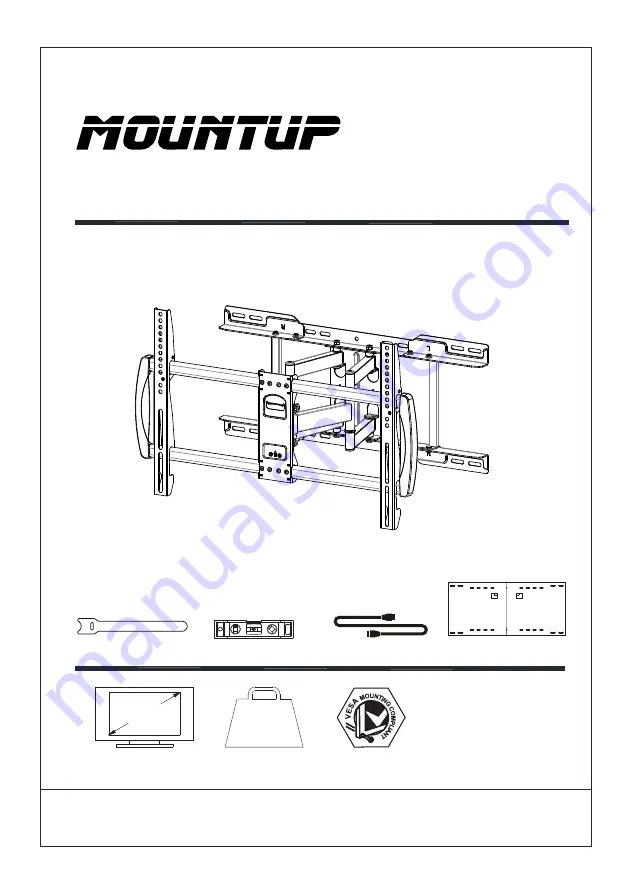
Mountup MU0012-24K Скачать руководство пользователя страница 1

100LBS

45.5KG

Max:

Max:600x400mm/24x16"
Min:200x100mm /8x4"

42"~70"

(A0)

If you have any questions, please contact us via 

[email protected]

MU0012-24K     INSTALLATION  INSTRUCTION

Velcro cable ties X5

Bubble level X1

HDMI cable X1

Mounting template X1

- 1 -

Содержание MU0012-24K

Страница 1: ...600x400mm 24x16 Min 200x100mm 8x4 42 70 A0 If you have any questions please contact us via help jollyholding com MU0012 24K INSTALLATION INSTRUCTION Velcro cable ties X5 Bubble level X1 HDMI cable X1...

Страница 2: ...rect assembly or misuse Please read this instruction carefully before installation If you do not understand these instructions or have doubts about the safety of the installation assembly or use of th...

Страница 3: ...olts x4 x1 C x8 D x8 E A Washers 8mm Bolts M6 x 12 Nuts M6 x4 B Open end wrench Philips Screws M6 x 15mm M6 x 30mm Philips Screws M4 x 12mm M4 x 30mm Washers 6mm M4 5 6 Spacers L10mm x4 x4 x4 x4 Phili...

Страница 4: ...ect TV Screw Diameter Thread screws by hand into the threaded holes on the back of your TV to select which screw diameter fits your TV M6 M4 M8 STEP 1 2 Select TV Screw Length Correct Correct Too Long...

Страница 5: ...TV hole pattern Secure the brackets using your screw washer spacer selection a For Flat Back b For Round Back Extra Space CAUTION Ensure bracket is securely fastened before moving on to the next step...

Страница 6: ...il or an edge to edge stud finder then measure the space of the studs and record 18in to 24in 2A 2 Attach the Extensions to the Wall Plate Only one side need to attach each of extension L and R For st...

Страница 7: ...vel the mounting template and mark the pilot hole locations Drill pilot holes using a 7 32 in 5 5 mm diameter drill bit Drill Pilot Holes 2A 5 01 UP X X X X 7 32 in 5 5 mm in 70 mm 2 A B Mount wall pl...

Страница 8: ...talling Mounting template 01 Drill pilot holes 2B 2 2B 3 2 75in 70 mm 10 mm 10 mm Concrete Wall Concrete Wall 01 A B 01 Install wall plate using lag bolts washer and anchor not included Tighten the la...

Страница 9: ...d Cap together Install the extensions 03 to front support 02 with the pre assembled screws Install the end cover 03 to front support with the pre assembled screws 3 1 3 2 Pre assembled scews Finished...

Страница 10: ...preassembled screws and washer P1 P3 P3 Remove the preassembled screws P3 and save to use then raise the safety locks Press the safety locks then fasten the removed screws P3 01 02 03 STEP 4 Hang TV...

Страница 11: ...ilting nuts pull TV to your desired angle then fasten tilting nuts with open end wrench Loosen Tighten Tighten Loosen 3 TV leveling adjustment 3 3 Loosen 2 leveling bolts on the rear of TV plate with...

Страница 12: ...Product Dimensions 12...

Отзывы: