


3
10
1
5
7
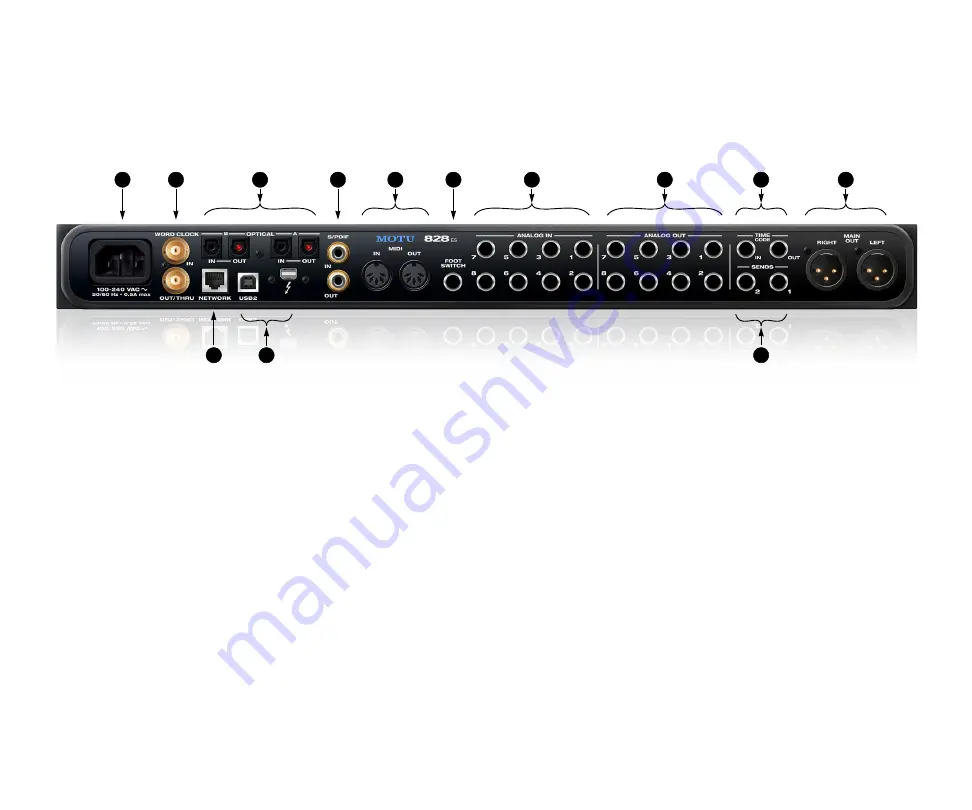
828es Rear Panel
1. The 828es is equipped with an auto-switching interna-
tional power supply.
2. These are standard BNC word clock jacks. Use them for a
variety of applications, such as digital transfers with
devices that cannot resolve to the clock supplied by their
digital I/O connection with the 828es.
3. These two banks of ADAT optical “lightpipe” connectors
each provide 8 channels of 24-bit ADAT optical digital I/O
at 1x sample rates (44.1 or 48 kHz) and 4 channels at 2x
sample rates (88.2 or 96 kHz). They are disabled at
higher sample rates. Alternately, they can operate as
stereo TOSLink (optical S/PDIF) connectors.
Note: you can choose independent formats for each
bank, A and B, as well as IN and OUT within each bank.
For example, you could choose ADAT for the optical A IN
(for, say, eight channels of input from your digital mixer)
and stereo TOSLink for the optical A OUT (for, say, your
DAT machine).
4. These jacks provide stereo, 24-bit S/PDIF digital input
and output at all supported sample rates (up to 96 kHz).
When connecting a source to the input, be sure to set the
clock source correctly. See “Syncing S/PDIF devices” on
page 47.
5. Connect a MIDI device here using standard MIDI cables.
Connect the 828es MIDI OUT port to the MIDI IN port on
the other device. Conversely, connect the 828es MIDI IN
port to the MIDI OUT port on the other device. You can
connect different devices to each port, such as a control-
ler device to the IN port and a sound module to the OUT
port. You can also daisy-chain MIDI devices, but be sure
to manage their MIDI channels (so that they don’t
receive or transmit on the same channel).
6. Connect a standard foot switch here for hands-free
punch-in and punch-out during recording. For details
about how to set this up, see item #34 in the Device tab
overview (page 14).
7. These eight analog inputs are balanced (TRS) quarter-
inch connectors that can also accept an unbalanced plug.
Use with line level signals up to +24 dBu, including
synthesizers, drum machines, effects processors, etc.
These inputs are also equipped with the 828es Precision
Digital Trim™ feature: digitally controlled analog trims
that let you adjust input level in 1 dB increments from
the included MOTU Pro Audio Control web app software.
8. The eight analog outputs are balanced, DC-coupled
quarter-inch connectors that can also accept an unbal-
anced plug. They provide additional analog output for
secondary studio monitors, surround monitoring, sub-
mixes or any other desired destination. The output trim
can be adjusted from the Device Tab in the MOTU Pro
Audio Control web app software. From the factory,
outputs 1-2 serve as monitor pair B for front panel A/B
monitor switching. (The XLR main outs serve as pair A.)
9. These are quarter-inch analog SMPTE input and output
jacks. Use them to resolve the 828es directly to time code
and transmit time code to other devices.
10. These two XLR jacks serve as the 828es main output pair
for primary (powered) studio monitors, PA speakers or
any other desired destination. You can control their
volume from the front panel MONITOR knob. They also
serve as monitor pair A for the 828es front panel A/B
monitor switching feature.
To hear audio playback from your host audio software on
the MAIN OUT pair, use the Audio Interface preset and
then assign audio tracks (and master fader) to these
main outs. You can also use the MOTU Pro Audio Control
web app to route live 828es inputs (and network inputs)
here as well.
11. These two balanced quarter-inch sends supply the pre-
amplified input signal from the mic/line/instrument
inputs on the front panel. Use them to insert your favor-
ite compressor, EQ, reverb or other outboard effect. Use
any analog input as a return.
12. Connect the 828es to the computer here via either
Thunderbolt or USB, using a standard Thunderbolt or
USB cable (one or the other, but not both). For details,
see chapter 5, “Hardware Installation” (page 33).
13. This AVB/TSN Ethernet port provides industry standard
IEEE 802.1 network connectivity to other network
devices. Examples include:
■
Another 828es or any other MOTU AVB-equipped audio
interface, such as the 1248, 8M, 16A, 24Ai, 24Ao, 112D,
Monitor 8, etc.
■
A standard Ethernet hub or Wi-Fi router (for internet
connection and communication with the web app
software).
■
A standard AVB Ethernet switch for high-speed, low-
latency, high-capacity audio connectivity to an AVB
audio network.
■
A recent-generation Mac (any Mac with a Thunderbolt
port) running OS X El Capitan (10.11) or later. This
allows you to operate the 828es as an audio interface
over Ethernet.
2
4
13
8
9
11
6
12
Содержание 828es
Страница 5: ...Part1 GettingStarted...
Страница 6: ......
Страница 8: ...8...
Страница 22: ...M O T U P R O A U D I O C O N T R O L W E B A P P 22...
Страница 28: ...P A C K I N G L I S T A N D S Y S T E M R E Q U I R E M E N T S 28...
Страница 32: ...S O F T W A R E I N S T A L L A T I O N 32...
Страница 51: ...Part2 Usingthe828es...
Страница 52: ......
Страница 62: ...F R O N T P A N E L O P E R A T I O N 62...
Страница 78: ...M I X E R E F F E C T S 78...
Страница 94: ...M O T U A U D I O T O O L S 94...
Страница 101: ...Part3 Appendices...
Страница 102: ......
Страница 108: ...A P P E N D I X B A U D I O S P E C I F I C A T I O N S 108...
Страница 109: ...APPENDIX 109 C Mixer Schematics MONO INPUT CHANNEL...
Страница 110: ...A P P E N D I X C M I X E R S C H E M A T I C S 110 STEREO INPUT CHANNEL...
Страница 111: ...A P P E N D I X C M I X E R S C H E M A T I C S 111 GROUP BUS...
Страница 112: ...A P P E N D I X C M I X E R S C H E M A T I C S 112 MONITOR BUS...
Страница 116: ...A P P E N D I X E O S C S U P P O R T 116...
Страница 120: ...I N D E X 120...


