


MODELS:
VM65X CONNECT
VM65X-2 CONNECT
VM65X-3 CONNECT
VM65X-4 CONNECT
UK EN
QUICK START GUIDE
For a full explanation of all features and instructions, please refer to the User’s
Guide.(available for download from
motorolanursery.com
).
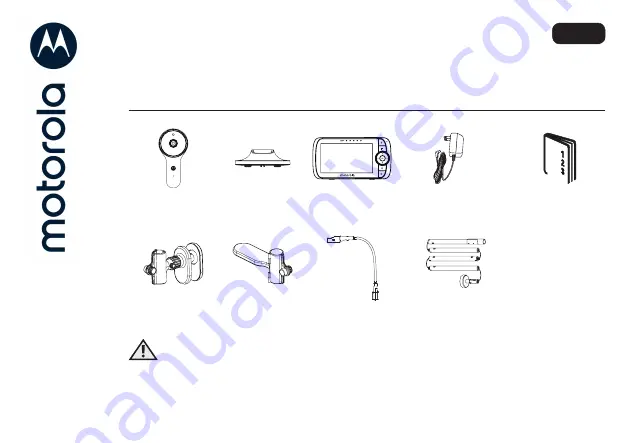
1. Contents Inside Box
x 2
Baby Unit
(Camera)
Magnetic
Mount
Parent Unit
Power Adapters
Quick Start
Guide
Top Clamp
Bottom Clamp
Gooseneck
4-Poles with
stand base
WARNING:
Strangulation hazard. Children have STRANGLED in cords. Keep this cord out
of the reach of children (more than 1 metre away). Do not remove the tags from
the AC Adapters. Only use the AC Adapters provided.
2. Setting up your Digital Video Baby Monitor
A. Connecting the Power Supply for the Baby Unit
• Insert the DC plug of the power adapter
into the DC socket on the back of the
Baby Unit.
• Connect the other end of the power
adapter to a suitable power socket.
• The baby unit turns on and the power
indicator lights in Blue colour.
Note
Only use the supplied power adapter
(DC5V/1000mA).
B. Fixing magnetic mount on the wall
• Mark the position of the screw holes on
the wall.
• Install wall anchors (Not provided)
suitable for the wall type and mounting
screws if needed.
• Fasten the mounting screws (Not
provided) on the wall.
• Position the cable behind the base as the
picture shown before attaching the base
on the wall.
Pair button
C. Connecting the Power Supply of the Parent Unit.
• Connect the small plug of the power adapter to the
parent unit and the other end to the power socket.
Only use the enclosed adapter (5VDC/1000mA).
• A rechargeable battery (Lithium ion battery
2000mAh) allows the parent unit to be used when
not plugged into an power socket. The battery
provides up to 5 hours operation of the Parent Unit.
We recommend charging the for at least 16 hours
before first use, and when the Parent Unit indicates
the battery is low.
• Press and hold the POWER button
0
on the top of
the Parent Unit to turn it ON.
D. Desktop Stand of the Parent Unit
• Move the stand ring on the back of the parent unit downward.
• Recommend to rotate it by 90 degree to set up the desktop stand.
Step 1
Step 2
Reset button
3. Basic operation of the keys
Parent unit
0
ON/OFF button
Press and hold to switch the Parent Unit ON/OFF.
+-
UP/DOWN buttons
Press to tilt the camera image upward or downward.
Press to adjust menu setting when menu is active.
<>
LEFT/RIGHT
buttons
Press to pan the camera image left or right.
Press to access menu options when menu is active.
M
MENU button
Press to open menu options or exit the menu.
O
OK button
Press to confirm a selection.
V
VIDEO button
Press to turn the LCD screen ON/OFF.
T
TALK button
Press and hold to talk to your baby.
Volume button
Press -/+ to select volume level of the Parent Unit.
RESET button
Press and hold with a small pin to reset the unit.
Baby Unit
PAIR button
Press and hold to pair with the parent unit or
Motorola
Nursery
Setup.
4. Setting up the Baby Unit for Wi-Fi® internet viewing
A.
Install
Motorola Nursery
Ap
p
• Scan the QR code with your smart device and download
Motorola Nursery
App from the App Store for
iOS devices
or from the Google Play™ Store for Android™
devices.
• Install
Motorola Nursery
App on your device.
B.
View on Compatible Smartphones
and
Tablets
Camera Wi-Fi®
Connect to Internet
via Wi-Fi®
Compatible
Viewing Devices
1. Open the
Motorola Nursery
App on your compatible smartphone or tablet.
2. Follow the in-app instructions to create your account and connect to your device.
Please take note of the following minimum system requirements:
Smartphones/Tablets: iOS
10
.0, Android™
7
.0
Wi-Fi® requirements:
At least 0.6 Mbps upload bandwidth per Smart Montitoring Companion, test your Internet
speed at: http://www.speedtest.net/
5. Installation of Cot mount
A cot mount with cable management is included which mounts directly to most cots to allow
better viewing. Assemble and install the cot mount using the following steps.
• Join the 4 poles and the support base together as the diagram shown. (Fig. 1a , 1b)
Fig. 1a
Fig. 1b
Note:
Each pole is connected with power cord inside, manage with care the power cords when
removing the poles from the box and during installation.
•
The Top
C
lamp is delivered by default for vertical clamping on
the top rail of the cot, to clamp horizontally on the slates of the
c
ot
, please unfasten and remove the tiny knob completely
from
the Top Clamp assembly (Fig.
2a), remove the Top Clamp
from
the assembly and re-orient the Top Clamp with the long
open
end pointing at left hand side (Fig. 2b), then reinsert into
the
assembly, fasten the tiny knob back to the assembly until
the
Top Clamp is securely locked.
• Fasten the top clamp either vertically
on the upper rail
(Fig
.
2c)
or the slats horizontally
(Fig
.
2
d
).
Fig.
2c
Fig.
2d
Fig.
2a
Fig.
2b
MODELS:
VM65X CONNECT
VM65X-2 CONNECT
VM65X-3 CONNECT
VM65X-4 CONNECT
U
S
EN
QUICK START GUIDE
For a full explanation of all features and instructions, please refer to the User’s
Guide.(available for download from
motorolanursery.com
).
1. Contents Inside Box
x 2
Baby Unit
(Camera)
Magnetic
Mount
Parent Unit
Power Adapters
Quick Start
Guide
Top Clamp
Bottom Clamp
Gooseneck
4-Poles with
stand base
WARNING:
Strangulation hazard. Children have STRANGLED in cords. Keep this cord out
of the reach of children (more than
3 feet
away). Do not remove the tags from
the AC Adapters. Only use the AC Adapters provided.
2. Setting up your Digital Video Baby Monitor
A. Connecting the Power Supply for the Baby Unit
• Insert the DC plug of the power adapter
into the DC socket on the back of the
Baby Unit.
• Connect the other end of the power
adapter to a suitable power socket.
• The baby unit turns on and the power
indicator lights in Blue colour.
Note
Only use the supplied power adapter
(DC5V/1000mA).
B. Fixing magnetic mount on the wall
• Mark the position of the screw holes on
the wall.
• Install wall anchors (Not provided)
suitable for the wall type and mounting
screws if needed.
• Fasten the mounting screws (Not
provided) on the wall.
• Position the cable behind the base as the
picture shown before attaching the base
on the wall.
Pair button
C. Connecting the Power Supply of the Parent Unit.
• Connect the small plug of the power adapter to the
parent unit and the other end to the power socket.
Only use the enclosed adapter (5VDC/1000mA).
• A rechargeable battery (Lithium ion battery
2000mAh) allows the parent unit to be used when
not plugged into an power socket. The battery
provides up to 5 hours operation of the Parent Unit.
We recommend charging the for at least 16 hours
before first use, and when the Parent Unit indicates
the battery is low.
• Press and hold the POWER button
0
on the top of
the Parent Unit to turn it ON.
D. Desktop Stand of the Parent Unit
• Move the stand ring on the back of the parent unit downward.
• Recommend to rotate it by 90 degree to set up the desktop stand.
Step 1
Step 2
Reset button
3. Basic operation of the keys
Parent unit
0
ON/OFF button
Press and hold to switch the Parent Unit ON/OFF.
+-
UP/DOWN buttons
Press to tilt the camera image upward or downward.
Press to adjust menu setting when menu is active.
<>
LEFT/RIGHT
buttons
Press to pan the camera image left or right.
Press to access menu options when menu is active.
M
MENU button
Press to open menu options or exit the menu.
O
OK button
Press to confirm a selection.
V
VIDEO button
Press to turn the LCD screen ON/OFF.
T
TALK button
Press and hold to talk to your baby.
Volume button
Press -/+ to select volume level of the Parent Unit.
RESET button
Press and hold with a small pin to reset the unit.
Baby Unit
PAIR button
Press and hold to pair with the parent unit or
Motorola
Nursery
Setup.
4. Setting up the Baby Unit for Wi-Fi® internet viewing
A.
Install
Motorola Nursery
Ap
p
• Scan the QR code with your smart device and download
Motorola Nursery
App from the App Store for
iOS devices
or from the Google Play™ Store for Android™
devices.
• Install
Motorola Nursery
App on your device.
B.
View on Compatible Smartphones
and
Tablets
Camera Wi-Fi®
Connect to Internet
via Wi-Fi®
Compatible
Viewing Devices
1. Open the
Motorola Nursery
App on your compatible smartphone or tablet.
2. Follow the in-app instructions to create your account and connect to your device.
Please take note of the following minimum system requirements:
Smartphones/Tablets: iOS
10
.0, Android™
7
.0
Wi-Fi® requirements:
At least 0.6 Mbps upload bandwidth per Smart Montitoring Companion, test your Internet
speed at: http://www.speedtest.net/
5. Installation of Cot mount
A cot mount with cable management is included which mounts directly to most cots to allow
better viewing. Assemble and install the cot mount using the following steps.
• Join the 4 poles and the support base together as the diagram shown. (Fig. 1a , 1b)
Fig. 1a
Fig. 1b
Note:
Each pole is connected with power cord inside, manage with care the power cords when
removing the poles from the box and during installation.
•
The Top
C
lamp is delivered by default for vertical clamping on
the top rail of the cot, to clamp horizontally on the slates of the
c
ot
, please unfasten and remove the tiny knob completely
from
the Top Clamp assembly (Fig.
2a), remove the Top Clamp
from
the assembly and re-orient the Top Clamp with the long
open
end pointing at left hand side (Fig. 2b), then reinsert into
the
assembly, fasten the tiny knob back to the assembly until
the
Top Clamp is securely locked.
• Fasten the top clamp either vertically
on the upper rail
(Fig
.
2c)
or the slats horizontally
(Fig
.
2
d
).
Fig.
2c
Fig.
2d
Fig.
2a
Fig.
2b
GUIDE DE DÉMARRAGE RAPIDE
CA
FR
1. À l'intérieur de la boîte
x 2
Unité Bébé
(Caméra)
Monture
magnétiqu
Unité parent
Adaptateurs Secteur
Guide de
démarrage
rapide
Pince
supérieure
Pince inférieure
Extension
flexible
4 Pôles avec base de
support
AVERTISSEMENT:
Danger d'étranglement. des enfants se sont accidentellement ÉTRANGLÉS
avec les cordons. Tenez ce cordon hors de portée des enfants, à plus d'un
mètre (3 pieds) de distance. Ne retirez pas les étiquettes des adaptateurs
secteur. Utilisez uniquement les adaptateurs secteur fournis.
2.
Installation de votre moniteur vidéo numérique pour bébé
C.
Alimentation électrique de l’unité parents.
3.
Fonctions de base des touches
4.
Installation de la caméra avec visionnage Wi-Fi® sur Internet
5. Installation du support pour le lit de bébé
Un support pour le lit avec gestion des câbles est inclus et se monte directement sur la plupart
des lits pour permettre une meilleure visualisation. Assemblez et installez le support pour le lit
en suivant les étapes suivantes.
• Joindre les 4 pôles et la base de support ensemble comme le schéma illustré. (Fig. 1a , 1b)
Fig. 1a
Fig. 1b
Remarque:
Chaque pôle est connecté avec un cordon d'alimentation à l'intérieur, manipulez avec soin les cordons
d'alimentation lors du retrait des pôles de la boîte et lors de l'installation.
• La pince supérieure est livrée par défaut pour un serrage vertical sur
le rail supérieur du lit, pour serrer horizontalement sur les rebords
du lit, veuillez desserrer et retirer complètement le petit bouton de
l'ensemble de la pince supérieure (Fig. 2a), retirer le Pince supérieure de
l'assemblage et réorientez la pince supérieure avec l'extrémité longue
ouverte pointant vers le côté gauche (Fig.2b), puis réinsérez-la dans
l'assemblage, fixez le petit bouton à l'assemblage jusqu'à ce que la
pince supérieure soit solidement verrouillée.
• Fixez la pince supérieure soit verticalement sur le rail supérieur
(Fig.2c) ou les rebords horizontalement. (Fig. 2d)
Fig. 2a
Fig. 2b
Fig. 2d
Fig. 2c
MODÈLES:
VM65X CONNECT
VM65X-2 CONNECT
VM65X-3 CONNECT
VM65X-4 CONNECT
Pour les caractéristiques et les instructions complètes, veuillez vous référer au Guide de
l'utilisateur. (téléchargeable sur motorolanursery.com).
A. Alimentation électrique de l’unité bébé
• Insérez la fiche CC de l'adaptateur
secteur dans la prise CC située au dos
de l’unité bébé.
• Branchez l'adaptateur à une prise de
courant.
• L'unité bébé s'allume et le voyant
d'alimentation s'illumine en bleu.
Remarque
Utilisez uniquement l’adaptateur secteur
fourni (5Vcc/1000 mA).
B. Fixation du support magnétique sur le mur
• Marquez la position des trous de vis sur
le mur.
• Installez des ancrages muraux (non
fournis) adaptés au type de mur et des
vis de montage si nécessaire.
• Fixez les vis de fixation (non fournies) au
mur.
• Placez le câble derrière la base comme
indiqué sur la photo avant de fixer la
base au mur.
Bouton de
COUPLAGE
• Connectez le jack de l’adaptateur secteur à la prise
de l’unité parents et l’adaptateur à une prise de
courant. Utilisez uniquement l'adaptateur secteur 5
Vcc/1000 mA fourni.
• La batterie rechargeable au lithium-ion de 2000
mAh inttégrée à l'unité parents vous permet de
déplacer cette dernière sans perdre la liaison et les
images de l'unité bébé. La batterie fournit jusqu'à
5 heures de fonctionnement de l'unité parent.
Nous vous recommandons de le charger pendant
au moins 16 heures avant la première utilisation, et
lorsque l'unité parent indique que la batterie est
faible.
• Appuyez longuement sur la touche MARCHE/
ARRÊT
0
en haut de l'unité parents pour mettre
celle-ci sous tension.
D. Support de bureau de l'unité parent
• Soulevez le support à l'arrière de l'unité parent
• Il est recommandé de le faire pivoter de 90 degrés pour mettre en place le stand de
bureau.
Étape 1 Étape 2
Bouton de
RÉINITIALISATION
Parent unit
0
Touche MARCHE/
ARRÊT
Appuyez longuement pour mettre l’unité parents sous ou hors
tension.
+-
Touches HAUT/BAS
Appuyez pour incliner la caméra vers le haut ou le bas.
Appuyez pour régler les paramètres du menu lorsque le menu
est actif.
<>
Touches GAUCHE/
DROITE
Appuyez pour faire pivoter la caméra vers la gauche ou la
droite.
Appuyez pour accéder aux options du menu lorsque le menu
est actif.
M
Touche MENU
Appuyez pour ouvrir le menu ou pour sortir.
O
Touche OK
Appuyez pour confirmer une sélection.
V
Touche VIDÉO
Appuyez pour activer ou désactiver l’écran LCD.
T
Touche PAROLE
Maintenez cette touche enfoncée pour parler à votre bébé.
Touches de volume
Appuyez sur -/+ pour régler le volume de l'unité parents.
Bouton de
RÉINITIALISATION
Appuyez longuement avec un objet pointu (par ex. une épingle)
pour réinitialiser l'appareil.
Unité bébé
Bouton de COUPLAGE
Appuyez et maintenez-le enfoncé pour jumeler l’unité
parente ou la configuration Motorola Nursery Wi-Fi®.
A.
Installation de l’application
Motorola Nursery
.
• Scannez le code QR avec votre appareil intelligent et
téléchargez l'application Motorola Nursery de la boutique
App Store pour les appareils iOS ou de la boutique Google
Play™ pour les appareils Android™.
• Installez l'application Motorola Nursery sur votre appareil
intelligent.
B.
Visionnez les images sur un Smartphone
ou
une tablette compatibles.
Caméra Wi-Fi®
Connexion à Internet via le
Wi-Fi®
Périphériques de visionnage
compatibles
visionnage compatibles
1. Démarrez l'application Motorola Nursery sur votre smartphone ou votre tablette compatible.
2. Suivez les instructions de l'application pour créer votre compte et vous connecter à votre
caméra Wi-Fi®.
Veuillez noter les configurations système minimales suivantes :
Smartphones/Tablettes: iOS 10.0, Android™ 7.0
Exigences Wi-Fi® :
Bande passante de téléchargement
≥
0,6 Mbps par caméra. Testez la vitesse de votre connexion
Internet sur : http://www.speedtest.net/
LA ES
ES
GUÍA DE INICIO RÁPIDA.
1. Contenido de la caja.
x 2
Unidad
para Bebés
(Cámara).
Montaje
Magnético.
Unidad para
Padres.
Adaptadores de
Corriente.
Guía de Inicio
Rápido.
Abrazadera
Superior.
Abrazadera
Inferior.
Soporte.
4-Polos con base
de soporte.
PRECAUCIÓN
Peligro de Estrangulamiento: Se han presentado casos de ESTRANGULAM-
IENTO de niños con cables. Mantenga este cable fuera del alcance de los niños
(a más de 3 pies). No retire las etiquetas de los transformadores de CA. Sólo
utilice los Transformadores de CA que se adjuntan.
2.
Configuración de su Monitor para bebés con video digital.
A.
Suministro de energía de la unidad para el bebé
C.
Conectar el suministro eléctrico de la Unidad para los padres.
3.
Funcionamiento básico de los botones.
4.
Configuración de la cámara para su visualización por Internet a través de Wi-Fi®
5. Instalación del Soporte para Cuna.
Se incluye un soporte para cuna con gestión de cables que se monta directamente en la
mayoría de las cunas para permitir una mejor visualización. Ensamble e instale el soporte de
cuna siguiendo los siguientes pasos:
• Una los 4 polos y la base de soporte juntos como se muestra en el diagrama. (Fig. 1a , 1b)
Fig. 1a
Fig. 1b
Nota:
Cada poste está conectado con un cable de alimentación en el interior, maneje con cuidado los cables
de alimentación cuando retire los postes de la caja y durante la instalación.
• La Abrazadera Superior se entrega de forma predeterminada
para la sujeción vertical en el riel superior de la cuna, para sujetar
horizontalmente las pizarras de la cuna, desabroche y retire
completamente la pequeña perilla del conjunto de la abrazadera
superior (Fig. 2a), retire la Abrazadera Superior del conjunto y reoriente
la Abrazadera Superior con el extremo abierto largo apuntado hacia el
lado izquierdo (Fig. 2b), luego vuelva a insertarla en el conjunto, vuelva
a colocar la pequeña perilla en el conjunto hasta que la Abrazadera
Superior quede firmemente bloqueada. .
• Sujete la abrazadera superior verticalmente en el riel superior (Fig. 2c)
o los listones horizontalmente. (Fig. 2d)
Fig. 2a
Fig. 2b
Fig. 2d
Fig. 2c
MODELOS:
VM65X CONNECT
VM65X-2 CONNECT
VM65X-3 CONNECT
VM65X-4 CONNECT
Para obtener una explicación más detallada de todas las funciones e instrucciones, consulte la
Guía de usuario (la puede descargar en motorolanursery.com).
• Inserte el enchufe de CC del transformador
en la entrada de CC ubicada en la parte
posterior de la Unidad para el bebé.
• Conecte el otro extremo del transformador
a una toma de corriente adecuada.
• La unidad del bebé se encenderá y el
indicador de encendido se iluminará en
color azul.
Nota
Sólo utilice el transformador que se
proporciona (5V CC/1000mA).
B. Fijación de montaje magnético en la pared.
• Marque la posición de los orificios para los
tornillos en la pared.
• Instale anclajes para la pared (no incluidos)
adecuados para el tipo de pared y tornillos
de montaje si es necesario.
• Apriete los tornillos de montaje (no
incluidos) en la pared.
• Coloque el cable detrás de la base como se
muestra en la imagen antes de enganchar
la base en la pared.
Botón de
SINCRONIZ
-ACIÓN
• Conecte el enchufe pequeño del transformador
a la unidad para los padres y el otro extremo al
tomacorriente. Solo utilice el transformador que se
adjunta (5V CC/1000mA).
• Una batería recargable (batería de iones de litio
2000mAh) dentro de la Unidad para los padres le
permite moverla sin perder el enlace ni la imagen
de la Unidad para el bebé. La batería le brinda
hasta 5 horas de funcionamiento de la Unidad para
los padres. Le recomendamos que cargue la unidad
por 16 horas como mínimo antes de utilizarla por
primera vez, o cuando la Unidad para los padres
indique que la carga de batería está baja.
• Mantenga presionado el botón de ENCENDIDO
0
en la parte superior de la Unidad para ERASE
padres para ENCENDERLA.
D. Soporte de escritorio de la unidad para padres.
• Levante el soporte que se encuentra en la parte posterior de la unidad para padres.
• Se recomienda rotarlo a un ángulo de 90 grados para el modo de soporte de escritorio.
Paso 1
Paso 2
Botón de
REINICIO
Unidad para los padres
0
Botón de
ENCENDIDO/
APAGADO
Mantenga presionado para ENCENDER/APAGAR la
Unidad para los padres.
+-
Botones ARRIBA/
ABAJO
Presione para inclinar la cámara hacia arriba o hacia abajo.
Presione para ajustar las configuraciones del menú.
<>
Botones
IZQUIERDA/
DERECHA
Presione para girar la cámara hacia la izquierda o derecha.
Presione para acceder a diferentes opciones del menú.
M
Botón MENÚ
Presione para abrir las opciones del menú o para salir del mismo.
O
Botón ACEPTAR
Presione para confirmar la selección.
V
Botón de VIDEO
Presione para ENCENDER/APAGAR la pantalla LCD.
T
Botón HABLAR
Mantenga presionado para hablarle a su bebé.
Botones de
Volumen
Presione -/+ para seleccionar el nivel de volumen de la
unidad para los padres.
Botón de REINICIO
Mantenga presionado con un alfiler pequeño para
reiniciar la unidad.
Unidad para el bebé
Botón de
SINCRONIZACIÓN
Mantenga presionado para sincronizar con la unidad de
padres o con los ajustes de Motorola Nursery Wi-Fi®.
A.
Instalar la aplicación
Motorola Nursery
.
• Escanee el código QR con su dispositivo inteligente y
descargue la aplicación Motorola Nursery de App Store para
dispositivos iOS o de Google Play™ Store para dispositivos
Android™.
• Instale la Aplicación Motorola Nursery en su dispositivo.
B.
Ver en Teléfonos inteligentes
y
tabletas compatibles.
Cámara Wi-Fi®
Conectar a Internet a través
de Wi-Fi®
Dispositivos compatibles
para la visualización
1. Abra la aplicación Motorola Nursery en su teléfono inteligente o tablet compatible.
2. Siga las instrucciones en la aplicación para crear su cuenta y conectarse a su Cámara Wi-Fi®.
Por favor, tome nota de los siguientes requisitos mínimos del sistema:
Teléfonos inteligentes/Tablets: iOS 10.0, Android™ 7.0
Requisitos Wi-Fi®:
Al menos 0.6 Mbps de banda ancha para cargar por cámara. Puede comprobar la velocidad de
su conexión a Internet en: http://www.speedtest.net/


