User’s Guide
All-in One Smart Monitor and Intercom
Models: MBP164CONNECT
The features described in this guide are subject to modifications without prior notice.
Страница 1: ...User s Guide All in One Smart Monitor and Intercom Models MBP164CONNECT The features described in this guide are subject to modifications without prior notice ...
Страница 2: ...or your records For warranty service of your Motorola product you will need to provide a copy of your dated sales receipt to confirm warranty status Registration is not required for warranty coverage For product related questions please call This User s Guide has all the information you need to make the most out of your product Please read the Safety Instructions on pages 5 before you install the ...
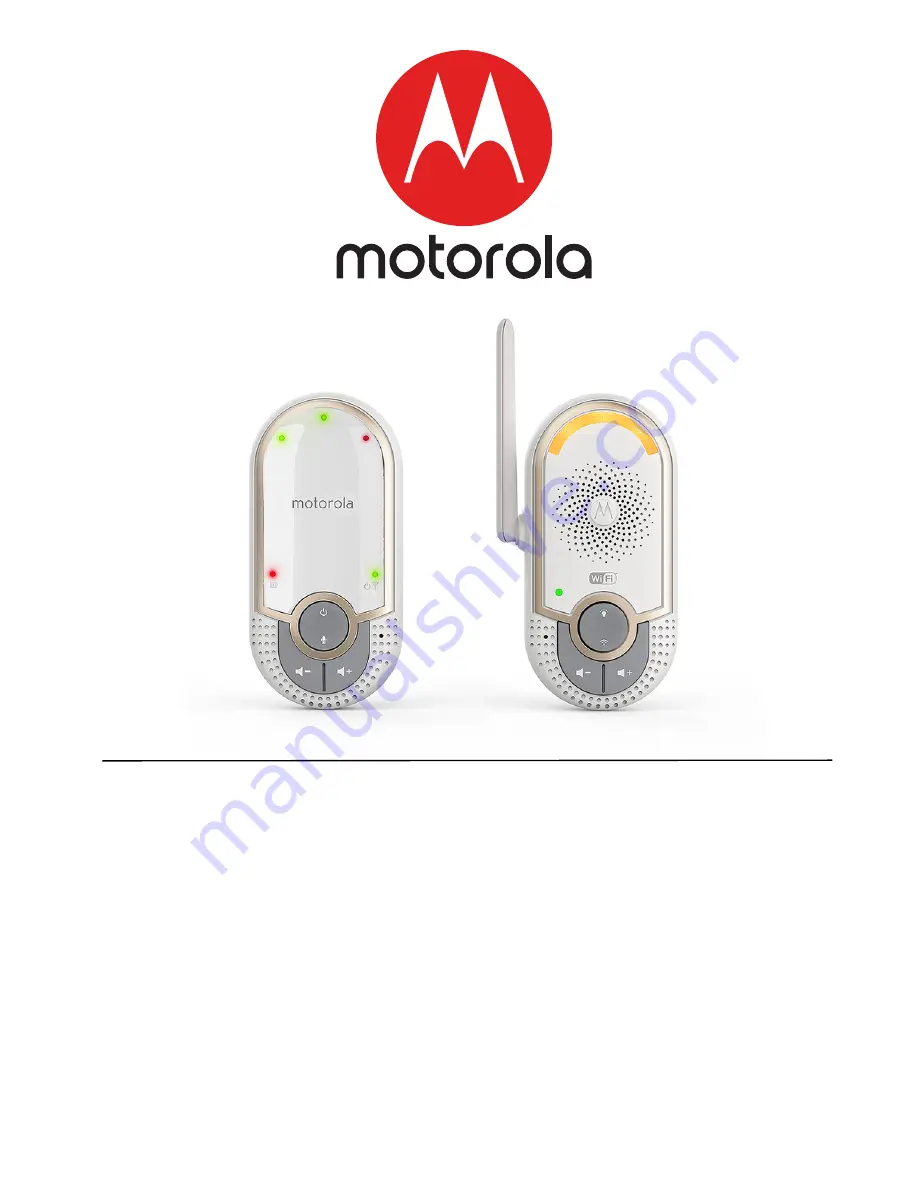
Страница 3: ...plug the device into power socket 4 Night Light button Press to turn on o the nightlight 5 PAIR button Press and hold for 3s to enter to pairing mode Press and hold for more than 20s to de register from Smart Nursery App and reset to factory default 6 Volume buttons Press to decrease increase speaker volume 7 Antenna 8 Power Plug 7 8 1 2 3 4 5 6 ...
Страница 4: ...ill be affected by environmental conditions Any large metal object like a refrigerator a mirror a filing cabinet metallic doors or reinforced concrete between the Baby and Parent Unit may block the radio signal The signal strength may also be reduced by other solid structures like walls or by radio or electrical equipment such as TVs computers cordless or mobile phones fluorescent lights or dimmer...
Страница 5: ... 3 1 Set nightlight 12 3 2 Adjust Baby Unit volume 12 3 3 Talk Mode 12 3 4 Adjust Parent Baby Unit volume 12 4 System Requirements 13 5 Connecting Devices 14 5 1 Setup 14 5 2 What you need 14 5 3 User Account and MBP164CONNECT setup on Android Devices 15 5 4 User Account and MBP164CONNECT setup on iOS Devices 20 5 5 Reset the Smart Monitoring Companion 25 6 Disposal of the Device Environment 26 7 ...
Страница 6: ... Safety Instructions WARNING Strangulation Hazard Children have STRANGLED in cords Keep this cord out of the reach of children more than 3ft 1m away Never use extension cords with AC Adapters Only use the AC Adapters provided ...
Страница 7: ... crib NEVER place the baby monitor within the crib Adult assembly is required Keep small parts away from children when assembling This product is not a toy Don t allow children to play with it This baby monitor is not a substitute for responsible adult supervision Keep this User s Guide for future reference Do not cover the baby monitor with a towel or blanket Test this monitor and all its functio...
Страница 8: ...r supply Choose a proper location with easy access to a power outlet Plug the Unit into the power outlet in your baby s room Ensuring sufficient clearance is given for it to detect sound and no more than 3 feet from the baby crib When the unit is plugged in for the first time the green LED illuminates and the night light switches on ...
Страница 9: ...attery pack for the Parent Unit Insert the wire tab of the rechargeable battery pack into the contact slot as shown above and fit the battery pack into the compartment Reattach the battery compartment cover The Charging Indicator comes on Black Red ...
Страница 10: ...he event of a power failure Connect the small plug of the power adapter to the Baby Unit and the other end to the electrical outlet Only use the enclosed adapter 5VDC 600mA Press and hold Power Button to turn on the Parent Unit NOTE The battery icon turns RED and the unit emits a beep every 16 seconds to indicate that the battery is low and needs to be recharged The battery pack takes about 16 hou...
Страница 11: ...Getting Started 11 ENGLISH 2 4 Desktop Mount of Parent Unit Flip the stand from Parent rear to open position for desktop mount ...
Страница 12: ...ight is off press to turn it on 2 When the nightlight is on press to turn it off 3 2 Adjust Baby Unit volume There are 5 volume levels on the unit including volume off Press to increase or to decrease the volume of the unit respectively the sound level will be detected on your iPhone iPad or Android devices that paired 3 3 Talk Mode Press and hold TALK button 7 on the parent unit to talk to your b...
Страница 13: ...Requirements 13 ENGLISH 4 System Requirements Smartphones Tablets Android and iOS only Minimum requirement iOS 8 0 Android 5 0 or above For more information please visit https hubbleconnected com requirements ...
Страница 14: ... switch on The Unit must be within range of the Wi Fi router with which you want to connect Have the router password available for entering during the in app setup process 5 2 What you need MBP164CONNECT Device with Android system 5 0 or above or Any iOS Device with iOS version 8 0 or above Note You can only setup via a compatible smartphone or tablet and not via a PC MBP164 CONNECT Wi Fi Router H...
Страница 15: ...wnload Hubble for Smart Nursery App Go to Google Play Store to search for Hubble for Smart Nursery App Download Hubble for Smart Nursery App from Google Play Store and install it on your Android device 5 3 2 Run Smart Nursery App on Android Device Ensure that your smart device is connected to your Wi Fi router ...
Страница 16: ...p SIGN UP by entering your account information read through the Terms Conditions then select I agree to the Terms of Use Pictures A1 A2 Note If you already have a Smart Nursery App account please select Already have an Account to go to the next step A1 A2 ...
Страница 17: ...Audio Monitors then tap MBP164 to add the device read through the features of MBP164CONNECT or tap on Skip to setup Pictures A3 A4 A5 Press and hold the PAIR button at the front of MBP164CONNECT the nightlight blinks in amber alternately indicating that the device is ready for pairing A5 A3 A4 ...
Страница 18: ...he App will automatically search for your device as shown in the picture below Pictures A6 A7 Tap the device SSID AudioMonitor 0164XXXXXX to connect to the App Picture A8 Tap Next to search for the Wi Fi router Picture A9 A7 A6 A9 A8 ...
Страница 19: ... password and then tap Search Picture A10 It will take a few minutes for the device to connect to the Wi Fi the device is successfully registered to your Samrt Nusery account Picture A11 If connection fails please tap Retry and repeat the steps starting from steps 5 3 3 A11 A10 ...
Страница 20: ... install it on your iOS device 5 4 2 Run Smart Nursery App on your iOS Device Ensure that your iOS device is connected to your Wi Fi Router Run the Hubble for Smart Nursery App enter your account information read through the Terms and Conditions and then select I agree to the Terms of Use Pictures i1 i2 Note If you already have a Smart Nursery App account please select Already have an Account to g...
Страница 21: ...64CONNECT to your account Tap on Audio Monitors the tap MBP164 to add the device read through the features of MBP164CONNECT or tap on Skip to setup Pictures i3 i4 i5 The following setup instructions will appear on the screen Pictures i6 i7 i5 i3 i4 i7 I6 ...
Страница 22: ...ks in amber color alternately indicating that the device is ready for pairing The unit also bleeped three times and the Power LED switched off then on again Go to Settings Wi Fi menu on your iOS device Picture i8 Select your device SSID AudioMonitor 0164XXXXXX from the list of networks Picture i9 i8 i9 ...
Страница 23: ...es 23 iOS ENGLISH Press Home Key to return back tape the Smart Nursery app to resume setup the SSID will be detected on your iOS device Picture 10 Tape NEXT Select your Wi Fi network and tap Search Picture i11 i10 i11 ...
Страница 24: ...p OK Picture i12 It will take a few minutes for the device to connect to the Wi Fi network the device is successfully registered to your Samrt Nusery account Picture i13 If connection fails please tap Retry and repeat the steps starting from 5 4 3 i12 i13 ...
Страница 25: ...set Press and hold PAIR button for more than 20s to enter to deregister mode and perform factory default You will hear a series of bleeps as you hold the button After 20 seconds the unit will re initialise When it is ready the night light will flash ready for pairing Register your device to Smart Nursery App by following the steps in section 5 3 3 for Android devices or in section 5 4 3 for iOS de...
Страница 26: ...cling of electrical and electronic equipment The symbol on the product user s guide and or box indicates this Some of the product materials can be re used if you take them to a recycling point By reusing some parts or raw materials from used products you make an important contribution to the protection of the environment Please contact your local authorities in case you need more information on th...
Страница 27: ...se permanent damage to the product which is not covered by the warranty Keep your Smart Monitoring Companion away from hot humid areas or strong sunlight and do not let it get wet Every effort has been made to ensure high standards of reliability of your Smart Monitoring Companion However if something does go wrong please do not try to repair it yourself contact Customer Service for assistance IMP...
Страница 28: ...sword OR on your Android or iOS application An e mail will be sent to your registered e mail address Account I am unable to receive a new password although I have used the Forgot Password option 1 The e mail might have been sent to your Junk Mail Folder Please check your Junk Mail Folder 2 There might be a delay in getting your e mail Please wait a few minutes and refresh your email account Settin...
Страница 29: ...ain later 1 Please try again in a few minutes This could be because of any issue with your internet connection 2 If the problem remains please restart your Device to check if this fixes the problem 3 Please restart your Wireless Router Connectivit y Issues Even though I am accessing my Device from the same Wi Fi network I still find my Device is shown as remote I can only access it for 5 minutes a...
Страница 30: ...the Google Play on your Android device Select Search Type in Hubble Connect for Smart Nursery The results will show the Hubble App Select to install it iOS Device Open the App StoreSM Select Search Type in Hubble Connect for Smart Nursery The results will show the Hubble App Select to install it ...
Страница 31: ...cessory sold for use with this product is manufactured to be free from defects in materials and workmanship under normal consumer usage for the period outlined below This Warranty is your exclusive warranty and is not transferable THIS WARRANTY GIVES YOU SPECIFIC LEGAL RIGHTS AND YOU MAY HAVE OTHER RIGHTS THAT VARY BY STATE PROVINCE OR COUNTRY FOR CONSUMERS WHO ARE COVERED BY CONSUMER PROTECTION L...
Страница 32: ... WARRANTY IS THE EXCLUSIVE REMEDY OF THE CONSUMER AND IS PROVIDED IN LIEU OF ALL OTHER WARRANTIES EXPRESS OR IMPLIED IN NO EVENT SHALL MOTOROLA OR BINATONE BE LIABLE WHETHER IN CONTRACT OR TORT INCLUDING NEGLIGENCE FOR DAMAGES IN EXCESS OF THE PURCHASE PRICE OF THE PRODUCT OR ACCESSORY OR FOR ANY INDIRECT INCIDENTAL SPECIAL OR CONSEQUENTIAL DAMAGES OF ANY KIND OR LOSS OF REVENUE OR PROFITS LOSS OF...
Страница 33: ...e fault of MOTOROLA or BINATONE are excluded from coverage Use of Non Motorola branded Products and Accessories Defects or damage that result from the use of Non Motorola branded or certified Products or Accessories or other peripheral equipment are excluded from coverage Unauthorized Service or Modification Defects or damages resulting from service testing adjustment installation maintenance alte...
Страница 34: ... and risk to a BINATONE Authorized Repair center To obtain service you must include a the Product or Accessory b the original proof of purchase receipt which includes the date place and seller of the Product c if a Warranty card was included in your box a completed Warranty card showing the serial number of the Product d a written description of the problem and most importantly e your address and ...
Страница 35: ...eceiver Connect the equipment into an outlet on a circuit different from that to which the receiver is connected Consult the dealer or an experienced radio TV technician for help Changes or modifications to this equipment not expressly approved by the party responsible for compliance could void the user s authority to operate the equipment This device complies with Part 15 of the FCC rules Operati...
Страница 36: ...erference that may cause undesired operation of the device The term IC before the certification registration number only signifies that the Industry Canada technical specifications were met This product meets the applicable Industry Canada technical specifications Le présent appareil est conforme aux CNR d Industrie Canada applicables aux appareils radio exempts de licence L exploitation est autor...
Страница 37: ...y pack Power Voltage Baby Unit Input 100 240V AC 50 60Hz 150mA Power Adapter Parent Unit Ten Pao international Ltd S003GU0500060 Input 100 240V AC 50 60Hz 150mA Output DC5V 600mA WARNING Use only with provided power supply Do not use non rechargeable batteries for the Parent Unit Risk of explosion if battery is replaced by an incorrect type Dispose of used batteries according to the instructions ...
Страница 38: ...k Holdings LLC and are used under license Apple logo is trademark of Apple Inc registered in the U S and other countries App Store is a service mark of Apple Inc Apple logo is trademark are trademarks of Google Inc Wi Fi is a trademark of the Wi Fi Alliance All other trademarks are the property of their respective owners 2017 Motorola Mobility LLC All rights reserved US_EN Version 2 0 Printed in C...