background image

1

English

CONTENT

S

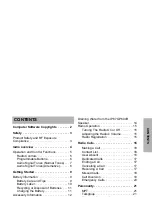
CONTENTS

Computer Software Copyrights  . . . . . . .  2

Safety  . . . . . . . . . . . . . . . . . . . . . . . . . . . .  3

Product Safety and RF Exposure 
Compliance  . . . . . . . . . . . . . . . . . . . . . . . .  3

radio overview  . . . . . . . . . . . . . . . . . . . . .  4

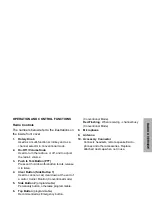
Operation and Control Functions . . . . . . . .  5

Radio Controls  . . . . . . . . . . . . . . . . . . .  5
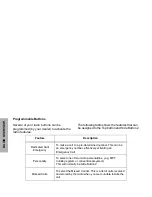
Programmable Buttons . . . . . . . . . . . . .  6
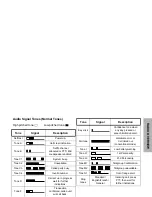
Audio Signal Tones (Normal Tones) . . .  7
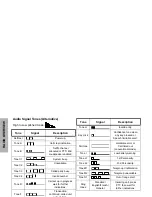
Audio Signal Tones (Alternative). . . . . .  8

Getting Started . . . . . . . . . . . . . . . . . . . . .  9

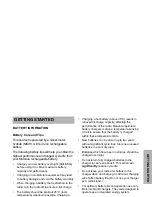
Battery Information  . . . . . . . . . . . . . . . . . .  9

Battery Care and Tips   . . . . . . . . . . . . .  9
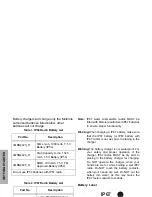
Battery Label . . . . . . . . . . . . . . . . . . . .  10
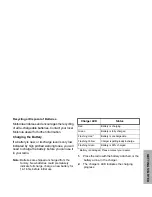
Recycling or Disposal of Batteries  . . .  11
Charging the Battery . . . . . . . . . . . . . .  11

Accessory Information . . . . . . . . . . . . . . .  12

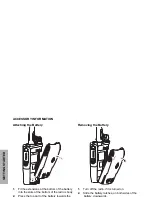
Attaching the Battery  . . . . . . . . . . . . .  12
Removing the Battery . . . . . . . . . . . . .  12
Attaching the Antenna  . . . . . . . . . . . .  13
Removing the Antenna . . . . . . . . . . . .  13

Draining Water from the IP67 GP644R 
Speaker . . . . . . . . . . . . . . . . . . . . . . . . . .  14
Radio Operation  . . . . . . . . . . . . . . . . . . . .15

Turning The Radio On or Off  . . . . . . .  15
Adjusting the Radio’s Volume. . . . . . .  15
Radio Registration  . . . . . . . . . . . . . . .  15

Radio Calls . . . . . . . . . . . . . . . . . . . . . . .  16

Making a Call . . . . . . . . . . . . . . . . . . .  16
Contact List. . . . . . . . . . . . . . . . . . . . .  16
User Absent . . . . . . . . . . . . . . . . . . . . .16
Dedicated Calls  . . . . . . . . . . . . . . . . .  17
Ending a Call  . . . . . . . . . . . . . . . . . . .  17
Cancelling a Call  . . . . . . . . . . . . . . . . .17
Receiving A Call   . . . . . . . . . . . . . . . . .17
Missed Calls . . . . . . . . . . . . . . . . . . . .  18
Call Diversion . . . . . . . . . . . . . . . . . . .  19
Emergency Calls  . . . . . . . . . . . . . . . . .20

Personality . . . . . . . . . . . . . . . . . . . . . . .  21

MPT  . . . . . . . . . . . . . . . . . . . . . . . . . .  21
Talkgroup . . . . . . . . . . . . . . . . . . . . . . .21
Fixed and Dynamic Groups  . . . . . . . .  21
Conventional Mode  . . . . . . . . . . . . . . .22
Personality Selection  . . . . . . . . . . . . .  22

Содержание GP644R

Страница 1: ...M GP644R User Guide 6866542D03 P ...

Страница 2: ...m ...

Страница 3: ...ttery Care and Tips 9 Battery Label 10 Recycling or Disposal of Batteries 11 Charging the Battery 11 Accessory Information 12 Draining Water from the IP67 GP644R Speaker 14 Radio Operation 15 Turning The Radio On or Off 15 Adjusting the Radio s Volume 15 Radio Registration 15 Radio Calls 16 Making a Call 16 Contact List 16 User Absent 16 Dedicated Calls 17 Ending a Call 17 Cancelling a Call 17 Rec...

Страница 4: ...ny form the copyrighted computer program Accordingly any copyrighted Motorola computer programs contained in the Motorola products described in this manual may not be copied reproduced modified reverse engineered or distributed in any manner without the express written permission of Motorola Furthermore the purchase of Motorola products shall not be deemed to grant either directly or by implicatio...

Страница 5: ...xposure booklet enclosed with your radio Motorola Publication part number 6864117B25 to ensure compliance with RF energy exposure limits For a list of Motorola approved antennas batteries and other accessories visit the following web site which lists approved accessories http www motorola comgovernmentandenterprise Before using this product read the operating instructions for safe usage contained ...

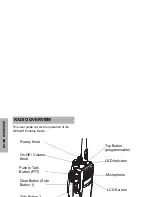
Страница 6: ...IO OVERVIEW This user guide covers the operation of the GP644R Portable Radio Top Button programmable LED Indicator Microphone LCD Screen Rotary Knob On Off Volume Knob Push to Talk Button PTT Clear Button Side Button 1 ...

Страница 7: ... Press and hold down this button to talk release it to listen 4 Clear Button Side Button 1 Used to cancel a call clear down at the end of a call or Carrier Monitor Conventional mode 5 Side Button 2 programmable Personality button otherwise programmable 6 Top Button programmable Recommended as Emergency button Conventional Mode Red Flashing When receiving channel busy Conventional Mode 8 Microphone...

Страница 8: ...ture Description Dedicated Call Emergency To make a call to a pre determined number This can be an emergency number effectively activating an Emergency Call Personality To select one of two radio personalities e g MPT trunking system or conventional system This will normally be Side Button 2 Missed Calls To select the Missed Call list This is a list of calls received and stored by the radio when y...

Страница 9: ... up in progress wait for further indications Tone F Transaction confirmed called unit will call back Key click Confidence tone when any key pressed or speech limitation alert Fail tone Hardware error or Call timed out conventional mode Tone I Low battery warning Tone L1 1st Personality Tone L2 2nd Personality Tone M1 Talkgroup Confirmation Tone M2 Talkgroup unavailable Tone N1 Out of range alert R...

Страница 10: ...rogress wait for further indications Tone F Transaction confirmed called unit Tone H Invalid entry Key click Confidence tone when any key pressed or Speech limitation alert Fail tone Hardware error or Call timed out conventional mode Tone I Low battery warning Tone L1 1st Personality Tone L2 2nd Personality Tone M1 Talkgroup Confirmation Tone M2 Talkgroup unavailable Tone N1 Out of range alert Rin...

Страница 11: ...ible Charging a Charging a hot battery above 35 C results in reduced discharge capacity affecting the performance of the radio Motorola rapid rate battery chargers contain a temperature sensing circuit to ensure that the battery is charged within these temperature limits New batteries can be stored up to two years without significant cycle loss Store new unused batteries in a cool dry area Batteri...

Страница 12: ...er operation of the charger IP67 radios MUST be dry prior to placing in the battery charger for charging Do NOT operate the charger when your hands are wet or while holding a wet IP67 radio Do NOT touch the battery contacts when your hands are wet Do NOT put the battery into water as this may cause the IP67 metal contacts to corrode Battery Label Table 1 IP54 Radio Battery List Part No Description...

Страница 13: ...e it in your radio Note Batteries are shipped uncharged from the factory New batteries could prematurely indicate full charge charge a new battery for 14 16 hrs before initial use 1 Place the radio with the battery attached or the battery alone in the charger 2 The charger s LED indicates the charging progress Charger LED Status Red Battery is charging Green Battery is fully charged Flashing Red B...

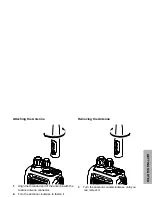
Страница 14: ...TION Attaching the Battery 1 Fit the extensions at the bottom of the battery into the slots at the bottom of the radio s body Removing the Battery 1 Turn off the radio if it is turned on 2 Slide the battery latches on both sides of the ...

Страница 15: ...ttaching the Antenna 1 Align the threaded end of the antenna with the radio s antenna connector 2 Turn the antenna clockwise to fasten it Removing the Antenna 1 Turn the antenna counterclockwise until you can remove it ...

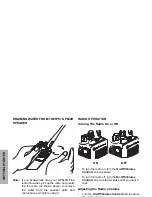
Страница 16: ... above to remove the water from the speaker grille and microphone port before using it RADIO OPERATION Turning The Radio On or Off To turn the radio on turn the On Off Volume Control knob clockwise To turn the radio off turn the On Off Volume Control knob counterclockwise until you hear a click Adjusting the Radio s Volume Turn the On Off Volume Control knob to adjust ON OFF ...

Страница 17: ...rned off Note If the radio fails the self test routine consult your dealer When the self test is complete the radio will scan for system access with the LED on the top of the radio flashing GREEN The radio personality will be the one last used prior to the radio being switched off To check the radio personality or select a new personality refer to PERSONALITY Personality Selection When a system is...

Страница 18: ...croll through the list and select the required number indicated on base of the knob Make the call by If a contact list number is selected but no call request is sent tone H sounds and the radio reverts to the IDLE STATE User Absent User Absent is a network feature which may be enabled in your radio With this feature enabled entry into the user absent mode is automatic and any calls received when y...

Страница 19: ...ng a Call At any time while setting up a call it may be cancelled by Receiving A Call There are two types of systems on which the radio may be used Off Air Call Set Up OACSU and Full Off Air Call Set Up FOACSU If you are in doubt about which system you are operating on please consult your dealer Receiving a call on an OACSU system When the radio is called 1 CLEAR BUTTON Tone A sounds 1 CLEAR BUTTO...

Страница 20: ...sed Call List is entered directly by pressing the Missed Call button when the radio is in the IDLE STATE You can call back to the number in the Missed Call list by 1 Ringing tone sounds LED flashes red 2 PTT button to accept call Unless in talkgroup personality when the radio unmutes automatically for dynamic and fixed group calls 3 Tone D sounds LED flashes red Call is being set up 4 Tone B sound...

Страница 21: ...not deleted when the radio is turned off It is not possible to call back status calls Call Diversion Incoming speech calls or status calls can be diverted from your radio or to your radio Call diversion and cancellation may be programmed into the Contact List Please contact your network manager or dealer for further information 1 Press MISSED CALL button to enter list 2 Press CLEAR button to delet...

Страница 22: ...redefined by your dealer in emergency situations To initiate an emergency call Emergency can be stopped by one of the following Note The emergency time duration is programmed into your radio by your dealer Your radio may receive an emergency call when 1 Press the Emergency button 1 Switching the radio Off and On again 2 Pressing the CLEAR button 3 The emergency time duration is reached Tone D or R...

Страница 23: ...o an MPT trunked system as described in GETTING STARTED Radio Registration talkgroups are contained in a Talkgroup list similar to the Contact list which is scrolled and selected using the Rotary Knob 1 On selection of a talkgroup you may send and receive calls as described below Fixed and Dynamic Groups These groups form part of the Talkgroup Personality such that when this personality is selecte...

Страница 24: ... not flashing Press the PTT 4 to transmit release to listen The red LED lights while the radio transmits and flashes if the channel is busy Some channels may be monitored for activity by pressing the Clear button 3 off The call timed out tone will sound and continue until the PTT is released Personality Selection Your radio may be programmed with two different personalities known as Personality 1 ...

Страница 25: ...ess Personality button 5 for longer than 3 seconds 3 If the current personality is Personality 1 Tone L1 sounds 4 At the end of the 3 second button press Tone L2 sounds indicating that the personality has changed to Personality 2 5 Repeat procedure to revert to Personality 1 ...

Страница 26: ......

Страница 27: ...echnoplex Industrial Park Mukim 12 S W D 11900 Penang Malaysia Printed in Malaysia MOTOROLA and the Stylized M Logo are registered in the U S Patent and Trademark Office All other product or service names are the property of their respective owners 2007 by Motorola Inc All rights reserved ...

Отзывы: