background image

www.sprint.com

User Guide

©2009 Sprint. SPRINT and the logo are trademarks 
of Sprint. Other marks are the property of their 
respective owners.

12/3/09

Sprint 4G Desktop Modem

Содержание CPEI 25150

Страница 1: ...www sprint com User Guide 2009 Sprint SPRINT and the logo are trademarks of Sprint Other marks are the property of their respective owners 12 3 09 Sprint 4G Desktop Modem ...

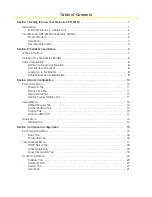
Страница 2: ...w 6 Logging In to the Modem 8 Setup Wizard and Authentication 8 Section 3 Basic Configuration 10 Personalize Menu 10 Password Tab 11 Device Time Tab 11 Device Name Tab 11 Restore Factory Settings Tab 11 Internet Menu 12 WiMAX Security Tab 12 Internet Protocol Tab 13 Firewall Tab 13 Dynamic DNS Tab 14 Status Menu 14 Network Tab 14 Section 4 Advanced Configuration 15 Port Forwarding Menu 15 Basic Ta...

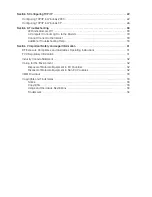
Страница 3: ...ubleshooting Help 30 Section 7 Important Safety and Legal Information 31 RF Exposure Compliance and Guidelines Operating Instructions 31 FCC Regulatory Information 31 Industry Canada Statement 32 Caring for the Environment 32 Disposal of Motorola Equipment in EU Countries 32 Disposal of Motorola Equipment in Non EU Countries 32 CMM Disclosure 33 Copyrights and Trademarks 33 Notice 33 Copyrights 33...

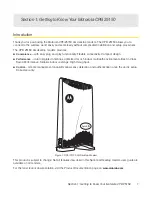
Страница 4: ...ign 䢇 Performance dual integrated antennas optimized for rich indoor multipath environments Best in Class Radio Performance Reliable indoor coverage High throughput 䢇 Control remote management capability allows easy detection and authentication once the unit is setup Robust security Figure 1 CPEi 25150 4G Desktop Modem This product is subject to change Not all features described in this Sprint 4G ...

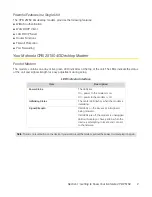
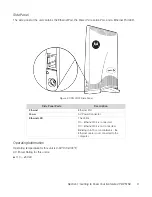
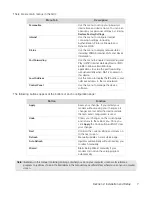
Страница 5: ...cate the status of the unit and signal strength for easy adjustment during setup LED Indicator Interface Item Description Power Status The LEDs are On power to the modem is on Off power to the modem is off Initializing Status The center LED flashes when the modem is initializing Signal Strength If all LEDs on the bar are lit full signal is being received If all LEDs are off the modem is unplugged ...

Страница 6: ...0 Side Panel Operating Information Operating temperature for this unit is 0 40 C 32 104 F AC Power Rating for this unit is 䢇 110 240 AC Side Panel Ports Description Ethernet Ethernet Port Power AC Power Connector Ethernet LED The LED is On Ethernet Port is connected Off Ethernet Port is not connected Blinking in 5 10 second intervals the Ethernet cable is not connected to the computer ...

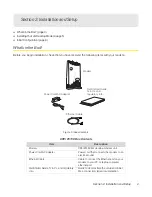
Страница 7: ... Item Description Modem CPEi 25150 4G desktop modem unit Power Cord AC Adapter Power cord that connects the modem to an electrical outlet Ethernet Cable Cable to connect the Ethernet port on your modem to your PC or laptop computer ethernet port Get Started Guide Ts Cs and regulatory info Guide to demonstrate the setup and initial Web connection legal documentation Section 2 Installation and Setup...

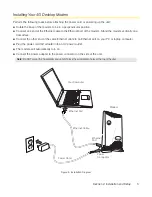
Страница 8: ...ally on a flat surface 䢇 Connect the other end of the same Ethernet cable to an Ethernet port on your PC or laptop computer 䢇 Plug the power cord AC adapter into an AC power outlet 䢇 The modem will automatically turn on 䢇 Connect the power adapter to the power connector on the side of the unit Figure 4 Installation Diagram Note Do NOT mount the horizontally and do NOT block the air ventilation hol...

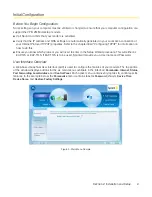
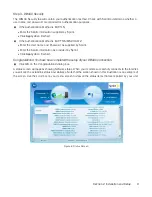
Страница 9: ...his 䢇 Ensure you know which protocol you will need to enter in the Setup Wizard procedure This will either be EAP TLS or EAP TTLS If EAP TTLS is to be used Sprint will provide you a Username and Password User Interface Overview A Web based Graphical User Interface GUI is used to configure the features of your modem The top portion of the window displays buttons for the six main menus available in ...

Страница 10: ...ddress Use this menu to display the IP Address and netmask address in the local network Control Panel Use this menu to manage the device software Button Function Apply Saves your changes If you restart your modem without saving your changes all changes are lost After the device restarts the last saved configuration is used Undo Clears your changes on the current page and returns to the main menu O...

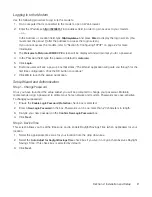
Страница 11: ... through for the first time configuration Click the OK button to continue 7 Click OK to launch the wizard application Setup Wizard and Authentication Step 1 Change Password Once you have launched the setup wizard you will be prompted to change your password Motorola recommends using a password to protect your home network and modem Passwords are case sensitive To change yourpassword 1 Ensure the E...

Страница 12: ...Enter the User name and Password as supplied by Sprint Enter the Realm information as provided by Sprint Click Apply when finished Congratulations YouhavenowcompletedthesetupofyourWiMAXconnection 䡵 Click OK on the Congratulations dialog box A status screen will appear showing Network status When your modem successfully connects to the Internet you will see the actual link status and statistics Not...

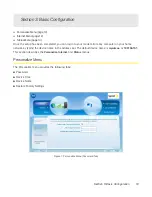
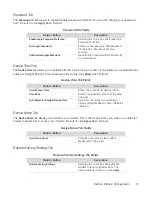
Страница 13: ...n your home network by typing the device name in the address bar The default device name is mywimax or 192 168 15 1 This section describes the Personalize Internet and Status menus Personalize Menu The Personalize menu provides the following tabs 䢇 Password 䢇 Device Time 䢇 Device Name 䢇 Restore Factory Settings Figure 7 Personalize Menu Password Tab Section 3 Basic Configuration ...

Страница 14: ...word Protection Selecting this check box will require login Password Protection New Login Password Enter your new password here Maximum 20 characters Passwords are case sensitive Confirm New Login Password Re enter your new password here exactly as entered above Device Time Tab Fields Field or Button Description Current Local Time Shows the current local date and time Time Zone Select your local t...

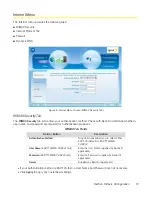
Страница 15: ...nd password are required for authentication purposes If your authentication method is EAP TLS then a User Name and Password are not necessary Click Apply to apply any customized settings WiMAX Tab Fields Field or Button Description Authentication Method Drop down box allows you to select either EAP TLS default or EAP TTLS MS CHAPv2 User Name EAP TTLS MS CHAPv2 only Enter the User Name supplied by ...

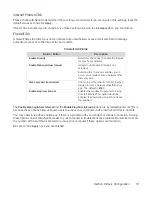
Страница 16: ...ions on if there is a problem with your modem or Internet connection Turning these options on will allow Sprint access to your computer to troubleshoot any problems Remember to enter the number of the port that is allowed to access your computer if these options are turned on Be sure to click Apply once you are finished Firewall Tab Fields Field or Button Description Enable Firewall Select this ch...

Страница 17: ... to click Apply once you are finished Status Menu The Status menu provides the following tab 䢇 Network Figure 9 Status Menu Screen Network Tab Network Tab The Network tab will provide any status associated with your WiMAX wireless broadband connection Dynamic DNS Tab Fields Field or Button Description Enable DDNS Select this check box to Enable DDNS Default is unchecked DDNS Service Provider Selec...

Страница 18: ... to direct incoming traffic to specific LAN hosts computers on your network based on the protocol and port number It is used to play Internet games or provide local services such as web hosting for a LAN group The Port Forwarding menu contains the following tabs 䢇 Basic 䢇 Forwarding Figure 10 Port Forwarding Menu Screen Basic Tab Section 4 Advanced Configuration ...

Страница 19: ...d on this device DMZ IP Address Enter the DMZ IP Address Forwarding Tab Fields Field or Button Description Select Select a box when you want to delete the specific row Protocol Select TCP Transmission Control Protocol or UDP User Datagram Protocol WAN Port Start Enter the beginning port range for external network access WAN Port End Enter the ending port range for external network access LAN IP Ad...

Страница 20: ...Local Address Menu The Local Address menu allows you to configure your Local Area Network LAN connections It contains the following tabs 䢇 DHCP Server 䢇 Lease Status 䢇 Lease Reservation Figure 11 Local Address Menu Screen DHCP Server Tab ...

Страница 21: ...t assign the same IP address to more than one host Your gateway must be on the same subnet as the other hosts DHCP Server IP Address Enter the default port forwarding LAN Client IP Address DHCP Starting IP Address Sets the first IP address assigned by the DHCP server in dotted decimal format It must be greater than the IP address value of the gateway For example if the IP address of the gateway is...

Страница 22: ... the client host name The Name field is limited to 20 characters only 5 appear in display MAC Address Media Access Control MAC address IP Address Shows the IP Address for each active lease Remaining Lease Duration Shows the amount of time in seconds remaining in the lease Lease Reservation Tab Fields Field or Button Description Select Select this box if you want to delete an established lease rese...

Страница 23: ...n your modem It is also where you can upgrade device software Software Tab Fields Field or Button Description Browse Use this button to browse your computer for additional software packages Upgrade Once you have located the software package update you would like to add to your device View Use this button if you are unable to see the Available Software List Install Click this button to begin instal...

Страница 24: ...r computer Import Click this button to install a certificate once you have located the certificate file on your computer Remove Click this button to remove a selected certificate System Tab Fields Field or Button Description Language Used in User Interface Select the desired language for the user interface The default language is English Enable WiMAX Radio Interface Check this box to enable the Wi...

Страница 25: ... to verify that the configuration is set up All client computers on your network must be configured for TCP IP the protocol that controls communication among computers Configuring TCP IP in Windows 2000 1 On the Windows desktop click Start 2 Select Settings and then Control Panel from the pop up menus to display the Control Panel window Figure 13 Windows Control Panel Note Follow the instructions ...

Страница 26: ... icon to display the Network and Dial up Connections window Figure 14 Network and Dial Up Connections 4 Click Local Area Connection number icon The value of number varies from system to system The Local Area Connection number Status window is displayed Figure 15 Local Area Connection ...

Страница 27: ...w is displayed Figure 16 Properties 6 If Internet Protocol TCP IP is in the list of components TCP IP is installed You can skip to step 11 7 If Internet Protocol TCP IP is not in the list click Install The Select Network Component Type window is displayed Figure 17 Select Network Component Type ...

Страница 28: ...1 Be sure the box next to Internet Protocol TCP IP is checked 12 Click Properties The Internet Protocol TCP IP Properties window is displayed Figure 19 Internet Protocol TCP IP Properties 13 Be sure Obtain IP address automatically and Obtain DNS server address automatically are selected 14 Click OK to accept the TCP IP settings 15 Click Close to close the Local Area Connection number Properties wi...

Страница 29: ...ktop click Start to display the Start window Figure 20 Windows XP Start Window 2 Click Control Panel to display the Control Panel window The display varies depending on your Windows XP view options If the display is a Category view as shown below continue with step 3 Otherwise skip to step 5 Figure 21 Control Panel Category View 223 50 223 50 ...

Страница 30: ...rk and Internet Connections window Figure 22 Network and Internet Connections 4 Click Network Connections Skip to Step 6 5 If a classic view similar to below is displayed double click Network Connections to display the LAN or High speed Internet connections Figure 23 Control Panel Classic View ...

Страница 31: ...re to select the one for your network interface Figure 24 Network Connections 7 Select Properties from the pop up menu to display the Local Area Connection Properties window Figure 25 Local Area Connection Properties 8 On the Local Area Connection Properties window select Internet Protocol TCP IP if it is not selected ...

Страница 32: ...es to display the Internet Protocol TCP IP Properties window Figure 26 Internet Protocol TCP IP Properties Be sure Obtain IP address automatically and Obtain DNS server address automatically are selected Click OK to close the TCP IP Properties window ...

Страница 33: ...to the modem unit and the computer Cannot Connect to the Internet 䢇 Check the modem connection status from the Web interface Refer to the Connection Status section to verify the connection status 䢇 If the desktop modem connection is down and the gateway has not received an IP for more than 5 minutes re run the set up wizard 䢇 To restart the modem unplug the power and re connect Additional Troubles...

Страница 34: ... com rfhealth FCC Regulatory Information This device complies with Part 15 of the FCC Rules Operation is subject to the following two conditions 1 this device may not cause harmful interference and 2 this device must accept any interference received including interference that may cause undesired operation This equipment has been tested and found to comply with the limits for a Class B digital dev...

Страница 35: ...at permitted for successful communications This Class B digital apparatus complies with Canadian ICES 003 Cet appareil numérique de la classe B est conforme à la norme NMB 003 du Canada ICRadiationExposure Statement This equipment complies with IC radiation exposure limits set forth for an uncontrolled environment This equipment should be installed and operated with minimum distance 20cm between t...

Страница 36: ...or circuit described herein neither does it convey license under its patent rights or the rights of others It is possible that this publication may contain references to or information about Motorola products machines and programs programming or services that are not announced in your country Such references or information must not be construed to mean that Motorola intends to announce such Motoro...

Страница 37: ...red in a retrieval system or translated into any language or computer language in any form or by any means without prior written permission of Motorola Inc HighRisk Materials Components units or third party products used in the product described herein are NOT fault tolerant and are NOT designed manufactured or intended for use as on line control equipment in the following hazardous environments r...

Отзывы: