background image

Installing the MoCA Adapters 


SBM1000 SMART Video Adapter Kit 

 User Guide 

23 

590631-001-a   


4.


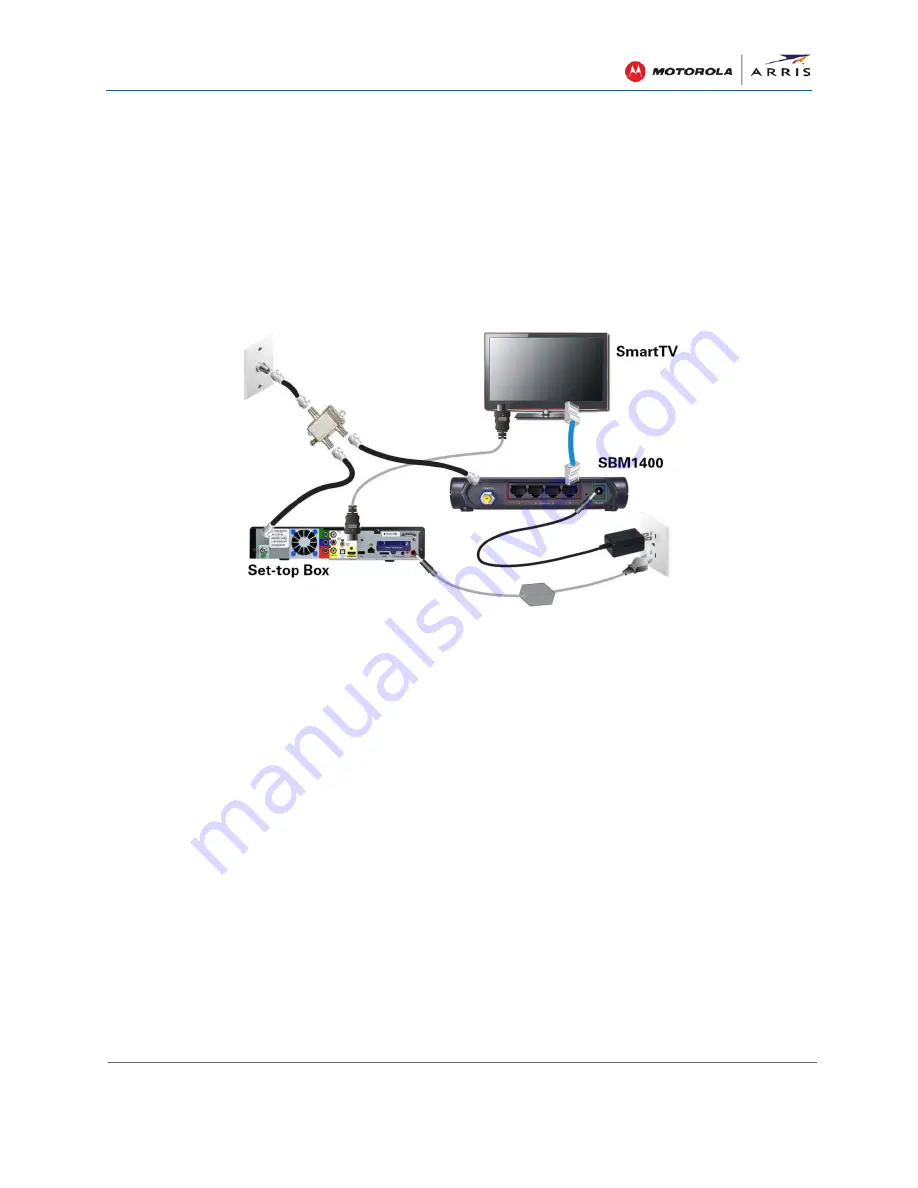
Connect one of the coaxial cables (included) to one of the 

OUT

 connectors on the RF splitter 

and the 

Coax In

 connector on the SBM1400 (see Figure 19).  

Note

: You can use either 

OUT

 connector on the RF splitter (included) for this installation. 

5.


Connect a second coaxial cable (included) to the other 

OUT

 connector on the RF splitter and 

the Smart TV or set-top box (see Figure 19). 

6.


Connect one of the Ethernet cables (included) to one of the 

Ethernet

 ports on the SBM1400 

and 

Ethernet/network

 port on your Smart TV or other Smart device. 

Repeat for each additional SBM1400 Ethernet connection with other networked audio-visual 
devices, if applicable. 


Figure 19 – Room 1: SBM1400 Adapter Installation 

7.


Connect one of the power adapters (included) to the 

Power

 port on the SBM1400 and plug it 

into the electrical wall outlet.  

To install the SBM1100 (see Room 2 in Figure 18): 
8.


Locate the cable wall outlet (or RF splitter) and electrical wall outlet in the second room (see 
Room 2 in Figure 18). 

9.


Disconnect the coaxial cable from your residential modem/gateway and connect it to the 

In


connector on one of the RF splitters (included).  

10.


Connect one of the coaxial cables (included) to the 

Coax In

 connector on the SBM1100 and 

to one of the 

OUT

 connectors on the RF splitter (included). 

Note

: You can use either 

OUT

 connector on the RF splitter (included) for this installation.


11.


Connect a second coaxial cable (included) to the 

coaxial

 connector on the residential 

modem/gateway and the other 

OUT

 connector on the RF splitter (included).  

12.


Connect one of the Ethernet cables (included) to one of the LAN Ethernet ports on your 
router and the Ethernet port on the SBM1100. 

13.


Connect one of the power adapters (included) to the 

Power 

port on the SBM1100 and plug it 

into an electrical wall outlet. 

ο


The 

Coax

 LEDs on both MoCA adapters should turn ON within five minutes to indicate 

that a secure coaxial connection was established between the two adapters. 

Содержание ARRIS SURFboard SBM1000 Series

Страница 1: ...User Guide ARRIS SURFboard SBM1000 SMART Video Adapter Kit SBM1100 SBM1400 ...

Страница 2: ...RIS SURFboard and the ARRIS logo are trademarks or registered trademarks of ARRIS Enterprises Inc All other trademarks are the property of their respective owners MOTOROLA and the Stylized M Logo are trademarks or registered trademarks of Motorola Trademark Holdings LLC and are used by ARRIS under license All other product or service names are the property of their respective owners ARRIS provides...

Страница 3: ...f power source indicated on the device s marking label If you are not sure of the type of power supplied to your home consult your dealer or local power company Do not overload outlets or extension cords as this can result in a risk of fire or electric shock Overloaded AC outlets extension cords frayed power cords damaged or cracked wire insulation and broken plugs are dangerous They may result in...

Страница 4: ... comply with the limits for a Class B digital device pursuant to part 15 of the FCC Rules These limits are designed to provide reasonable protection against harmful interference in a residential environment This equipment generates uses and can radiate radio frequency energy and if not installed and used in accordance with the instructions may cause harmful interference to radio communications How...

Страница 5: ...ty 14 1 3 Installing for Cable with Integrated Cable Modem Router with MoCA 17 2 AT T Telco Installations 19 2 1 Installing for AT T U verse with a Separate Wi Fi Router 20 2 2 Installing for AT T U verse with AT T Gateway Integrated Modem Router 22 2 3 Installing for AT T U verse with an Ethernet connected Set top Box 24 3 Verizon FiOS Installation 26 4 Dish EchoStar Installation 28 5 DirecTV Ins...

Страница 6: ...pter Configuration Screen Definitions 62 Settings Screens 62 MoCA Setup 62 Device Setup 64 Status Screens 65 Device Status 65 PHY Rates 67 Advanced Screens 68 Security Setup 68 Upgrade 70 Warranty Information 72 Tables Table 1 SBM1000 Video Adapter Package Contents 2 Table 2 SMART Video Adapter Front Panel LEDs 5 Table 3 SMART Video Adapter Rear Panel Ports Connectors 6 Table 4 Troubleshooting Sol...

Страница 7: ...6 AT T U verse Installation with Separate Wi Fi Router 20 Figure 17 Room 1 SBM1400 Adapter Installation 21 Figure 18 Room 1 AT T U verse Installation with Gateway 22 Figure 19 Room 1 SBM1400 Adapter Installation 23 Figure 20 AT T U verse Installation with Ethernet connected Set top Box 24 Figure 21 Room 1 SBM1400 Adapter Installation 25 Figure 22 Verizon FiOS Installation 26 Figure 23 Room 1 SBM14...

Страница 8: ...t Single Channel of Operation Screen 56 Figure 41 MoCA Adapter Device Status Screen 57 Figure 42 MoCA Adapter s PHY Rates Screen 58 Figure 43 MoCA Setup Screen 62 Figure 44 Device Setup Screen 64 Figure 45 Device Status Screen 65 Figure 46 PHY Rates Status Screen 67 Figure 47 Advanced Security Setup Screen 68 Figure 48 Advanced Upgrade Screen 70 ...

Страница 9: ...o connect up to four network devices to your coaxial cable network The SBM1000 adapters will coexist with Telco Cable and Satellite TV services Set up is easy If you already have available coaxial cable outlets you will not have to install any new wires or cables This guide provides instructions for installing and setting up the SBM1000 SMART Video Adapters on your home network to share audio visu...

Страница 10: ...adapters included in the SBM1000 adapter kit If you use any other power adapter permanent damage to your MoCA adapters may occur and also void the warranty Ethernet Cables 2 Standard Category 5 or higher cables for connecting Ethernet enabled devices Coaxial cables 4 Standard shielded RG6 coaxial cables for connecting to the home coaxial cable network RF Splitters 2 Used for connecting two or more...

Страница 11: ... User Guide 3 590631 001 a Contact Information To contact technical support or obtain additional ARRIS product information Visit the ARRIS Consumer Care website at www arrisi com consumer Call ARRIS Technical Support Center at 1 877 466 8646 USA ...

Страница 12: ...rview SBM1000 SMART Video Adapter Kit User Guide 4 590631 001 a Product Overview Front Panel Figure 1 SBM1100 Single Port SMART Video Adapter Front View Figure 2 SBM1400 Four Port SMART Video Adapter Front View 2 ...

Страница 13: ...e image on the device Speed Green SOLID Indicates a MoCA network connection with a 225 Mbps or greater transfer rate with each MoCA enabled device on the MoCA network Amber SOLID Indicates a MoCA network connection with at least a 150 to 225 Mbps transfer rate with each MoCA enabled device on the MoCA network Amber FLASHING Indicates the MoCA adapter is searching for a MoCA network FLASHING Concur...

Страница 14: ...DVR SBM1400 Four Ethernet ports for network connections to network enabled devices such as a computer game console Blu ray players Smart TV set top box or DVR Reset Press and hold the Reset button for at least 2 seconds but no more than five seconds to reboot the MoCA adapter and maintain the current MoCA adapter settings If you experience a problem you can push this recessed button to reset the M...

Страница 15: ...rk The rooms that you are planning to be part of the home network must have an existing coaxial network connection If the coaxial connection can receive broadcast television service make sure that it is NOT receiving more than one of the following ο Over the Air OTA Television from an antenna ο DirecTV Satellite ο Telco or Cable TV on the same coaxial cable Getting Started The following is a list ...

Страница 16: ...Coax LEDs still fail to light SOLID see Troubleshooting Solutions for more information Set up Internet access on both MoCA adapters must have access to a computer on the network Network Service Providers List The SBM1000 Video Adapters support the following network service providers Traditional cable service provider Telco Verizon FiOS or AT T U verse Satellite DirectTV or Dish EchoStar Over the A...

Страница 17: ...Over the Air OTA with installation of the MoCA filter included with the SBM1000 adapters The following flowchart is provided to further help you determine the applicable installation procedure for your SBM1000 adapters Please follow the questions in the flowchart Figure 5 Installation Scenarios Flowchart ...

Страница 18: ...Installing the MoCA Adapters SBM1000 SMART Video Adapter Kit User Guide 10 590631 001 a 1 Cable Network Installations Figure 6 Cable Network Installations Flowchart ...

Страница 19: ...st room see Room 1 in Figure 7 Note Although the SBM1100 and SBM1400 adapters are interchangeable the SBM1400 is typically located where more than one Ethernet connection is required see Room 1 in Figure 7 3 Check if the coaxial cable is connected to an RF splitter If it is not then disconnect the cable from your Smart TV or set top box and connect it to the IN connector on one of the RF splitters...

Страница 20: ... TV or other Smart device see Figure 8 Repeat for each additional SBM1400 Ethernet connection with other networked audio visual devices if applicable 7 Connect one of the power adapters included to the Power port on the SBM1400 and plug it into an electrical wall outlet see Figure 8 8 Locate the cable wall outlet or RF splitter and electrical wall outlet in the second room see Room 2 in Figure 7 F...

Страница 21: ...12 Connect an Ethernet cable to the Ethernet port on the SBM1100 adapter and one of the LAN Ethernet ports on your router see Figure 9 Note Make sure your router WAN port and modem Ethernet port are connected via an Ethernet cable 13 Connect one of the power adapters included to the Power port on the SBM1100 and plug it into an electrical wall outlet see Figure 9 ο The Coax LEDs on both MoCA adapt...

Страница 22: ...BM1400 is typically located where more than one Ethernet connection is required see Room 1 in Figure 10 3 Check if the coaxial cable is connected to an RF splitter If it is not then disconnect the cable from your Smart TV or set top box and connect it to the IN connector on one of the RF splitters included 4 Connect one of the coaxial cables included to the OUT connector on the RF splitter and you...

Страница 23: ...utlet or RF splitter and electrical wall outlet in the second room see Room 2 in Figure 10 Figure 12 Room 2 SBM1100 Adapter Installation with Gateway 9 Check if the coaxial cable is connected to an RF splitter If it is not then disconnect the cable from your gateway and connect it to the IN connector on the RF splitter included see Figure 12 10 Connect a third coaxial cable included to one of the ...

Страница 24: ...ure 12 13 Connect one of the power adapters included to the Power port on the SBM1100 and plug it into an electrical wall outlet see Figure 12 ο The Coax LEDs on both MoCA adapters should turn ON within five minutes to indicate that a secure coaxial link was established between the two adapters ο If the Coax LED does not turn ON within five minutes disconnect the power adapter from both MoCA adapt...

Страница 25: ... electrical wall outlet in the first room see Room 1 in Figure 13 Note Although the SBM1100 and SBM1400 adapters are interchangeable the SBM1400 is typically located where more than one Ethernet connection is required see Room 1 in Figure 13 3 Check if the coaxial cable is connected to an RF splitter If it is not then disconnect the cable from your Smart TV or set top box and connect it to the IN ...

Страница 26: ...t top box and connect it to the IN connector on one of the RF splitters included 10 Connect one of the coaxial cables included to the Coax In connector on the SBM1100 and one of the OUT connectors on the RF splitter included Note You can use either OUT connector on the RF splitter included for this installation 11 Connect another coaxial cable included to the Coax connector on the Smart TV or set ...

Страница 27: ...aptop and any other Ethernet connected devices You can now configure your Smart TV and other Ethernet enabled devices for Internet access through their related user interfaces See Configure_MoCA_Adapters for more information on setting up the MoCA adapters 2 AT T Telco Installations Figure 15 AT T Telco Installations Flowchart ...

Страница 28: ...erchangeable the SBM1400 is typically located where more than one Ethernet connection is required see Room 1 in Figure 16 3 Check if the coaxial cable is connected to an RF splitter If it is not disconnect the cable from your Smart TV or set top box and connect it to the IN connector on one of the RF splitters included 4 Connect one of the coaxial cables included to the OUT connector on the RF spl...

Страница 29: ...uded to the Coax In connector on the SBM1100 and to one of the OUT connectors on the RF splitter included Note You can use either OUT connector on the RF splitter included for this installation 11 Connect a second coaxial cable included to the coaxial connector on the residential modem gateway and the other OUT connector on the RF splitter included 12 Connect one of the Ethernet cables included to...

Страница 30: ...Gateway 1 Identify the rooms that you want to add to your home network and make sure there is a coaxial cable connection in each room 2 Locate the cable wall outlet or RF splitter and electrical wall outlet in the first room see Room 1 in Figure 18 Note Although the SBM1100 and SBM1400 adapters are interchangeable the SBM1400 is typically located where more than one Ethernet connection is required...

Страница 31: ...tall the SBM1100 see Room 2 in Figure 18 8 Locate the cable wall outlet or RF splitter and electrical wall outlet in the second room see Room 2 in Figure 18 9 Disconnect the coaxial cable from your residential modem gateway and connect it to the In connector on one of the RF splitters included 10 Connect one of the coaxial cables included to the Coax In connector on the SBM1100 and to one of the O...

Страница 32: ...ers for more information on setting up the MoCA adapters 2 3 Installing for AT T U verse with an Ethernet connected Set top Box Figure 20 AT T U verse Installation with Ethernet connected Set top Box 1 Identify the rooms that you want to add to your home network and make sure there is a coaxial cable connection in each room 2 Locate the cable wall outlet or RF splitter and electrical wall outlet i...

Страница 33: ...e Ethernet cables included to one of the LAN Ethernet ports on your residential modem gateway and the Ethernet port on the SBM1100 8 Connect one of the power adapters included to the Power port on the SBM1100 and plug it into an electrical wall outlet ο The Coax LEDs on both MoCA adapters should turn ON within five minutes to indicate that a secure coaxial connection was established between the tw...

Страница 34: ...splitter If it is not then disconnect it from your Smart TV or set top box and connect it to the IN connector on one of the RF splitters included 4 Connect one of the coaxial cables included to the Coax In connector on the SBM1400 and one of the OUT connectors on the RF splitter see Figure 23 Note You can use either OUT connector on the RF splitter included for this installation 5 Connect a second...

Страница 35: ... on the RF splitter included for this installation 11 Connect the second coaxial cable included to the coaxial connector on the TV or set top box and the other OUT connector on the RF splitter included 12 Connect one of the Ethernet cables included to the Ethernet port on the SBM1100 and the Ethernet network port on your Smart TV or other Smart device 13 Connect one of the power adapters included ...

Страница 36: ...angeable the SBM1400 is typically located where more than one Ethernet connection is required see Room 1 in Figure 24 3 Connect one of the coaxial cables included to the Coax In connector on the SBM1400 and the RF port on the cable wall outlet see Figure 25 4 Connect one of the Ethernet cables included to one of the Ethernet ports on the SBM1400 and the Ethernet network port on your Smart TV or ot...

Страница 37: ... Coax In connector on the SBM1100 and a Secondary coaxial wall outlet 9 Connect one of the Ethernet cables included to the Ethernet port on the SBM1100 and one of the LAN Ethernet network ports on your gateway router 10 Connect one of the power adapters included to the Power port on the SBM1100 and plug it into an electrical wall outlet ο The Coax LEDs on both MoCA adapters should turn ON within f...

Страница 38: ... service is on a SWiM network please follow the instructions below from DirecTV support directv com app answers detail a_id 3794 kw SWiM 1 Turn ON your HD DVR 2 Press the DASH button on your remote control A message will display at the bottom of your TV screen ο If the SWiM Connected message DISPLAYS see Installing for DirecTV with Single Wire Multi Switch SWiM for installation instructions ο If t...

Страница 39: ...ial cable connection in each room 2 Locate the cable wall outlet or RF splitter and electrical wall outlet in the first room see Room 1 in Figure 27 Note Although the SBM1100 and SBM1400 adapters are interchangeable the SBM1400 is typically located where more than one Ethernet connection is required see Room 1 in Figure 27 3 Check if the coaxial cable is connected to an RF splitter If it is not th...

Страница 40: ... outlet and the Coax In connector on the SBM1100 9 Connect one of the coaxial cables included to the In port on the Satellite receiver and the OUT connector marked with a red line on the RF splitter 10 Connect a second coaxial cable to the Coax In connector on the SBM1100 and one of the OUT connectors on the RF splitter included that is NOT marked with a red line 11 Connect one of the Ethernet cab...

Страница 41: ...m 2 Locate the cable wall outlet or RF splitter and electrical wall outlet in the first room see Room 1 in Figure 28 Note Although the SBM1100 and SBM1400 adapters are interchangeable the SBM1400 is typically located where more than one Ethernet connection is required see Room 1 in Figure 28 3 Connect one of the coaxial cables included to the Coax In connector on the SBM1400 and to the RF port on ...

Страница 42: ...e See Alternate Room 2 in Figure 28 Connect one of the coaxial cables included to the Coax In connector on the SBM1100 and the secondary coaxial wall outlet 9 Connect one of the Ethernet cables included to one of the LAN Ethernet ports on your router and the Ethernet port on the SBM1100 10 Connect one of the power adapters included to the Power port on the SBM1100 and plug it into an electrical wa...

Страница 43: ...0 In Figure 30 ATA refers to a television adapter that may be installed between the TV and the cable wall outlet for TV service Note If the coaxial connection runs directly into the television ignore the ATA reference in the steps below 1 Identify the rooms that you want to add to your home network and make sure there is a coaxial cable connection in each room 2 Locate the cable wall outlet or RF ...

Страница 44: ...outlet Install the SBM1100 see Room 2 in Figure 30 8 Connect the coaxial cable included to the Coax In connector on the SBM1100 and the RF port on the cable wall outlet 9 Connect one of the Ethernet cables included to one of the Ethernet LAN ports on your gateway and the Ethernet port on the rear of the SBM1100 10 Connect one of the power adapters included to the Power port on the SBM1100 and plug...

Страница 45: ... on the same IP network subnet to communicate with each other For that reason you will have to temporarily change your computer s IP address IMPORTANT This change is intended to be a temporary change Please remember to change the IP address on your computer back to its original configuration as soon as you complete setting up your MoCA adapters and network configurations Configure a Temporary IP A...

Страница 46: ...ce SBM1000 SMART Video Adapter Kit User Guide 38 590631 001 a 3 Click Change adapter settings from the Control Panel Home pane to open the Network Connections window 4 Click Local Area Connection to open the Local Area Connection Status window ...

Страница 47: ...rface SBM1000 SMART Video Adapter Kit User Guide 39 590631 001 a 5 Click Properties to open the Local Area Connection Properties window 6 Click Internet Protocol Version 4 TCP IPv4 and Properties button to open the TCP IP4 Properties window ...

Страница 48: ...ng values IP address 192 168 144 100 Subnet mask 255 255 255 0 Note If your computer is already configured with an IP address and Subnet mask please write down all the current IP address and DNS server configuration values You will need these values to return your computer to its original IP address configuration after you complete the SBM1000 configuration changes ...

Страница 49: ...sure the coaxial cable is disconnected from the adapter Please follow these same guidelines if you are configuring an additional SBM1000 adapter 1 Connect an Ethernet cable to the Ethernet port on your computer and the Ethernet port on the SBM1000 adapter 2 Check that the SBM1000 adapter is powered ON 3 Open any web browser on your computer and type 192 168 144 200 in the browser window 4 Press En...

Страница 50: ...shed configuring the SBM1100 and SBM1400 adapters you must change the IP address on your computer back to its original network configuration Note The following windows apply to Windows 7 Some windows shown in this procedure may vary slightly with your computer depending on your operating system 1 Click Start and select Control Panel on your computer to open the Control Panel window 2 Click View ne...

Страница 51: ...ce SBM1000 SMART Video Adapter Kit User Guide 43 590631 001 a 3 Click Change adapter settings from the Control Panel Home pane to open the Network Connections window 4 Click Local Area Connection to open the Local Area Connection Status window ...

Страница 52: ...rface SBM1000 SMART Video Adapter Kit User Guide 44 590631 001 a 5 Click Properties to open the Local Area Connection Properties window 6 Click Internet Protocol Version 4 TCP IPv4 and Properties button to open the TCP IP4 Properties window ...

Страница 53: ...y remaining open windows from the IP address change process Note If your computer was originally configured with an IP address instead of Obtain an IP address automatically then you were prompted to save your current IP address and DNS server Click Use the following IP address then enter the saved IP address Subnet mask Default gateway and any DNS servers Click OK when done ...

Страница 54: ...ols ο Continue to change your administrator and password on a regular basis Manage Your Passwords The SBM1000 adapters support two types of passwords Administrator Security Used to log into the web administrator interface It is strongly recommended that you change the default admin security password upon your first visit The new admin security password can contain any combination of 4 to 20 alphan...

Страница 55: ...M1100 or SBM1400 Web Admin Interface 2 Click Security Setup link on the left side menu on the screen Figure 32 Changing My Admin Security Password 3 Type the current configured Admin Security password motorola in the Old Password field 4 Type a new Admin Security password in the New Password field The password can contain any combination of 4 to 20 letters and numbers DO NOT include spaces 5 Retyp...

Страница 56: ...1400 Web Admin Interface 2 Click Security Setup link on the left side menu on the screen Figure 33 Changing My Network Security Password 3 Click Enable under Network Security Setup to turn ON Network security 4 Type your new MoCA Network Security password in the New Password field The password can contain from 12 to 17 numbers DO NOT include spaces alphabetic characters or special characters 5 Ret...

Страница 57: ... main page select Enable for Network Security Figure 34 Finding the Current Network Security Password 2 Select Show Current Password to reveal the current network security password 3 Click OK in the pop up window containing the current password to cancel displaying the Network Security password value Note If you do not want to enable the MoCA Network Security function you can click Cancel to exit ...

Страница 58: ...ack to the factory default configuration However you will lose all configuration changes that were made to the adapter s including your passwords 1 Click MoCA Setup on the left side menu Figure 35 Restoring Factory Default Settings 2 Click Restores Defaults 3 Click Save and then Reboot to complete restoring the SBM1000 configuration settings to the factory defaults ...

Страница 59: ... utilized to access the web based administrative interface on the SBM1000 device 1 Click Device Setup from the Settings side menu Figure 36 Changing the Adapter IP Configuration 2 Select one of the following ο DHCP automatic configuration ο Link Local automatic configuration ο Static IP Address If you select Static IP Address enter your desired IP address Network mask and gateway IP address 3 Clic...

Страница 60: ...pied the firmware files You will have to navigate to that location during the firmware upgrade process See Upgrade for more information Do the following to upgrade the firmware on your MoCA adapters 1 Log in to the SBM1100 or SBM1400 Web Admin Interface 2 Click Upgrade link on the left side menu on the screen Figure 37 Upgrade Firmware Screen 3 Click Browse to navigate to the previously downloaded...

Страница 61: ...e to utilize the SBM1000 adapters without making any changes to the default out of the box Beacon Power Level configuration You have the option to configure a specific MoCA Beacon power level for the coax network interface If the MoCA Beacon power level must be reduced it is highly recommended that the beacon power level is not configured at a value lower than 7 The same configuration changes you ...

Страница 62: ...lect the new Beacon Power level from the drop down list Default is 10 5 Click Save and then Reboot to save and apply your change Note After you have completed your SBM1000 configuration changes you must change your computer IP address back to its original configuration See Change My IP Address Back to the Original Configuration for more information ...

Страница 63: ...A Channel of Operation Screen The factory default MoCA channel configuration is Scan mode in D E Band This by default supports automated detection of the appropriate MoCA operational channel based on whether your home network is a cable telco or satellite service provider based network 3 Click the Channel drop down button to select D Band or E Band from the list D Band is typically used for custom...

Страница 64: ...nel of Operation Screen 6 When done click Save and then Reboot to save and activate your changes Note After you have completed your SBM1000 configuration changes you must change your computer IP address back to its original configuration See Change My IP Address Back to the Original Configuration for more information ...

Страница 65: ...d user and can also help a technical service representative to diagnose or troubleshoot any reported problems with the SBM1000 adapters See Device Status for more information on MoCA statistics available via the SBM1000 Admin Interface To access the SBM1000 MoCA statistics 1 Log in to the SBM1100 or SBM1400 Web Admin Interface 2 Click Device Status link on the left side menu on the screen Figure 4...

Страница 66: ...rrent data rates for the MoCA network between the MoCA devices Figure 42 MoCA Adapter s PHY Rates Screen Note After you have completed your SBM1000 configuration changes you must change your computer IP address back to its original configuration See Change My IP Address Back to the Original Configuration for more information ...

Страница 67: ...s are set in common for both the SBM1100 and SBM1400 adapters MoCA password MoCA security enabled disabled MoCA Channel If the settings match and the adapters still do not link then the adapters may be defective Verify there is no signal booster between the RF splitters and the SBM1000 adapters Install a MoCA filter included in the box at the root of your RF splitter tree to reduce coax attenuatio...

Страница 68: ...urity settings in order to create a network Make sure that all cables are securely connected Remember to only hand tighten the coaxial cables Check that the MoCA adapters are connected to the same coaxial wiring network in the home Video Audio is distorted or missing after connecting the SBM1400 and SBM1100 adapters to my TV or set top box Check to make sure all the coax connections are tight Powe...

Страница 69: ...cable directly to the set top box Confirm that the signal is clean If it is still impaired then there is a problem with your TV service Please contact your service provider Confirm that the MoCA adapter is installed exactly as recommended in Planning Your Installation Make sure that all cables are securely connected Remember to only hand tighten the coaxial cables Forgot the IP address to my MoCA ...

Страница 70: ... use the MoCA adapters without making any changes to the default out of the box configuration Settings Screens The SBM1000 Settings screens allow you to change the MoCA configuration settings on the SBM1400 and SBM1100 MoCA adapters When you are done configuring each adapter remember to Save your configuration changes and then Reboot to update the adapter with your changes MoCA Setup The SBM1000 M...

Страница 71: ... home network is a cable telco or satellite service provider based network Single mode Allows you to select any channel of operation from the available channels in the MoCA E Band and D band range Beacon Power Level Configures a specific MoCA Beacon power level for the coax network interface Default level 10 It is highly recommended that you do not modify the default MoCA Beacon power level of 10 ...

Страница 72: ...P Configuration DHCP automatic configuration Dynamically assigns an IP address to the SBM1000 adapter from your network DHCP server After a dynamic IP address is assigned to the SBM1000 adapter you will have to access the DHCP server administrative pages to find the dynamic IP address assigned to the SBM1000 adapter Link Local automatic configuration Select this IP Configuration option if there is...

Страница 73: ...r saving your changes you must reboot the adapter to update the adapter configuration Cancel button Cancels any changes you made to the adapter configuration Reboot button Reboots the SBM1000 adapter Status Screens The SBM1000 Status screens provide operational and configuration status of the SBM1000 adapters Device Status You can use the Device Status screen to view the current status and configu...

Страница 74: ...ted SBM1000 adapter Network MoCA Version Identifies the current MoCA network version IP Address Identifies the IP address assigned to the listed SBM1000 adapter MAC Address Identifies the MAC address of the listed SBM1000 adapter Last Operation Frequency Identifies the current MoCA channel of operation if the adapter is actively part of a MoCA network Identifies the last MoCA channel of operation ...

Страница 75: ...ond Mbps The PHY Rates data can also be helpful if necessary to aid a technical service representative in troubleshooting the SBM1000 adapter MoCA network Figure 46 PHY Rates Status Screen Table 8 PHY Rates Status Screen Field Descriptions FIELD DESCRIPTION From To Displays the pairing of the transmit and receive MoCA physical layer PHY bit rates of the devices on your MoCA network For example dev...

Страница 76: ...e SBM1000 Web Admin Interface It is strongly recommended that you change the factory default admin security password to prevent unauthorized access to the SBM1000 Web Admin Interface All users attempting to access the web admin interface will be prompted to enter the admin security password MoCA Network Security The MoCA Network Security password allows you to control which MoCA devices can join y...

Страница 77: ...curity password Cancel button Click to cancel your new password entries and keep your current password Network Security Network Security Allows you to modify and enable disable MoCA network security for the listed SBM1000 adapter Enable turns ON network security for the listed SBM1000 adapter Disable turns OFF network security for the listed SBM1000 adapter New Password Enter your new MoCA Network...

Страница 78: ...hen upgrading the SBM1000 firmware Please make sure that the adapter does not lose power during the upgrade process Whenever firmware upgrades for the SBM1000 MoCA adapters are necessary you must first obtain your copies of the firmware from the ARRIS Support website at www arrisi com consumer and then download and save the copies to your computer For easy retrieval later write down the location w...

Страница 79: ...ou to search for the firmware upgrade file that was previously downloaded and stored on the computer that is now connected to the SBM1000 adapter Note Make sure to select the correct software file specifically named for the SBM1100 or SBM1400 adapter that is currently connected to your computer Upgrade button Loads the new firmware from the selected firmware upgrade file Clear Selection button Rem...

Страница 80: ...d General Information The warranties described in this Section shall not apply i to any Product subjected to accident misuse neglect alteration Acts of God improper handling improper transport improper storage improper use or application improper installation improper testing or unauthorized repair or ii to cosmetic problems or defects which result from normal wear and tear under ordinary use and ...

Страница 81: ...t of or in connection with this Product whether made or suffered by you or another person and whether based in contract or tort IN NO EVENT SHALL ARRIS BE LIABLE TO YOU OR ANY OTHER PARTY FOR ANY DIRECT INDIRECT GENERAL SPECIAL INCIDENTAL CONSEQUENTIAL EXEMPLARY OR OTHER DAMAGES ARISING OUT OF THE USE OR INABILITY TO USE THE PRODUCT INCLUDING WITHOUT LIMITATION DAMAGES FOR LOSS OF BUSINESS PROFITS...

Страница 82: ...ARRIS Enterprises Inc 101 Tournament Drive Horsham PA 19044 USA www arrisi com 590631 001 a 07 2013 ...

Отзывы: