background image

WWW.MOTIC.COM

MOTIC HONG KONG LIMITED

Panthera Series 

Scientific Instrument

Operation Manual

If the equipment is used in a manner 
not specified by the manufacturer, 
the protection provided by the 
equipment may be impaired.

Note

The clear knowledge of this Instruction Manual is needed to operate Motic Panthera Series Microscopes at 
maximum performance and to ensure safety at all specified operations. Please familiarize yourself with the use 
of this microscope and pay special attention to the safety hints given in this manual. This Document is not subject 
of a update routine, please download a newer version from the Motic website, if needed. Keep this instruction 
manual in reach and easily accessible for future user reference. All Specifications, Illustrations and items in this 
Manual are subject to changes. 

E250223

Содержание Panthera Series

Страница 1: ...Series Microscopes at maximum performance and to ensure safety at all specified operations Please familiarize yourself with the use of this microscope and pay special attention to the safety hints gi...

Страница 2: ...1 English Please familiarize yourself with the instruction manual provided in English Versions in other languages are available for download at http www motic com Panthera Panthera_Eng_OP zip...

Страница 3: ...e warranty 9 2 Nomenclature 10 2 1 Panthera E2 Binocular Version 10 2 2 Panthera C2 Binocular Version 12 3 Setting up the Microscope 14 3 1 Operating environment 14 4 Assembling the Microscope 15 4 1...

Страница 4: ...ustment 26 5 11 1 Panthera E2 26 5 11 2 Panthera C2 with light manager 26 5 12 Restore factory default for intensity Panthera C2 27 5 13 Turn off light manager 27 5 14 Standby mode Panthera C2 28 5 15...

Страница 5: ...4 9 Troubleshooting Table 34 9 1 Optical 34 9 2 Electrical 35 10 Selection of the Power Supply Cord 36 11 Table 2 HAR Flexible Cord 37 12 Microscope Terminology 38...

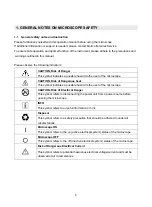
Страница 6: ...N Risk of Dangerous heat This symbol indicates a possible hazard to the user of the microscope CAUTION Risk of Electrical Danger This symbol refers to disconnecting the power unit from a power source...

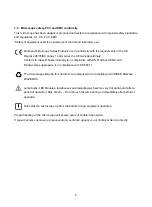
Страница 7: ...in compliance with EN 61326 and EMC and Radio noise suppression is in compliance with EN 5501 1 The microscopes listed in this document are disposed of in compliance with WEEE Directive 2002 96 EC La...

Страница 8: ...Do not touch optical surfaces 1 4 Instrument Disposal Please observe the following safety notes for the disposal of the microscope Defective microscopes accessories and consumables should be disposed...

Страница 9: ...d power cords as described in the Appendix of this document Always disconnect the power cable before opening the microscope and changing the lamp or LED source Wait for the lamp to cool down before re...

Страница 10: ...tion manual may cause interference to radio communications Operation of this microscope in a residential area is not permitted FCC WARNING Changes or modifications would void the microscope s FCC comp...

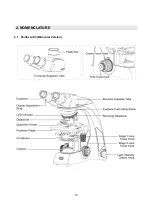
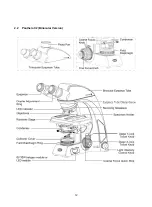
Страница 11: ...10 2 NOMENCLATURE 2 1 Panthera E2 Binocular Version...

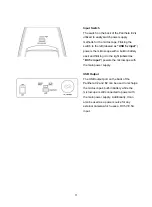
Страница 12: ...battery pack and flicking it to the right labeled as DC 5v input powers the microscope with the main power supply USB Output The USB output port on the back of the Panthera C2 and E2 can be used to re...

Страница 13: ...12 2 2 Panthera C2 Binocular Version...

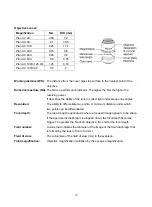
Страница 14: ...to collect light under steep entry angles Resolution The ability to differentiate two points or minimum distance under which two points can be differentiated Focal depth The area along the optical ax...

Страница 15: ...Not to exceed 10 of the normal voltage Pollution degree 2 in according with IEC60664 Installation Overvoltage category 2 in according with IEC60664 Air pressure of 75kPa to 106 kPa Avoid frost dew per...

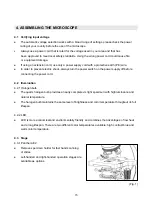
Страница 16: ...always turn the power switch on the power supply off before connecting the power cord 4 2 Illumination 4 2 1 Halogen bulb The quartz halogen bulb provides a nearly complete vis light specimen with hig...

Страница 17: ...tages are available as options Left hand operation stages are available as options It should be used with the short stage knob to avoid interference with the fine focus knob Fig 2 4 4 Specimen holder...

Страница 18: ...wards the user Secure it with the condenser clamp screw Fig 4 2 Turn the condenser focus knob to raise the condenser as far as it will go Fig 4 1 Fig 4 1 Fig 4 2 4 7 Eyepiece tube Loosen the eyepiece...

Страница 19: ...gently out when removing the eyepiece Fig 6 2 Fig 6 4 9 Filters 4 9 1 Panthera E2 Place the filter in the filter holder located around the field lens Fig 7 Fig 7 4 9 2 Panthera C2 Remove the collecto...

Страница 20: ...with black and white film HE didymium filter For colour photomicrography of HE stained specimen with tungsten type film A diffuser is built into the base of the microscope 4 10 Power cord Take out the...

Страница 21: ...ion on the fine focus knob is 2 microns Never attempt either of the following actions since doing so will damage the focusing mechanism Rotating the left and right knob while holding the other Turning...

Страница 22: ...stage Lower the stage by using the coarse focus knob Fig 11 5 4 Stage upper limit stop adjustment Fig 12 Upper Stage Limit is pre set at the factory please adjust only if necessary The stage upper li...

Страница 23: ...interpupillary distance bring a specimen into focus using the 10x objective Adjust the interpupillary distance so that both the right and left field of view become one This adjustment will enable the...

Страница 24: ...Change to the other eye and follow below steps Correct the focus for the second eye by using only the diopter adjustment ring Fig 14 Do not use the coarse fine focusing knob Change to a higher magnifi...

Страница 25: ...rive 7 to focus the 10x lens on the specimen Look through the second eyepiece 6 and if necessary adjust the diopter until the second eyepiece has sharp image Fully open the aperture diaphragm using th...

Страница 26: ...ger than the field of view If the illuminated area is set much larger than the field of view extraneous light will enter the field of view This will create a flare in the image and lower the contrast...

Страница 27: ...model 5 11 2 Panthera C2 with light manager To adjust the brightness turn the light intensity control knob Fig 16 2 and observe change in brightness until the desired level has been reached If the ill...

Страница 28: ...ou switch back to objective A the light intensity will return to its last setting The light intensity of all five objectives can be remembered The light manager feature can be disabled by pushing the...

Страница 29: ...tting The LED light will flash once per second and once it finishes flashing the current setting is in effect b The LED on the right indicates the current standby time setting and each LED light repre...

Страница 30: ...definition and contrast To ensure optimal illumination check the position and centring of the lamp and position of the condenser Select a blue filter for routine application An additional color compen...

Страница 31: ...Immersion oil must be used sparingly After the examination the oil should be wiped off the objective with a lens cleaning tissue and the residual film removed with soft cloth moistened with petroleum...

Страница 32: ...liquid be careful when handling around open flame and always observe the local security advisory on how to handle such substances 8 2 2 Cleaning of painted or plastic components Do not use organic sol...

Страница 33: ...ule or the two different LED modules Panthera C2 Lift up the cover of illumination module Fig 18 1 Loosen the fastening screw of the illumination module In doing so slightly press the screw against th...

Страница 34: ...USB Output 5V 1A Input AC100 240V 50 60Hz 0 55A Bulb 1W LED color temperature 5700K B Panthera C2 Camera USB Output 5V 0 8A Input AC100 240V 50 60Hz 1 2A Bulb 3W LED or 6V 30W Halogen LED module high...

Страница 35: ...ut Field diaphragm closed too far Aperture diaphragm closed too far Improper condenser objective combination Revolving nosepiece not clicked into position Trinocular eyepiece tube optical path selecto...

Страница 36: ...rfocality of objectives Eyepiece diopter not adjusted No cohesion of binocular image Magnification or field of view of left and right eyepieces differ Interpupillary distance not adjusted Eyepiece dio...

Страница 37: ...ble 1 Certified Cord Specifications Voltage Rating 125V AC for 100 120V AC area or 250V AC for 220 240V AC area Current Rating 6A minimum Temperature Rating 60 C minimum Length 3 05 m maximum Fitting...

Страница 38: ...IEMMEQU HAR 10 30 50 British approvals Service for Electric Cables BASEC BASEC HAR 10 10 30 N V KEMA KEMA KEUR HAR 10 30 30 SEMKO AB Svenska Elektriska Matenelkontrollanstalter SEMKO HAR 10 10 50 ste...

Страница 39: ...p The thickness of this small glass piece is now standardized at 0 17 mm for most applications Diaphragm Condenser A diaphragm controls the size of the condenser aperture A synonym for the condenser i...

Страница 40: ...icroscope objective It is usually required by objectives of 3 mm focal length or less Resolving Power A measure of an optical system s ability to produce an image which separates two points or paralle...

Страница 41: ...Barcelona Spain Tel 34 93 756 6286 Fax 34 93 756 6287 Website http www motic com E mail info motic com hk Motic China Group Ltd China Motic Building Torch Hi Tech Industrial Development Zone Xiamen P...

Отзывы: