E-18 PREPARATION BEFORE STARTING MASS PRODUCTION
7
CHECKING THE PROGRAM WITH A WORKPIECE CLAMPED IN
THE CHUCK
To check the program (tool paths) by executing automatic operation (no-load running) with a
workpiece clamped in the chuck, shift the coordinate system before executing the program.
The procedure to shift the coordinate system and the shift amount vary depending on the
workpiece.
In this section, the procedure used to check a program by shifting the coordinate system in the
Z-axis direction is described.
There are variety of types of workpieces which are machined by the customer.
Chucking methods will vary according to the workpiece type as well. Therefore, when
checking the program with a workpiece clamped in the chuck, pay sufficient attention to
interference, taking the workpiece shape and chucking method into consideration.
<Example>
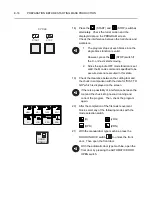
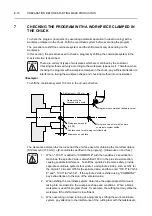
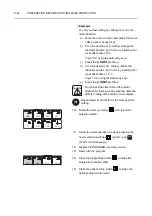
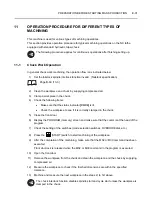
To shift the coordinate system 100 mm in the +Z-axis direction
The clearance between the tool nose and the end face used for obtaining the tool offset data is:
[Shift amount (100 mm)] + [Z-coordinate specified in the program]
−
[Allowance on end face]
1.
When "
−
100.0" is added to "COMMON Z" with the headstock 2 specification
machines, the spindle 2 side is also shifted 100.0 in the plus Z-axis direction,
causing possible interference. To shift the spindle 2 side more safely, provide
separate coordinate systems for spindle 1 and spindle 2 sides, such as G54 for
the spindle 1 side and G55 for the spindle 2 side, and then enter "100.0" for "G54
Z" and "
−
100.0" for "G55 Z". If the spindle 2 side is shifted using "COMMON Z",
pay extra attention to the sign of the entered value.
2.
When shifting the coordinate system, determine the appropriate shift amount
taking into consideration the workpiece shape and conditions. When a blank
workpiece is used for program check, for example, the cutting tool may strike the
workpiece if the shift amount is insufficient.
3.
When executing no-load running of a program by shifting the work coordinate
system, pay attention to the interference of the cutting tool with the tailstock etc.
CAUTION
Shift amount = 100 mm
Clearance to be
checked with a scale
Workpiece zero point
(X0, Z0)
End face used for obtaining tool offset data
Allowance on end face
Workpiece zero point with the work
coordinate system shifted
Programmed commands (absolute value)
CAUTION


