Chapter 10: Blue-White Regional Picking Processes
5031496 G
125
Setting Regional Picking Source and Destination Options
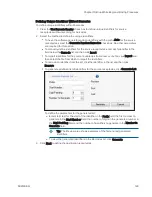
To set regional picking source and destination options:
1. In the Destination/Source Options window, select the Limit Max. Number of Features Per
Region check box and in the Number of Features Per Region field, enter the maximum
number of colonies to pick from a single source receptacle.
Setting a limit for the maximum number of colonies in the Destination/Source Options
window prevents selecting a maximum number in the Feature Selection window when you
run the picking routine. See
Selecting Colonies for Regional Picking on page 112
.
Select the Reserve Wells for Regions check box to leave wells empty if the number of
colonies per region is not reached. For example, if you select to pick 8 colonies per
region, but only 6 colonies are eligible, then wells 7 and 8 would be left blank.
Select the Skip Region If Number of Features Not Found check box to ignore the
region if the target number of features in Number of Features Per Region is not met.
Select the Keep Picked Regions Together check box to have colonies that are picked
from the same region delivered to the same destination plate.
With the Reserve Wells for Region check box selected, select the Skip Region If
Picking Count is Zero check box to skip regions that have a picking count of zero.
2. Select the Deposit Order to deposit the picked colonies in the destination plates By
Columns or By Rows.
3. Define the Deposit Strategy.
Click Fill All Microplates to fill every selected well of a destination plate before starting
a new destination plate.
Click New Microplate for Each Position to start a new destination plate whenever the
instrument starts picking from a different source QTray or Petri dish.
4. Select a Pick Order option.
Click Standard to pick from regions in straight columns from the source receptacle,
such as A1 to A8, B1 to B8, and so on.
Click Plating Order to pick from square blocks of eight regions, such as A1 to B4, A5 to
B8, and so on.
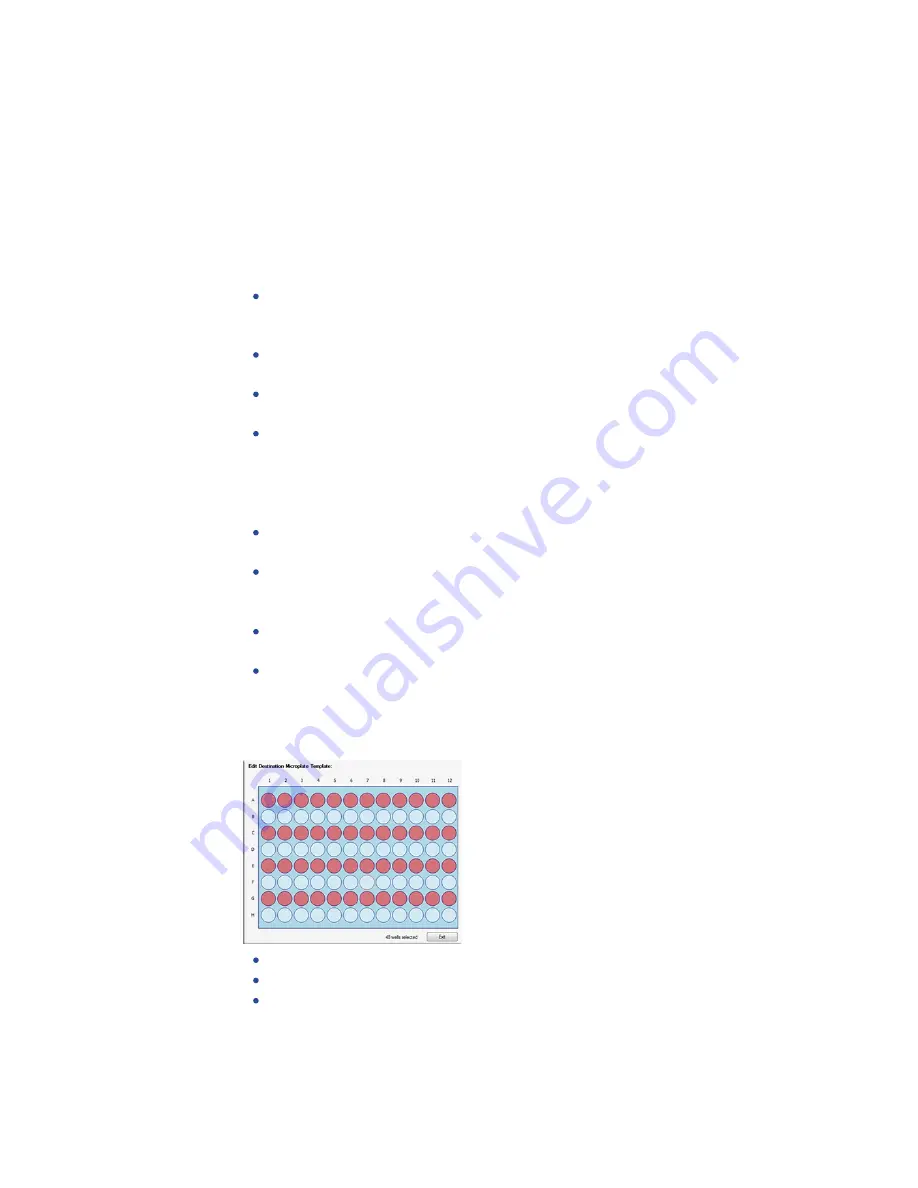
5. Under Destination Microplate Template, click Edit to define the wells to dip. Skip wells to
use as blank or control wells. The defined template is used for all the destination plates
during the picking routine.
To skip a well, click the well. Wells to skip display in light blue.
To skip multiple contiguous wells, right-click and drag across the wells.
To dip a well that you select to skip, click the well again. Wells to dip display in red.
After you define the wells to dip or skip, click Exit.
6. Click Next to define the picking head and the Sanitise profile.
Содержание QPix 420
Страница 1: ...5031496 G August 2022 QPix 420 Colony Picking System User Guide...
Страница 6: ...QPix 420 Colony Picking System User Guide 6 5031496 G...
Страница 20: ...QPix 420 Colony Picking System User Guide 20 5031496 G...
Страница 30: ...QPix 420 Colony Picking System User Guide 30 5031496 G...
Страница 38: ...QPix 420 Colony Picking System User Guide 38 5031496 G...
Страница 62: ...QPix 420 Colony Picking System User Guide 62 5031496 G...
Страница 138: ...QPix 420 Colony Picking System User Guide 138 5031496 G...
Страница 156: ...QPix 420 Colony Picking System User Guide 156 5031496 G...
Страница 186: ...QPix 420 Colony Picking System User Guide 186 5031496 G...
Страница 194: ...QPix 420 Colony Picking System User Guide 194 5031496 G...
Страница 210: ...QPix 420 Colony Picking System User Guide 210 5031496 G...
Страница 214: ...QPix 420 Colony Picking System User Guide 214 5031496 G...
Страница 218: ...QPix 420 Colony Picking System User Guide 218 5031496 G...
Страница 222: ...QPix 420 Colony Picking System User Guide 222 5031496 G...
Страница 224: ...QPix 420 Colony Picking System User Guide 224 5031496 G...


