Moeller Rapid Link Скачать руководство пользователя страница 83

01/08 AWB2190-1430GB

Setting the functions with DIP 
switches/jumpers

79

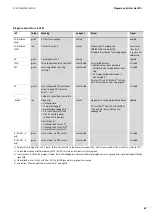
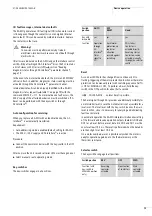
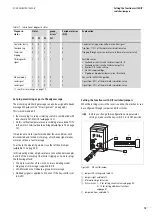
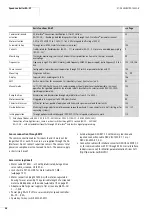
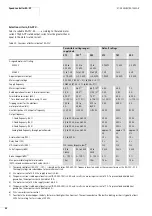
Table 11: Indication of diagnostic status

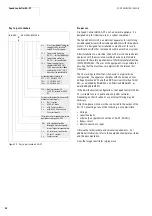
Set plug monitoring as part of Ready message

The motor plug monitoring message can also be assigned to Ready 
message DI0 (

a

section “I/O assignment” on page 69).

This is recommended if

• the motor plug is used as isolating switch in combination with 

lock shackle SET-M-LOCK (

a

page 152).

• motors without temperature sensor winding are used and T1/T2 

in the motor’s terminal board ae bridged (

a

figure 76 on page 

73).

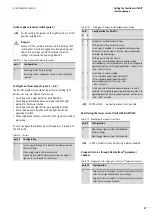
If maintenance work is performed under these conditions with 
disconnected and locked motor plug, a Not Ready signal makes 
more sense than a fault message.

To activate this operating mode, close the left hook jumper 
(

a

table 12 on page 80).

In this opeating mode, a high-resistance connection between pins 
5 and 8 of the motor plug (thermistor tripping or no motor plug) 
the following effects:

• The motor switches off (as in the normal operating mode).
• No group error message is applied to DI1.
• LED Motor does not indicate a group error message.
• No Ready signal is applied to DI0, even if the key-switch is set 

to AUTO.

Setting the functions with DIP switches/jumpers

When the locking screw in the cover is undone, the electronics can 
be configured through jumpers and DIP switches.

Diagnosic-
status

Status

group 
errors

1

Peripheral error 
(FID)

Explanation

P1

P2

P3

DI1

Contactor faulty

0

0

1

1

1

Contactor in On position without actuation signal

Overload trip

0

1

0

1

0

Trip from 110 % of thermal motor simulation value

Thermistor 
tripping

0

1

1

1

0

Tripping through excessive resistance in thermistor sensor circuit

NO diagnostic 
signal

1

1

1

1

0

Possible causes:
• Overload or short circuit of external inputs I3, I4
• Overload or short circuit of external output O3
• Incorrect DIP switch setting
• No 24 V supply voltage
• Tripping on drop below lower current threshold

Manual mode

1

0

0

0

0

Key-switch in MANUAL position

Load signal

1

0

1

0

0

Signal from 90 % of thermal motor simulation value

Load signal

1

1

0

0

0

Signal from 70 % of thermal motor simulation value

1) see I/O error message on page 75

h

Before you change the configuration and parameter 
settings, make sure the key-switch is in its OFF position.

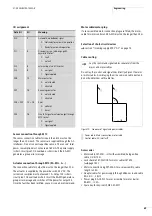
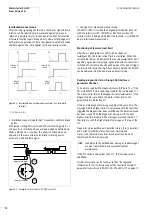
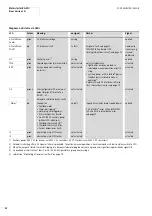
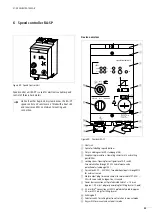
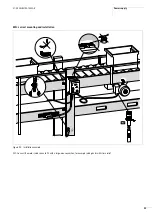
Figure 85: DIP switch/jumper

a

Jumper left, settings 

a

table 12

b

Jumpers right 

a

table 12

c

Information digit for service

d

DIP switches: 1 – 4 for setting current values 

a

page 80

5 – 10 for setting additional functions 

  a

page 81

e

Jumper bottom, 

a

table 12

1

1
0

OFF

2

3

4

5

1

ON

DIP

2

3

4

5

6

7

9 10

8

1
0

M

V

3

.7.1

a

b

d

e

c

Содержание Rapid Link

Страница 1: ...Switching and Installation System Rapid Link User Manual 01 08 AWB2190 1430GB A We keep power under control ...

Страница 2: ...e About this manual chapter Moeller GmbH 53105 Bonn Author Jörg Randermann Production Thomas Kracht Barbara Petrick Translators OneWord All rights reserved including those of the translation No part of this manual may be reproduced in any form printed photocopy microfilm or any other process or processed duplicated or distributed by means of electronic systems without written permission of Moeller...

Страница 3: ...signed for mounting in housings or control cabinets must only be operated and controlled after they have been installed and with the housing closed Desktop or portable units must only be operated and controlled in enclosed housings Measures should be taken to ensure the proper restart of programs interrupted after a voltage dip or failure This should not cause dangerous operating states even for a...

Страница 4: ...ices complying with IEC EN 60204 must be effective in all operating modes of the system The power supplies of all the switching elements of the control system must be disconnected in the event of an Emergency Stop Uncontrolled and undefined startups must not occur e g Startup after unlatching the Emergency Stop devices and or Startup of the control systems without the DP master or DP slave respond...

Страница 5: ... round cable junction 23 2 Head station RA IN 25 Device overview 25 Key to part numbers 25 Proper use 25 Improper use 25 Functions overview 26 Engineering 26 Design 26 Extended diagnostics functions 26 Information to EMC 26 Accessories 26 Installation 28 Mounting position 28 Mounting 28 PROFIBUS DP interface 28 as interface 29 Connecting the power supply 29 Device operation 29 Device startup 29 En...

Страница 6: ...tatus via LEDs 43 4 Motor starter RA MO to Version 2 x 45 Device overview 45 Key to part numbers 45 Proper use 46 Engineering 47 Functions overview RA DIMO 47 I O assignment 48 Sensor connection through M12 RA MO 4 48 Actuator connection through M12 RA MO 4A 48 Motor cable motor plug 48 Selection of short circuit devices 48 Cable routing 48 Accessories 48 Installation 49 Mounting position 49 Mount...

Страница 7: ...atus via LEDs 65 5 Motor starter RA MO from Version 3 0 67 Device overview 67 Key to type references 67 Proper use 68 Engineering 68 Functions overview RA DIMO 68 I O assignment 69 Sensor connection through M12 69 Actuator connection through M12 RA MO A 69 Motor cable motor plug 69 Selection of short circuit devices 69 Cable routing 69 Accessories 69 Installation 70 Mounting position 70 Mounting 7...

Страница 8: ...7 Selection criteria RA SPV 88 Design RA SP 89 Power supply 90 Network configuration 90 Mains voltage mains frequency 90 Interaction with p f correction equipment 90 Protective devices and cable cross sections 90 Protection of persons and domestic animals with residual current protective devices 91 Current peaks 91 Mains choke 91 EMC Guidelines 92 Cable routing 92 EMC correct mounting and installa...

Страница 9: ...mps ACC DEC 126 F 11 Fixed frequencies SPD 128 F 20 DC braking 129 F 32 Frequency value signal FA2 130 F 22 Mains failure duration IPS 131 F 23 Electronic motor protection E THM 132 Calibrating current indication and motor protection 133 F 24 Current limit OLOAD 134 F 25 Parameter protection S LOOK 135 F 26 Operating frequency range LIMIT 135 F 34 F 35 Initialization of built in digital inputs out...

Страница 10: ...01 08 AWB2190 1430GB 6 ...

Страница 11: ...actions to be taken For greater clarity the name of the current chapter is shown in the header of the left hand page and the name of the current section in the header of the right hand page This does not apply to pages at the start of a chapter and empty pages at the end of a chapter All dimensions are in millimetres unless otherwise specified DESINA Decentralized standardized installation technol...

Страница 12: ...nt amendments have been introduced since previous issues Edition date Page Keyword new Amend ment deleted 01 05 Chap 1 4 5 General revision because of new devices 01 08 General revision chapter 5 Motor starter RA MO from Version 3 0 j earlier Chap 6 Programmable function unit RA LO j ...

Страница 13: ...ace to the open field bus b Disconnect control unit RA DI r Power infeed with lockable rotary handle r Circuit breaker to protect from overload and short circuits c Motor control unit r Three phase electronic motor protection with additional use as direct on line starter expandable DOL starter or reversing starter d Speed control unit r Operation of three phase asynchronous motors with four fixed ...

Страница 14: ...c equipment Improper use Engineering The Rapid Link function modules are installed immediately adjacent to the drives They can be connected to the power and data bus at any point without having to interrupt the bus Data bus The AS Interface data bus is a system solution for networking different modules AS Interface networks are quick and easy to implement Data cable AS Interface uses a geometrical...

Страница 15: ...the PLC sends parameter bits P1 to P3 000 A only parameter value 000 C is returned regardless of the RA MO electronic s status Reading out diagnostic status If the PLC sends the value 111 A the motor starter interprets this as a request to return the diagnostic status To allow correct transfer of the diagnostic status a table 2 on page 60 the PLC must send only parameter value 111 until it receive...

Страница 16: ...lug lines of the function modules for each assembled 0 5 m long cable with M12 plugs calculate 0 9 m is 100 m The cable between PSU and RA IN is not included in these 100 m Each slave must be supplied with at least 24 V H 10 15 The interface control unit RA IN must be supplied with at least 26 V H Calculate the current demand and voltage drop to ensure that all sensors actuators and the interface ...

Страница 17: ...e is a main factor in determining the length of the power bus The total current of all running and simultaneously starting motors must not exceed 110 A 170 A The incoming circuit breaker RA DI or PKZ2 ZM25 8 can switch on the following number of speed controllers RA SP without the short circuit release being tripped by the RA SP 10 to 15 20 to 25 RA SP 075 or 5 to 8 10 to 13 RA SP 1K1 or 3 ti 5 7 ...

Страница 18: ...ce the fault has been rectified the voltage builds up again automatic restarting This type of power supply unit must not supply a continuous short circuit current higher than 16 A or if a flat cable RA C1 7x2 5PVC is used 6 A Switched mode power supply units with short circuit recognition i e with disconnection and automatic restarting should disconnect a short circuit current e g 3 x IN after no ...

Страница 19: ...ature and three live strands i e the 24 V DC strands carry a current of no more than 5 A The flat cable junction RA C1 VP SR must be used a feeder module only in combination with the 7 x 2 5 mm2 flat cable and can be loaded with up to 20 A Round cable junction RA C2 For the power bus you can also use conventional round cables cross section 7 x 2 5 mm2 or 7 x 4 mm2 outer core diameter 5 mm flexible...

Страница 20: ... the site of installation must be fulfilled When the device is operated in a UL approved system use only UL approved fuses fuse bases and cables L U0 x 1000 Zv ZStich irm zpower bus L lengt h u0 230 V no load voltage 1 ph ir m Tripping current of short circuit release e g 150 A for RA DI zv e g 100 mO series impedance of feeder ZStich 35 50 mO m spur line 1 5 mm2 zpower bus 13 40 mO m power bus 4 ...

Страница 21: ...ress the slaves to specification 2 0 with 31 possible stations to specification 2 1 with 31 or 62 possible stations X Plug the M12 plug of the function modules into the socket of the addressing unit and press button ADR On the display the currently set address is now shown The factory settings are For RA DI and RA SP 00 31 possible stations For RA MO 00A 62 possible stations With the arrow keys yo...

Страница 22: ...ey No Addresses for 31 stations Adresses for 62 stations No Addresses for 31 stations Adresses for 62 stations 0 00 00A 0 00 00B 1 01 01A 32 01B 2 02 02A 33 02B 3 03 03A 34 03B 4 04 04A 35 04B 5 05 05A 36 05B 6 06 06A 37 06B 7 07 07A 38 07B 8 08 08A 39 08B 9 09 09A 40 09B 10 10 10A 41 10B 11 11 11A 42 11B 12 12 12A 43 12B 13 13 13A 44 13B 14 14 14A 45 14B 15 15 15A 46 15B 16 16 16A 47 16B 17 17 17...

Страница 23: ...housed in identical enclosures with the same attachment method Diameter of fixing holes 5 5 mm for M5 screws Length of screws 10 mm exception speed control unit see chapter 6on page 83 Washer with circlip Distance between fixing holes 210 mm The default mounting position is vertical Other mounting positions are possible see chapter for respective unit The dimensions can be found in the appendix on...

Страница 24: ...te to the tapered hinge of the opened tap off point Laying the flexible busbar The flexible busbar is reeled off the drum cut to length and laid Before unreeling the cable position the drum in a suitable position The cable is marked on its side to indicate the correct polarity It also contains a metric scale to help you cut it to the required length If the busbar is not laid in a cable duct secure...

Страница 25: ...xible busbar power supply and junction RA C1 AM 7 for the flexible busbar are fitted in the same way X Secure the module to the subsurface with suitable screws e g M4 using the provided slots X Flip open the top and insert the flexible busbar X Close the top and screw it shut The top section is now protected to IP65 Pin Function wire colours 7 x 2 5 mm2 wire numbers 7 x 4 mm2 1 L1 black 1 2 L2 bro...

Страница 26: ...ushings Once the flexible busbar has been laid all free cable ends must be safely terminated and sealed to IP65 To do this use the cable end pieces or bushings Cable end pieces consist of a shorter lower and a longer upper section which contains the the seal and the insulation channels With bushing RA C1 DF you can feed the flexible busbar into power supply and distributor module RA C1 VM 7 or a c...

Страница 27: ...ening torque 0 5 to 1 Nm Observe the correct assignment of terminals and strands h For cutting the busbar we recommend tool RA C1 CUT h Fir stripping the 7 x 4 mm2 flexiblen busbar a commercial cable knife can be used Score the rubber sheath cutting no more than 0 7 mm into the sheath deep so as not to damage the conductor insulation The blade of tool RA C1 AZ 4 protrudes by exactly this amount so...

Страница 28: ...ink function module RA C2 and secure it with the clip If you are using ruand cable junction RA C2 S2 4 fit function modules RA C2 into both distributor sockets Pin Func 1 L1 2 L2 3 L3 e e 4 N 5 24 V 6 0 V Pin Function 1 N 2 L2 3 N A 4 24 V brake 5 0 V brake 6 L3 7 8 L1 PE PE 1 2 3 4 5 6 h Close the open seal of the last round cable junction at the end of the power bus with end piece RA C2 SBL Figu...

Страница 29: ... self resetting time lag fuse 3 A For the power supply of the interface control unit RA IN a standard PSU with 30 V H to AS Interface specifications SELV smoothing etc with or without data link is needed Improper use Figure 24 Overview RA IN a Space for labelling top and bottom b 7 Status and diagnostic LEDs c Three digit digital display assembly Mode and Set keys for device configuration d Socket...

Страница 30: ...D file Moel1745 GSD You can download this file from the Moeller website at http www moeller net support use the search term GSD Operating software AS i Control Tools With the AS i Control Tools software from Bihl und Wiedemann you can view the AS i data online through PROFIBUS DP V1 In combination with the PROFIBUS DP simulator you can also use it to configure and program the RA IN To commission e...

Страница 31: ...BUS DP B coded RA IN XT DP Y type M12 connector for PROFIBUS DP B coded RA IN XY DP M12 terminating resistor for PROFIBUS DP B coded RA IN XTR DP nc 1 gree 2 nc 3 re 4 screen 5 nc 1 gree 2 nc 3 re 4 screen 5 1 2 3 4 5 1 2 3 4 5 1 2 3 4 5 390 O 1 4W 220 O 1 4W 4 1 2 3 5 390 O 1 4W M12 x 1 RSSW plug RKSW coupling 45x RSSW 45x M RSSW 45x M M12 x 1 RSSW plug RSSW RSSW 45x M RSSW RKSW 45x M RKSW coupli...

Страница 32: ...are permissible only at baud rates below F 1 5 MBit s For higher baud rates the T or Y connector must be connected directly to the RA IN without spur line The connectors have the additional advantage that they allow replacement of the RA IN unit without interrupting the bus Figure 26 Mounting position Figure 27 Mounting o mm Thread Torque Nm 5 5 M5 3 F 90 F 90 F 90 F 90 o 5 Figure 28 M12 connector...

Страница 33: ...V H ZB2 155 KB1 SELV ZB2 100 AZ1 3 x 1 5 mm2 3 x 2 5 mm2 o 6 9 mm 30 V H h 1 30 VH 2 0 V OFP offline phase RA IN is being initialized no data exchange through AS Interface see warning note under table In Engineering mode or automatic start of the AS Interface the unit can leave the offline phase Accordingly if PROFIBUS communication is interrupted in protected operation mode RA IN changes to offli...

Страница 34: ...rmittent configuration errors are saved in the device extended AS Interface diagnostics To view the most recent intermittent configuration error press the Set key If the configuration error was caused by an intermittent AS Interface power supply failure a 39 is displayed in this position Addressing AS Interface slaves in engineering mode AS Interface slave addresses can be assigned with an address...

Страница 35: ...tion address is 3 To change the address at the gateway press the Set and Mode keys at the same time for at least five seconds or until the PROFIBUS address appears on the display Each additional operation of the Set key increments the station address by one When the desired PROFIBUS station address is displayed press the Mode key to accept it and save it permanently to the EEPROM First operation o...

Страница 36: ...You can now take the higher level fieldbus into operation The gateway remains in offline phase display dark ASi active LED off until the higher level fieldbus is operating correctly Indicating elements Display and control unit Digital display In the basic state in engineering mode the addresses of all detected AS Interface slaves are displayed at a rate of two per second A blank display indicates ...

Страница 37: ... operation is locked Until the AS Interface master is restarted the device can be accessed only from the host through the interface E83 AS Interface control program reset The AS Interface control program is being read out of the EEPROM and copied to RAM E88 Dosplay test on AS Interface master startup E90 Error on changing a slave address in protected operation mode No slave with address 0 was foun...

Страница 38: ...ation error e g slave has no address UASi green AS Interface circuit has sufficient voltage No voltage Voltage supply sufficient prj mode yellow RA IN is in engineering mode Operation mode Engineering mode prg enable green Automatic address programming is possible In protected operation mode exactly one slave is missing This can be replaced with an equivalent slave with address 0 The master automa...

Страница 39: ...to a safe state This allows a faster response to configuration errors and the task does not have to be performed by the host Parameterising the AS Interface master for this function With every configuration error on the AS Interface the AS Interface master changes from normal operation in protected operation mode to offline phase A list of slaves that can trigger offline phase following a configur...

Страница 40: ...01 08 AWB2190 1430GB 36 ...

Страница 41: ...m c Status and diagnostic LEDs d Lockable rotary handle H PKZ2 e With AS Interface supply cable approx 0 5 m with M12 plug Disconnect Control Unit ERROR POWER O1 ASi c b a a d b e I1 Figure 33 Key to part numbers for RA DI j Warning Rapid Link must be operated only on 400V three phase systems with earthed star point and separate N and PE conductors TN S network It must not be operated unearthed Th...

Страница 42: ...60947 4 1 type 1 coordination short circuit tripping current 130 A to 210 A factory default 130 A 39 Main and maintenance switches Power disconnecting device with lockable handle to IEC EN 60947 1 39 Communication AS Interface slave specification 2 1 for 31 stations 41 Display Differentiated diagnostics LEDs States Power Error Signalling of switch position via AS Interface 43 Figure 34 Example arr...

Страница 43: ... VDE 0100 Part 430 Core insulation The core insulation of all used conductors must be laid out for the highest operational voltage occurring in the unit Safe isolation To ensure safe PELV isolation between voltages 24 V H and 400 V h of the control and main circuits and the AS Interface voltage use only the correct provided connections For additional protection against loosening of cables fit the ...

Страница 44: ...g torque 1 8 Nm to 6 mm2 c overload release Ir d short circuit release Irm e T1 T2 T3 tightening torque 1 8 Nm to 6 mm2 f PE tightening torque 2 Nm g 24 V DC standard auxiliary contact NHI11 contact 1 14 tightening torque 1 Nm for conductor cross sections 2 5 mm2 use with supplied pin end connector h 0 V terminal K10 1 for 1 5 to 6 mm2 tightening torque 0 8 Nm i 24 V DC standard auxiliary contact ...

Страница 45: ...PE 24 V 0 V in to the busbar fit the connectors and connect it as shown in figure 38 X Fed the round cable s 5 x 2 5 4 6 mm2 L1 L2 L3 N PE and 2 x 2 5 4 6 mm2 24 V 0 V or alternatively 7 x 2 5 4 mm2 L1 L2 L3 N PE 24 V 0 V in to the busbar fit the connectors and connect them as shown in figure 38 X For additional protection of AS Interface from loosened cables fit the cover plate The procedure is d...

Страница 46: ...ribbon cable RA C1 or round cable RA C2 Figure 41 For additional protection of AS Interface from loosened cables fit the cover plate on h For connecting conductors f 4 mm2 to terminals 1 13 1 14 suitable pin end connectors are supplied ZB2 155 KB1 ZB2 100 AZ1 RA C1 VM 7 RA C2 S1 4 RA C1 7 x 2 5 PVC RA C1 7 x 4 HF 7 x 2 5 mm2 7 x 4 mm2 V M25 7 x 2 5 mm2 7 x 4 mm2 400 V h 24 V H 7 x 2 5 mm2 7 x 4 mm...

Страница 47: ...l Data Bit AS Interface Power green AS Interface voltage No voltage Voltage applied AS Interface Error red AS Interface fault no fault Communications fault e g slave not addressed Q1 green Signal LED can be actuated by PLC not actuated actuated DO0 I1 green Switch position Switch On I Switch in position 0 or Trip DI0 ...

Страница 48: ...01 08 AWB2190 1430GB 44 ...

Страница 49: ...anticlockwise operation j Key switch for manual and automatic mode 0 3A 1 0 1 1 0 4A 0 1 1 1 0 6A 1 0 0 0 0 8A 0 1 0 0 1 0A 1 1 0 0 1 2A 0 0 1 0 1 5A 1 0 1 0 1 7A 0 1 1 0 1 9A 1 1 1 0 2 1A 0 0 0 1 2 6A 1 0 0 1 3 6A 0 1 0 1 5 0A 1 1 0 1 6 6A 0 0 1 1 Motor Control Unit FAULT O3 POWER I4 I3 REV FWD UV 3 AC I3 I4 OFF RESET REVERSE FORWARD OFF a b c d e f j i h g 1 ON 2 3 4 7 RA MO W L1 T3 L3 T1 L1 T1 ...

Страница 50: ...nded by 93 68 EEC Observe the technical data and terminal requirements For additional information refer to the equipment nameplate or label and the documentation Any other usage constitutes improper use h Caution The Motor Control Unit must be operated only in combination with this user manual h Caution Rapid Link must be operated only on 400 480 V three phase systems with earthed star point and s...

Страница 51: ...ckwise or anticlockwise operation through DIP switch 57 Mounting Plug in connections 13 Display Separate status and diagnostic LEDs 65 Manual mode AUTO OFF HAND with key switch commissioning without higher level control possible actuation of direction s of rotation with REV OFF FWD selector switch for RA MO DE and RA MO W 57 56 External inputs Connection of two light barriers sensors or limit swit...

Страница 52: ...signal lines directly adjacent to mains or motor cables Avoid laying them in a common cable duct and do not bundle them with cable ties Accessories Motor cable SET M3 HF with assembled halogen free cable 2 3 5 10 m Lock shackle SET M LOCK for motor cables SET M3 a page 152 Motor connection plug SET M3 A for user assembly cable length F 25 m Adapter cables for power supply through ribbon or round c...

Страница 53: ... vertically but can also be fitted in the positions shown Mounting Figure 48 Mounting position h Caution Do not fit the unit rotated 90 to the right F 90 F 90 F 90 F 90 Figure 49 Mounting o 1 1 0 OFF 2 3 4 5 M 1 ON DIP 2 3 4 5 6 7 9 10 8 1 0 o Thread Torque 5 5 mm M5 3 Nm M 32 x 1 5 1 Nm 2 10 x 1 6 mm 5 ...

Страница 54: ...3AC motor without special technical knowledge Figure 50 Mounting example RA MO2 1 C1 400 V M 3 h 1 1 0 OFF 2 3 4 5 3 h 400 V PE 50 60 Hz 24 V H ZB2 100 AZ1 ZB2 155 KB1 RA C1 7x2 5PVC RA C1 7x4HF RA C1 PLF RA C1 VP PLF SET M3 HF M Figure 51 Mounting example RA MO2 1 C2 24 V H 400 V M 3 h 1 1 0 OFF 2 3 4 5 3 h 400 V PE 50 60 Hz ZB2 100 AZ1 ZB2 155 KB1 RA C2 S 4 SET M3 HF M ...

Страница 55: ... 3 4 5 3 h 400 V PE 50 60 Hz 3 h 400 V PE 50 60 Hz 24 V H RA XAZ2 1M ZB2 105 KB1 ZB2 155 KB1 RA C1 7x2 5PVC RA C1 7x4HF RA C1 PLF RA C1 VP PLF RA C3 C1 1 5HF RA C2 S 4 SET M3 HF M 1 2 RA C3 C2 1 5HF Part no Connection types RA MO C1 Mains incomer L1 L2 L3 N PE 24V 0V with plug for flexible busbar flat cable junction RA C1 VP PLF or RA C1 PLF RA MO C2 Mains incomer L1 L2 L3 N PE 24V 0V with plug fo...

Страница 56: ...F 8 x 1 5 m2 2 10 m unscreened DESINA conformant Alternatively you can assemble your own motor supply cable with plug SET M3 A with 8 x 1 5 mm2 contacts Pin assignment to DESINA specification a page 24 Figure 53 Connection sockets for sensors and actuators M12 I3 I4 O3 RA MO2 1 2 RA MO2 1 4 x x RA MO2 1 4A x x x A coded IEC EN 60947 5 2 1 brown 3 blue 4 black 24 V H S I F 160 mA F 20 m I3 O3 I4 1 ...

Страница 57: ...otor connection without thermistor h If motors are connected without PTC thermistor thermoclick cables 6 and 7 must be linked at the motor Figure 56 Motor connection with thermistor 1 4 6 3 5 8 PE 7 5 8 1 7 3 PE T1 T2 M 3 h U V W PE 6 7 1 2 3 PE e 5 8 1 7 3 PE T1 T2 M 3 h i U V W PE 6 7 1 2 3 PE e Figure 57 Connection of a 230 V AC brake for RA MO 4 230 Figure 58 Connection of a 400 V AC brake Fig...

Страница 58: ...the mechanical interlock X Prepare the reversing starter wiring kit X Fit the reversing starter wiring kit link L1 3 T1 3 A1 X Connect the factory prepared strand in the device with A2 and bridge terminal 7 with 7 and 8 with 8 X Assigning strand labels to the contactor contacts terminal assignment X Change the jumper settings to reversing starter function a section Setting the functions with DIP s...

Страница 59: ... the DIP switch a section Setting the functions with DIP switches jumpers page 60 This ensures that the motor is also protected against overload during commissioning When the mains cable is connected the load switch disconnect control unit RA DI then applies mains voltage LED display UV on the motor symbol indicates readiness for operation A lit red LED in the motor symbol indicates a group fault ...

Страница 60: ...The key switches engage in all positions Reset As soon as LED Motor has changed from continuously lit to flashing triggering of the motor preotection function or thermistor protection can be manually reset with switching sequence AUTO r OFF or MANUAL r OFF To perform a Reset hold the key switch in the OFF position for about half a second From version 2 x The Reset signal through AS i provides an a...

Страница 61: ...limit switch is reached the drive switched off directly through preprocessing of the motor starter PLC and bus cycle times do not affect the power off times From version 2 x the power off times are even shorter and more precise than in version 1 x From version 2 x and depending on your application there are several ways of configuring the Quick Stop function From Version 2 1 Input I3 acts on both ...

Страница 62: ...igure 61 Sensors with break contacts can also be used In this case the motor starter s DIP switch must be set accordingly LED signal on Quick stop LED FWD or REV is lit when the PLC has set the associated direction of rotation bit LED FWD or REV flashes when the contactor has been switched off through the Quick stop and the PLC direction of rotation bit continues to be set Figure 61 Quick stop in ...

Страница 63: ... do not trigger lower current level monitoring After a Reset command the RA MO can be operated in both manual and automatic mode Reading diagnostic status through AS Interface parameter channel To be able to read out the diagnostic status left jumper in right position a figure 64 r DIP switch 10 1 from version 2 2 the PLC with WRITE P must send the parameter bit combination 111 The motor starter r...

Страница 64: ... is set to AUTO Setting the functions with DIP switches jumpers When the locking screw in the cover is undone the electronics can be configured through jumpers and DIP switches Diagnosic status Status Group faults1 Peripheral error FID Explanation P1 P2 P3 DI1 Contactor faulty 0 0 1 1 1 Contactor in On position without actuation signal Overload trip 0 1 0 1 0 Trip from 110 of thermal motor simulat...

Страница 65: ... Device version1 Information number2 Left jumper in position Middle jumper in position Right jumper in position left right left right left right Version 1 x Reversing starter DOL starter Version 2 1 V 3 6 3 FS invalid FS invalid V3 6 4 Diagnostic status through AS Interface parameter channel 3 Monitoring of lower current limit Off FS On Off FS On Version 2 23 V3 7 1 Monitoring of motor plug4 therm...

Страница 66: ... can not be operated The red LED in the motor symbol is lit A group fault is active 1 ON DIP 2 3 4 5 6 7 8 1 0 Figure 66 Configuring the RA MO2 1 W4 from version 2 x Figure 67 Configuring the RA MO2 1 D E 4 from version 2 x I3 I4 0 I3 I4 1 I3 I4 ASi 0 0 I3 I4 ASi AUTO I3 FWD REV From version 2 2 jumper setting for DOL starter I3 I4 ASi AUTO I3 I4 FWD 1 0 I3 I4 ASi AUTO I3 FWD I4 REV 0 1 I3 I4 ASi ...

Страница 67: ...to 1 on a DOL starter the contactor is no longer actuated DOL starters work only with DIP switch pole 7 in position 0 pole 7 Configuration 0 Reversing starter factory setting 1 Reversing starters and phases L1 and L3 reversed phase reversal pole 5 Configuration 0 Sensor signals through AS Interface no add on function factory setting 1 When using sensors with break contacts Signals are inverted for...

Страница 68: ... 2 0 right Monitoring of lower current limit disabled factory setting 1 right Monitoring of lower current limit enabled only in manual mode 0 left Monitoring of lower current limit enabled only in automatic mode 1 left Monitoring of lower current limit enabled in both manual and automatic modes h On RA MO up to version 2 1 this function is set with the jumpers pole 10 Configuration for RA MO from ...

Страница 69: ...ted by key switch Motor red Group error Overload motor Thermistor tripping3 motor plug not plugged in3 DIP switch position invalid No 24 V auxiliary power without LED indication from Version 2 x Overload short circuit O34 Overload short circuit I3 I44 Current below lower limit5 no fault tripped Reset ready motor cooled down If AS Interface error LED and FWD REV LED also flash Internal device error...

Страница 70: ...01 08 AWB2190 1430GB 66 ...

Страница 71: ...lockwise operation j Key switch for manual and automatic mode 0 3A 1 0 1 1 0 4A 0 1 1 1 0 6A 1 0 0 0 0 8A 0 1 0 0 1 0A 1 1 0 0 1 2A 0 0 1 0 1 5A 1 0 1 0 1 7A 0 1 1 0 1 9A 1 1 1 0 2 1A 0 0 0 1 2 6A 1 0 0 1 3 6A 0 1 0 1 5 0A 1 1 0 1 6 6A 0 0 1 1 Motor Control Unit FAULT O3 POWER I4 I3 REV FWD UV 3 AC I3 I4 OFF RESET REVERSE FORWARD OFF a b c d e f j i h g 1 ON 2 3 4 7 RA MO W L1 T3 L3 T1 L1 T1 L3 T3...

Страница 72: ...ply 400 V AC on page 13 Following a short circuit not overload the complete affected motor starter must be replaced The devices must be opened only in a de energized state Key switch in OFF position Pull power supply plug and secure against reconnection Pull motor plug and plug M12 Do not touch the electronics in the cover Basic functions a Page Communication AS Interface connection specification ...

Страница 73: ...e routing Do not lay the control and signal lines directly adjacent to mains or motor cables Avoid laying them in a common cable duct and do not bundle them with cable ties Accessories Motor cable SET M3 HF with assembled halogen free cable 2 3 5 10 m Lock shackle SET M LOCK for motor cables SET M3 a page 152 Motor connection plug SET M3 A for user aassembly cable length F 25 m Adapter cables for ...

Страница 74: ...tion The device is preferably installed vertically but can also be fitted in the positions shown Mounting Figure 71 Mounting position F 90 F 30 F 90 F 90 Figure 72 Mounting o 1 1 0 OFF 2 3 4 5 M 1 ON DIP 2 3 4 5 6 7 9 10 8 1 0 5 o Thread Torque 5 5 mm M5 3 Nm M 32 x 1 5 1 Nm 2 10 x 1 6 mm ...

Страница 75: ... plug M12 with an addressing device a page 17 Figure 73 Mounting example RA MO C3A 400 V M 3 h 1 1 0 OFF 2 3 4 5 3 h 400 V PE 50 60 Hz 3 h 400 V PE 50 60 Hz 24 V H RA XAZ2 1M ZB2 105 KB1 ZB2 155 KB1 RA C1 7x2 5PVC RA C1 7x4HF RA C1 PLF RA C1 VP PLF RA C3 C1 1 5HF RA C2 S 4 SET M3 HF M 1 2 RA C3 C2 1 5HF Part no Connection types RA MO C3 Power supply plug with L1 L2 L3 N PE for the adapter cables t...

Страница 76: ...A conformant Alternatively you can assemble your own motor supply cable with plug SET M3 A with 8 x 1 5 mm2 Pin assignment to DESINA specification a page 24 Figure 74 Connection sockets for sensors and actuators M12 I3 I4 O3 RA MO x x RA MO A x x x A coded IEC EN 60947 5 2 1 brown 3 blue 4 black 24 V H S I F 160 mA F 20 m I3 O3 I4 1 2 1 4 3 I3 I4 1 L 3 L 4 I 1 3 1 1 4 4 4 24 V H I F 1 0 A Pin on m...

Страница 77: ...76 Motor connection without thermistor h If motors are connected without PTC thermistor thermoclick cables 6 and 7 must be linked at the motor Figure 77 Motor connection with thermistor 1 4 6 3 5 8 PE 7 5 8 1 7 3 PE T1 T2 M 3 h U V W PE 6 7 1 2 3 PE e 5 8 1 7 3 PE T1 T2 M 3 h i U V W PE 6 7 1 2 3 PE e Figure 78 Connection 230 V AC brake for RA MO 230 Figure 79 Connection of a 400 V AC brake Figure...

Страница 78: ... commissioning the motor s current value must be set with the DIP switch a section Setting the functions with DIP switches jumpers page 79 This ensures that the motor is also protected against overload during commissioning When the mains cable is connected the load switch disconnect control unit RA DI then applies mains voltage LED display UV on the motor symbol indicates readiness for operation A...

Страница 79: ...Reset As soon as LED Motor has changed from continuously lit to flashing triggering of the motor preotection function or thermistor protection can be manually reset with switching sequence AUTO r OFF or MANUAL r OFF To perform a Reset hold the key switch in the OFF position for about half a second The Reset signal through AS i provides an additional possibility for a motorstarter reset in case the...

Страница 80: ... with DIP switches The Quick Stop function allows precision stopping of the drive When the limit switch is reached the drive switched off directly through preprocessing of the motor starter PLC and bus cycle times do not affect the power off times Depending on yuor application there are several ways of configuring the Quick Stop function Input I3 acts on both directions of rotation and I4 has no a...

Страница 81: ...82 Sensors with break contacts can also be used In this case the motor starter s DIP switch must be set accordingly LED signal on Quick stop LED FWD or REV is lit when the PLC has set the associated operating direction bit LED FWD or REV flashes when the contactor has been switched off through the Quick stop and the PLC directio of rotation bit continues to be set Figure 82 Quick stop in Automatic...

Страница 82: ...f Current values above 30 percent of In do not trigger lower current level monitoring After a Reset command the RA MO can be operated in both manual and automatic mode Reading diagnostic status through AS Interface parameter channel To be able to read out the diagnostic status DIP pole 10 1 the PLC with WRITE P must send the parameter bit combination 111 The motor starter returns the diagnostic st...

Страница 83: ...s jumpers When the locking screw in the cover is undone the electronics can be configured through jumpers and DIP switches Diagnosic status Status group errors1 Peripheral error FID Explanation P1 P2 P3 DI1 Contactor faulty 0 0 1 1 1 Contactor in On position without actuation signal Overload trip 0 1 0 1 0 Trip from 110 of thermal motor simulation value Thermistor tripping 0 1 1 1 0 Tripping throu...

Страница 84: ...umper bottom and Jumper right settings 1 1 1 1 No function factory setting 1 1 0 1 1 0 3 A 0 1 1 1 0 4 A 1 0 0 0 0 6 A 0 1 0 0 0 8 A 1 1 0 0 1 0 A 0 0 1 0 1 2 A 1 0 1 0 1 5 A 0 1 1 0 1 7 A 1 1 1 0 1 9 A 0 0 0 1 2 1 A 1 0 0 1 2 6 A 0 1 0 1 3 6 A 1 1 0 1 5 0 A 0 0 1 1 6 6 A 0 0 0 0 No function1 1 RA MO can not be operated The red LED in the motor symbol is lit A group error is active 1 ON DIP 2 3 4 ...

Страница 85: ...rsing starters and phases L1 and L3 reversed phase reversal pole 5 Configuration 0 Sensor signals through AS Interface no add on function factory setting 1 When using sensors with break contacts Signals are inverted for internal processing the original signals are sent through AS Interface Pole Configuration for RA MO 6 8 0 0 No add on function factory setting 1 0 With jumper setting Reversing sta...

Страница 86: ... not actuated actuated Automatic indicated by key switch Motor red Group error Overload motor Thermistor tripping3 motor plug not plugged in3 DIP switch position invalid No 24 V 400 V auxiliary power without LED indication Overload short circuit O34 Overload short circuit I3 I44 Current below lower limit5 no fault tripped Reset ready motor cooled down If AS Interface error LED and FWD REV LED also...

Страница 87: ... RS 422 and reference value potentiometer a page 103 f For version RA SP 342 343 Two additional inputs through M12 for external sensors g Motor output plug screened version for motor cable SET M4 HF with servo cable halogen free screened h Power bus connection with prefabricated cable 7 1 5 mm2 approx 1 45 m incl plug or power plug for fitting by user 5 pole i AS Interface connection with M12 pref...

Страница 88: ...on their location of use external filtering may be necessary Only three phase motors must be connected to the output of the RA SP Connecting of any of the following is not permissible Voltage capacitive loads other outputs parallel connection of RA SP RA MO Bypass circuit direct connection to input Observe the technical data and terminal requirements For additional information refer to the equipme...

Страница 89: ...s for up to four independent motor speeds Three digital and one analog fixed frequency Parameterizable operating data acceleration and deceleration time current limitation etc Actuation of motors featuring brakes with an external 400 V AC or 230 V AC power supply Connection of two light barriers sensors or limit switches through two M12 sockets Automatic actuation through AS Interface start forwar...

Страница 90: ...rough serial RS 422 interface under screw cover 105 Variants Prefabricated for flexible busbar RA SP C1 round cable RA SP C2 or user assembled power plug RA SP C3 1 9 Monitoring Thermistor monitoring short circuit and earth fault protection on Power On thermal overload overvoltage 99 Frequencies Frequency range 0 5 to 360 Hz motor rated frequency 50 60 Hz power supply pulse frequency 0 5 to 5 kHz ...

Страница 91: ...Output frequency 1 Fixed frequency A21 0 5 to 50 Hz max 360 Hz 30 Hz 30 Hz 30 Hz 2 Fixed frequency A22 0 5 to 50 Hz max 360 Hz 40 Hz 40 Hz 40 Hz 3 Fixed frequency A23 0 5 to 50 Hz max 360 Hz 50 Hz 50 Hz 50 Hz Analog fixed frequency through potentiometer 0 5 to 50 Hz max 360 Hz approx 10 Hz approx 10 Hz approx 10 Hz Acceleration time F02 0 1 to 3000 s 10 s 10 s 10 s Delay time F03 2 s 2 s 2 s U f c...

Страница 92: ...z 40 Hz 40 Hz 40 Hz 3 Fixed frequency A23 0 5 to 50 Hz max 360 Hz 50 Hz 50 Hz 50 Hz Analog fixed frequency through potentiometer 0 5 to 50 Hz max 360 Hz approx 10 Hz approx 10 Hz approx 10 Hz Acceleration time F02 0 1 to 3000 s 10 s 10 s 10 s Delay time F03 2 s 2 s 2 s U f characteristic A44 SLV linear b square law 6 SLV SLV SLV Pulse frequency b83 0 5 to 16 kHz 0 5 to 5 kHz 0 5 to 5 kHz 5 kHz 5 k...

Страница 93: ...control cable When you open the enclosure make sure that this cable is not under any mechanical tension Enclosures must be opened only in a de energized state and by trained personnel Key switch in OFF position Pull power supply plug and secure against reconnection Pull motor plug and plug M12 To prevent reconnection of the motor cable it can be secured with lock shackle SET M LOCK a page 152 j Da...

Страница 94: ...out the short circuit release being tripped by the RA SP 10 to 15 20 to 25 RA SP 075 or 5 to 8 10 to 13 RA SP 1K1 or 3 ti 5 7 to 9 RA SP 2K2 The national and regional standards for example IEC EN 60204 must be observed and the necessary approvals for example UL at the site of installation must be fulfilled When the device is operated in a UL approved system use only UL approved fuses fuse bases an...

Страница 95: ...reater than the RA SP s maximum rating about 500 kVA If sudden voltage dips in the supply voltage are to be expected for example when several RA SPs are operated on a common supply voltage a thyristor system and an RA SP are operated on a common supply voltage of the Rapid Link system power factor correction devices are switched on or off In these cases a line reactor with about 4 voltage drop at ...

Страница 96: ...MC product standard IEC EN 61800 3 in industrial environments second environment The stricter limit values for domestic environments first environment can be achieved with upstream RFI filters A domestic environment is defined here as a connection point transformer feeder to which domestic households are also connected For industrial systems the EMC Directive requires electromagnetic compatibility...

Страница 97: ... 1430GB Power supply 93 EMC correct mounting and installation Figure 94 Installation example PES Connect the motor cable screen to PE with a large area connection for example cable glands with strain relief PES e PE ...

Страница 98: ...ow must be taken into consideration Figure 95 For mounting position see also derating figure 96 to figure 98 F 30 F 30 F 30 F 30 Figure 96 RA SP 075 in vertical left and horizontal right mounting positions Figure 97 RA SP 1K1 in vertical left and horizontal right mounting positions 30 40 ia C I A 2 5 2 0 1 0 5 kHz 12 kHz 1 9 A q 0 75 kW 30 40 2 5 2 0 1 0 12 kHz 5 kHz 1 9 A q 0 75 kW ia C I A 30 40...

Страница 99: ...25 mm if no further RA SP or other self cooling device is to be fitted there Mounting Figure 98 RA SP 2K2 in vertical left and horizontal right mounting positions 30 I A 5 0 2 0 3 6 1 0 12 kHz 5 kHz 40 ia C 30 I A 5 0 2 0 3 6 1 0 12 kHz 5 kHz 40 ia C Figure 99 Mounting dimensions f 150 f 150 i F 40 C f 100 f 100 f 150 f 150 Figure 100 Mounting Part no o mm Thread Torque Nm l mm RA SP 075 RA SP 1K1...

Страница 100: ...Mounting example RA SP C 400 V M 3 h 3 h 400 V PE 50 60 Hz 24 V H ZB2 100 AZ1 ZB2 155 KB1 RA C1 7x2 5PVC RA C1 7x4HF RA C1 PLF RA C1 VP PLF SET M4 HF Figure 102 Mounting example RA SP C2 24 V H 400 V M 3 h 3 h 400 V PE 50 60 Hz ZB2 100 AZ1 ZB2 155 KB1 RA C2 S 4 SET M4 HF ...

Страница 101: ... 4 SET M4 HF RA C3 C2 1 5HF ZB2 105 KB1 RA XAZ2 1M Ue Ue M1 M 3 h 24 V H 1 2 Part no Connection types RA SP C1 Mains incomer L1 L2 L3 N PE with plug for flexible busbar flat cable junction RA C1 VP PLF or RA C1 PLF RA SP C2 Mains incomer L1 L2 L3 N PE with plug for round cable junction RA C2 S 4 RA SP C3 Power supply plug with L1 L2 L3 N PE for the adapter cables to ribbon or round cable RA SP C A...

Страница 102: ...this case the signals must be split through the Y connector RA XM12 Y PIN Function 1 ASi 2 3 ASi 4 PIN Function 1 ASi 2 0 V 3 ASi 4 24 V h On M12 sockets I3 and I4 with visible nut pin 2 is not assigned On M12 sockets I3 and I4 without visible nuts pins 2 and 4 are bridged Exception RA SP HE RA SP2 342 RA SP2 343 A coded IEC EN 60947 5 2 1 brown 2 white 3 blue 4 black 24 V H S I F 70 mA RA SP HE o...

Страница 103: ...fed three phase commutator shunt motors slipring rotor or reluctance motors synchronous motors and servo motors can be connected provided they are approved for use with frequency inverters by the motor manufacturer Figure 104 Pin assignment at motor output socket DESINA i Caution The operation of a motor at speeds higher than the rated speed see nameplate can cause mechanical damage to the motor b...

Страница 104: ... U1 V1 W1 W2 U2 V2 690 V 400 1 9 1 1 A 0 75 S1 0 79 ϕ cos kW rpm 1430 50 Hz U1 V1 W1 W2 U2 V2 PES 5 8 1 7 3 PE T1 T2 M 3 h U V W PE e PES PES 5 8 1 7 3 PE T1 T2 M 3 h i U V W PE 4 6 B1 B2 e PES RA SP2 341 343 RA SP2 341 343 230 h The motor circuit must be laid out for the rated operational voltage 400 V i Warning If motors are used whose insulation is not suitable for operation with RA SP the moto...

Страница 105: ...0 V AC h To replace the device s internal fuses the device must be opened up This operation should therefore be performed only by qualified persons RA SP2 C1 RA SP2 C2 RA SP2 C3A Supplier maufacturer Wickmann Schurter Order code 356 1800 7022 0700 Type 356 A12FA500V Rated voltage 440 V 500 V Rated current T 8 A FF 10 A Figure 106 Built in device fuse a Ceramic body 32 o 6 3 Ceramic body 2 1 F Figu...

Страница 106: ...p X Secure the braid ends with a rubber grommet or with insulating tape to prevent the braid from fraying X Connect the intertwisted strands U V W and PE and the separately twisted strands B1 B2 and T1 T2 to the corresponding terminals in the motor or in the connector SET M4 A X Connect the screen braids to earth potential over a large area in the motor connection cable s plug in the motor s screw...

Страница 107: ... be parameterized only with the motor connected Alternatively you can convert the motor plug SET M4 A into a parameterization plug by bridging pins 5 and 8 When the mains cable is connected the load switch disconnect control unit RA DI then applies mains voltage When mains voltage is applied the RA SP performs a self test red LED in the motor symbol briefly lights up LED display UV on the motor sy...

Страница 108: ...ction to reduce it turn the potentiometer anticlockwise RA SP 34 RA SP HE Figure 109 Modification of default setting for frequency direction and parameters a Spindle potentiometer n0 b Direction reversal c Serial interface RS 422 RJ45 d DIP switch M 32 x 1 5 1 Nm 2 10 x 1 6 mm a c b ON DIP 1 2 3 4 5 6 7 8 a c 0 50 Hz 0 400 V 0 4 x 2 5 mm Figure 110 Spindle potentiometer n0 50 Hz 400 V 10 x n0 ...

Страница 109: ... switch DIP switch under the front locking screw without rewiring or reprogramming a page 111 With control signal FWD LED FWD lit a clockwise rotating field is output in switch position Top default and an anticlockwise rotating field in switch position Bottom The changeover can be performed during drive operation c Serial interface RS 422 a fig 109 Figure 111 Direction of rotation L1L2L3 1 7 3 U V...

Страница 110: ... operating mode HAND key switch start stop and direction reversal are performed with selector switch REV OFF FWD REV reverse FWD forward OFF stop and reset following a fault detected by the power module The selected direction is indicated by the LED on the motor The speed control unit is controlled through AS Interface from interface control unit RA IN The AS Interface connection must be establish...

Страница 111: ... material and the plant in also manual operation If you have selected this function limit switch I3 limits the possible forward travel and limit switch I4 limits the possible reverse travel If the material reaches the limit switch in Manual mode the drive stops even if the selector switch remains in an actuating position In addition you can use this function to adjust the light barriers before com...

Страница 112: ... a figure 63 on page 59 Quick stop with creep speed with RA SP HE When the input signal is applied to pin 2 rising edge or continuous signal the RA SP HE switches the drive over to fixed frequency 1 The input signal must be applied for at least 18 5 ms Creep speed remains active until the end light barrier pin 4 of M12 sockets I3 and I4 is reached and the drive switches off a Quick stop with RA SP...

Страница 113: ...isconnected and locked motor plug a Not Ready signal makes more sense than a fault message Do enable this operating mode use pole 1 of the DIP switch In this operating mode a high resistance connection between pins 5 and 8 of the motor plug thermistor tripping or no motor plug the following effects The motor switches off as in the normal operating mode No group fault message at DI1 No group fault ...

Страница 114: ... 5 6 0 0 0 No additional functions default 1 0 0 Quick stop and interlocked manual operation edge controlled only I3A and I4A enabled I3A and I4A are assigned to forward operating direction Reverse direction is disabled Application example vertical sorter 360 eccentric and 360 rotary table 0 1 0 Quick stop I3A enabled I3A is assigned to both operating directions I4A has no additional function Appl...

Страница 115: ...in order of their priority The highest priority message is at the top of the list Table 28 Diagnostic status j Danger Safety risk The jumper positions and the setting of DIP switch pole 7 must be changed only by trained persons and only in accordance with this manual Incorrect settings will cancel the reversing starter s interlock or reverse the operating direction Pole 7 Configuration 0 Reversing...

Страница 116: ...ual mode1 24 V supply failed and returned with DIP pole 8 1 in manual mode1 Start Forward rotating field REV green Anti clockwise not actuated Start Reverse rotating field Automatic indicated by key switch Motor red Group error from power module thermistor motor plug not connected In addition on RA SP HE DIP switch position invalid Overload short circuit I3 I4 no fault applied I 3 I4 RA SP 342 343...

Страница 117: ...the error message turn the key switch to the Off position Hold the switch in this position for about 0 5 seconds to allow the RA SP to recognize the command The Reset signal through AS i provides an additional possibility for resetting the RA SP HE in case it is not accessible for a local reset The local reset with the key switch remains the main reset function since it is necessary for analysing ...

Страница 118: ...e Parameterization The parameters of the frequency inverter DF5 are described in manual AWB8230 1412 The descriptions below include only those parameters that are applicable for use of the RA SP in the Rapid Link system The parameters can be changed only with the keypad DEX KEY 10 or the Moeller parameterization software Drive Soft a page 105 The speed control unit RA SP is factory configured for ...

Страница 119: ... BPS bits per second indicates the data transfer rate For RA SP this value should be set to 4800 X Press arrow key Ú X Press arrow key í X Press arrow key Ú twice and confirm selection DRW2 with the ENTER key X Then press the RMT key twice All LEDs except POWER and RMT go out The keypad is now correctly configured Monitor menu of DEX KEY 10 To call up the Monitor menu press the MNT key For RA SP T...

Страница 120: ... VR not used with RA SP REM remote keypad DEX KEY 10 not affected by key switch position AUTO OFF HAND rw STOP F R SELECT TRM A02 F SET SELECT enable with forward reverse rotating field through TRM terminal selector switch REV OFF FWD or AS Interface REM remote keypad DEX KEY 10 not affected by key switch position AUTO OFF HAND and selector switch REV OFF FWD rw STOP Hz01 0 0 00 b86 Hz01 0 output ...

Страница 121: ...ult DC link voltage on fault Vdc ro ERR1 0 0Hz 0 0Hz frequency on fault ERR1 ro ERR1 0 0A 0 0A current on fault ERR1 ro ERR1 000 0Vdc 000 0Vdc DC link voltage on fault ERR1 ro ERR1 RUN 000000H RUN 000000H operating hours on fault ERR1 ro ERROR COUNT 000 ERROR COUNT 000 number of faults to date ro ERR2 ERR2 last but one fault message additional indication as for ERR1 ro ERR3 ERR3 second from last f...

Страница 122: ...t loads causing high current peaks in output switching in output voltage during operation OC Accel E02 In the acceleration phase OC Decel E03 In the deceleration phase Over C E04 At standstill Over L E05 Overload Power off through built in electronic motor protection Over V E15 Overvoltage Power off through overvoltage in regenerative operation OV SRC The mains voltage exceeds the permissible valu...

Страница 123: ...ates the associated value To select the value 10 use the í keys press 2 n times and press Í or Ú to change it To confirm your changes press ENTER To call up the remaining acceleration ramp functions for example the characteristic of acceleration ramp ACC LINE select digit 1 and then use the Í key To change the settings use the arrow keys í Í and Ú to confirm your changes press ENTER To go back to ...

Страница 124: ... 2 0015 0s A92 2 Acceleration time 0 1 to 3000 s 1 5 ACC CHFr 000 0Hz A95 Changeover frequency from first to second acceleration time 0 to 360 Hz 0 ACC LINE L A97 Acceleration characteristic L 00 linear S 01 S shaped L S L F 07 DEC Delay time DEC 1 0010 0s F03 1 Delay time 0 1 to 3000 s 2 126 DEC 2 0015 0s A93 2 Delay time 0 1 to 3000 s 1 5 DEC CHFr 000 0Hz A96 Changeover frequency on changeover f...

Страница 125: ...24 OLOAD Current limit OLOAD LVL 00 00A b22 Tripping current 0 5 to 1 5 x Ie A a table 19on page 87 134 OLOAD CONST 01 0 b23 Time constant 0 1 to 30 Hz s 1 OLOAD MODE b21 Motor current limitation OFF 00 inactive ON 01 active CRT 02 inactive during acceleration OFF ON CRT ON F 25 S LOCK b31 Parameter protection MD0 00 with SFT digital input all functions inhibited MD1 01 with SFT digital input all ...

Страница 126: ...signal OV LOAD 00 0A C41 Threshold for signal to digital output 11 or 12 0 to 2 x Ie A Ie OV PID 003 0 C44 PID control deviation 0 to 100 3 F 34 IN TM Initialization of digital inputs IN TM 1 FW C01 AS Interface DQ0 1 FW Clockwise rotating field FWD Caution Do not change FW 136 IN TM 2 RV C02 AS Interface DQ1 1 RV Anticlockwise rotating field REV RV IN TM 3 CF1 C03 AS Interface DQ2 1 CF1 Fixed fre...

Страница 127: ...n Do not change setting OFF INIT DOPE FWD F04 Direction of rotating field FWD INIT MODE TRP b84 Intialization mode TRP F 43 PID PID regulation PID SW OFF A71 Not used with RA SP Caution Do not change OFF PID P 1 0 A72 1 0 PID I 001 0s A73 1 0 PID D 000 0 A74 0 0 PID CONV 01 00 A75 1 00 PID INPT CUR A76 CUR DEX KEY 10 Fn No indication DF5 PNU Meaning display code DF5 Value range FS a Page PNU Desig...

Страница 128: ... voltage causes an increase in the braking torque For deceleration you can therefore deactivate the AVR function under PNU A81 If the mains voltage is higher than the rated motor voltage enter the mains voltage under PNU A82 and reduce the output voltage in PNU A45 V gain in Monitor menu to the rated motor voltage Example With 440 V mains voltage and 400 V rated motor voltage enter 82 under PNU A4...

Страница 129: ...sage and trip due to the higher currents involved Figure 121 Boost characteristic Parameter settings A41 00 A42 50 A43 10 0 A44 00 A45 100 U f Hz 0 5 0 25 0 50 0 A42 20 A43 10 100 PNU Designation Adjustable in RUN mode Value Function FS A41 Boost characteristic 00 Manual boost 00 01 Automatic boost A42 Manual boost percentage j 0 to 99 Setting the voltage increase with manual boost 11 A43 Manual b...

Страница 130: ... A92 and A93 can be performed This can take place when the fixed frequencies defined with PNU A95 and A96 are reached PNU Designation Adjustable in RUN mode Value Function FS F02 Acceleration time 1 j 0 1 to 3000 s Resolution of 0 1 s at an input of 0 1 to 999 9 Resolution of 1 s at an input of 1000 to 3000 10 0 PNU Designation Adjustable in RUN mode Value Function FS F03 Delay time 1 j 0 1 to 300...

Страница 131: ...d A95 Acceleration time changeover frequency 0 0 to 360 0 Hz Here set a frequency at which the changeover from the first to the second acceleration time is to take place 0 0 A96 Deceleration time changeover frequency 0 0 to 360 0 Hz Here set a frequency at which the changeover from the first to the second deceleration time is to take place 0 0 A97 Acceleration characteristic Here you can set a lin...

Страница 132: ...encies REV FWD FF2 FF1 f0 f0 f1 f2 f2 f3 h If one or more of the fixed frequencies exceeds 50 Hz you must first increase the end frequency with PNU A04 a section F 01 End frequency F MAX page 123 h Fixed frequency stage 0 none of the inputs FF1 to FF3 are activated corresponds to the frequency reference value which an be specified with the built in potentiometer Alternatively you can set the fixed...

Страница 133: ...gh digital output 11 By default this output is active during motor operation operating mode RUN Alternatively you can actuate digital output 11 through the frequency value signal operating mode FA2 a page 130 In operating mode FA2 fixed frequency stage 0 must be set digitally with F01 A20 a table 29 on page 128 This setting can not be made with a potentiometer Table 30 Parameterizing digital outpu...

Страница 134: ... signal is active during acceleration X With PNU C43 set the respective frequency which is to remain active until the FA2 signal is deactivated during deceleration Figure 124 Function chart for FA2 frequency exceeded fo Output frequency h The transition of an FA1 or FA2 signal from the inactive to the active state takes place with a delay of about 60 ms FA2 PNU C42 PNU C43 fO 0 5 Hz 1 5 Hz 60 ms P...

Страница 135: ...fy the restarting behaviour With PNU b02 and b03 specify the behaviour on mains failure a fig 125 and fig 126 j Danger In the event of a fault this function causes an automatic restart of the RA SP after the set delay when a Start signal is applied through AS Interface or if an operating direction is enabled in manual mode selector switch Ensure that an automatic restart does not present a danger ...

Страница 136: ...ation speed and the motor brakes for the set deceleration time A fault message is then displayed b02 Permissible power failure duration 0 3 to 25 s Here you set a time duration during which the undervoltage condition is met without the corresponding fault message in PNU E 09 being initiated 5 b03 Waitingtimeto restart 0 3 to 100 s Here set a time which is to expire before an automatic restart is i...

Страница 137: ...rrent indicated by PNU d02 If the indicated current is not the same as the known current adjust the indication with PNU b32 as follows X If the displayed current is too low increase the value under PNU b32 X If the displayed current is too high decrease the value under PNU b32 If the motor s load current is unknown you have to measure it X Connect the motor under load directly to the three phase s...

Страница 138: ...Figure 127 Current limit IM Motor current I1 Current limit h Caution Note that the current limit cannot prevent a fault message and shutdown due to a sudden overcurrent e g caused by a short circuit PNU b22 I1 f I t IM PNU Designation Adjustable in RUN mode Value Function FS b21 Motor current limitation 00 OFF Motor current limit not active 01 01 ON Motor current limit active in all operating stat...

Страница 139: ...e frequency set under PNU A62 PNU Designation Adjustable in RUN mode Value Function FS b31 Software parameter protection 00 MD0 Can not be used with RA SP 01 01 MD1 Can not be used with RA SP 02 MD2 Parameter protection all functions inhibited 03 MD3 Parameter protection input through reference value potentiometer n0 possible Figure 128 Upper frequency limit PNU A61 and lower frequency limit PNU A...

Страница 140: ...eypad with the READ key Reconnect the keypad or the connection cable to an other RA SP and press the COPY key The data saved to the keypad are then copied to the RA SP For further information about the keypad DEX KEY 10 see manual AWB8240 1416 h With RA SP initialization is used only to check the factory default settings h Caution These settings must not be changed for RA SP h Caution To prevent o...

Страница 141: ...s connection cable 6 Repeat steps 3 to 5 for RA SP units C and D A C D 1 Note on step 4 If individual parameters are changed after you have pressed the COPY key for example the acceleration time you can carry out step 4a here without changing the keypad s saved data 4a After issuing the COPY command you can use the keypad to change the copied parameters of RA SP B The changed data is automatically...

Страница 142: ...rivesSoft on your PC you can parameterize your devices as follows X Remove the screw cover a figure 109 on page 104 X Plug in connection cable DEX CBL 2M0 PC into the unit RJ45 plug and to your PC s RS 232 port X Start DrivesSoft Figure 129 Parameterization with DrivesSoft RS232 Drives Soft PC DEX CBL 2MO PC h DrivesSoft is available for download free of charge from the Moeller website http www mo...

Страница 143: ...Language select the desired language Click OK to confirm your choice To open the device selection dialog click the New button on the toolbar The speed control unit RA SP is not listed here It is based on the frequency inverters DF5 340 RA SP2 075 DF5 340 075 RA SP2 1K1 DF5 340 1K5 RA SP2 2K2 DF5 340 2K2 X Select one of the assigned frequency inverters Figure 131 Selecting interface language Figure...

Страница 144: ...rd Windows settings Use the menu to change the drive unit s parameters Any changes are transferred directly to the connected speed control unit online Changed values are marked in red To view the parameter number associated with a setting move the cursor over the entry example acceleration time F02 ACC1 Figure 133 Menu overview j Danger Undefined operating states With DrivesSoft you can access all...

Страница 145: ...01 08 AWB2190 1430GB Parameterization with DrivesSoft 141 Figure 134 Example acceleration time ...

Страница 146: ...01 08 AWB2190 1430GB 142 ...

Страница 147: ... 150 Mechanical shock resistance IEC EN 60068 2 27 6 shocks axis 6 shocks axis Mounting position vertical a page 28 vertical a page 40 vertical a page 49 vertical a page 94 Weight kg 0 8 2 2 7 4 3 4 3 5 Indicating element 7 Segment LED LED LED LED Power circuit Supply Rated operational voltage Ue V h 400 400 400 Mains current I A 20 6 6 3 3 3 6 6 4 Rated operational current Ie A 20 6 6 2 5 2 8 5 R...

Страница 148: ... 30 V H power supply unit mA 200 90 50 2003 25 220 max current supply in AS Interface mA 2800 AS Interface specification 2 1 2 1 2 1 2 1 Slave addresses Number 62 31 62 31 IO Code or I O configuration 7 hex 7 hex 7 hex ID code F hex A hex E hex ID1 Code 0 hex Address xxA o xxB F 0 hex ID2 Code E hex D hex 0 hex Inputs Data input 0 DI0 Switch position I1 Automatic Automatic Data input 1 DI1 Group f...

Страница 149: ...d Sheathing Material according to DIN VDE 0282 EVA mixture EM4 black PVC oil resistant to CENELEC HD 21 1 S3 TM5 paint film contaminant silicon free Minimum bending radius mm 18 100 Cable weight kg km 440 402 External dimensions L W H mm L x 34 8 x 6 0 L x 34 8 x 6 0 175 x 83 x 78 119 x 57 5 x H 158 x 112 5 x 55 Overvoltage category degree of pollution III 3 III 3 III 3 Termination Twin level term...

Страница 150: ... Minimum bending radius mm 6 x external diameter of cable 10 x external diameter of cable Conductor material Cu flexible to VDE 0295 Class 5 Cu highly flexible to VDE 0295 Class 6 Material of outer casing Halogen free Halogen free Colour Silver grey RAL 7001 Orange RAL 2003 Resistance to oils and acids VDE 0472 Part 803 B VDE 0472 Part 803 A B Flame retardance fire resistance EN 50265 2 1 IEC 6033...

Страница 151: ...ink Figure 135 Motor starter RA MO 5 1 5 200 152 210 222 120 50 5 74 5 125 19 5 45 5 5 Figure 136 Speed controller RA SP 0 75 to 1 1 kW 210 242 222 o 5 5 61 123 55 120 221 5 Figure 137 RA SP speed control unit up to 2 2 kW 82 o 6 5 260 292 5 280 224 5 76 121 164 ...

Страница 152: ...ith RA LO b Wider housing depth and rotary handle for RA DI Knockout plate RA DI top 2 x M20 M25 bottom 2 x M20 M25 and 1 x M20 200 120 152 1 5 210 222 5 5 5 50 5 74 5 125 160 62 a b Figure 139 Lock shackle SET M LOCK 35 o 8 5 50 65 M 5 35 Figure 140 Round cable junction RA C2 S1 4 55 27 130 158 78 5 112 5 25 5 5 5 142 5 ...

Страница 153: ...130 142 5 158 78 5 106 9 25 5 57 5 119 109 47 5 M4 162 5 4 5 6 5 175 70 83 3 3 78 37 2 50 4 4 7 2 Figure 145 Terminal module RA C1 VP AM 2 with screw terminals for 24 V Figure 146 Terminal module RA C1 VP SR with screw terminals for 24 V and 400 V Figure 147 Terminal module RA C1 AM 7 with cage clamp terminals for 24 V und 400 V 107 115 6 54 5 47 5 55 4 5 6 5 47 5 60 3 132 170 M4 59 5 60 2 59 5 37...

Страница 154: ...om Version 3 0 Figure 148 Dimensions Figure 149 Dimensions RA DI 5 1 5 200 152 210 222 120 50 5 74 5 125 5 5 5 1 5 200 152 210 222 120 50 5 109 5 62 160 70 5 5 Figure 150 Dimensions RA MO Figure 151 Dimensions RA MO from Version 3 0 5 29 1 5 200 152 210 222 5 5 50 5 74 5 125 19 5 45 120 5 29 1 5 200 152 210 222 5 5 50 5 74 5 125 19 5 45 120 ...

Страница 155: ...01 08 AWB2190 1430GB Dimensions 151 Speed controller RA SP Figure 152 RA SP075 and RA SP 1K1 210 242 222 o 5 5 61 123 55 120 221 5 Figure 153 RA SP 2K2x 82 o 6 5 260 292 5 280 224 5 76 121 164 ...

Страница 156: ...om inadvertent and or accidental closing according to section 5 6 The lock shackle can be fitted next to any motor starter RA MO and speed control unit RA SP with one or two 90 countersunk M5 screws e g to ISO 2009 or ISO 7046 Alternatively the lock shackle can be made available as an accessory to maintenance personnel Procedure X Set the key switch of the motor control unit RA MO or RA SP to its ...

Страница 157: ...and I O error signals RA MO from Version 3 0 81 Diagnostic status through AS Interface and I O error signals RA MO up to version 2 x 64 External inputs on RA MO from Version 3 0 81 External inputs on RA MO up to version 2 x 63 Monitoring of lower current limit RA MO from Version 3 0 81 Monitoring of lower current limit RA MO up to version 2 x 64 Phase reversal and reversing functions RA MO from Ve...

Страница 158: ...eed control unit RA SP up to 1 1 kW 147 Speed control unit RA SP up to 2 2 kW 147 151 Terminal module RA C1 VP AM 2 149 Terminal module RA C1 VP SR 149 DIP switches RA MO from Version 3 0 79 RA MO up to version 2 x 60 Direction reversal 105 RA MO from Version 3 0 76 RA MO up to version 2 x 57 RA SP 106 Discharge currents 90 Disclaimer 10 Display unit accessory for RA SP 103 Display RA IN 29 Distri...

Страница 159: ...0 79 RA MO up to version 2 x 60 Motor cable screening 102 Motor cables RA MO from Version 3 0 69 RA MO up to version 2 x 48 Motor connection RA MO from Version 3 0 72 RA MO up to version 2 x 52 RA SP 99 Motor connection example 100 Motor output socket pin assignment RA MO from Version 3 0 73 RA MO up to version 2 x 53 Motor output socket terminal assignment 99 Motor plug RA MO from Version 3 0 69 ...

Страница 160: ...junction 15 23 S Safety devices 90 Screening motor cable 102 Selection criteria RA SP2 87 RA SPV 88 Selector switch 106 RA MO from Version 3 0 75 RA MO up to version 2 x 56 Self test 103 Sensors connecting RA MO from Version 3 0 69 72 RA MO up to version 2 x 48 52 Serial interface 106 Servo motors 99 Shielding motor cable 102 Short circuit current maximum 14 Short circuit protection 13 RA MO from ...

Страница 161: ...RCCB 91 User assembled M12 plug 98 RA MO from Version 3 0 71 RA MO up to version 2 x 51 V Vector frequency inverter RA SPV 88 Version number 19 Voltage characteristic 125 Voltage drop 12 16 Voltage reversal protection flexible busbar 20 W Wiring fault in 24 V circuit 24 Wiring RA DI 41 ...

Страница 162: ...01 08 AWB2190 1430GB 158 ...

Отзывы: