background image


Q

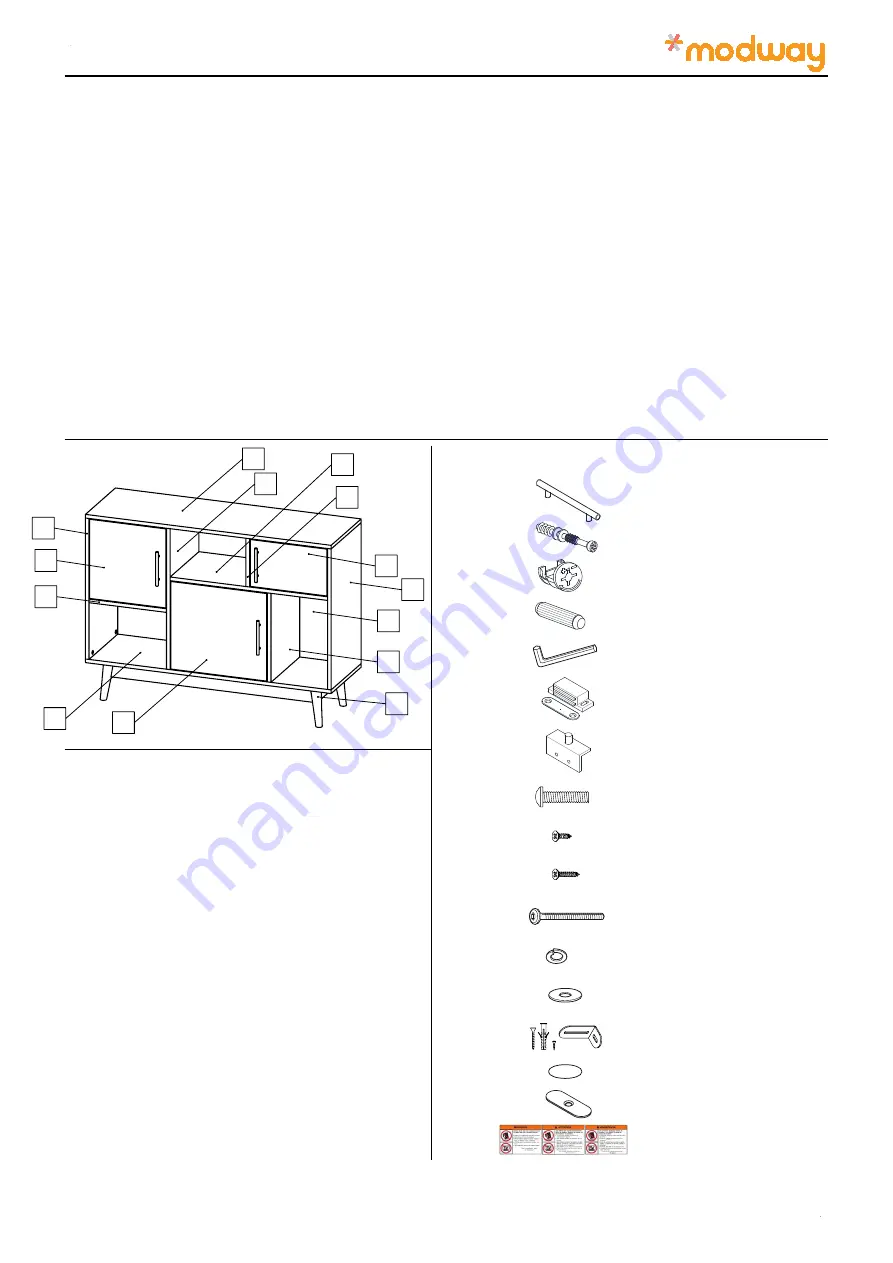
Warning Label                   x  1

Thank you for purchasing the 

MODWAY DISPLAY CABINET!

Before you start, here are some helpful advice:

1. We suggest you spend a short time reading through this leaflet and then follow the simple step by step

instructions.

Owing to the size and weight of the dining chair, we recommend that it is assembled by two adults, on a
carpeted or padded area, in the room that it is intended for. Approximate assembly time: 30 minutes.

Please do not use any tools other than those provided or recommended in these instructions.

Please do not throw away any of the packaging or instructions until you have checked all the components and
hardware and the furniture is fully assembled.

Assemble all components loosely until advised to tighten. Depending on use, it may be necessary to tighten the
components from time to time, so please save the tools that have been provided.

Please keep all pieces out of reach of small children.

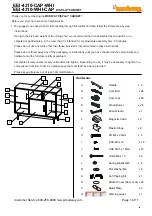
Hardware:

1

2

3

4

5

6

8

7

9

10

11

12

13

14 

Customer Service 609-256-9000 / www.modway.com

Page 1 of 11


C

Cam Lock                          x 28


B

Cam Bolt 

                x 28

Wood Dowel                     x 28


D


K

JCBC M6 x 70                   x  8


E

Allen Wrench                     x 1

Flat Washer M6                 x 8


M

Sticker Cover (Cam Lock) x 20


O

Spring Washer M6            x  8


L


H

PH M4 x 20mm                 x  6


I

CSK M3 x 12                     x  16


J

CSK M3.5 x 16mm            x 12


A

Handle                              x  3

Anti Tipping Kit                  x 1


N


F

Magnetic Catch  

   x 3

Plastic Hinge 

             x 6


G

Matel Plate                        x 4


P

EEI-4310-WHI-CAP

EEI-4310-CAP-WHI

DISPLAY CABINET

Содержание EEI-4310-CAP-WHI

Страница 1: ... you have checked all the components and hardware and the furniture is fully assembled Assemble all components loosely until advised to tighten Depending on use it may be necessary to tighten the components from time to time so please save the tools that have been provided Please keep all pieces out of reach of small children Hardware 1 2 3 4 5 6 8 7 9 10 11 12 13 14 Customer Service 609 256 9000 ...

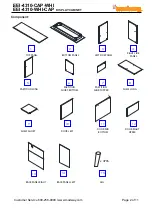
Страница 2: ... 14 2 3 4 5 TOP PANEL SHELF LONG SHELF SHORT DOOR LEFT DOOR MID BOTTOM DOOR RIGHT UPPER BACK PANEL RIGHT BACK PANEL LEFT 15 x 4PCS LEG BOTTOM PANEL LEFT SIDE PANEL RIGHT SIDE PANEL PARTITION LONG PARTITION SHORT BOTTOM PARTITION SHORT UPPER EEI 4310 WHI CAP EEI 4310 CAP WHI DISPLAY CABINET ...

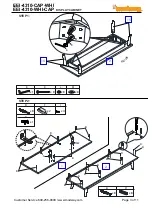
Страница 3: ... K L M F I F F I STEP 1 STEP 2 Customer Service 609 256 9000 www modway com Page 3 of 11 1 2 2 15 15 FLOOR x 8 x 1 x 8 x 1 x 2 x 4 x 8 x 8 B D x 8 x 8 B D D D D I EEI 4310 WHI CAP EEI 4310 CAP WHI DISPLAY CABINET E K L M ...

Страница 4: ...9 internal face internal face left face left face bottom face back face back face back face top face bottom face right face right face B B B B B B B B D D D D D D D D D D D C C C C C C C C C C C C C x 12 A x 3 x 20 x 3 x 6 H H H H H x 6 I I I I A G G G F A A x 6 J J J J x 12 x 28 F G F F EEI 4310 WHI CAP EEI 4310 CAP WHI DISPLAY CABINET ...

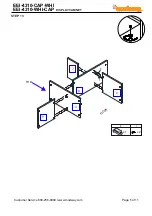
Страница 5: ...STEP 11 5 6 7 8 Customer Service 609 256 9000 www modway com Page 5 of 11 9 TOP FLOOR F I F I x 1 x 2 EEI 4310 WHI CAP EEI 4310 CAP WHI DISPLAY CABINET ...

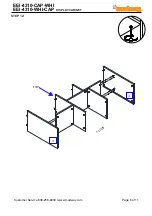
Страница 6: ...STEP 12 3 4 Customer Service 609 256 9000 www modway com Page 6 of 11 TOP FLOOR EEI 4310 WHI CAP EEI 4310 CAP WHI DISPLAY CABINET ...

Страница 7: ...STEP 13 11 Customer Service 609 256 9000 www modway com Page 7 of 11 FLOOR TOP Put door hinge plastic at right hole first EEI 4310 WHI CAP EEI 4310 CAP WHI DISPLAY CABINET ...

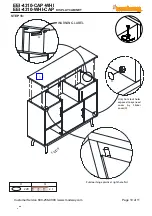
Страница 8: ...STEP 14 10 13 14 12 Customer Service 609 256 9000 www modway com Page 8 of 11 FLOOR EEI 4310 WHI CAP EEI 4310 CAP WHI DISPLAY CABINET ...

Страница 9: ... 9000 www modway com Page 9 of 11 P P I I x 4 x 4 EEI 4310 WHI CAP EEI 4310 CAP WHI DISPLAY CABINET Put matel plate P to back panel gap by follow arrow sticker and attach CSK M3x12 I to holes and tighten with screwdriver as top image ...

Страница 10: ...256 9000 www modway com Page 10 of 11 FLOOR Put door hinge plastic at right hole first O Q O Q x 20 x 1 EEI 4310 WHI CAP EEI 4310 CAP WHI DISPLAY CABINET WARNING LABEL Only Com lock holes exposed to eye need cover by Sticker cover O ...

Страница 11: ... to climb or hang on drawers door or shelves Never open more than one drawer reduce but not eliminate the risk To make driving the screw easier you can drill a 1 8 diameter pilot hole 3mm through the safety bracket into the stud Drive the screw through the safety bracket into the wall stud Tighten the screw that was not fully Locate your unit where desired against a wall and mark the wall through ...

Отзывы: