background image

Display Setup

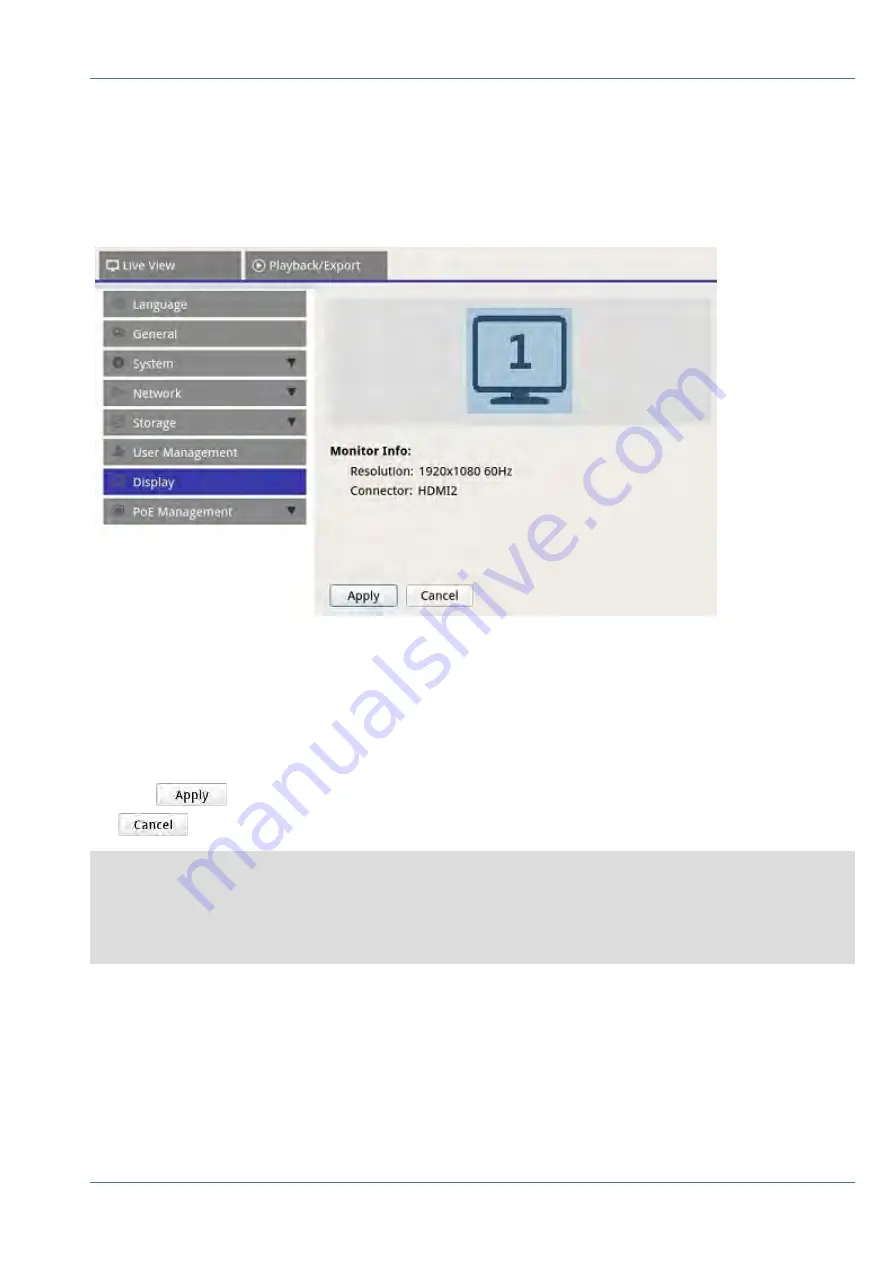
The NVR viewing display supports up to 2x 1080p display, the system can extend across two monitors by con-
necting both monitors to the NVR.

Before powering up the NVR system, make sure the HDMI and/or DisplayPort cable is connected to both the 
monitor and the system. The NVR will automatically detect the display output and adjust display resolution 
upon startup. The NVR will define the DisplayPort monitor as the primary monitor and the HDMI monitor as 
the secondary monitor.

 1.  If users wish to change the order of the monitors, click and drag to drop selected monitor to preferred 

location.

 2.  Click 

 to save the settings and the NVR will reset the order of monitor display, or click 

 to reload current settings. 

NOTE

System cannot extend display view on 4K monitor.

If user wants to upgrade from 1080p resolution display to 4K resolution display, system needs to reboot and 

rescale for best image quality.

Monitor function 

Across Mode

 will be available under 

Live View

 tab when two monitors are connected to 

the NVR.


n

Check “Across Mode” check box to extend view layout across the monitors.

NVR Setup

Display Setup

57 / 85

Содержание MOVE NVR-16

Страница 1: ...User Manual MOBOTIX MOVE NVR 8 16 Mx S NVR1A 8 16 POE 2020 MOBOTIX AG V1 1_8 6 2020...

Страница 2: ...NVR Installation 11 Unit Placement 11 Unit Setup 12 System Startup 12 System User Interface Introduction 14 Live View Window Overview 14 A Function Tabs 14 B MISC 15 C Channel Viewing Function Keys 15...

Страница 3: ...Setup 26 Camera Video Analysis Setup 29 Camera Fisheye Setup 31 Camera IR Exposure Setup 35 Camera Information 36 NVR Setup 37 Language 37 General 38 System 40 Date Time Setup 41 System Monitor 43 Eve...

Страница 4: ...Videos 74 Search and Playback Videos by Time 74 Export Videos by Time 75 Search Playback Export Event Videos 75 Search and Playback Event Videos 76 Export Event Videos 77 View Export Snapshots 77 Sear...

Страница 5: ...ealer cannot help you he will contact the support channel to get an answer for you as quickly as possible If you have internet access you can open the MOBOTIX help desk to find additional information...

Страница 6: ...from moisture or water entering the housing n Make sure that you install this product as outlined in this document A faulty installation can damage the product n Do not replace batteries of the produ...

Страница 7: ...bstances in Electrical and Electronic Equipment RoHS Directive 2011 65 EC as far as they are subject to these regulations for the RoHS Declaration of MOBOTIX please see www mobotix com Support Downloa...

Страница 8: ......

Страница 9: ...ntegrated PoE switch to provide time and cost saving benefits from complicated device integration Software Upgradability MOBOTIX MOVE NVR 8 16 has great flexibility to configure both NVR and IP Camera...

Страница 10: ...y customer an affordable reliable and secure end to end surveillance solution Quick Installation Document The MOBOTIX MOVE NVR 8 16 Quick Installation guide contains useful information for setting up...

Страница 11: ...g up the MOBOTIX MOVE NVR 8 16 please avoid placing the NVR in any space that reduces airflow to or from the unit This can help preventing the unit from over heating DO NOT operate the unit in areas w...

Страница 12: ...and change the default password meinsm To show the virtual keyboard click twice in the password field Note n Password length is 6 to 12 characters n These characters are allowed A Z a z 0 9 _ You are...

Страница 13: ...t Edit n Click on Setup and change the default password meinsm To show the virtual keyboard click twice in the password field Note n Password length is 6 to 12 characters n These characters are allowe...

Страница 14: ...ear The following sections describe the items on the user interface Live View Window Overview A Function Tabs B MISC C Channel Viewing Function Keys D Hybrid View Layout Management E View Management F...

Страница 15: ...temperature is high users will receive warning messages here Device n When an IP camera event is triggered the alert messages will be listed here Edge n Download Status Users can check the download s...

Страница 16: ...nction bar Users can capture the current viewing image by clicking To exit the full screen mode click and the NVR will return to the previous viewing mode D Hybrid View Layout Management Item Descript...

Страница 17: ...Item Description View Man agement Normal Mode Here lists all IP cameras connected via network or the PoE switch under Camera View F Camera Setup Panes System User Interface Introduction Live View Wind...

Страница 18: ...f the IP cam era by its color n Gray When the NVR is 1 started for the first time or 2 currently not connecting any IP cameras the title bar is in gray indicating no IP camera is connected to the chan...

Страница 19: ...ck OK to save the setting or click Cancel to discard changes Edit a Display Layout 1 Select a layout from the layout list 2 Click to enter its layout setup mode 3 To resize a channel grid first click...

Страница 20: ...g Delete a Display Layout n To delete a layout right click on the desired layout button and select Remove The layout will be deleted from the list Snapshot The NVR allows users to capture the current...

Страница 21: ...d as a reminder 2 Select again to disable the Listen function Talk On Off 1 Select Talk On Off to enable the NVR audio transmission to the camera site Users can speak or send an audio via the micropho...

Страница 22: ...d VA Event Detection Image Adjustment Icons Users can click following icons at the bottom right of each channel grid to adjust the view image Icon Description Rotate the View 90 Fill Up the Channel Gr...

Страница 23: ...r Set Preset This function is to set up certain position as a pre set point and go to the predetermined preset pos itions for viewing Go Preset Auto Focus Click this button to auto matically adjust fo...

Страница 24: ...o call the preset point The selected camera will automatically move to the preset position Set Camera Tour Path Follow the steps to set tour paths 1 Click a camera channel that equips pan tilt zoom fu...

Страница 25: ...annel grid to check the change of image setting 2 Click to keep the settings or click to reload the settings NOTE Some setting functions may not be available for certain IP camera models The unavailab...

Страница 26: ...ge advanced streaming settings for the NVR please go to Add Device Device List refer to the section Main Sub Streaming Setup in Add Device Window for further instruction Camera Motion Detection Setup...

Страница 27: ...sampling pixel e g if user set the interval as 5 IP camera will take 1 samplig pixel from every 5 pixels of each row and each column in detection area and compare System will trigger the alarm when d...

Страница 28: ...ow will pop up as below The detection area is divided into 1200 40x30 detection grids users can paint and select motion detection region with the mouse Check the Enable Brush box left click and move t...

Страница 29: ...ection window right click the channel grid and select Add New Window Click Apply to save the settings Edit the added detection window 1 To remove a motion detection window right click on selected moti...

Страница 30: ...VA func tion VA options include Abandoned Object Intrusion Detection Camera Sabotage Wrong Direction Loitering Detection Object Counting Object Removal and Stopped Vehicle 5 Click to save the settings...

Страница 31: ...settings for fisheye cameras depending on the camera s DSP Select fisheye cam era channel and click Camera Fisheye Setup on the left to display the settings Fisheye Dewarping Type Front End Front End...

Страница 32: ...oduction Camera Fisheye Setup n Stream 2 View Mode For cameras installed on Ceiling Mount users can choose the dewarping mode between 360 View and 4PTZ View n 360 View This mode contains two 180 view...

Страница 33: ...ewarped live images For cameras installed on Wall Mount users can choose the dewarping mode between 180 View and 2PTZ View n 180 View This mode contains one 180 view dewarped live image System User In...

Страница 34: ...0 view dewarped live image and two ePTZ views Fisheye ePTZ Function Under 4PTZ View or 180 2PTZ View mode users can move the image around by using te Direction Control Panel and Zoom In Out icons like...

Страница 35: ...g shutter speed max gain etc 2 Click to save the settings or click to reload the settings IR Function Setup IR Function changes IR cut filter s reaction to allow prevent infrared IR light reaching the...

Страница 36: ...D lights IR Day Night Threshold IR Day Night Threshold is used as light level standard for cameras to switch between Day Night mode Threshold value represents the level of light for camera s ambi ent...

Страница 37: ...agement etc Click Setup to access the general NVR configuration menu Language 1 In Setup select Language to enter the language setting 2 Select the preferred language from the language list to change...

Страница 38: ...to enter the basic NVR setting menu Factory Default Users can load factory settings for the XMS software 1 Click and read the warning message on the pop up window 2 Select Yes to proceed loading fact...

Страница 39: ...e between HDMI 1 HDMI 2 and Line Out n After selecting the preferred audio output mode click Apply to save the settings or click Cancel to reload current settings Import Configuration Users can load N...

Страница 40: ...onfirmation pop up window to confirm the exporting file location 3 Click to start exportation or click to stop NOTE Export the configuration file every time before upgrading the XMS system In addition...

Страница 41: ...etting menu Date Time Setup 1 Click and select a date from the calendar to change the date on the system 2 Click in the time field and press the UP DOWN arrow buttons or scroll the mouse wheel to chan...

Страница 42: ...103 128 138 140 44 192 43 244 18 131 107 1 10 69 25 96 13 206 246 118 250 208 184 49 9 64 125 78 85 207 200 81 113 64 236 96 53 68 216 79 113 n After choosing the preferred NTP server click next to th...

Страница 43: ...CPU Temperature Warning High CPU temperature may cause system defects Users can fill in the pre ferred temperature value to prevent CPU from overheating Default value is 80 Users may also check un che...

Страница 44: ...agement Users can set the event settings for each selected IP camera The setting menu displays as follows Default Configure Users can setup the default event actions that can be apply to every camera...

Страница 45: ...camera to turn to the target position when an event is triggered and return to the set position when the event is over Follow the steps to configure PTZ actions 1 Check the Enable PTZ box and select t...

Страница 46: ...Loss Motion and Video Analysis IP camera needs to support this feature to have the option 4 Setup the event actions Please refer to Default Configure under section Event Management for further instru...

Страница 47: ...Users can setup NVR alarm type and event actions Follow the steps to setup event trigger for the NVR 1 Select NVR Event Type Alarm 1 4 from the drop down menu 2 Check the Event Trigger box to enable e...

Страница 48: ...service provider for more information Keep individual network interface under different IP address e g 192 168 10 xxx 192 168 11 xxx to avoid interface conflict and failing to detect IP cameras Ether...

Страница 49: ...t the NVR under a fixed IP address users must com plete all the related settings 2 In the LAN configuration menu users can setup LAN network IP address subnet mask etc individually n Address Users can...

Страница 50: ...he preferred port SMTP is commonly used for operating over Internet port 465 n SSL SSL Secure Sockets Layer provides communication security over the Internet Check or un check the box to enable or dis...

Страница 51: ...ions include DynDNS ChangeIP and NoIP 3 Hostname Set up a domain name used for entering the NVR through internet on remote PC 4 Username Enter the DDNS user name here 5 Password Enter corresponding DD...

Страница 52: ...al HDDs format repair the internal HDDs etc Cloud storage like NAS device is also included to store snapshots and recording videos Local Storage Setup n Click the HDD icon and the drop down list will...

Страница 53: ...p Show Disk Smart Info Users can view and check brief information and Smart Self Monitoring Analysis and Reporting Technology information of the selected HDDs Repair Disk 1 When error occurred on the...

Страница 54: ...After login window pops up choose Anonymous or enter Account and Password in the entry field to log in Click OK to continue 3 Enter the IP address of the NAS and click Search 4 The NVR will search and...

Страница 55: ...user name and pass word length and character categories Username Password Length 2 32 characters 6 20 characters Character Categories 1 alphabets A Z a z 2 numbers 0 9 3 the ONLY special character ava...

Страница 56: ...an only view live streaming channel under the Live View n Device Access to the Add Device function tab n PTZ Access to control the Camera PTZ functions in Live View n Playback Access to the Playback E...

Страница 57: ...r as the secondary monitor 1 If users wish to change the order of the monitors click and drag to drop selected monitor to preferred location 2 Click to save the settings and the NVR will reset the ord...

Страница 58: ...e is any new IP camera connected to the system 1 Click and a warning message will appear 2 Click OK to proceed or select Cancel to stop 2 PoE Switch Topology Number of the connected PoE switches will...

Страница 59: ...port 4 is 192 168 51 9 n MAC The MAC address of the IP camera n Link Status Network connection speed of the IP camera n Link Quality Network connection status of the IP camera n PoE Budget AF represe...

Страница 60: ...VIF Admin 1234 2 Auto Add The NVR system will automatically refresh and add detected IP devices to live view chan nel Auto Add will also enable Auto Refresh function Configure Auto Refresh before chec...

Страница 61: ...lumn will be added to the Device List 2 Provide required information for the IP device to corresponding fields Required information includes Site Name Type IP Address Protocol Streaming Port User Name...

Страница 62: ...cted IP camera does not sup port the preview function Main Sub Streaming Setup The NVR system supports advanced dual stream settings of each connected camera Users can choose which live stream to watc...

Страница 63: ...List Upgrade win dow Select File will appear 2 Select the firmware file from the list and click Confirm an upgrade status bar will appear and show the firmware upgrade process 3 Click to return to the...

Страница 64: ...ding the IP cameras that are directly connected to NVR s PoE ports 3 To find the IP camera users can check the IP address MAC address or preview picture of the IP camera NOTE When the IP camera is con...

Страница 65: ...ording templates and assign recording type for weekly schedule Add Remove Rename a Recording Template 1 Click in the Recording Template Configuration to create new template in the template list 2 Sele...

Страница 66: ...Post Alarm videos 3 Make up recording type and schedule for selected template Click and circle to assign selected recording type to the circled time Click on the numbers 0 23 hour on top to assign se...

Страница 67: ...ayback Once the video data exceeds Data Life Time it will be hidden and cannot be retrieved for playback n Check the Data Life Time box to enable this function Select preferred data life time from the...

Страница 68: ...de recorded video before alarm triggers The setting duration is between 0 to 120 seconds 0 will disable pre alarm recording NOTE Normal video recording MUST be enabled to provide video data for the co...

Страница 69: ...users can select the preferred record group from the drop down list for video playback and export functions Playback Control Bar Playback control bar is displayed at the bottom of the screen Item Desc...

Страница 70: ...Bookmark Users can assign preferred data to be protected from deletion or modifying and set specific sections of recor ded data as bookmark Alternatively users can also delete certain recording data...

Страница 71: ...segment of the protected data in the time bar using Time Interval icon and Time Range Adjustment icon 2 Click and select 3 A confirmation window pops up click OK to proceed or click Cancel to stop The...

Страница 72: ...e 1 Follow Step1 to 3 from Set Data Protection to select time segment of the recorded videos 2 Click and select Click OK after the confirmation window pops up to erase selected time segment of the rec...

Страница 73: ...fol lowing picture 3 Name the bookmark under Describe the bookmark 4 Click and a confirmation dialog will pop up 5 Click to proceed or click to stop Play Delete Bookmarks 1 Click and select to displa...

Страница 74: ...rch and playback preferred recorded videos 1 Select any underlined date recording data is available from the calendar The yellow stripe in the time bar indicates what time has recorded videos availabl...

Страница 75: ...o zoom in out to adjust and select the exact time 4 Click an Export window will appear 5 Select and check preferred channel boxes to export videos 6 Select preferred external storage device 7 Choose t...

Страница 76: ...ct event type for the event search The event types of Local Play back VA are listed below Item Event Type Local Playback By Event Motion Video Loss and Alarm Video Analysis By Event Intrusion Detectio...

Страница 77: ...ng videos The provided video formats include avi raw mp4 mkv and mov 5 Click Confirm to start the video export process or click Cancel to stop 6 After the video export process is completed click OK to...

Страница 78: ...ge for image preview and snapshot s information will display in the Snapshot Information panel on the right 6 Snapshot Information Selected snapshot information including the captured date time image...

Страница 79: ...By Index box and select which motion index to be searched Event Category Only 4 Click to list event snapshots that meet the searching criteria Users can see the search result in the snapshot list Exp...

Страница 80: ...is complete Click OK to confirm and finish exporting image Cloud Storage click Confirm and OK from the pop up window The NVR will export image file s in the background View the upload status by check...

Страница 81: ...and NVR System Event Log Select preferred log category on the left of the Log tab to view cor responding log data To search preferred log data please refer to the following sections according to sele...

Страница 82: ...preferred log data Table View 1 Choose Table View on the top of the function tab 2 Assign Start and End Date on the top left of the function tab to find the log data within selected time range 3 Selec...

Страница 83: ...list the recorded event log data within the set time Search VA Detected Event Log This log provides two types of data view modes Table View and Chart View Please follow the steps to search and view th...

Страница 84: ...Detected Event type and enable the preferred VA type box to see related information VA event type options include Intrusion Detection Loitering Detection Camera Sabotage Wrong Direction Object Abandon...

Страница 85: ...d by copyright Passing on information to others is not premitted without the prior written consent of the manufacturer Violations will be subject to criminal punishment Patent and Copy Protection All...

Отзывы: