19 -
4
19. LOADING AND INSTALLATION
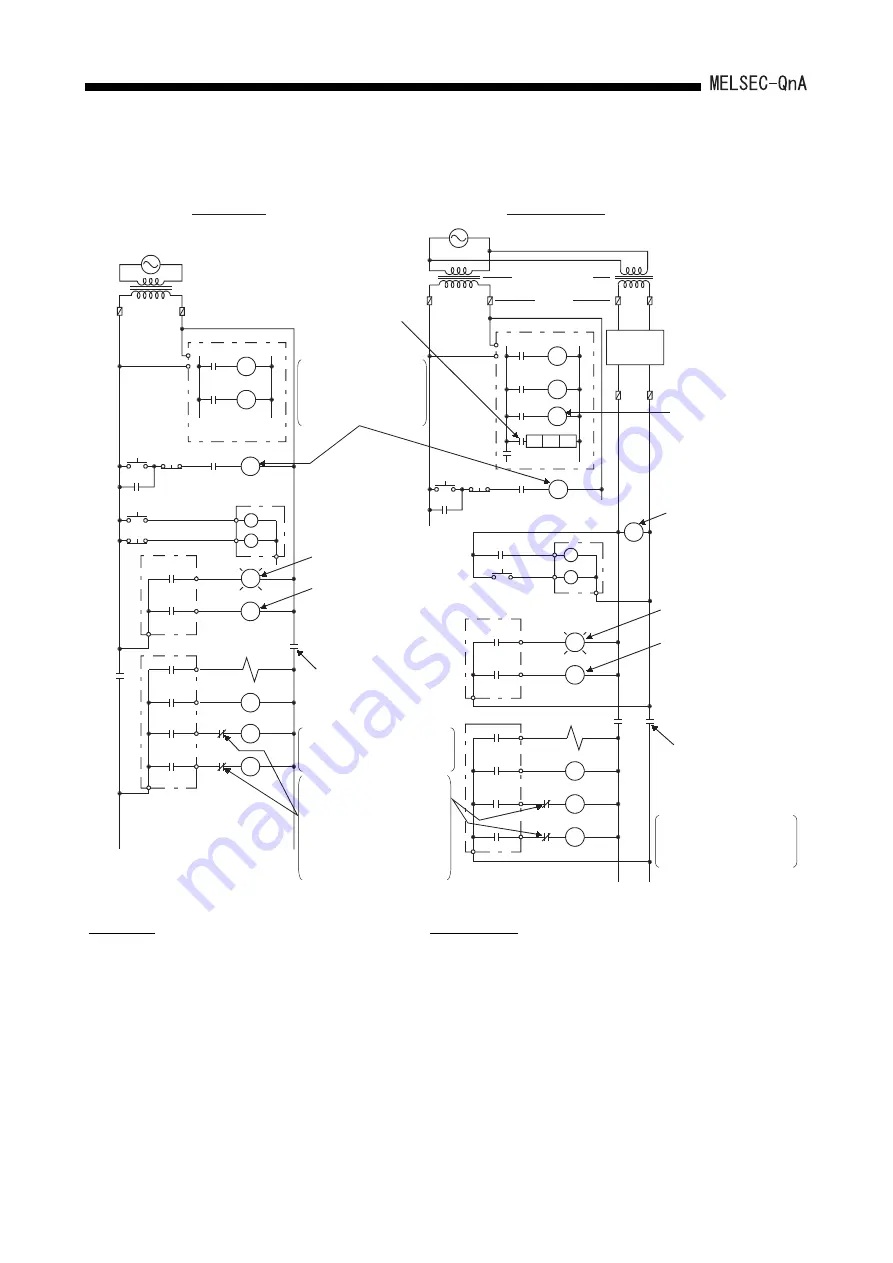
(1) System design circuit example
The procedures used to switch on the power supply are indicated below.
AC system
1) Switch the power supply ON.
2) Set the CPU module to RUN.
3) Switch the start switch ON.
4) The output devices are driven in accordance with the
program when the magnetic contactor (MC) comes ON.
AC/DC system
1) Switch the power supply ON.
2) Set the CPU module to RUN.
3) Switch RA2 ON when the DC power supply starts.
4) Set the timer (TM) to "ON" upon 100% establishment of DC power
supply.
(The set value for TM shall be the period from turning "ON"RA2 to
100% establishment of DC power supply.Set 0.5 seconds for it.)
5) Switch the start switch ON.
6) The output devices are driven in accordance with the program
when the magnetic contactor (MC) comes ON.
(When a voltage relay is used for RA2, the timer in the program
(TM) is not necessary.)
Interlock circuit
Constructs external interlock
circuits for opposing
operations such as forward
and reverse rotation, and
parts that could cause
machine damage or accidents.
Switches the power
supply to output devices
OFF when the system
stops:
At emergency stops
At stops on reaching a limit
Power supply
Power supply
Switches the power
supply to output
devices OFF when
the system stops:
Output for warning
(lamp or buzzer)
Turned ON in RUN
status by SM403
The setting for TM
is the time taken
to establish the
DC input signal.
Output for warning
(lamp or buzzer)
Turned ON in RUN
status by SM403
Fuse
Transformer
Fuse
Transformer
AC system
AC/DC system
CPU module
SM52
SM403
Ym
Yn
Start/stop circuit
DC power supply
established signal
input
CPU module
XM
Ym
Yn
TM
DC power
supply
(+ )( - )
Fuse
TM
M10
N0
Program
Start
switch
MC
MC1 N0 M10
XM
RA2
Ym
Y n
MC1
MC2
MC1
MC2
L
RA1
MC
MC
MC
RA1
Program
MC
Input module
Ym
Yn
MC
MC
L
RA1
MC2
MC1
MC1
MC2
RA1
MC
RA2
Output module
Voltage relay
recommended
Stop
switch
At emergency stops
At stops on reaching a limit
SM52
SM403
Can be started by
turning ON of RA1,
which is the PLC's RUN
output.
Stop
switch
Start
switch
Input module
Output module
Output module
Output module
Содержание Q2ACPU
Страница 1: ......
Страница 2: ......
Страница 221: ...12 12 12 OVERVIEW OF PROCESSING PERFORMED BY THE QnACPU ...
Страница 222: ...12 13 12 OVERVIEW OF PROCESSING PERFORMED BY THE QnACPU ...
Страница 237: ...12 28 12 OVERVIEW OF PROCESSING PERFORMED BY THE QnACPU MEMO ...
Страница 269: ...16 11 16 POWER SUPPLY MODULE 2 Names and description of parts of the A62P A62PEU and A65P module ...
Страница 271: ...16 13 16 POWER SUPPLY MODULE 4 Names and description of parts of the A66P ...
Страница 343: ...21 21 13 MAINTENANCE AND INSPECTION 21 4 2 Replacement of the fuse for an output module ...
Страница 357: ...22 12 22 TROUBLESHOOTING ...
Страница 359: ...22 14 22 TROUBLESHOOTING MEMO ...
Страница 417: ...App 20 APPENDICES 3 Shift instructions Classification Symbol Description n bit shift 1 bit shift 1 word shift ...
Страница 429: ...App 32 APPENDICES Trigonometric function Classification Symbol Description ...
Страница 432: ...App 35 APPENDICES 15 Clock instructions Classification Symbol Description Clock data read write ...
Страница 537: ...App 140 APPENDICES REMARK 1 Message 1 An error code is displayed in 2 Alert 1 3 Alert 2 ...
Страница 538: ...App 141 APPENDICES APPENDIX 6 EXTERNAL DIMENSIONS Appendix 6 1 CPU Module 1 Q3ACPU Q4ACPU modules Unit mm inch ...
Страница 539: ...App 142 APPENDICES 2 Q2ACPU Q2ACPU S1 modules Unit mm inch ...
Страница 541: ...App 144 APPENDICES 2 A66P power supply module Unit mm inch ...
Страница 542: ...App 145 APPENDICES Appendix 6 3 Main Base Unit 1 A32B base unit 2 A32B S1 base unit Unit mm inch Unit mm inch ...
Страница 543: ...App 146 APPENDICES 3 A35B base unit 4 A38B A38HB A38HBEU base unit Unit mm inch Unit mm inch ...
Страница 567: ...MEMO ...
Страница 569: ......
Страница 570: ......


